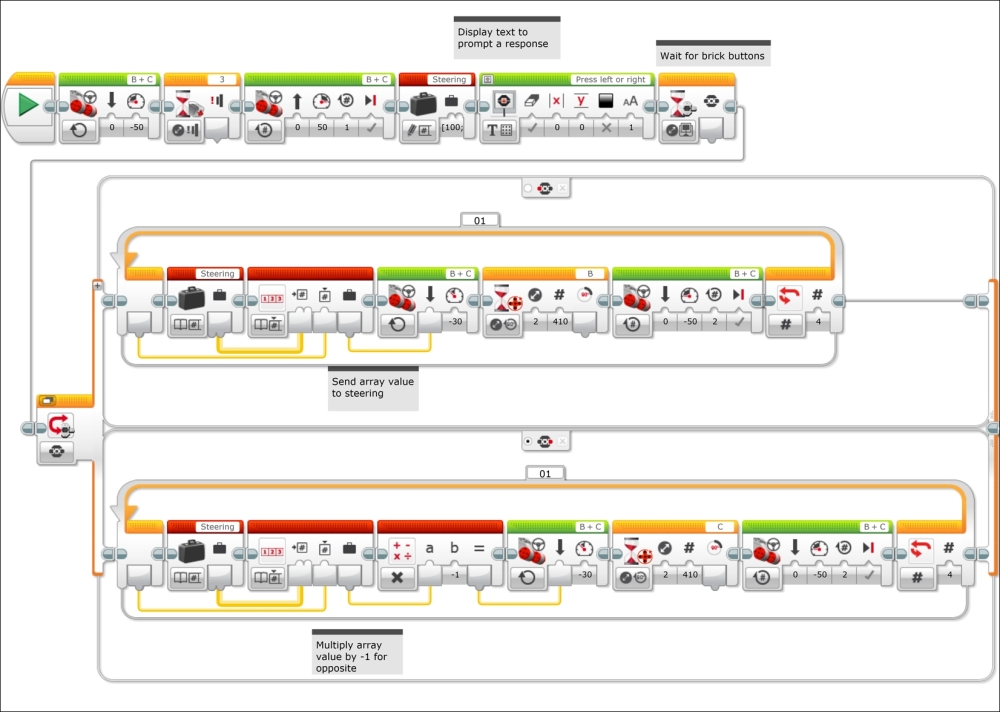
We just saw how to simplify the program to avoid an obstacle using a My Block (subroutine). Now, we will instead optimize the program using an array, whereas in the LEGO EV3 software, a variable can have one value, an array can have several elements, each with its own value. To learn how an array in EV3 works, you will first need to write a program to display a series of numbers on the EV3 brick screen.
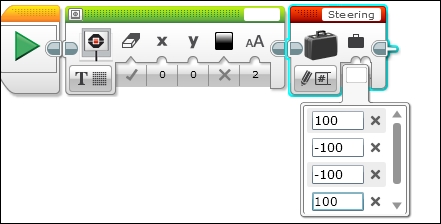
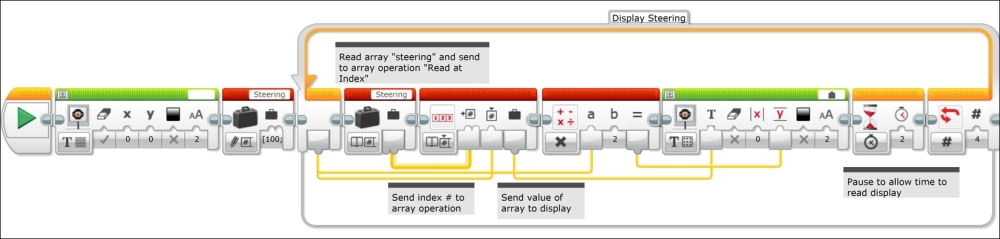
First, clear the display screen. Then define a variable called Steering. By clicking on the mode selector of the Variable block, we can choose to write to an array instead of writing to a numeric variable. The LEGO EV3 software contains numeric and logic (or Boolean) arrays. It does not currently have arrays for strings (or lists).

We will write the series of numbers [100, -100, -100, 100] into the array. You can enter elements by clicking on the input value of the array variable block. This will be useful later when we use this same array variable block in the obstacle code.
We will now create a loop called Display Steering that will repeat four times. The first block in our loop will read array variable block. It will then send the information from the variable via a wire steering into an array operation block. The plugs for an array wire have two semicircles. Notice that the wire for an array is much thicker than the wires for numeric data. We will also run a wire from the loop index into the array operation. This will allow us to read a different element in the array every iteration of the loop. This element will be sent as text to the display screen via a wire. Remember to uncheck the clear screen parameter on the Display block so that it will not erase each time it runs. Again, the y coordinate location on the display screen is increased by a multiple of the loop index.
When you run this program, you should see the elements of the array displayed in a column on the brick screen every 2 seconds.
Now we are going to use an array to modify the obstacle code we wrote earlier. Let's first examine the version of our program using the Gyro Sensor. You will need to add the write array variable block in the beginning of the program before the case structure.

Replace the code you previously wrote in the left button case structure with the following blocks:
- First, place a loop that will run for
4counts into the case structure. - Next, send the output from a read array variable block to an array operation block.
- Run a wire from the loop index to the array operation block.
- Then run a wire from the array operation block output to the move steering block direction input.
The array is telling the robot in which direction to turn. Remember, the array contains the elements [100, -100, -100, 100]. If the program chooses the first or last elements, then the steering value is to the left. If the program chooses the second or third elements, then the steering value is to the right. During each loop, the element that is chosen is determined by the loop index. The robot will turn until the Wait Gyro block reaches 90 degrees. The robot will then move forward for two rotations of the wheel and the loop will repeat.
The other side of the case structure, resulting when the right (or any other) button is pushed, has a similar code. We can modify the direction of the robot by adding a Math block, which will send the negative of the value of the array elements to the Move Steering block.
Now, let's examine a version of the array code using the rotation sensor and dead reckoning. The code is almost identical to the Gyro array code. With the My Block code, we paid careful attention to which wheel we monitored for the number of rotations. However, we also used a gentle turning (75 percent) so that the wheels were not turning at the same rate. In this array code, the turning rates of the wheels are at 100 percent. In a full speed turn, the wheels will rotate exactly opposite of each other. This means that for every forward rotation of the motor connected to port B, the motor connected to port C rotates once backwards.
Thus, we are not concerned about which motor rotation sensor we are monitoring. This is a very useful trick in dead reckoning.