
There are multiple scenarios that a business wants to automate. For example:
- Allow external users to fill the survey form, and after submitting capture the data into Salesforce.
- To improve the collaboration, an organization wants to send a Chatter group link into the e-mail, and as soon as users click on it, they are automatically added to the Chatter group.
- Whenever the Opportunity contact role is updated as primary, update the Opportunity lead source, the same as contact lead source.
We are going to discuss how we can use Flow elements with Fast elements (Fast Create, Fast Update, Fast Delete, and Fast Lookup) and the Loop element to implement preceding business scenarios.
A user can follow records and users in Salesforce. As an owner or manager of Chatter group, or as a system administrator, you can add or remove members from the Chatter groups. But you can't add or remove followers from the records.
A business scenario: Alice Atwood is working as a system administrator in Universal Container. On a daily basis, she receives plenty of requests from Opportunity owners to add same followers from old Opportunity X to new Opportunity Y. Currently, she is handling it through data loader, but before that, she used to spend time on data massaging.
We will create a Flow that will allow the system administrator or users with the Manage Users permission to copy followers from Opportunity record X (old) to Opportunity record Y (new). We can assume that, as Opportunity owner wants to copy followers to a new record, it means that currently records don't have any followers.
The steps to develop this Flow are as follows:
- Navigate to Setup | Build | Create | Workflow & Approvals | Flows.
- Click on the New Flow button; it will open the Flow canvas for you.
- Create a Text variable
VarT_NewOppIDto pass the new Opportunity ID (where user wants to add followers) from the custom URL. - Then, navigate to the Palette tab, and drag and drop the Screen element onto the canvas; it will open a Screen element window for you. Enter Name as
Enter Old Opportunity ID, you can also add Description. Under the Navigation Options section, select Don't show Previous button from the dropdown. Optionally, you can add Help Text as well. - The next task is to add a field onto the screen to capture the old Opportunity ID (from where Opportunity owner wants to copy the followers). Add a Textbox field on Screen by navigating to the Add a Field tab. Double-click on the Textbox field, available under the INPUTS section, as shown in the following screenshot:
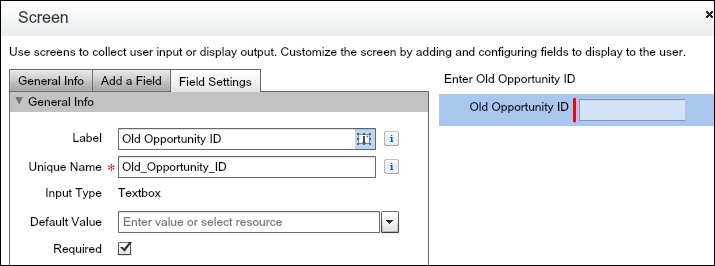
- Once you are done, click on OK.
- Now our next task is to get the list of followers from the old Opportunity. For this, we have to use the Fast Lookup element. The reason behind using Fast Lookup is that it allows saving the outcomes into a SObject Collection Variable. Create a SObject Collection Variable
SocvOld_Opportuntiy_Followersfor the object type EntitySubscription, and set Input/Output Type as Input and Output as shown in the following screenshot: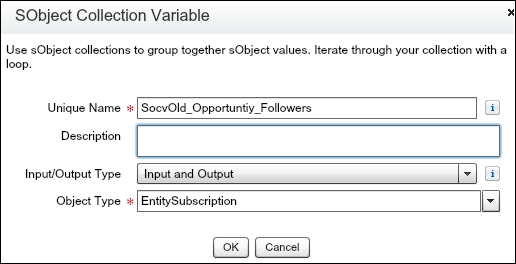
- Once you are done, click on OK. We will use it in Fast Lookup to store the record details. Similarly, create another SObject Collection Variable
SocvNew_Opportuntiy_Followersand one SObject VariableSovIndividual_Follower_Detailsfor the object EntitySubscription.
The Fast Lookup element allows you to search records in Salesforce and save results into an SObject Variable or SObject Collection Variable. The difference between Record Lookup and Fast Lookup is as follows:
|
Record Lookup |
Fast Lookup |
|---|---|
|
It allows you to save only one record field value. |
It allows you to save all the records that Fast Lookup found after applying the filter criteria. |
|
You can use variables or SObject Variables to save the record details. |
You can use SObject Variable or SObject Collection Variable to save the records details. Remember the Salesforce governor limit applies. |
|
You have to map the record fields one-by-one with either variables or SObject Variable. |
You don't have to map the record fields. Here, you have to just select the fields whose data you want to save. |
Now, we will add one Fast Lookup element to this Flow:
- Navigate to the Palette tab and drag and drop the Fast Lookup element onto the canvas; it will open a new window for you, where you have to enter the following details:
- Name: Enter the name for the Fast Lookup element. In this case, enter name as
Followers from old Opportunity. - Unique Name: This will be auto-populated based on the name.
- Description: Write some meaningful text so that another developer/administrator can easily understand why this Fast Lookup element was created. When you select the Fast Lookup element in the Explorer tab, a description appears in the Description pane.
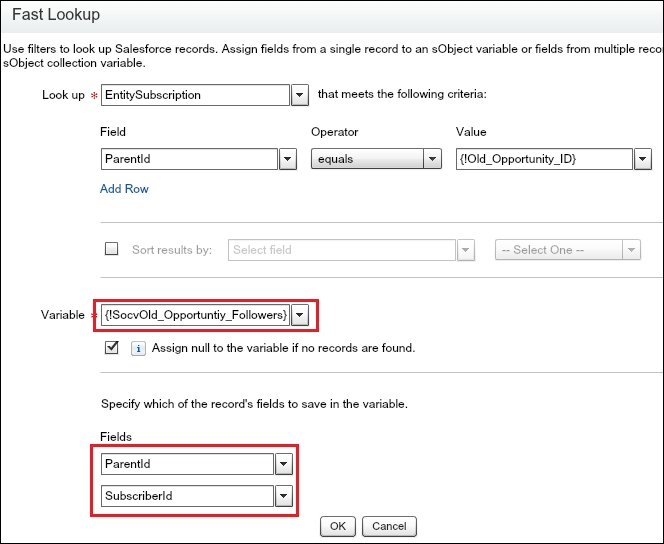
- Lookup: Select the object you want to search the records of. In this case, select the EntitySubscription object.
The next task is to define the search criteria. For this, map ParentId with the Screen element
{!Old_Opportunity_ID}. If you want to add multiple fields for search criteria, click on the Add Row link to add a new row. You can take help from the following screenshot to define the search criteria. You can use Sort option to sort the result. - Variable: Select SObject Variable or SObject Collection Variable to store the field's values for all returned records by Fast Lookup. In our case, select the SObject Collection Variable
SocvOld_Opportuntiy_Followers. Don't forget to select the Assign null to the variable if no records are found checkbox. Finally, select the fields whose values you want to store in the SObject Variable or SObject Collection Variable. In this case, select ParentId and SubscriberId.
Refer to the following screenshot for more details:
- Name: Enter the name for the Fast Lookup element. In this case, enter name as
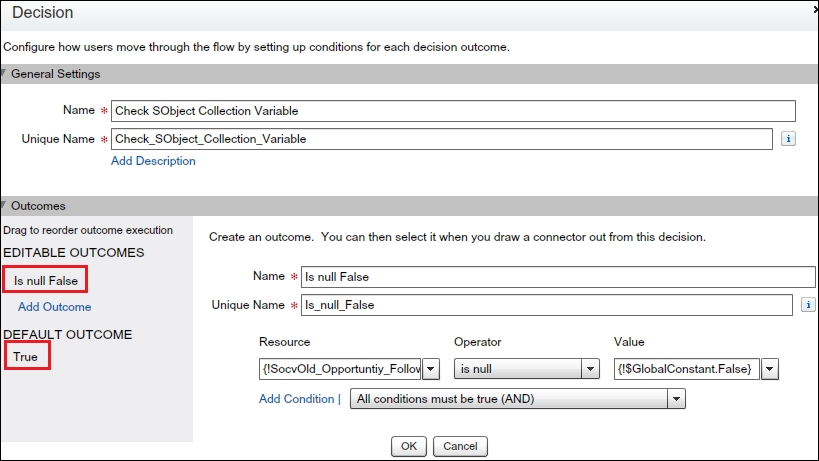
- Once you're done, click on OK. The next step is to check whether the SObject Collection Variable
SocvOld_Opportuntiy_Followerscontains any values or not. For this, we will use the Decision element. Drag and drop the Decision element onto the Flow canvas. Enter the Name field asCheck SObject Collection Variableand Unique Name will auto-populate based on the name. Optionally, you can also add Description for the Decision element. Then, create two outcomes for the Decision element, which are as follows:- Is null False: Select the collection variable
SocvOld_Opportuntiy_Followersis null {!$GlobalConstant.False} - True: Enter the name
Truefor DEFAULT OUTCOME
It will look like the following screenshot:
- Is null False: Select the collection variable
The Loop element is used to check each item in a collection variable and execute an action on it. For example, you can use the Loop element to store SObject Collection Variable values into a Loop variable, that is, SObject Variable and both must have the same object as the collection. You can also use the Loop element to examine the collection variable (data type text) and copy its value into a Text variable.
If the SObject Collection Variable is not null, it means that the old Opportunity record has some followers. We will use Loop element to extract records from the SObject Collection Variable (SocvOld_Opportuntiy_Followers) and store it to the SObject Variable (SovIndividual_Follower_Details):
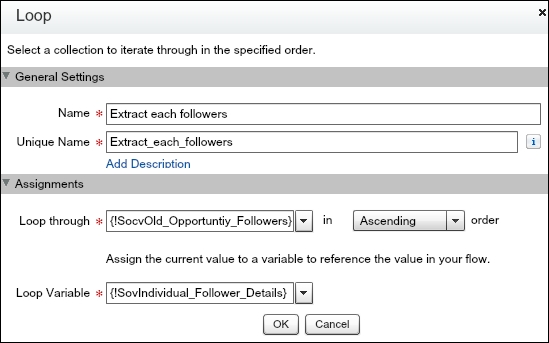
- Navigate to the Palette tab and drag and drop the Loop element onto the Flow canvas. It will open a new window for you, where you have to enter following details:
- Name: Enter the name for the Loop element. In this case, enter Name as
Extract each followers. - Unique Name: This will be auto-populated based on the name.
- Description: Write some meaningful text so other developer/administrator can easily understand why this Loop was created. When you select Loop in the Explorer tab, the description appears in the Description pane.
- Loop through: In the Assignments section, select the collection or SObject Collection Variable you want to loop through. In this case, select the SObject Collection Variable
SocvOld_Opportuntiy_Followers. Select the order as Ascending to loop through the collection. - Loop Variable: Select the SObject Variable or variable as a Loop variable. In this case, select the SObject Variable
SovIndividual_Follower_Detailsas the Loop variable.
For more details, refer to the following screenshot:
- Name: Enter the name for the Loop element. In this case, enter Name as
- Once you are done, click on OK.
- To add followers into a record, two things are required: one is the subscriber ID (user ID) and another is the parent ID (record ID). The SObject Variable
SovIndividual_Follower_Detailsalready has a user ID, so we will assign new a Opportunity ID into the parent ID field using the Assignment element.
The Assignment element is used to assign values into the Flow resources:
- Navigate to the Palette tab and drag and drop the Assignment element onto the Flow canvas. It will open a new window for you, where you have to enter the following details:
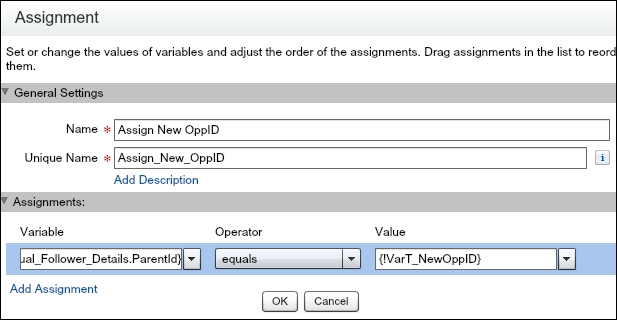
- Name: Enter the name for the Assignment element. In this case, enter
Assign New OppIDas the name. - Unique Name: This will be auto-populated based on the name.
- Description: Write some meaningful text so other developer/administrator can easily understand why this Assignment element was created. When you select the Assignment element in the Explorer tab, the description appears in the Description pane.
- Assignment: In the Assignment section, select the Variable field whose value you want to modify; in this case, select {!SovIndividual_Follower_Details.ParentId}. Then, select the operator depending on the data type of the selected variable. In this case, select equals. For Value, select an existing resource from the Flow, such as Variable, Formula, or Constant, for whose value you want to assign. In this case, select
VarT_NewOppIDas Value. To assign value to multiple variables, use Add Assignment to enter new rows.
It will look like the following screenshot:
- Name: Enter the name for the Assignment element. In this case, enter
- Once you're done, click on OK.
- The next steps are to add all SObject Variables into a SObject Collection Variable. So, at the end, we will create records in EntitySubscription at once. If you add a record using SObject Variable for each record separately, you will easily hit the governor limit.
- Drag and drop the Assignment element onto the Flow canvas; it will open a new window for you. Enter
Add Sobject Variable into SObject Collectionas Name and add the SObject VariableSovIndividual_Follower_Detailsto the SObject Collection VariableSocvNew_Opportuntiy_Followers.
- Once you're done, click on OK. The final task is to create records in the EntitySubscription object. For this, we will use the Fast Create element.
The Fast Create element allows you to create records using values store in the SObject Collection Variable. The difference between Record Create and Fast Create is as follows:
|
Record Create |
Fast Create |
|---|---|
|
It allows you to create one record at a time. |
It allows you to create single or multiple records at a time. |
|
You can use variables or SObject Variables to create a record. |
You can use SObject Variable or SObject Collection Variable to create the record. |
|
One-by-one you have to map the record fields with either variables or SObject Variable. |
You don't have to map the record fields. Here, you have to just select the SObject Variable or SObject Collection Variable to create the records. |
|
If you use multiple the Record Create element in a Flow, or the Record Create element inside the Loop element, then it will easily hit the governor limit. |
To avoid the governor limits, add the multiple record details into a SObject Collection Variable and refer to a Fast Create element. |
Now, we will add a Fast Create element with the following steps:
- Navigate to the Palette tab and drag and drop the Fast Create element onto the Flow canvas. It will open a new window for you, where you have to enter the following details:
- Name: Enter the name for the Fast Create element. In this case, enter
Add_Followers_to_new_Opportunityas the name. - Unique Name: This will be auto-populated based on the name.
- Description: Write some meaningful text so other developer/administrator can easily understand why this Fast Create element was created. When you select the Fast Create element in the Explorer tab, the description appears in the Description pane.
- Variable: To create a record or multiple records, you can either use SObject Variable or SObject Collection Variable. The object types must match and each ID field must not have a value. In this case, select the SObject Collection Variable
SocvNew_Opportuntiy_Followers.
- Name: Enter the name for the Fast Create element. In this case, enter
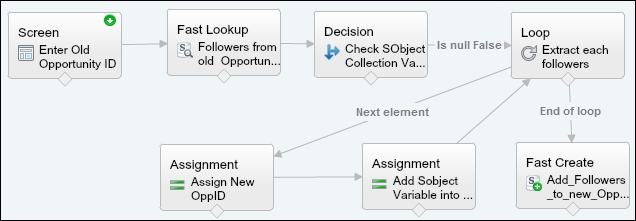
- Click on OK. Use the connector to connect the Screen, Fast Lookup, Decision, Assignment, and Fast Create elements, and set the Screen field Enter Old Opportunity ID as the Start point, as shown in the following screenshot:
- Save your Flow with the Name field
Copying the record followersand close the Flow Designer using the Close button; it will redirect you to Flow detail page. From here, copy the Flow URL. - To execute the Flow, we will create a custom button on the Opportunity object. To create a custom button, navigate to Setup | Build | Customize | Opportunities | Buttons, Links, and Actions and click on the New Button or Link button. Enter the name
Copy Followers, for Display Type select Detail Page Button, for Behavior select Display in existing window without sidebar or header, for Content Source select URL, and then construct the URL as per the business needs. In this case, /flow/Copying_the_record_followers?VarT_NewOppID={!Opportunity.Id}&&retURL={!Opportunity.Id}. - Once you're done, click on Save. The next task is adding a custom button on Opportunity page layouts. Navigate to Setup | Build | Customize | Opportunities | Page Layouts, click on the Edit link and drag and drop custom button Copy Followers onto the page layout, and save the changes.
- To test it, create a new Opportunity record. Now, identify an existing Opportunity record in which there are few followers, and copy the record ID from URL. Then, navigate to the newly created Opportunity, click on the Copy Followers button, and paste the existing Opportunity ID (that you copied) and click on the Next button.
Flow will copy followers from the existing Opportunity record to the newly created Opportunity record.
Until now we have learned different ways to call a Flow, and a Visualforce page is one of them. Once you have embedded a Flow into a Visualforce page, business users can use it without having the Run Flows system permission or the Force.com Flow User feature license. In the beginning of this chapter, we had already discussed ways to embed a Flow into a Visualforce page.
In Chapter 2, Creating Flow through Point and Click (under the Hands on 3 – displaying a feedback form based on conditions section), we created a Flow for survey purposes, Displaying feedback form based on age. Now, we will open it for unauthenticated access using Force.com Sites. It means anyone can use this Flow to share their feedback without logging into Salesforce.
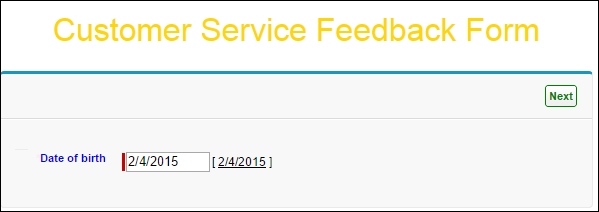
To customize the Flow user interface, first of all you have to embed the Flow into a Visualforce page. Create a Visualforce page and embed your Flow (Displaying feedback form based on age) into it, as shown in the following code:
<apex:page>
<br/>
<Center>
<Font size ="6" color ="gold">Customer Service Feedback Form </font>
</Center>
<br/>
<flow:interview name="Displaying_feedback_form_based_on_age"/> // Flow interview component is used to embed Flow in a Visualforce Page. Displaying_feedback_form_based_on_age is Flow Unique Name.
</apex:page>
It will display an embedded survey form into the Visualforce page, and will look like the following screenshot:
Flow allows you to modify the user interface by applying a custom style using CSS. It allows you to customize specific parts of a Flow, such as button style, button location, background, and the look and feel of the screen and labels by using a combination of Flow attributes and CSS classes.
A business scenario: Sara Bareilles, who is working on the Flow Displaying feedback form based on age, received a new requirement to change the Date of birth field label color to blue and to display the Next button in green on the top.
To modify the Flow user interface, we have to use Flow style classes with CSS styles. First of all, we will add a CSS style into the Visualforce page to change the color of the Date of birth field label:
<style type="text/css">
.FlowDate {
color: Blue;
}
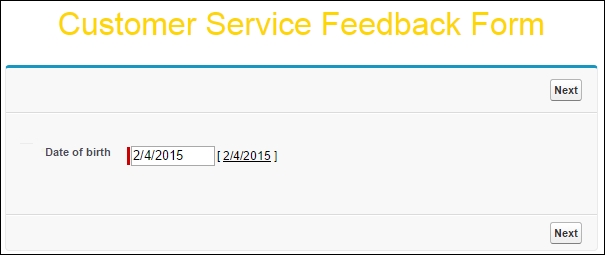
</style>The next task is to modify the Next button's location and color. For which, we will add the flow:interview attributes, buttonLocation and buttonStyle, as shown in the following code:
<flow:interview name="Displaying_feedback_form_based_on_age"
                buttonLocation="top"
                buttonStyle=" color:Green; border:1px solid;"
/>
So finally, the Visualforce page code will look like the following code snippet:
<apex:page >
  <br/>
    <Center>
      <Font size ="6" color ="gold">Customer Service Feedback Form </font>
    </Center>
  <br/>
  <style type="text/css">
    .FlowDate {
      color: Blue;
  }
  </style>
  <flow:interview name="Displaying_feedback_form_based_on_age"
                  buttonLocation="top"
                  buttonStyle=" color:Green; border:1px solid;"
  />
</apex:page>
The Visualforce page will look like the following screenshot:
You can change the CSS style sheet as per your requirement.
Note
To learn more about which fields can be customized in Flow, go to https://www.salesforce.com/us/developer/docs/pages/Content/pages_flows_customize_runtime_ui.htm.
Once you are done with design, save the Visualforce page with name Flow for Force.com Sites. The next step is to open the Flow for unauthenticated access using Force.com Sites.
Using Force.com Site, open a Flow for unauthenticated access. Once you have embedded the Flow into a Visualforce page, with help of Force.com Sites, you can open it for unauthenticated access. This means that users can access the Flow without logging into Salesforce. To open the access of the Flow Displaying feedback form based on age, we have to add the Visualforce page Flow for Force.com Sites into Force.com Sites. For more details, perform the following steps:
- Navigate to Setup | Build | Develop | Sites.
- If you haven't registered a Force.com domain for your organization then do so first. Sites page allows you to register Force.com domains for your organization. Once you are successfully registered, you can see a Sites-related list on the Sites page. It will look like the following screenshot:
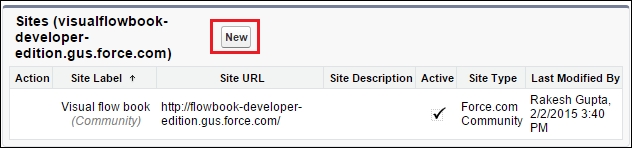
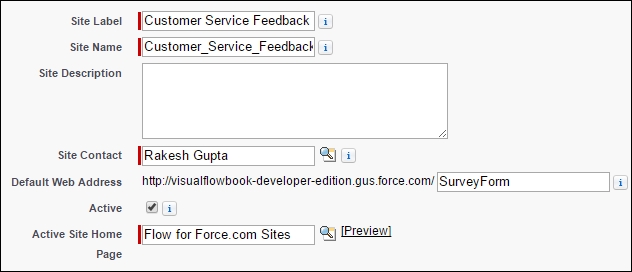
- To create a new Site, click on the New button, as shown in the preceding screenshot. It will redirect you to the Site edit page, where you have to enter the following details:
- Site Label: Enter the site label. it will appear in the user interface. Enter
Customer Service Feedback Formas Site Label. - Site Name: This will be auto-populated based on the Site name.
- Site Description: Write some meaningful text so other developer/administrator can easily understand why this Site was created.
- Site Contact: Select the user who is responsible to receive communication from Site visitors and Salesforce.com.
- Default Web Address: Create a unique URL for the Force.com Site by entering the Visualforce page's unique name. Enter
SurveyFormin the default web address textbox. - Active: Select this checkbox to activate the Site after saving.
- Active Site Home Page: From the lookup dialog, select the Visualforce page you have created to embed the Flow. In this case, select Flow for Force.com Sites as Active Site Home Page.
- Site Label: Enter the site label. it will appear in the user interface. Enter
- You can enter other details as well. Once you are done, click on the Save button. It will redirect you to Site detail page, which will allow you to configure your Site.
- Now we have to grant the Visualforce page access to the Site user. To do this, navigate to Site Visualforce pages related list on the Site detail page, click on the Edit button, and make sure that you have granted the Visualforce page access to the Site user that you have used in Active Site Home Page and in your site.
- The next step is to grant the custom object Survey__c permission to Site guest users. For this, click on Public Access Setting available on the Site detail page by navigating to the Survey object to grant create, read, and edit permissions, and to also grant custom fields permission.
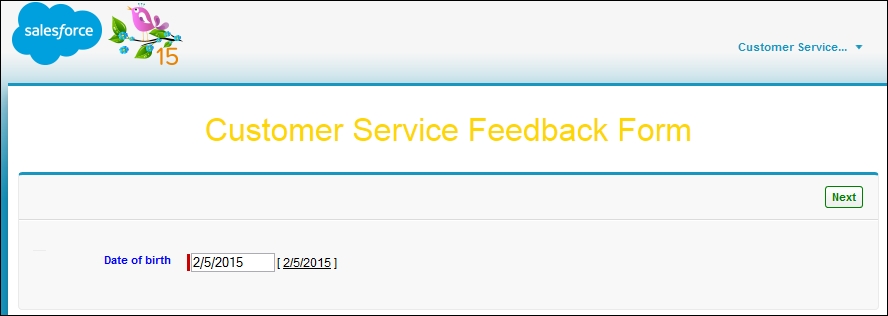
- Once you are done, navigate to the Site by following the path Setup | Build | Develop | Sites and click on the Site URL, which will appear as follows:
http://visualflowbook-developer-edition.gus.force.com/SurveyForm
The site will look like the following screenshot:
You can check Site usage history by navigating to the 24-Hour Usage History related list available in the Site detail page.
The custom button/link allows you to redirect your user to a page within your Salesforce organization by using the retURL attribute once they click on the Finish button. If you used the standard controller in a Visualforce page to display a record on the same page as the Flow, then users who click on the Finish button will redirect to a new Flow interview, and they will see the first screen of the Flow without moving to the record detail page. This is because the ID query string parameter is not conserved in the page URL. If you want to redirect the user to another page, use finishLocation. If you have embedded your Flow in a Visualforce page, and want to achieve the same thing once a user clicks on the Finish button, you can achieve it by adding the finishLocation attribute in the <flow:interview> component. But you can't redirect your users to a URL that is external to your Salesforce organization. If you have created a Flow for a lead and embedded it into a Visualforce page that uses a standard controller, and after completion you want to redirect users to the same page from where they have started, you can use the following method:
<flow:interview name="FlowUniqueName" finishLocation="/{!Lead.Id}">There are a few other ways in which you can configure the finishLocation attribute in the <flow:interview> component, and those are as follows.
If you want to redirect a user to a specific page such as the home tab, detail page, or specific record, use the URLFOR function. Let's take an example: if you want to redirect your Flow user to a lead tab after completion of the Flow, use the following method:
<flow:interview name="FlowUniqueName" finishLocation="{!URLFOR('/00Q/o')}" />If you want to redirect your Flow user to another Visualforce page without using the URLFOR function, you can use the $Page variable. Use the name of the Visualforce page with the $Page variable, as shown in the following example:
<flow:interview name="FlowUniqueName" finishLocation="{!$Page. Flow_Partner_Community}"/>Using a custom controller, you can set the finish location for a Flow. Imitate a new page reference by passing the URL (as string) to define the location, as shown in the following controller example:
public class FlowRedirect {
    public PageReference getPageA() {
        return new PageReference('/001'),
    }
}
The following is the code for the Visualforce page that uses a custom controller and sets the Flow's finish behavior:
<apex:page controller="myFlowController">
  <flow:interview name="flowname" finishLocation="{!pageA}"/>
</apex>
Using the preceding options, you can redirect Flow users to another page/URL, but not the URL that is external to your Salesforce organization.
Until now, we have learned the way to embed a Flow into a Visualforce page so that users can access a Flow through Sites or a Salesforce web application without having the Run Flows system permission or Force.com Flow User feature license. There are few ways through which Flow users can access it on Salesforce1 mobile application.
If you have created a Flow and allow your users to access it from the Salesforce1 mobile application, then you have to embed the Flow into a Visualforce page.
A business scenario: Helina Jolly, who is working as a system administrator in Universal Container, developed the Clean Chatter Group Feeds Flow in Chapter 3, Manipulating Records in Visual Workflow (under the Hands on 3 – quickly update an account record section). She received another requirement from her manager to make this Flow available to Salesforce1 users.
To make a Flow available for Salesforce1 users through the navigation menu, perform the following steps:
- Create a Visualforce page by navigating to Setup | Build | Develop | Pages to embed the Flow. Following is the sample code, where
Delete_Chatter_Group_feedsis the Flow's unique name:<apex:page> <flow:interview name="Delete_Chatter_Group_feeds"/> </apex:page>
- Save this Flow with the name
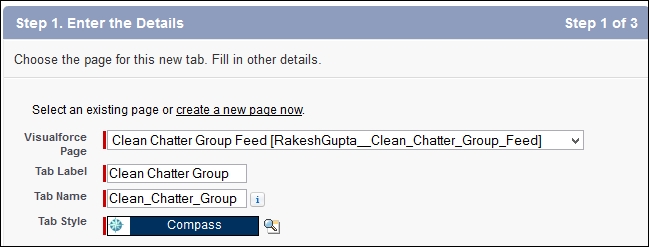
Clean Chatter Group Feed, and don't forget to select the Available for Salesforce mobile apps checkbox to make this Visualforce page available for Salesforce1. - The next step is to create a Visualforce tab for it; to do this, navigate to Setup | Build | Create | Tabs, then navigate to the Visualforce Tabs related list and click on the New button; it will redirect you to another page, where you to enter the following details:
- Visualforce Page: Select a Visualforce page to display in the Visualforce tab.
- Tab Label: Enter the tab label. It will appear in the user interface. Enter
Clean Chatter Groupas the tab label. - Tab Name: This will be auto-populated based on the tab label.
- Tab Style: Select a the tab style.
- Once you are done, click on the Next button, and select tab visibility for profiles, followed by adding tab to apps.
- The final task is to add this Visualforce tab into the Salesforce1 navigation menu. To do that, navigate to Setup | Administer | Mobile Administration | Mobile Navigation, and move the Visualforce tab Clean Chatter Group from Available to the Selected pane, as shown in the following screenshot:
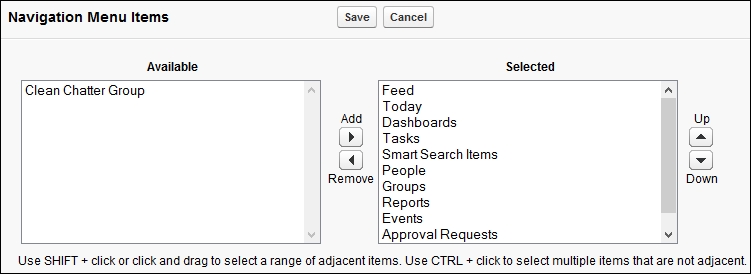
- Once you are done, click on Save.
- Now, log in into Salesforce through the Salesforce1 mobile application; you can find it under the navigation menu.
To use Flow as the publisher action, you have to embed it into the Visualforce page with a standard controller.
A business scenario: Alice Atwood is working as a system administrator in Universal Container and has developed a Flow to copy Opportunity followers in this chapter. She received another requirement to make it available for the Salesforce1 publisher action on Opportunity object.
To make a Flow available for the publisher action, perform the following steps:
- Create a Visualforce page with the standard controller by navigating to Setup | Build | Develop | Pages to embed the Flow. Following is the sample code where
Copying_the_record_followersis Flow's Unique Name:<apex:page Standardcontroller="Opportunity"> <flow:interview name="Copying_the_record_followers" > <apex:param name="VarT_NewOppID" value="{!Opportunity.Id}"/> </flow:interview> </apex:page> - Save this Flow with the name
Copy record followers, and don't forget to select Available for Salesforce1. - To create an action, navigate to Setup | Build | Customize | Opportunities | Buttons, Links, and Actions and click on the New Action button, and then enter the following details:
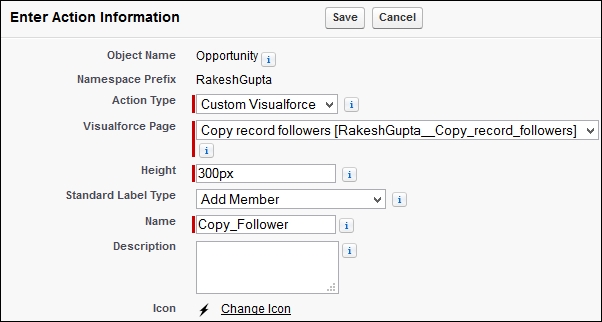
- Action Type: Select an action type. In this case, select Custom Visualforce page.
- Visualforce Page: Select the Visualforce page Copy record followers.
- Height: Set the height of custom action composer. Enter
300px. - Standard Label Type: Select a standard label Add Member.
- Name: Enter the action name, Copy_Follower.
- Description: Write some meaningful text so other developer/administrator can easily understand why this action was created.
It will look like the following screenshot:
- Once done, click on Save.
- The next task is adding custom action on Opportunity page layout. Navigate to Setup | Build | Customize | Opportunities | Page Layouts, click on the Edit link, and drag and drop custom action Copy Follower onto the page layout and save the changes.
- Now you will be able to use Flow from Publisher actions.
Once you embed a Flow into a Visualforce page, it allows you to set the initial values of variables, collection variables, SObject Variables, and SObject Collection Variables through the <apex:param> component. The <apex:param> tags evaluated at the time Flow launched means you can set Flow variables values only once. It allows you to set values for those variables that allow input access—for variables that Input/Output Type selected as Input and Output or Input only. There are a few ways in which you can set Flow variables from a Visualforce page, which are as follows.
You can set a variable's value without using the controller by hard coding the variables value. Here's an example that sets the initial value of VarT_NewOppID to 006B0000002REvl when the interview starts, as shown in the following sample code:
<apex:page Standardcontroller="Opportunity">
<flow:interview name="Copying_the_record_followers" >
<apex:param name="VarT_NewOppID" value="006B0000002REvl"/>
</flow:interview>
</apex:page>Without a controller, you can only set the value of variables.
By using the standard controllers, you can set variables or SObject Variables by passing in data from a record. Let's see an example that sets the initial value of VarT_NewOppID to the Visualforce expression {!Opportunity.Id} when the interview starts, as shown in the following sample code:
<apex:page Standardcontroller="Opportunity">
  <flow:interview name="Copying_the_record_followers" >
    <apex:param name="VarT_NewOppID" value="{!Opportunity.Id}"/>
  </flow:interview>
</apex:page>With the standard controller, you can set the value of variables and SObject variables.
You can set Flow variable values using the custom controller as well. You can write a custom controller that sets the variables values, and then you can reference that controller in your Visualforce page. The following example sets the variable OppId value to a specific Opportunity IDs when the interview starts by using a custom controller, as shown in the following sample code for controller. The controller used the get value in the variable OppId and passed it to Visualforce page:
public class FlowCustomController {
    public Opportunity OppId {get; set;}
    public FlowCustomController () {
        OppId = [
            SELECT Id, Name FROM Opportunity
            WHERE Name = 'Edge Installation' LIMIT 1];
    }
}
The following is the code for the Visualforce page that embedded the Flow and is passing value to the OppId variable with help of the custom controller:
<apex:page Standardcontroller=" FlowCustomController ">
  <flow:interview name="Copying_the_record_followers" >
    <apex:param name="VarT_NewOppID" value="{!OppId}"/>
  </flow:interview>
</apex:page>
By using the custom controller, you can set the value of variables, collection variables, SObject Variables, and SObject Collection Variables.
Don't forget to grant the Visualforce page and custom controller access to users; it's only then that they can access the Flow.
A Visualforce page allows you to call a Flow using the custom controller. To launch an autolaunched Flow from Apex, you have to use the start() method in the Flow.Interview class.
A business scenario: Joe Thompson is working as a system administrator in Universal Container and developed a Flow to update the account rating in Chapter 3, Manipulating Records in Visual Workflow (under the Hands on 3 – quickly update an account record section). He embedded the Flow into a Visualforce page and also added a Start button on the Visualforce page. Now, he wants to call the Flow as soon as users click on the Start button, without showing the Flow in the user interface.
Create a Visualforce page using a custom controller and add one command button on it:
<apex:page controller="FlowController">
    <apex:outputLabel id="text">
        <b>Click on Start button to call the flow</b>
    </apex:outputLabel>
    <apex:form >
        <apex:commandButton action="{!start}" Value="Start"/>
    </apex:form>
</apex:page>
The following is the sample code for the custom controller; it launches the Flow using the start() method:
public with sharing class FlowController {
   public Flow.Interview.Update_an_account myFlow {get; set;} //Instance of the Flow
       public void start() {
       Map<String, Object> Var= new Map<String, Object>();
       myFlow = new Flow.Interview.Update_an_account(Var);
       myFlow.start();
   }
}
You can use getVariableVale(String) in the custom code to get the value of the specified Flow variable.
It is also possible to call a Flow through an Inline Visualforce page. Let's start with a business scenario.
A business scenario: Sara Bareilles, who is working as a system administrator in Universal Container, receives a requirement as soon as a contact is added into an Opportunity (that is, using Opportunity contact role) as a primary contact, to copy the contacts' lead source to the Opportunity lead source.
There are no out of the box solutions for it. You can't achieve the preceding business requirement using Workflow Rule. You can achieve it through the Apex code. We will use a Flow and an Inline Visualforce Page to achieve it, the steps to create which are as follows:
- Navigate to Setup | Build | Create | Workflow & Approvals | Flows, then click on the New Flow button; it will open the Flow canvas for you.
- Create three Text variables,
VarTOppId(to pass the Opportunity ID from Visualforce page),VarTConId(to save the primary contact ID), andVarTLeadSource(to store primary contact lead source). - The next task is to get the primary contact from the Opportunity, for this we will use the Record Lookup element. Navigate to the Palette tab and drag and drop the Record Lookup element onto the canvas; it will open a new window for you, where you have to enter following details:
- Name: Enter the name for the Record Lookup element. Enter
Get Primary Contactas the name. - Unique Name: This will be auto-populated based on the name.
- Description: Write some meaningful text so other developer/administrator can easily understand why this Record Lookup element is added to Flow.
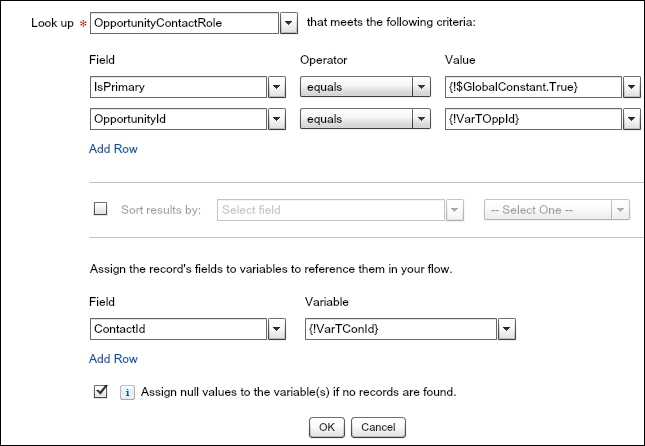
- Look up: Select the object for which you want to search the record of. In this case, select the OpportunityContactRole object. The next task is to define the search criteria. If you want to add multiple fields for the search criteria, click on the Add Row link to add a new row. For the field, select IsPrimary equal to {!$GlobalCOnstant.True} and OpportunityId equal to {!VArTOppId}. You can take help from the following screenshot to define search criteria.
- Assign the record's fields to variables to reference them in your flow: Optionally, you can save the fields' value into variables, so you can use it later in the Flow. Save ContactId into the
varTConIdvariable.
Don't forget to select the Assign null values to the variable(s) if no records are found checkbox, as shown in the following screenshot:
- Name: Enter the name for the Record Lookup element. Enter
- Once you are done, click on OK.
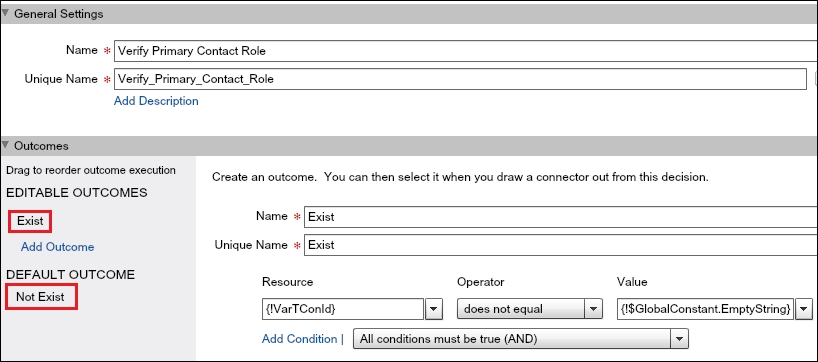
- The next task is to check whether Opportunity has any contact role or not. To check this, we will use the Decision element and check whether the variable ContactId contains any value or not. To do that, drag and drop the Decision element onto the Flow canvas. Enter the Name field as
Verify Primary Contact Roleand Unique Name will auto-populate based on the name. Optionally, you can also add Description for the Decision element. Next, create two outcomes for the Decision element, which are as follows:- Exist: Select variable
VarTConIddoes not equal to {!$ GlobalConstant.EmptyString} - Not Exist: Enter the name
Not Exist, as DEFAULT OUTCOME.
It will look like the following screenshot:
- Exist: Select variable
- Once you are done, click on OK.
- The next step is to find lead source for the Opportunity primary contact role. For this, we will use the Record Lookup element. Drag and drop the Record Lookup element onto the canvas; it will open a new window for you, where you have to enter following details:
- Name: Enter the name for the Record Lookup element. Enter
Get Contact Lead Sourceas the name. - Unique Name: This will be auto-populated based on the name.
- Description: Write some meaningful text so other developer/administrator can easily understand why this Record Lookup element is added to Flow.
- Look up: Select the object for which you want to search the record of. In this case, select the Contact object. The next task is to define the search criteria. Add Id of Contact equals to the
VarTConIdvariable. - Assign the record's fields to variables to reference them in your flow: Optionally, you can save the fields' value into variables, so you can use it later in the Flow. Save LeadSource into the
varTLeadSourcevariable.Don't forget to select the Assign null values to the variable(s) if no records are found checkbox, it will look like the following screenshot:

- Name: Enter the name for the Record Lookup element. Enter
- Once you are done, click on OK.
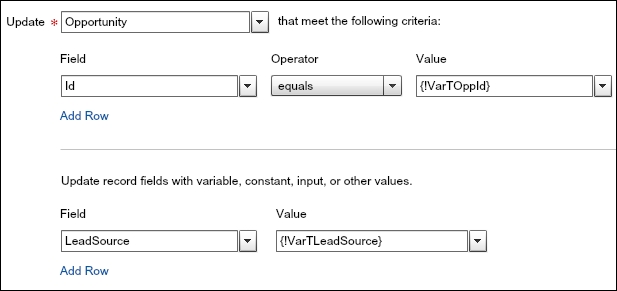
- The final task is to add the Record Update element to update the Opportunity lead source. Drag and drop the Record Update element onto the canvas; it will open a new window for you, where you have to enter the following details:
- Name: Enter the name for the Record Update element. Enter
Update Opportunity Lead Sourceas the name. - Unique Name: This will be auto-populated based on the name.
- Description: Write some meaningful text so other developer/administrator can easily understand why this Record Update element was added to a Flow.
- Update: Select the object for which you want to update the record. In this case, select the Opportunity object. The next task is to set the filter criteria to identify which record gets updated, in this case, select Id of Opportunity equals to
VarTOppId. Then, select the fields from the object that you want to update, and assign the value or resource (input, Constant, and so on ) to it; (data types must match) in this case, select the LeadSource field, and for value from drop-down variables, selectVarTLeadSource. To add multiple fields, click on the Add Row link.
It will look like the following screenshot:
- Name: Enter the name for the Record Update element. Enter
- Once you are done, click on OK.
- Save your Flow with the name
Update Opportunity Lead Sourceand close the canvas using the Close button; it will redirect you to the Flow detail page. Don't forget to activate the Flow. - The next task is to add the Flow into a Visualforce page. Navigate to Setup | Build | Develop | Pages and click on New to add a new Visualforce page, to embed the Flow into Visualforce page and pass the value the
VarTOppIdvariable using the standard controller. In the following code,apex:paramis used to pass value in theVarTOppIdvariable:<apex:page standardController="Opportunity"> <flow:interview name="Update_Opportunity_Lead_Source"> <apex:param name="VarTOppId" value="{!Opportunity.id}"/> </flow:interview> </apex:page> - Save the Visualforce page with the name
Update Opportunity Lead Source. - Now we have to add the Visualforce page into the Opportunity page layout. Navigate to Setup | Build | Customize | Opportunities | Page Layouts, click on the Edit link and drag and drop the Visualforce page Update Opportunity Lead Source on to the page layout, set the Visualforce page width to 0 px and height to 0. Once you are done, click on the Save button to save the changes.
From now on, if the user adds or updates the Opportunity contact role as primary, then Flow will fire and automatically update the Opportunity lead source to the same as the primary contact role lead source.
In the Hands on 2 – open a Flow for unauthenticated access section, we discussed a way to open a Flow access for unauthenticated access by embedding it to a Visualforce page. There is another possibility to use the Flow as the backend class to save the data from Visualforce page. Let's start with a business scenario.
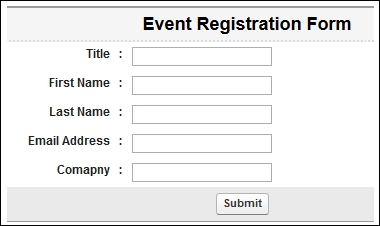
A business scenario: Robby Williams, who is working as a system administrator in Universal Container, receives a requirement to create an event registration form to save the data in a custom object. For frontend, they want to use Visualforce page, and for backend, Flow to save the date.
There are many possible solutions for the preceding business scenario. We will use a Visualforce page as the user interface screen (frontend) to allow users to enter the data and a Flow to save the data in a custom object. To achieve it, perform the following steps:
- First of all, create a custom object Event Registration and set the record name as
Auto Number data Type. Also, create a few fields: Title, First Name, Last Name, Email Address, and Company. Make a schedule to the required field and grant permission to respective profiles. For more details, refer to the following screenshot: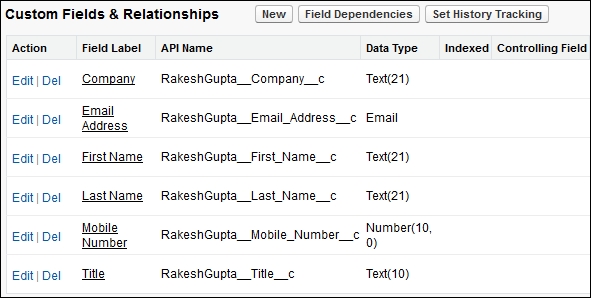
Later on, we will use this object to save the event data from the Visualforce page.
- The next step is to create a Flow. Navigate to Setup | Build | Create | Workflow & Approvals | Flows and click on the New Flow button, it will open the Flow canvas for you. Create a few variables in the Flow, as shown in the following table:
Name
Data Type
Input/Output Type
VarT_CompanyText
Input and Output
VarT_EmailAddressText
Input and Output
VarT_FirstNameText
Input and Output
VarT_LastNameText
Input and Output
VarT_TitleText
Input and Output
We will use these variables in the Flow.
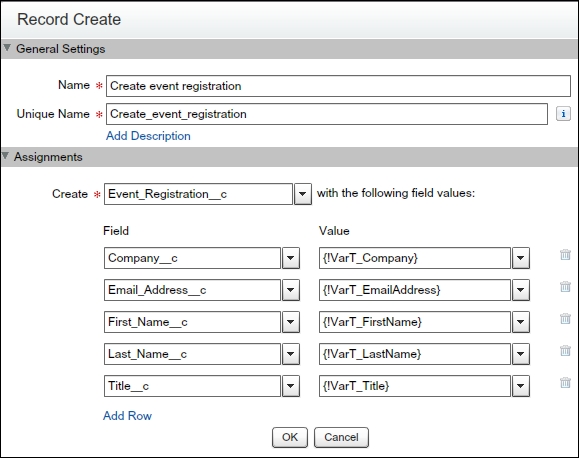
- Now we will add one Record Create element into the Flow to create the date in the custom object Event Registration. Navigate to the Palette tab and drag and drop the Record Create element onto the canvas; it will open a new window for you, where you have to enter the following details:
- Name: Enter the name for the Record Create element. In this case, enter
Create event registrationas Name. - Unique Name: This will be auto populated based on the name.
- Description: Write some meaningful text so other developer/administrator can easily understand why this Record Create element was created. When you select the Record Create element in the Explorer tab, the description appears in the Description pane.
- Create: Select the object for which you want to create the record for. In this case, select Event_Registration__c object. The next task is to assign the value or resource to the object fields, the data types must match. To assign values to multiple fields, click on the Add Row link.
- Variable: Optionally, you can save the new record's ID into a variable, so you can use it later in the Flow.
It will look like the following screenshot:
- Name: Enter the name for the Record Create element. In this case, enter
- Once you are done, click on OK.
- Set the Record Create element Create event registration as the Start element.
- Save the Flow with name
Event Registration Formand close the Flow designer using the Close button, it will redirect you to Flow detail page. Don't forget to activate the Flow. - From the Flow detail page, copy Unique Name, it will look as follows: Event_Registartion_Form.
- The next task is to create a Visualforce page to allow users to enter the data. Navigate to Setup | Build | Develop | Pages and click on New to add a new Visualforce page. Create a Visualforce page with name
EventRegistrationForm. To add the input field into the Visualforce page, use the following code:<apex:inputText id="Title" Value="{!Title}" required="true"/>Likewise, use the same code to get user input for other fields.
- Add one button onto the Visualforce page that allows the user to submit the event registration form. Use the following code to add the command button onto the Visualforce page:
<apex:commandButton action="{!Save}" value="Save" reRender="myFlow"/> - To embed the Flow into a Visualforce page, and then pass the value from custom controller to the Flow variables, use the following code:
<flow:interview name="Event_Registartion_Form" id="myFlow" rendered="{!renderOrNot}">
  <apex:param name="VarT_Title" value="{!inputTitle}"/>
  <apex:param name="VarT_FirstName" value="{!inputFirstName}"/>
  <apex:param name="VarT_LastName" value="{!inputLastName}"/>
  <apex:param name="VarT_EmailAddress" value="{!inputEmailAddress}"/>
  <apex:param name="VarT_Company" value="{!inputCompany}"/>
</flow:interview>
Finally, the Visualforce page will look like the following screenshot:
- The next step is to add a custom controller into the Visualforce page to pass the input data to the Flow variables. Navigate to Setup | Build | Develop | Apex Classes and click on New to add a new Apex class. Create an Apex class with the name
EventRegistrationFormController. Use the following code to pass the user input from the Visualforce page to Flow variables using the custom controller:Public void Submit() { renderOrNot = true; inputTitle = Title; inputFirstName = FirstName; inputLastName = LastName; inputEmailAddress = EmailAddress; inputCompany = Company; }Tip
Downloading the example code
You can download the example code files from your account at http://www.packtpub.com for all the Packt Publishing books you have purchased. If you purchased this book elsewhere, you can visit http://www.packtpub.com/support and register to have the files e-mailed directly to you.
- Once you are done with Visualforce page and custom controller, you can also expose this page for unauthenticated access using a Force.com Site, as mentioned in the Hands on 2 – open a Flow for unauthenticated access section.