
Scheduled jobs are automated portions of work that can be performed at either a particular time or on a recurring schedule. For example, a business wants to run a daily job at night to send out an e-mail to Opportunity owners within one week of the Opportunity close date. You can also solve a few of them using Flow and Process Builder.
A business scenario: Sara Bareilles is working as a system administrator in Universal Container. She has received a requirement to create a schedule job that will run every night at 11:00 P.M. to add all new users created on that day to the Chatter group Sales Executive. Currently, the administrator has to manually add new users to the Chatter group Sales Executive. Universal Container grants Salesforce access to their users using Salesforce license only.
We will use Flow and Process Builder to solve it. Following is the approach that we are going to follow to solve the preceding business requirement:
Take the following steps to solve the preceding business requirement:
- First of all, create a custom object for the schedule job. Set the record name as Auto Number data type. Also create two fields
On/OffandScheduled Time. MakeSchedule Timethe required field and grant permission to respective profiles. For more details, refer the following screenshot: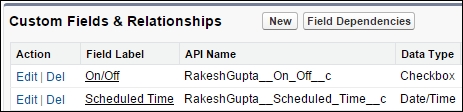
Later on we will use this object to create schedule jobs.
- The next step is to create a Flow. Navigate to Setup | Build | Create | Workflow & Approvals | Flows and click on the New Flow button; it will open the Flow canvas for you.
- Create a few variables in the Flow as shown in the following table:
Name
Variable Type
Object Type
Input/Output Type
SovUserIdSObject Variable
User
Input and Output
SOCVUsersIdSObject Collection Variable
User
Input and Output
SovNewUserIdSObject Variable
CollaborationGroupMember
Input and Output
SOCVNewUsersIdSObject Collection Variable
CollaborationGroupMember
Input and Output
We will use these variables in the Flow.
- First of all, we have to find the list of users that were created today. Navigate to the Palette tab and drag and drop the Fast Lookup element onto the Flow canvas; it will open a new window for you, where you have to enter following details:
- Name: Enter the name for the Fast Lookup element. In this case, enter
Users Created Todayas the name. - Unique Name: This will be auto-populated based on the name.
- Description: Enter a meaningful description.
- Look up: Select the object you want to search the records for. In this case, select User. The next task is to define the search criteria. For this, select CreatedDate greater than or equal to the system variable {!$Flow.CurrentDate} and IsActive equal to the global constant {!$GlobalConstant.True}.
- Variable: Use the SObject Collection Variable
SOCVUsersId. Don't forget to select the Assign null to the variable if no records are found checkbox. Finally, select the fields whose values you want to store in the SObject Collection Variable; in this case, select Id.
- Name: Enter the name for the Fast Lookup element. In this case, enter
- Once you are done, click on the OK button.
- The next task is to check whether SObject Collection Variables contains any users or not. To check this, we will use the Decision element. To do that, drag and drop the Decision element onto the Flow canvas. Enter the name
Check SObject Collection Variable Sizeand Unique Name will get auto-populated based on the name. Optionally, you can also add a description for the Decision element. Next, create two outcomes for the Decision element, which are as follows:- User Found: Select the SObject Collection Variable
SOCVUsersId, the is null operator, and the {!$ GlobalConstant.False} global constant as the value - User Not Found: Enter the name
Nullas DEFAULT OUTCOME
- User Found: Select the SObject Collection Variable
- Once you are done, click on OK.
- If the SObject Collection Variable is
Falsewith the null operator, it means the SObject Collection Variable contains a few users. We will use the Loop element to extract records from the SObject Collection Variable (SOCVUsersId) and store it to the SObject Variable (SovUserId). Navigate to the Palette tab and drag and drop the Loop element onto the Flow canvas. It will open a new window for you, where you have to enter following details:- Name: Enter the name for the Loop element. In this case, enter
Loop over collectionas the name. - Unique Name: This will be auto-populated based on the name.
- Description: Write some meaningful text so that another developer or an administrator can easily understand why this Loop was created.
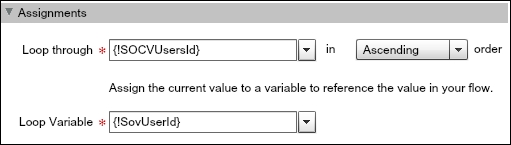
- Loop through: Select the SObject Collection Variable
SOCVUsersId. Select the order as Ascending to loop through the collection. - Loop Variable: Select the SObject Variable or variable as a Loop variable. In this case, select the SObject Variable
SovUserIdas the loop variable.
To map the variable, you can take help from the following screenshot:
- Name: Enter the name for the Loop element. In this case, enter
- Once you are done, click on OK.
- The next step is to assign a user ID and collaboration group ID (
Sales Executive) into the SObject VariableSovNewUserId. Navigate to the Palette tab and drag and drop the Assignment element onto the Flow canvas; it will open a new window for you, where you have to enter following details:- Name: Enter the name for the Assignment element. In this case, enter
Assign Details into SObject Variableas the name. - Unique Name: This will be auto-populated based on the name.
- Description: Write some meaningful text so that another developer or an administrator can easily understand why this Assignment element was added to this Flow.
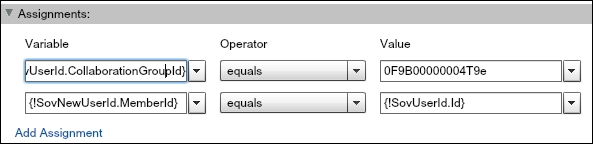
- Assignments: In the Assignments section, select Variable for the value you want to modify; in this case, select {!SovNewUserId.CollaborationGroupId} equals to 0F9B00000004T9e (
Sales ExecutiveChatter group's ID), and {!SovNewUserId.MemberId} equals to {!SovUserId.Id}. It will look like the following screenshot:
- Name: Enter the name for the Assignment element. In this case, enter
- Once you are done, click on OK.
- The next steps are to add all SObject Variables into a SObject Collection Variable, so at the end, we will create records in CollaborationGroupMember. If you add a record using the SObject Variable for each record separately, you will easily hit the governor limit. Drag and drop the Assignment element onto the Flow canvas; it will open a new window for you. Enter
Add Sobject Variableinto the SObject Collection as the name, add the SObject VariableSovNewUserIdto the SObject Collection VariableSOCVNewUsersId. It will look like the following screenshot:
- Once you are done, click on the OK button.
- The final task is to create records in the CollaborationGroupMember object. For this, we will use the Fast Create element. Navigate to the Palette tab and drag and drop the Fast Create element onto the Flow canvas; it will open a new window for you, where you have to enter following details:
- Name: Enter the name for the Fast Create element. In this case, enter
Add Users to Chatter Groupas the name. - Unique Name: This will be auto-populated based on the name.
- Description: Write some meaningful text so that another developer or an administrator can easily understand why this Fast Create element was created.
- Variable: To create a record or multiple records, you can either use the SObject Variable or the SObject Collection Variable. The object types must match, and each ID field must not have a value. In this case, select the SObject Collection Variable
SOCVNewUsersId.
- Name: Enter the name for the Fast Create element. In this case, enter
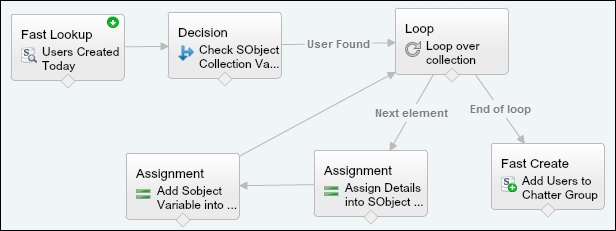
- Click on OK, and use the connector to connect the Fast Lookup, Decision, Assignment, Loop, and Fast Create elements. Set the Fast Lookup element Users Created Today as the Start element, as shown in the following screenshot:
- Save your Flow with the name
Add New Users to Chatter Groupand close the Flow Designer using the Close button; it will redirect you to Flow detail page. Don't forget to activate the Flow.
Until now, we have created the Flow to add new users (user created date greater than or equal to Flow runtime Date) to the Chatter group Sales Executive. To fire the Flow on every day at same time, we have use create time-dependent action. We will create Workflow Rule and Process Builder on the Schedule Job object; we will use this object to create a scheduler.
- First of all, we will create a time-based workflow to update the field On/Off to True. Navigate to Setup | Build | Create | Workflow & Approvals | Workflow Rules. Next, click on the New Rule button, and enter the following details:
- Rule Name: Enter the name
Create Schedule Job - Evaluation Criteria: For evaluation criteria, select created, and any time it's edited to subsequently meet criteria
- Rule Criteria: For the rule criteria, On/Off equals to False
- Rule Name: Enter the name
- Once you are done, click on the Save & Next button.
- To add a time-dependent action, click on the Add Time Trigger button available under the Time-Dependent Workflow Actions section, and set 24 hours after the scheduled time, as shown in the following screenshot:
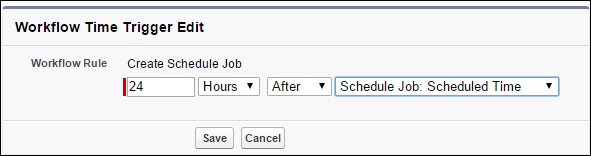
- Once you are done, click on the Save button.
- Now, add a field update action under the time-based trigger to update the On/Off field to True. For this, click on the New Field Update action available under time-based trigger that we have defined in the previous steps and enter the following details:
- Name: Enter the name
On/Off to True. - Unique Name: This will be auto-populated based on the name.
- Field to Update: Select On/Off.
- Re-evaluate Workflow Rules after Field Change: Don't forget to select this checkbox.
- Checkbox Options: Select the True option.
- Name: Enter the name
- Once you are done, click on the Save button.
- Once you are done with Workflow Rule, activate it by clicking on the Activate button available on Workflow Rule detail page.
Note
If you want to use Process Builder instead of Workflow Rule, then you have to select "created or edited" in the first step and then tick the only when specified changes are made option in the criteria node. This is similar to "Evaluate the rule when a record is created, and any time it's edited to subsequently meet criteria" in the Workflow Rule.
- Now we will create a Process to launch the Flow. To create a Process, navigate to Setup | Build | Create | Workflow & Approvals | Process Builder, and click on the New button and enter the following details:
- Name: Enter the name for the Process. Enter
Schedule Jobsas the name. - API Name: This will be auto populated based on the name.
- Description: Write some meaningful text so that another developer or an administrator can easily understand why this Process was created.
- Name: Enter the name for the Process. Enter
- Once you are done, click on the Save button; it will redirect you to the Process canvas that allows you to create the Process.
- After Process property definitions, the next task is to select the object you want to create a Process on and to define the evaluation criteria. For this, click on the Add Object node. It will open an additional window on the right of the Process canvas screen, where you have to enter the following details:
- Object: Start typing and then select the Schedule Job object.
- Start the process: For Start the process, select when a record is created or edited. It means Process will only fire each time a record is created or edited.
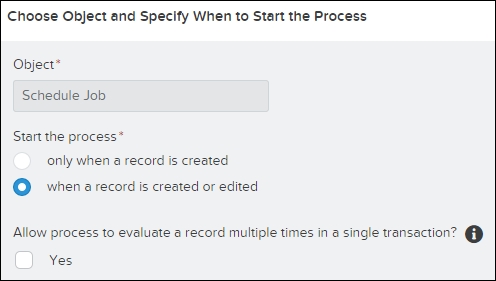
- Once you are done, click on the Save button.
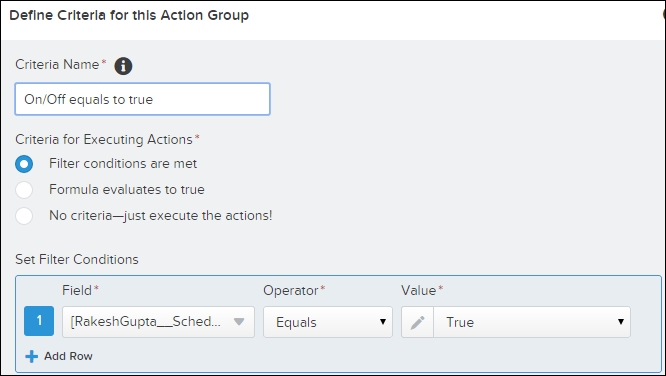
- After defining the Process evaluation criteria, the next step is to add the Process criteria. To define the Process criteria, click on the Add Criteria node; it will open an additional window on the right of the Process canvas screen, where you have to enter the following details:
- Criteria Name: Enter a name for the criteria node. Enter
On/Off equals To trueas the criteria name. - Criteria for Executing Actions: Select the type of criteria you want to define. You can either use Formula or Filter to define the Process criteria or No criteria. In this case, select Filter conditions are met, and select [Scheduled_Job__c].On_Off__c equals to True.
- Criteria Name: Enter a name for the criteria node. Enter
- Once you are done, click on the Save button.
- Once you are done with the Process criteria node, the next step is to add an immediate action to post Opportunity details to launch a Flow. For this, we will use the Flows action available in Process. Click on the Add Action available under IMMEDIATE ACTIONS; it will open an additional window on right of Process canvas screen, where you have to enter the following details:
- Action Type: Select the type of action; in this case, select Flows.
- Action Name: Enter a name for this action. Enter
Launch a Flowas the action name. - Flow: Select the Flow that you want to execute; in this case, select the Flow Add New Users to Chatter Group.
- Set Flow Variables: Use this to pass the value in your Flow variables. For the current case, we don't have to pass value to any variables.
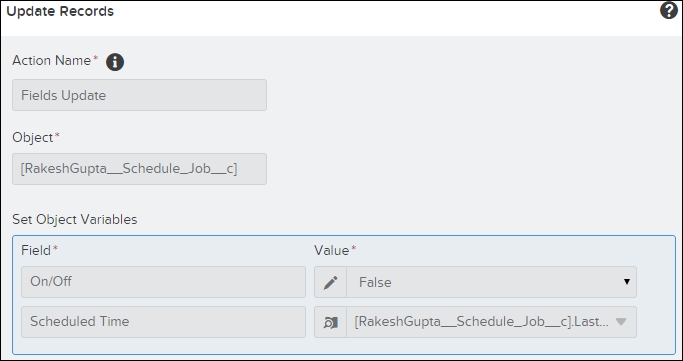
- The next task is to add the Update Records action available under Process to update the On/Off field to False, so it will trigger the time-dependent workflow and queue a job for next day. Also, update the scheduled time field with last modified time of the record; it will queue a job after 24 hours from record's modified date. Click on Add Action available under IMMEDIATE ACTIONS; it will open an additional window on the right of the Process canvas screen, where you have to enter the following details:
- Action Type: Select the type of action; in this case, select Update Records
- Action Name: Enter a name for this action. Enter
Fields Updateas the action name - Object: Start typing and then select object; in this case, select
Schedule_Job__cas the object - Set Object Variables: Map the On/Off field to False and Scheduled Time with LastModifiedDate
It will look like the following screenshot:
- Once you are done, click on the Save button.
Finally, your Process will look like the following screenshot:
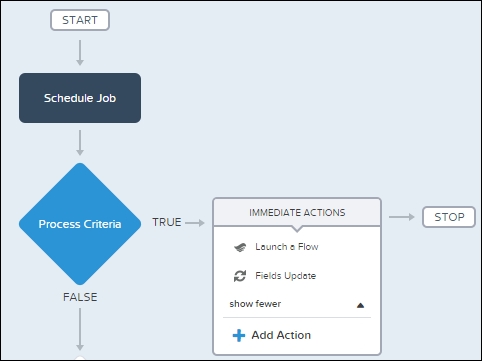
- Once you are done with Process creation, the final step is to activate it. To activate a Process, click on the Activate button available on the button bar.
Until now, we have created a Flow to add new users to the Chatter group Sales Executive. We have also created time-based Workflow Rule and Process Builder to run the job every day. Finally, we will create a record on the Schedule Job object, as shown in the following screenshot:
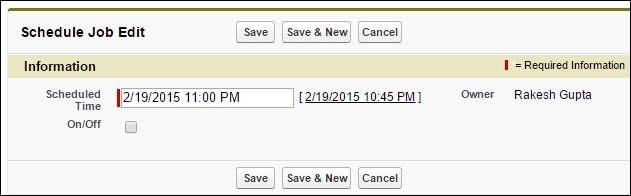
Set the time as 11:00 P.M., as seen in the preceding screenshot. Next, click on the Save button; it will fire the time-based workflow as it meets the rule criteria—that is, On/Off equals to False, and queue a job for next day. To verify it, navigate to Setup | Monitor | Time-Based Workflow and click on the Search button; it will look like the following screenshot:

If you focus on Schedule Date on the preceding screenshot, it's showing as 2/20/2015 11:00 PM because in the time-dependent Workflow Rule, we have added the criteria after 24 hours of the schedule date. The next day, the scheduled job will run and update the On/Off field to True. So first, meet the Process Builder criteria, then Process will execute. Process Builder first runs the Flow to add users to the Chatter group. Next, update the Schedule Time and On/Off fields to False. As soon as the On/Off field is updated as False, Workflow Rule will fire and queue a job for the next day.