
Before Process Builder was available, to automate complex business processes in Salesforce, knowledge of Apex and Visualforce was required. After completion of this chapter, you will get a clear-cut idea of how to automate business processes using Process Builder and minimize the need for Apex code. Now we will discuss how to use Process Builder to automate business processes.
It's a common business requirement to autocreate a child record whenever the parent record gets created. For example, as soon as an account gets activated, we need to autocreate an Opportunity for that account and set the Opportunity close date to the last date of the current quarter. To satisfy these types of business requirements, a developer normally writes an Apex trigger, but there are few other ways through which you can achieve this without writing code:
- Process Builder
- A combination of Flow and Process Builder
- A combination of Flow and Inline Visualforce page on the account detail page
We will use Process Builder to solve these types of business requirements.
Let's start with this business scenario: Joe Thompson is working as a system administrator in Universal Container. He has received a requirement from the management to autocreate a contract as soon as an account gets created in Salesforce, and autopopulate these values in the new contract:
- Contract term (months): 12
- Contract start date: Account created date + 90 days
- Status: Draft
- Auto-relate it with a new account
To solve the preceding business requirement, we will use Process Builder and do some customization. Follow these instructions to achieve this business requirement using Process Builder:
- First of all, create a Formula field on the Account object to populate a dynamic date, that is, the account created date plus 90 days. Navigate to Setup | Build | Customize | Accounts | Fields | Account Custom Fields & Relationships and then click on the New button. Create a Formula field with the data type as Date and use the
CreatedDate + 90formula function, as shown in the following screenshot: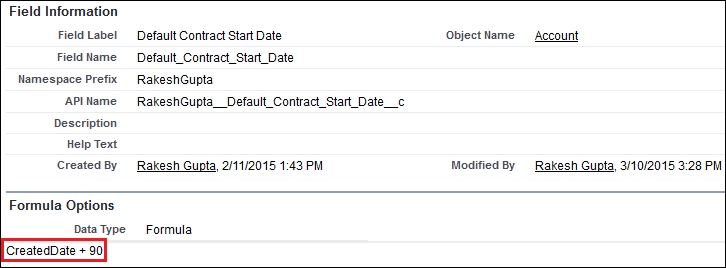
This field will give you the date that is required to map with the contract start date.
The next step is to create a Process to autocreate a contract record whenever a new account record gets created. To do this, follow these instructions:
- Navigate to Setup | Build | Create | Workflow & Approvals | Process Builder, click on the New button, and enter the following details:
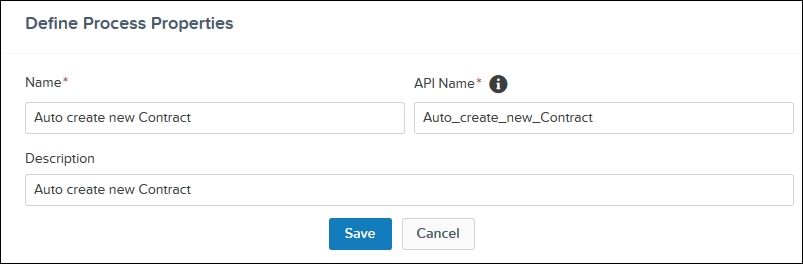
- Name: Enter the name for the Process. Enter
Auto create new Contractas Name. This must be within 255 characters. - API Name: This will be autopopulated based on the name.
- Description: Write some meaningful text so that other developers or administrators can easily understand why this Process is created.
The fields should appear as shown in the following screenshot:
- Name: Enter the name for the Process. Enter
- Click on the Save button once you are done. It will redirect you to the Process canvas, which allows you to create the Process by clicking, not code.
Once you are done with Define Process Properties, the next task is to select the object on which you want to create a Process and define the evaluation criteria:
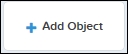
- Click on Add Object node, as shown in the following screenshot:
This will open a window in right-hand side, where you have to enter the following details:
- Object: Start typing and then select the Account object.
- Start the process: For Start the process, select only when a record is created. This means the Process will fire only at the time of record creation.
- Allow process to evaluate a record multiple times in a single transaction?: Select this checkbox only when you want the Process to evaluate the same record up to five times in a single transaction. It might re-examine the record because a Process, Workflow Rule, or Flow may have updated the record in the same transaction. In this case, leave this unchecked. This window should appear as shown in the following screenshot:

- Once you are done, click on the Save button. Just as in Workflow Rule, once you save the panel, it doesn't allow you to change the selected object.
After defining the evaluation criteria, the next step is to define the Process criteria. This is similar to the rule criteria in Workflow Rule. Once the Process criteria are true, only then will the Process execute with the associated actions:
- To define the Process criteria click on the Add Criteria node, as shown in this screenshot:

Now enter the following details:
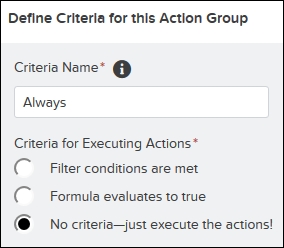
- Criteria Name: Enter a name for the criteria node. Enter
Alwaysin Criteria Name. - Criteria for Executing Actions: Select the type of criteria you want to define. You can use either a formula or a filter to define the Process criteria or no criteria. In this case, select No criteria-just execute the actions!. This means the Process will fire for every condition.
This window will look like what is shown in the following screenshot:
- Criteria Name: Enter a name for the criteria node. Enter
- Once you are done, click on the Save button.
Once you are done with the Process criteria node, the next step is to add an immediate action to create a contract. For this, we will use the Create a Record action available under Process. You can add 10 immediate and 10 scheduled actions for a particular criteria node. Immediate actions are executed as soon as the evaluation criteria are met. Scheduled actions are executed at a specified time. We will add an immediate action with the following steps:
- The next step is to add one immediate action to autocreate a record. For this, we will use the Create a Record action available under Process. Click on Add Action available under IMMEDIATE ACTIONS, as shown in the following screenshot:
Now enter the following details:
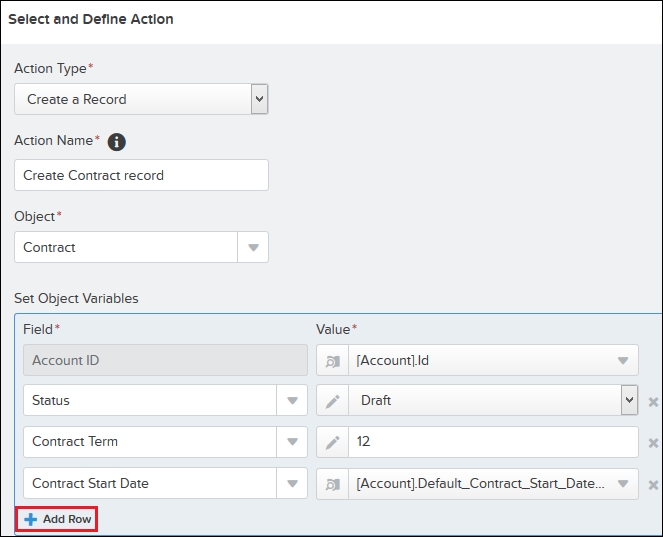
- Action Type: Select the type of action. In this case, select Create a Record.
- Action Name: Enter a name for this action. Enter
Create Contract recordin Action Name. - Object: Start typing and then select the Contract object.
To select the fields, you can use field picker. To enter the value, use the text entry field and map the fields according to the following screenshot:
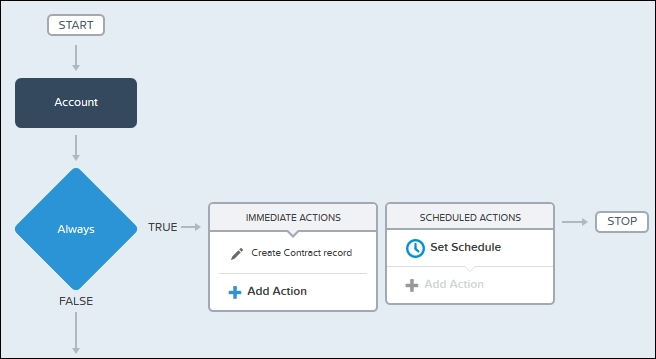
- Once you are done, click on the Save button. Finally, the Process will appear as shown in this screenshot:
As soon as you are done with the Process creation, the next step is to activate it:
- To activate a Process, click on the Activate button available on the button bar, as shown in the following screenshot:

- A warning message will appear on the screen. Read it carefully and then click on the Ok button, as shown in this screenshot:
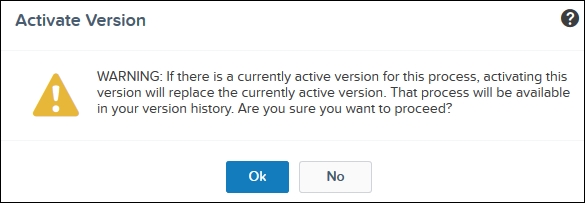
Once you click on the Ok button, it will activate the Process. For activation, a Process must have an action added to it. If a Process doesn't have any action added to it, the activate button won't be clickable. After activation of a Process, it's not allowed to make any changes to it. If you want to do so, you have to clone it and save it as either New Version or a New Process, which we will discuss later.
From now on, if you try to create a new account, after successful attempts, you can see a contract getting created for the account by the Process you have created.
If some active Processes are no longer required by the business, you can deactivate them. To deactivate an activated Process, open the Process and click on the Deactivate button, as shown in the following screenshot:
After deactivation, Salesforce stops using the Process to evaluate when an account record is created or edited.
If a Process is no longer in use, then you can delete it. You can delete only those Processes that are in the Draft, Inactive, or Invalid Draft status. This means you can't delete an active Process. If you want to delete an active Process, you must deactivate it first and wait for 12 hours as of Spring '15 release. Only then will you be able to delete it. If a Process has scheduled actions, then you can't delete it; in such a case, you must wait until those pending actions have been completed or deleted. To delete a Process, follow these instructions:
- Navigate to Setup | Build | Create | Workflow & Approvals | Process Builder.
- This will redirect you to the Process management page. Identify the Process that you want to delete and click on Manage Versions, as shown in the following screenshot:

- This will open a popup for you, from where you can delete a Process. Click on the Delete button available in front of each version to delete a Process, as shown in this screenshot:
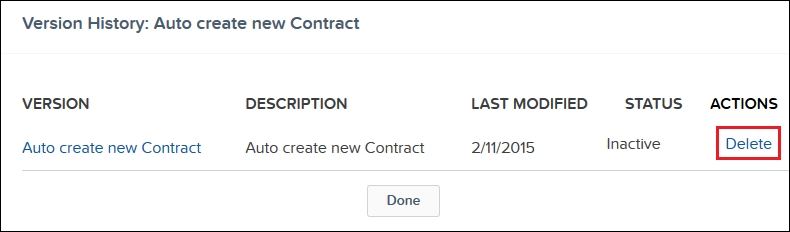
Once you've successfully deleted the Process, it will be removed from the Process management page.
There are several business use cases where a customer wants to update child records based on some criteria, for example, auto-updating all related Opportunity to Closed-Lost if an account is updated to Inactive. To achieve these types of business requirements, you can use the Apex trigger. You can also achieve these types of requirements using the following methods:
- Process Builder
- A combination of Flow and Process Builder
- A combination of Flow and Inline Visualforce page on the account detail page
We will use Process Builder to solve these types of business requirements. Let's start with a business requirement.
Here is a business scenario: Alice Atwood is working as a system administrator in Universal Container. She has received a requirement that once an account gets activated, the account phone must be synced with the related contact asst. phone field. This means whenever an account phone fields gets updated, the same phone number will be copied to the related contacts asst. phone field.
Follow these instructions to achieve the preceding requirement using Process Builder:
- First of all, navigate to Setup | Build | Customize | Accounts | Fields and make sure that the Active picklist is available in your Salesforce organization. If it's not available, create a custom Picklist field with the name as Active, and enter the Yes and No values.
- To create a Process, navigate to Setup | Build | Create | Workflow & Approvals | Process Builder, click on New Button, and enter the following details:
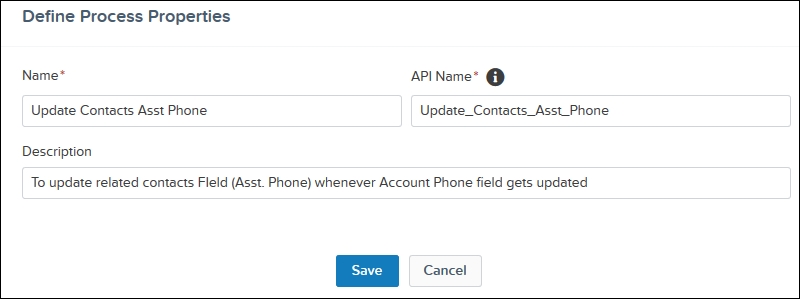
- Name: Enter the name of the Process. Enter
Update Contacts Asst Phonein Name. This must be within 255 characters. - API Name: This will be autopopulated based on the name.
- Description: Write some meaningful text so that other developers or administrators can easily understand why this Process is created.
The properties window will appear as shown in the following screenshot:
- Name: Enter the name of the Process. Enter
- Once you are done, click on the Save button. It will redirect you to the Process canvas, which allows you to create or modify the Process.
- After Define Process Properties, the next task is to select the object on which you want to create a Process and define the evaluation criteria. For this, click on the Add Object node. It will open an additional window on the right side of the Process canvas screen, where you have to enter the following details:
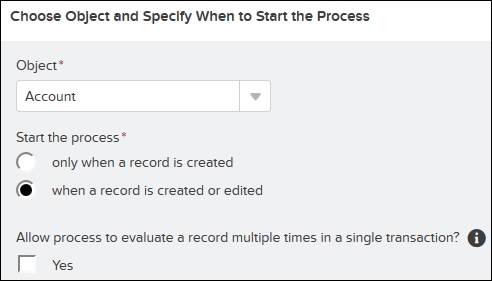
- Object: Start typing and then select the Account object.
- Start the process: For Start the process, select when a record is created or edited. This means the Process will fire every time, irrespective of record creation or updating.
- Allow process to evaluate a record multiple times in a single transaction?: Select this checkbox only when you want the Process to evaluate the same record up to five times in a single transaction. It might re-examine the record because a Process, Workflow Rule, or Flow may have updated the record in the same transaction. In this case, leave this unchecked. This window will appear as shown in the following screenshot:
- Once you are done with adding the Process criteria, click on the Save button. Similar to the Workflow Rule, once you save the panel, it doesn't allow you to change the selected object.
- After defining the evaluation criteria, the next step is to add the Process criteria. Once the Process criteria are true, only then will the Process execute the associated actions. To define the Process criteria, click on the Add Criteria node. It will open an additional window on the right side of the Process canvas screen, where you have to enter the following details:
- Criteria Name: Enter a name for the criteria node. Enter
Update Contactsin Criteria Name. - Criteria for Executing Actions: Select the type of criteria you want to define. You can use either a formula or a filter to define the Process criteria or no criteria. In this case, select Active equals to Yes. This means the Process will fire only when the account is active. This window will appear as shown in the following screenshot:
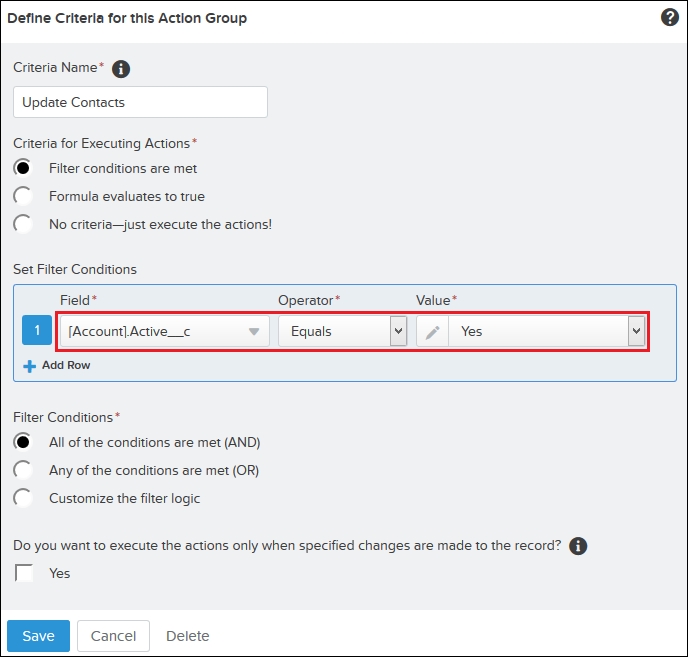
- Criteria Name: Enter a name for the criteria node. Enter
- Once you are done with defining the Process criteria, click on the Save button.
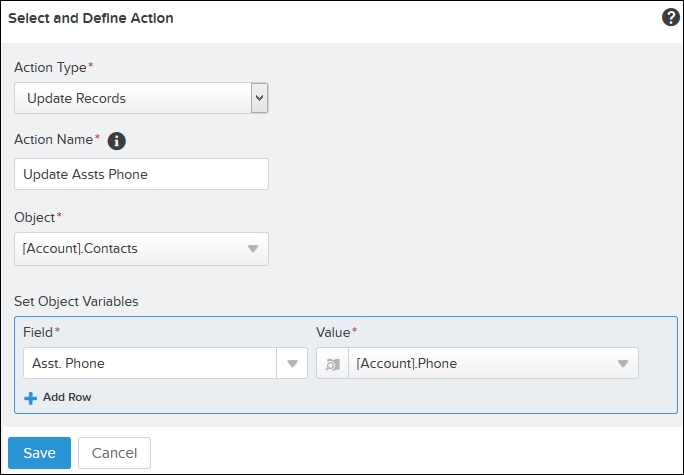
- Once you are done with the Process criteria node, the next step is to add an immediate action to update the related contact's asst. phone field. For this, we will use the Update Records action available under Process. Click on Add Action available under IMMEDIATE ACTIONS. It will open an additional window on the right side of the Process canvas screen, where you have to enter the following details:
To select the fields, you can use field picker. To enter the value, use the text entry field. It will appear as shown in the following screenshot:
- Once you are done, click on the Save button.
- Once you are done with the immediate action, the final step is to activate it. To activate a Process, click on the Activate button available on the button bar.
From now on, if you try to update an active account, Process will automatically update the related contact's asst. phone with the value available in the account phone field.
Once you have activated a Process, it doesn't allow you to make any changes to it. If you want to make any changes to the active Process, then you have to clone it and save it as either a New Version or a New Process.
Here is another business scenario: Alice Atwood is working as a system administrator in Universal Container and she has created a Process (update contacts' asst. phone) to update the contact asst. phone field from the account phone field as soon as account gets actives and it's working as per the business. She has received a request from a business that they want to add one more condition to the Process. The entry criteria is such that it will work only for accounts wherein the billing country is the USA.
To solve this business requirement, you have to add one more condition to the existing Process. For this, you have to modify your Process. As Process is already activated, the only possibility is to clone it. To clone a Process, follow these instructions:
- From the Process management page, click on the Process that you want to modify. It will redirect you to the Process canvas page.
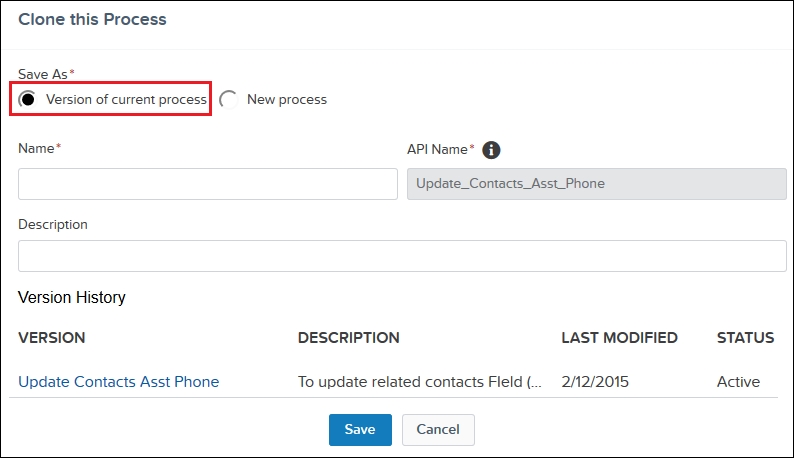
- Click on the Clone button available on the button bar. It will open a popup for you. Under Save As, there are two options:
In this case, select Version of current process to create a new version of an existing Process, as shown in the following screenshot:
- Click on the Save button once you are done.
- Now you can modify the Process as per the preceding business requirement, like this:

It will appear as shown in the preceding screenshot. Once you are done, click on the Activate button to activate the current version of a Process. Salesforce automatically deactivates others active version of the current Process, if any exist.
Often, the business wants to auto-post details of records to Chatter groups. This is possible through Apex code but there is another way you can achieve it without code – that is, Process Builder. Process Builder has a specific action for this called Post to Chatter. You can auto-post record details to a Chatter group using the following methods:
- Process Builder
- Combination of Flow and Process Builder
- Flow and Inline Visualforce page
Here is a business scenario: Helina Jolly is working as a system administrator in Universal Container. She has received a requirement to post Opportunity details to the Sales Executive Chatter group whenever an Opportunity gets created with an amount greater than 1,000,000.
Follow these instructions to achieve this using Process Builder:
- Create a public Chatter group named
Sales Executive.Note
Go to https://help.salesforce.com/HTViewHelpDoc?id=collab_group_creating.htm&language=en_US to know how to create a Chatter group.
- To create a Process, navigate to Setup | Build | Create | Workflow & Approvals | Process Builder, click on the New button, and enter the following details:
- Name: Enter the name for the Process. Enter
Post Opportunity Information to Chatter Groupin Name. - API Name: This will be autopopulated based on the name.
- Description: Write some meaningful text so that other developers or administrators can easily understand why this Process is created.
Once you are done, click on the Save button. It will redirect you to the Process canvas, which allows you to create or modify the Process.
- Name: Enter the name for the Process. Enter
- After Define Process Properties, the next task is to select the object on which you want to create a Process and define the evaluation criteria. For this, click on the Add Object node. It will open an additional window on the right side of Process canvas screen, where you have to enter the following details:
- Object: Start typing and then select the Opportunity object.
- Start the process: For Start the process, select only when a record is created. This means Process will fire only at the time of record creation.
- Allow process to evaluate a record multiple times in a single transaction?: Select this checkbox only when you want Process to evaluate the same record up to five times in a single transaction. It might re-examine the record because a Process, Workflow Rule, or Flow may have updated the record in the same transaction. In this case, leave this box unchecked.
- Once you are done with adding the Process criteria, click on the Save button.
- After defining the evaluation criteria, the next step is to add the Process criteria. To define the Process criteria, click on the Add Criteria node. It will open an additional window on the right side of the Process canvas screen, where you have to enter the following details:
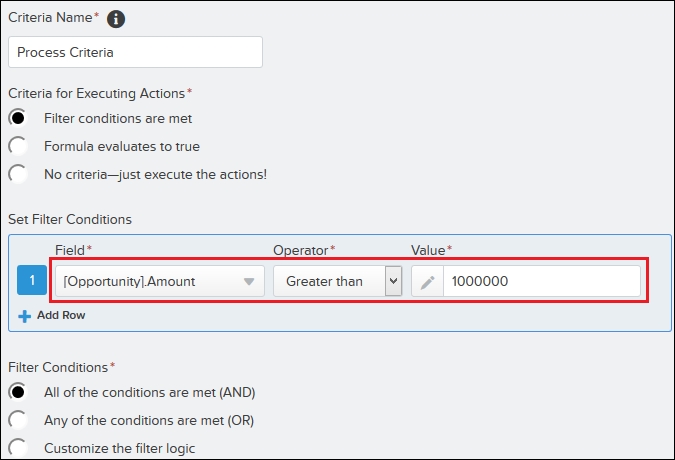
- Criteria Name: Enter a name for the criteria node. Enter
Process Criteriain Criteria Name. - Criteria for Executing Actions: Select the type of criteria you want to define. You can use either a formula or a filter to define the Process criteria or no criteria. In this case, select Amount greater than to 1000000.
It will look like what is shown in the following screenshot:
- Criteria Name: Enter a name for the criteria node. Enter
- Once you are done with defining the Process criteria, click on the Save button.
- Once you are done with the Process criteria node, the next step is to add an immediate action to post Opportunity details to the Chatter group. For this, we will use the Post to Chatter action available in Process. Click on Add Action available under IMMEDIATE ACTIONS. This will open an additional window on the right side of the Process canvas screen, where you have to enter the following details:
- Action Type: Select the type of action. In this case, select Post to Chatter.
- Action Name: Enter a name for this action. Enter
Post to Sales executive Chatter groupin Action Name. - Post to: It allows you to select the Chatter group (user or current record) where you want to post the Opportunity details. From the dropdown, select Chatter Group. Then start typing the name of the Chatter group in the textbox and select Sales Executive.
- Message: Enter the message that you want to post. You can also use the fields above the textbox to mention a user or group, add a topic, or insert a merge field into the message.
It will appear as shown in this screenshot:
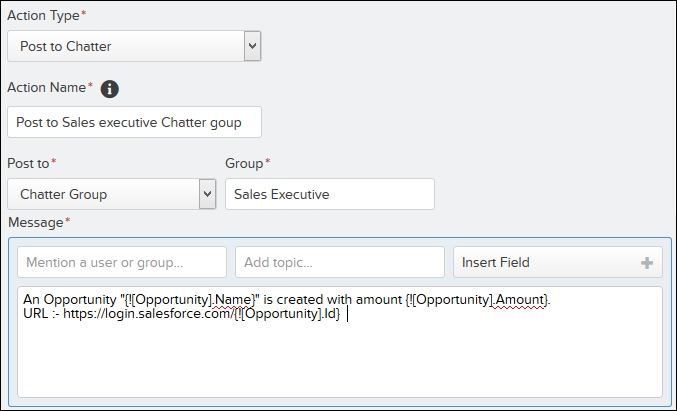
- To insert fields, click on Insert Field. To mention a user or group, use the Mention a user or group textbox. Finally, to add the topic, use the Add topic textbox. Once you are done, click on the Save button.
- Once you are done with the Process creation, the final step is to activate it. To activate a Process, click on the Activate button available on the button bar.
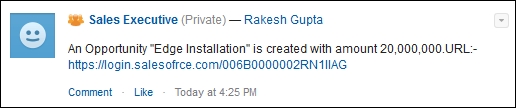
From now on, if users create an Opportunity with an amount more than 1,000,000, it will auto-post a textpost to the Chatter Group Sales Executive, which will appear as shown in the following screenshot:
You can also achieve this through a combination of Flow and Process Builder. If you use Process Builder, you can post only textpost, whereas if you use Flow, it allows you to post as linkpost, textpost, and so on. It also allows you set CreatedById. For this, use the Record Create element and the FeedItem object.
Note
You can achieve the preceding requirement using the Post to Chatter static action or the FeedItem object available in Flow and Process Builder. To learn more about this, refer to https://rakeshistom.wordpress.com/2014/06/14/post-opportunity-details-to-a-chatter-group/.
If you have embedded the Flow in a Visualforce page, you need to use the Inline Visualforce page on the Opportunity object to achieve it.
Process Builder also allows you to send e-mails to users. Let's consider a business scenario: Helina Jolly is working as a system administrator in Universal Container. She has created a Process to post Opportunity details to a Chatter group if the amount is greater than 1,000,000. She receives another requirement to send an e-mail to the Opportunity's owner after five days of its creation.
Follow these instructions to achieve this using Process Builder:
- Process Builder doesn't allow you to create a new e-mail alert, but it allows you to use an existing e-mail alert that you have created in past for the same object on which you created a Process. First of all, create an e-mail alert on the Opportunity object by navigating to Setup | Build | Create | Workflow & Approvals | Email Alerts. Click on the New Email Alert button. Save it with the name as
Email to Opportunity Owner.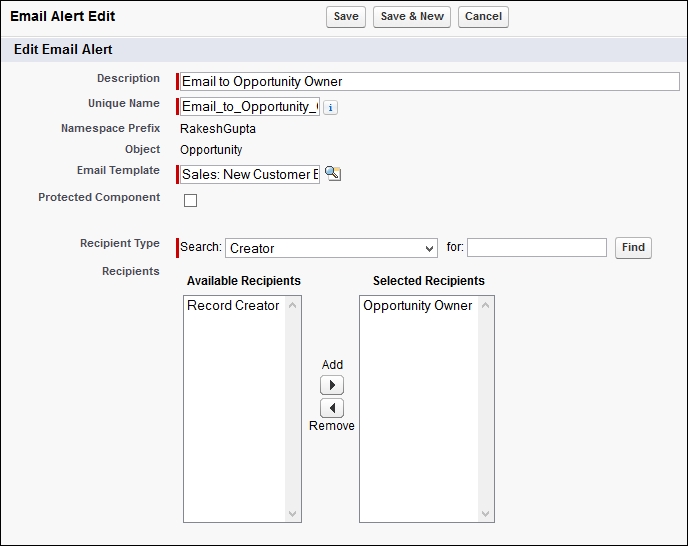
- To add this e-mail alert to the existing Process, navigate to Setup | Build | Create | Workflow & Approvals | Process Builder. Open the
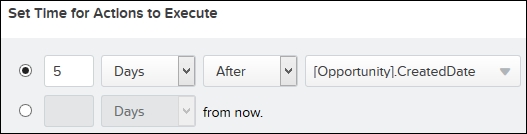
Post Opportunity Information to Chatter GroupProcess that you created to post the Opportunity details to the Chatter group. Save it as New Version because you can't modify an activated Process. - To add the schedule time, click on Set Schedule available under SCHEDULED ACTIONS, and set Set Time for Action to Execute to 5 days after the Opportunity created date, as shown in the following screenshot:
- Once you are done, click on the Save button.
- The next step is to add a scheduled action to send an e-mail. For this, we will use the Send an Email action available under Process. To add schedule actions, click on Add Action available under SCHEDULED ACTIONS. This will open an additional window on the right side of the Process canvas screen, where you have to enter the following details:
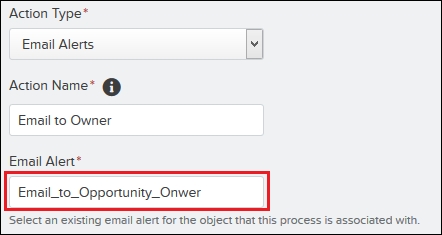
- Action Type: Select the type of action. In this case, select Email Alerts.
- Action Name: Enter a name for this action. Enter
Email to Ownerin Action Name. - Email Alert: Select the existing e-mail alert. In this case, select the e-mail alert that you created in step 1.
It will appear as shown in this screenshot:
- Once you are done, click on the Save button.
- Once you are done with the Process creation, don't forget to activate the Process by clicking on the Activate button.
Now this Process will both work to post the Opportunity details to the Chatter group, as well as send an e-mail to the Opportunity owner after 5 days of record creation.
Note
Flow also allows you to send e-mails. For this, you have to use the Send Email static action available inside it. To learn more about this, go to https://rakeshistom.wordpress.com/2014/09/08/reminder-email-to-upload-chatter-profile-photo/.
If you have embedded the Flow in a Visualforce page, you need to use an Inline Visualforce page on the Opportunity object to achieve the preceding business use case.
To monitor a time-dependent actions queue for Process Builder, follow these instructions:
- Navigate to Setup | Build | Create | Workflow & Approvals | Flows.
- Go to the Paused and Waiting Interviews section, and there you can check out the time-dependent action queue for Process Builder, as shown in the following screenshot:

- To remove a record from the time-based queue, use the Del link, as shown in the preceding screenshot.
This is because Process Builder is using a Wait element to create time-dependent actions.
Process Builder also allows you to auto-submit a record to an Approval Process. Currently, the user has to manually submit a record for the Approval Process. You can achieve these types of requirements using the following methods:
- Process Builder
- A combination of Flow (submit for the Approval-static action) and Process Builder
- A combination of Flow and Inline Visualforce page on the object's detail page
Here's a business scenario: Helina Jolly is working as a system administrator in Universal Container. She has created a Process to post Opportunity details to a Chatter group if the amount is greater than 1,000,000, and to send an e-mail to the Opportunity's owner. She receives another requirement to auto-submit new Opportunity records to the Approval Process if the amount is greater than 1,000,000. She has already created one step Approval Process for this. It will send an Approval request to the CEO.
Follow these instructions to achieve this using Process Builder:
- If you haven't created an Approval Process yet, create an Approval Process on the Opportunity object, set the entry criteria Opportunity amount greater than 1,000,000, and save it with the name as
Opportunity amount greater than 1M. Add one step to it and send the Approval request to the CEO role. Make sure than you have activated the Approval Process.Note
If you want to learn how to create an Approval Process, then refer to https://help.salesforce.com/HTViewHelpDoc?id=approvals_creating_approval_processes.htm&language=en_US.
The Process will fail at runtime if it allows the initial submitter to manually select the next approver.
- To auto-submit records to an Approval Process, you have to use Process Builder. Navigate to Setup | Build | Create | Workflow & Approvals | Process Builder. Open the
Post Opportunity Information to Chatter GroupProcess that you have created to post the Opportunity details to Chatter group. Save it as New Version because you can't modify the activate Process. - The next step is to add an immediate action to auto-submit a record to the Approval Process. For this, we will use the Submit for Approval action available under Process. Click on Add Action available under IMMEDIATE ACTIONS. This will open an additional window on the right side of the Process canvas screen, where you have to enter the following details:
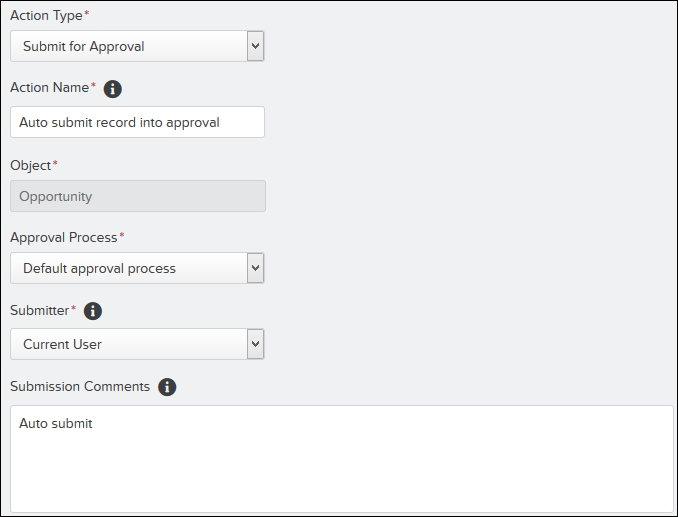
- Action Type: Select the type of action. In this case, select Submit for Approval.
- Action Name: Enter a name for this action. Enter
Auto submit record into approvalin Action Name. - Object: This will automatically populate from the object on which you have created the Process.
- Approval Process: You can select Default approval process, or if the object contains more than one Approval Process, you can use the Specific approval process option from the dropdown. Select Default approval process.
- Submitter: This allows you to choose a user to auto-submit a record to the Approval Process, and receives all related notifications. In this case, select Current User.
- Submission Comments: Optionally, you can enter submission comments. They will appear in the Approval history for the specified record. Enter
Auto submitin this case.
It will look like what is shown in the following screenshot:
- Once you are done, click on the Save button.
- Once you are done with the Process creation, don't forget to activate the Process by clicking on the Activate button.
Note
You can achieve the preceding requirement using the Submit for Approval static action available in Flow and Process Builder. To learn more about this, go to https://rakeshistom.wordpress.com/2014/06/27/auto-submit-record-into-approval-process-with-flow/.
We cannot submit any related records to the Approval Process.
Process Builder allows you to launch a Flow. In Chapter 3, Manipulating Records in Visual Workflow and Chapter 4, Debugging and New Ways to Call a Flow, we saw various ways to invoke or launch a Flow. Process Builder is another way to auto-launch a Flow. For example, there is a Flow that allows the removal of followers from closed Opportunity records. If you want this Flow to automatically execute whenever the Opportunity status gets closed, you should use Process Builder.
Let's consider a business scenario: Sara Bareilles, who is working as a system administrator in Universal Container, has created a Flow to create a new Opportunity using the Record Create element, as shown in the following screenshot:
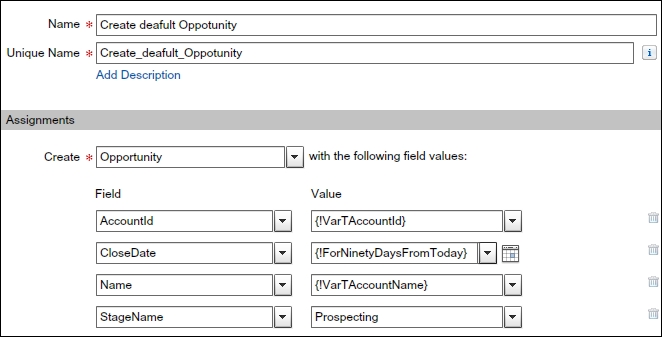
Currently, she is using a custom button on the Account Page Layout to call the Flow. She wants to use Process Builder to automatically fire Flow whenever an account gets created. The ForNinetyFromToday variable used in the preceding example is nothing but a formula to calculate 90 days from the present day. For this, we use TODAY()+90, as we can't currently use a dynamic date in Process Builder.
Follow these instructions to call a Flow from Process:
- Create a Flow similar to what is shown in the preceding screenshot, save it with the name as
Create an Opportunity, and activate it. - To create a Process, navigate to Setup | Build | Create | Workflow & Approvals | Process Builder, click on the New Button, and enter the following details:
- Name: Enter the name for the Process. Enter
Auto create an Opportunityin Name. - API Name: This will be autopopulated based on the Name field.
- Description: Write some meaningful text so that other developers or administrators can easily understand why this Process has been created.
- Name: Enter the name for the Process. Enter
- Once you are done, click on the Save button. It will redirect you to the Process canvas, which allows you to create the Process.
- After Define Process Properties, the next task is to select the object on which you want to create a Process and define the evaluation criteria. For this, click on the Add Object node. This will open an additional window on the right side of the Process canvas screen, where you have to enter the following details:
- Object: Start typing the name and then select the Account object.
- Start the process: For Start the process, select only when a record is created. This means Process will fire only at the time of record creation.
- Allow process to evaluate a record multiple times in a single transaction?: Select this checkbox only when you want Process to evaluate the same record up to five times in a single transaction. It might re-examine the record because Process, Workflow Rule, or Flow may have updated the record in the same transaction. In this case, leave this box unchecked.
- Once you are done, click on the Save button.
- After defining the evaluation criteria, the next step is to add the Process criteria. To define the Process criteria, click on the Add Criteria node. This will open an additional window on the right side of the Process canvas screen, where you have to enter the following details:
- Criteria Name: Enter a name for the criteria node. Enter
Always as Criteria Name. - Criteria for Executing Actions: Select the type of criteria you want to define. You can use either the Formula or the Filter to define the Process criteria or no criteria. In this case, select no criteria. This means the Process will fire in every condition.
- Criteria Name: Enter a name for the criteria node. Enter
- Click on the Save button.
- Once you are done with Process criteria node, the next step is to add an immediate action to post the Opportunity details to launch a Flow. For this, we will use the Flows action available in Process. Click on Add Action available under IMMEDIATE ACTIONS. This will open an additional window on the right side of the Process canvas screen, where you have to enter the following details:
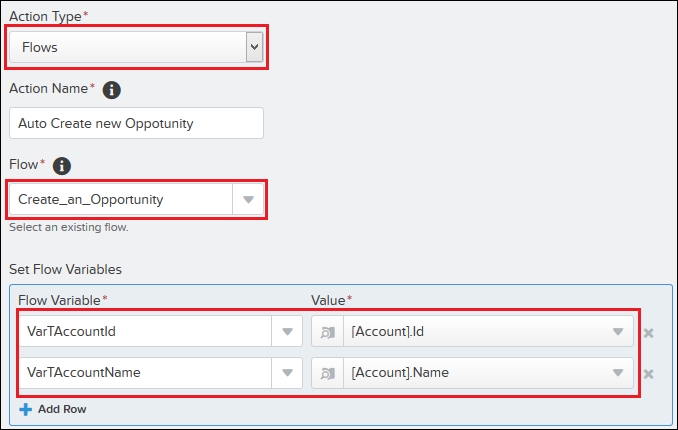
- Action Type: Select the type of action. In this case, select Flows.
- Action Name: Enter a name for this action. Enter
Auto create new Opportunityin Action Name. - Flow: Select the Flow that you want to execute. In this case, select Create Default Opportunity Flow.
- Set Flow Variables: Use this to pass the value in your Flow variables. For the current use case, map the
VarTAccountIdvariable with [Account].Id and theVarTAccountNamevariable with [Account].Name.
It will look like what is shown in the following screenshot:
- To assign value to multiple variables, click on the Add Row link. Once you are done, click on the Save button.
- Once you are done with the Process creation, the final step is to activate it. To activate a Process, click on the Activate button available on the button bar.
From now on, if an account gets created, Flow will automatically get executed by Process Builder, and a new Opportunity will be created.