
In the previous chapter, we discussed an overview of Process Builder. We learned the difference between automation tools such as Flow, Process Builder, and Workflow Rule. We also discussed various actions available in Process Builder. In this chapter, we will discuss various ways to distribute Flows and Processes. We will also discuss how you can use a combination of Flow and Process Builder to solve complex business scenarios. The following topics will be covered in this chapter:
- Distributing or deploying the Flows and Processes
- Displaying messages after login
- Understanding Subflow and the Wait element
- Using custom settings in a Flow
- Creating schedule jobs using a Flow
Once you are done with Flow or Process development, the next step is to deploy it. There are a couple of ways through which you can deploy or distribute it. They are as follows:
- Change Sets
- Packages
Change Sets allow you to deploy the Flows and Processes in the connect Salesforce organization, for instance, production and so on.
A business use case: Alice Atwood is working as a system administrator in Universal Container. She has developed a process in Sandbox (Full Sandbox) and is done with the testing. She wants to migrate the newly created process to production organization.
For the preceding business scenario, when both the Salesforce organizations are connected like Full Sandbox and Production, it's best practice using Change Sets to deploy the components. In this chapter, we are going to focus on a Package.
Note
You can learn more about deploying Flows or Processes using Change Sets at https://help.salesforce.com/HTViewHelpDoc?id=changesets.htm&language=en_US.
Change Sets allows you to add active Flows or Processes into outbound change sets. Active Processes and Flows is available under component type Flow.
Packages give you the flexibility to deploy Flows or Processes in any Salesforce organization, which means that if you have developed a Flow in a free developer organization and want to share it with your colleagues, they can install it in their Salesforce developer organization. In this case, both the Salesforce organizations are not connected.
Note
To learn more about a Package in Salesforce, browse the URL https://help.salesforce.com/HTViewHelpDoc?id=sharing_apps.htm&language=en_US.
A business use case: Joe Thompson is working as a system administrator in Universal Container. She has developed the Auto create new Contract Process in Chapter 5, Developing Applications with Process Builder, in her personal developer organization. Now she wants to install this Process to their organization Full Sandbox.
When both the organizations are not connected, you can use a Package to migrate application, code, or any changes. If a Package (Managed — Released) contains Apex code, Flows, or Processes, then you can only install the packages into Developer Edition, Enterprise Edition or the above, in case a Package doesn't pass AppExchange security review. If a Package that contains Apex code passes the security review, then you can install this type of application in any of the Salesforce Editions, even in Professional Edition or below. To solve the preceding business requirement, we will create an unmanaged Package. Perform the following steps to create a Package:
- Navigate to Setup | Build | Create | Packages, navigate to the Packages section, and then click on the New button.
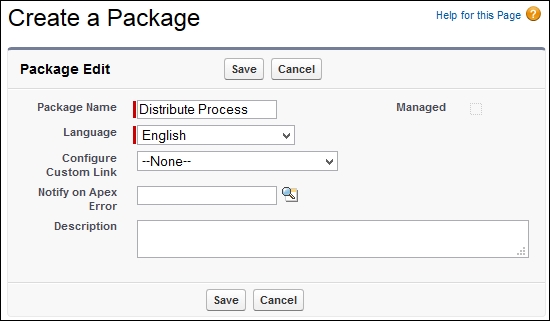
- It will redirect you to a new window where you have to enter Package Name, Language, Configure Custom Link, Notify on Apex Error, and Description, as shown in the following screenshot:
- Once you are done, click on the Save button; it will redirect you to the Package detail page.
- The next task is to add components to the Package. To do that, click on the Components tab, and then click on the Add button, as shown in the following screenshot:

It will redirect you to the Add To Package page from where you can add different components into it.
- From the Component Type dropdown, choose the Flow option, and then select the Auto create new Contract process, as shown in the following screenshot:
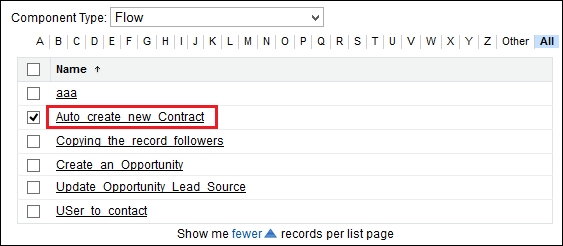
If you click on the link marked in the rectangle, as shown in the preceding screenshot, it will open the Flow created by Process Builder for a Process. In Chapter 5, Developing Applications with Process Builder, we had discussed that Process Builder always generates a Flow for all the Processes. Following is a screenshot of the Flow detail page for the Auto create new Contract Process:
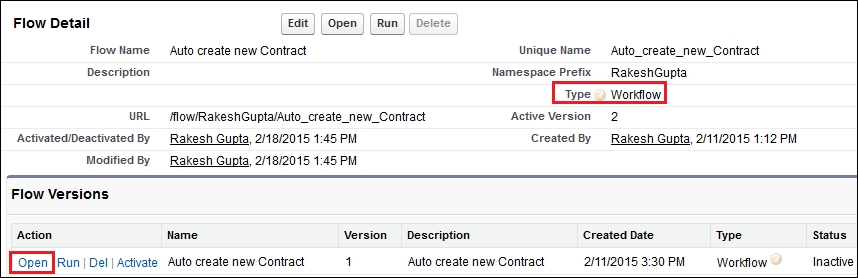
Type for this Flow is declared as Workflow because this Flow is generated by Process Builder. Click on the Open link to view Flow in detail; it will look like the following screenshot:
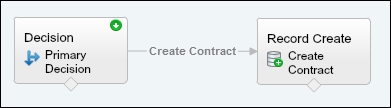
For creating a record using Process Builder Salesforce, use the Record Create element; to update records, use the Record Update element; post to the Chatter group Process, use the Flow static action Post to Chatter, and so on. Modifying the Flows generated by Process Builder is not allowed.
- Now we will come back to our Package. Once you are done, click on the Add To Package button. It will redirect you to the Package detail page. Make sure that you have added all dependent components that are used in Process Builder. Once you are done, click on the Upload button; it will redirect you to the Upload Package page where you have to enter the version name as
Spring2015,1.0for the version number, and requirements to install a Package. Once you are done, click on the Upload button. - After the successful upload, you will get an e-mail from Salesforce with a link to install the package into any organization.
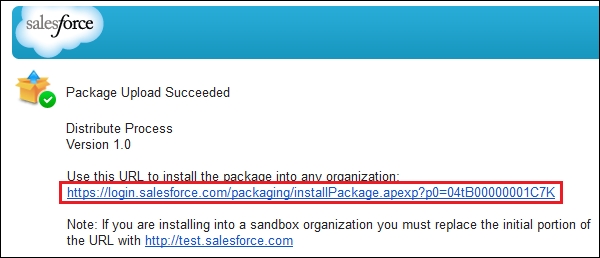
If you're planning to install this package in a developer organization, use the link as it is. To install this package in Sandbox, replace login with test; it will then look like the following URL:
https://test.salesforce.com/packaging/installPackage.apexp?p0=04tB00000001C7K
We have created an unmanaged Package to distribute the Processes or Flows. Using this URL, anyone will be able to install the Package in their organization. If you want to make it secure, at the time of the Package creation, you are allowed to add a username and password.