
In the previous chapter, we discussed who can access the Flows and how. We also discussed various ways to call a Flow and open it for unauthenticated access. You learned a way to pass values in variables through Apex and the technique to access the Flow from the Salesforce1 mobile application. In this chapter, we will discuss Process Builder and how to use it to automate business processes. We will also discuss a way to access a Flow through it. The following topics will be covered in this chapter:
- Overview of Process Builder
- Differences between Process Builder and other tools
- Creating applications with Process Builder
- Migrating your Process
- Limitations of Process Builder
Process Builder is a way of automating business processes. In other words, it is the upgraded version of the Workflow Rule. Whenever you create a Process, the system automatically creates a Flow and a Flow trigger to call this Flow. This happens behind the scenes and the user doesn't need to interact with these shadow Flows. The Workflow Rule has several limitations; it doesn't allow you to update child records. Also, it doesn't allow you to post to Chatter, create a child record on a specific action, or automatically submit a record for approval. To overcome these limitations, Salesforce introduced Process Builder in the Spring '15 release. Process Builder is available for the Enterprise, Performance, Unlimited, and Developer editions. There are a few advantages of Process Builder, as follows:
- It allows you to create a complete process in a single screen, unlike Workflow Rule where you have to move from screen to screen to create a complete rule
- Its visual layouts allow you to create a complete Process using point-and-click
- It will help you minimize Apex code usage
- It also allows you to call Apex from Process Builder
As a Salesforce administrator or developer, you may get multiple requirements from a business to streamline their sales or service processes. If something can't be achieved using Workflow Rule, then we use Apex code to automate it. Let's start with a business use case.
The use case is as follows: Sara Bareilles is working as a Salesforce administrator in Universal Container. She has a requirement to auto-update the related contacts other phone field with the account phone once the account is activated.
There are several ways of solving the preceding business requirement. These are mentioned as follows:
- Solution 1: To achieve this business requirement, we can create a Flow and embed it in a Visualforce page. Then we can use it as an inline Visualforce page in an account.
- Solution 2: Since we can't achieve the business requirement using the Workflow Rule, the next possibility is to use an Apex trigger. A developer writes an Apex trigger on an Account object to update all contacts when the account phone gets updated.
- Solution 3: You can also use Process Builder. We will discuss this in detail later in this chapter.
Process Builder is a tool that allows you to implement business requirements by creating a Process (without any code). It has almost all the features that are offered by Workflow Rule. Plus it contains some new features, such as Post to Chatter, Launch a Flow, and Create a Record. The Process Builder user interface has different functional parts, which are shown in the following screenshot:
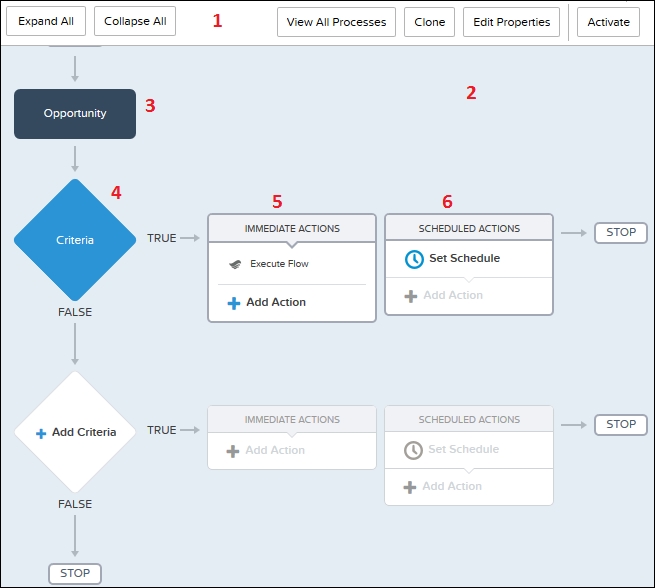
The different functional parts of the user interface of Process Builder are as follows:
- Button bar: The following are the buttons available in the button bar:
- Activate: Use this button to activate your Process. You can't make any changes once a Process is activated.
- Deactivate: This button is available on the button bar only if the Process is activated. Use this button to deactivate a Process.
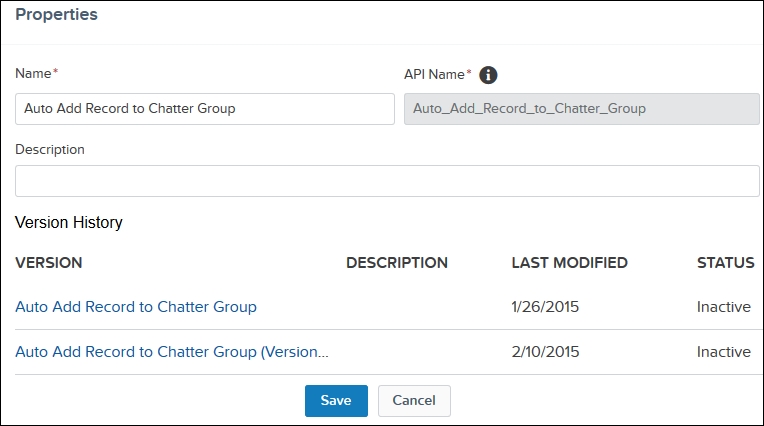
- Edit Properties: This will show you the Name, API Name, and Description fields of your Process. It allows you to change the Process name and description as long as the Process is not activated. You can't change the API Name field after you've saved it the first time. When you click on this button, it also shows the different versions of a Process, and you can navigate to any version. The Properties window will look like what is shown in the following screenshot:
- Clone: The Clone button lets you make a copy of the current Process. You can perform these activities using this button: Version of current process and New process.
- View All Processes: Once you click on this button, it will redirect you to the Processes management page. From there, you can see all the Processes created in the current Salesforce organization.
- Collapse All: Collapse actions on the canvas.
- Expand All: Expand actions on the canvas.
- Process canvas: This is main area where you can use point-and-click to develop a Process. To edit any element in the Process canvas, double-click on it.
- Add object: Select the object on which you want to create a Process, and choose the evaluation criteria (changes that will cause the Process to run).
- Add criteria: Use this to define the criteria and set the filter conditions.
- Immediate actions: Use this to define immediate actions for the Process.
- Scheduled actions: Use this to define scheduled actions for the Process.
Process Builder can perform almost all actions that are available for Workflow Rule, and it also contains some new actions, but it doesn't support outbound messages, among others. With Process Builder, you can perform the following actions:
- Apex: This allows you to call an Apex class that contains an invocable method
- Create a Record: Using this, you can create a record
- Email Alerts: Use this to send e-mail alerts
- Launch a Flow: Use this action to call a Flow from the Process
- Post to Chatter: Use this to post a textpost on a Chatter group, record, or users' wall
- Quick Actions: Use this to create a record, update a record, or log a call
- Submit for Approval: Use this action to submit a record to the Approval Process
- Update Records: This allows you to update any related records
In this chapter, we will see each action in detail.