
In this chapter, we'll discover how lists in ServiceNow are similar to tables in any other relational database, and just what exactly that means for our data. We'll learn how relationships between data are created and stored in these lists, and get a brief introduction to the data types in ServiceNow. While we're at it, we'll also learn how to either personalize or configure how list data is displayed, and edited.
As an integral part of understanding data structures in ServiceNow, we'll also learn about forms and form views, the types of data that you'll see in forms and lists, and how to personalize or configure what data shows up where.
In this chapter, you'll also learn how to create a custom table as part of the foundation for your first application: a Virtual War Room for major incidents. This application will be used to demonstrate various pieces of functionality throughout the ServiceNow platform for the earlier chapters of this book, so it would be a good idea to follow along!
Remember: lists are where data rows and columns are displayed for multiple records. Forms are where a single record is displayed, and where work is done in ServiceNow. As you might imagine, there's a lot to learn about them both! In summary, this chapter will cover the following topics:
- The list view, and list components
- List v2 versus List v3
- Creating custom tables
- Creating update sets to track your work within tables (and elsewhere)
- Adding fields, and filtering tables
Note
In Helsinki and later versions of ServiceNow, there are two versions of lists available: List v2, and List v3. For the most part, we'll use the example of List v3 in this book, but will attempt to call out important differences since List v2 is still used exclusively in some circumstances.
If it's not already active (such as if you've upgraded from a version prior to Helsinki), you can activate the List v3 plugin from System Definition | Plugins.
Before we get into a deep discussion about lists and how they work, you should be aware that there are two common versions of the list view in use presently: List v2 and List v3. You can see if the List v3 plugin is enabled in your instance, by going to System Definition | Plugins, and searching for the term: list. If it is enabled, the Status column will show Active with a little green circle. Otherwise, it'll show Inactive.
While List v3 is the latest generation and what we're going to focus on in this book, it is important to understand List v2 as well. This is because all embedded lists, list reports, and hierarchical table lists such as the update set (sys_update_set) table list, all display in List v2 by default, since List v3 does not support those features.
A quick and easy way to tell if you're looking at a List v2 or a List v3, is to check for the personalization gear button ![]() . If you see that, then you're looking at a List v2 list. On the other hand, if you see the Grid and Split buttons at the top of the list to the right of the search box, then you're looking at a List v3 list.
. If you see that, then you're looking at a List v2 list. On the other hand, if you see the Grid and Split buttons at the top of the list to the right of the search box, then you're looking at a List v3 list.
To an admin/developer, probably the biggest difference between the two list versions is how you access configuration data (business rules, client scripts, UI actions, and so on) for the table that the list is related to.
On List v2 lists, you right-click the header row of the list, and go to Configure, then select the type of configuration records you'd like to see:

However, on List v3 lists, you click on the hamburger menu at the top-left of the page and click Configure:
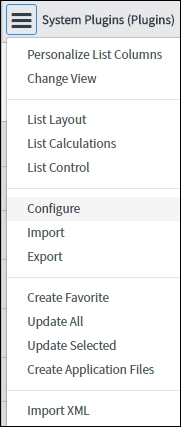
This opens up the List v3 Configure modal dialog with the same options you would find in the Configure sub-menu in List v2 lists:

You can disable List v3 on specific lists one-by-one, by clicking the hamburger menu at the top-left of the list, then clicking on List Control and checking the Disable list v3 checkbox. In this menu, you can also choose the default view mode (grid or split) for List v3.