
You can probably imagine that instead of the existing homepage, a company might want to have a homepage containing something different. Let's say our company wants to have three clocks with the time for the three locations where they have the most clients; San Francisco, Boston, and London. They also want to keep the search bar, and want a dynamic list of submitted incidents. Let's explore how we might create that for them:
- Navigate to Service Portal | Pages, and create a new page by clicking New in the top-left.
- Fill in the Title field with
Home, and the ID field withhome. The ID field is the URL suffix for this page. Once you're finished, right-click the header, and click Save. - Under the Related Links section of the page, click on Open in Designer. Inside the Page Designer header, you'll see a little book icon labeled sp next to a page icon labeled Home. sp is the URL suffix of the portal we're currently previewing this newly created page inside, and Home is the page currently being edited:
The page layout of a service portal page remains the same, no matter which portal it's being displayed in; however, different portals can have different color schemes, and display using different CSS. Click on the portal icon to change it to my_sp. At any point while in the Service Portal Designer, you can switch between Edit and Preview at the top of the designer UI, to instantly see changes you've made. Layout and widget changes made in the designer are automatically saved.
The Service Portal Designer provides a drag-and-drop interface for constructing page layouts and organizing widgets. First, drag a Container onto the form (from Layouts, under the Widget tab), then drag a 4 | 4 | 4 column layout into the container. Columns are the items beneath the Container option under the Widget tab labelled with numbers, as shown in following screenshot:

- Service Portal pages are comprised of Widgets inside of columns, inside of rows, and inside of Containers. Widgets are reusable, modular, customizable segments of code. Each use of a widget creates an instance record on the
sp_instancetable. Widgets often have options that are unique to each instance of the widget, and do not affect other instances of that widget. Several of ServiceNow's built-in widgets are protected and read-only, but can be cloned for customization. Creating a new record for customization instead of altering the out-of-the-box (OOB) widget is considered best practice, and ensures that the OOB widget can be updated in the event of future upgrades!
Type clock into the Filter Widget bar in the Widgets tab of the Service Portal Designer, and drag the Cool Clock widget into each of the columns in the container. Now you ought to have three clocks, all with either your current time, or the current time in Los Angeles (depending on your System Settings):
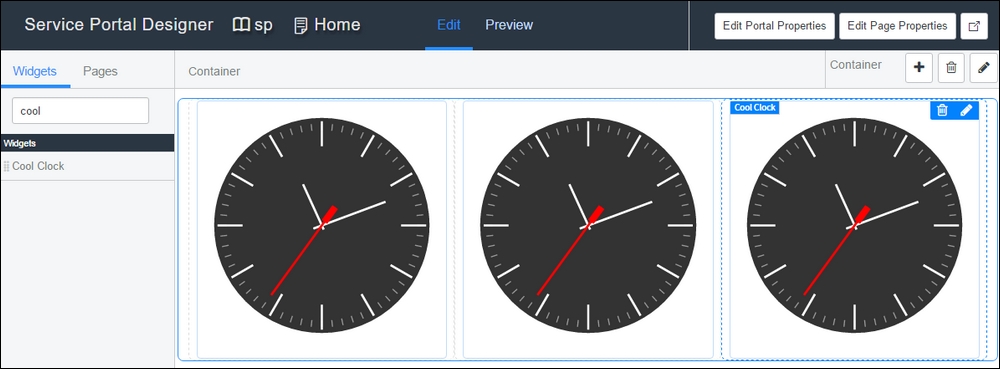
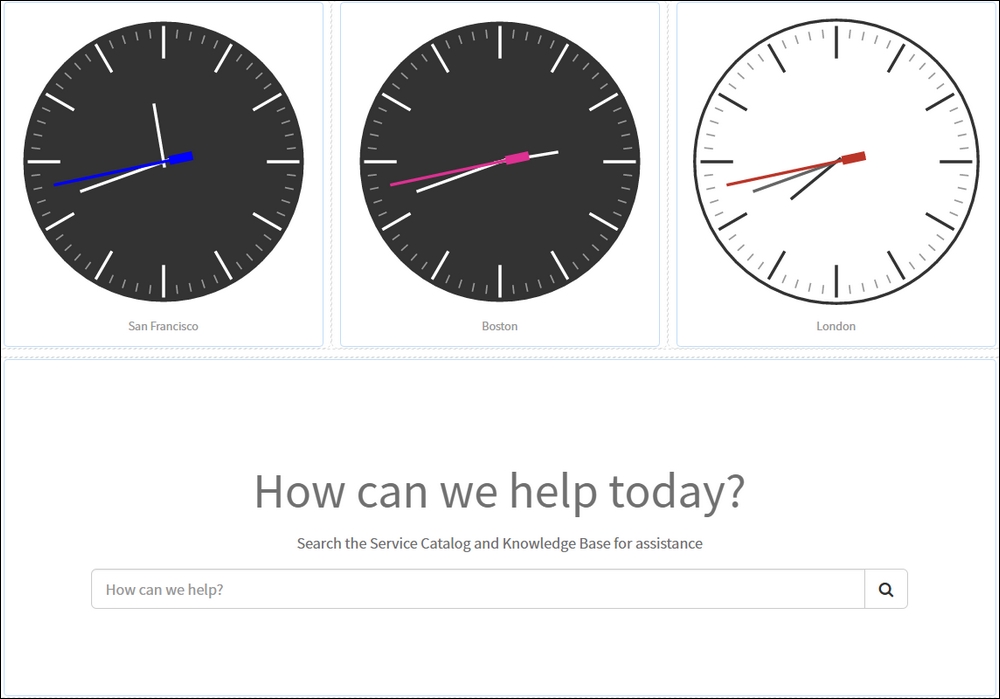
Hover your cursor over the clock on the left. A border and header should appear with a trash bin icon and a pencil icon ![]() . That is the edit button. If you click on that button, a modal window will appear with options for that widget. In this case, our options are Title, TimeZone, and Second hand color. For this one, set the Title to
. That is the edit button. If you click on that button, a modal window will appear with options for that widget. In this case, our options are Title, TimeZone, and Second hand color. For this one, set the Title to San Francisco, the TimeZone to US/Pacific, and the Second hand color to blue. Click on the Save button at the bottom of the modal.
Click the pencil icon again on the middle clock, and set the Title to Boston, the TimeZone to US/Eastern, and the Second hand color to rgb (222, 48, 146). As you can see, the color field accepts RGB values as well as color names!
Give the clock on the right a Title of London, a TimeZone of Europe/London, and a Second hand color of #bc3529. You may have already guessed it, but the color field also accepts hex values!
Do your clocks have different background colors? Don't worry, it's on purpose—this widget changes background colors depending on time of day for that location.
Next, we'll put in the homepage search widget. Just like in the OOB homepage, we want this widget to span most of the page, so drag in a new Container from the Widgets tab, and place it underneath the clock container. Then, drag a size 12 column into that container. Type search into the Widgets tab filter box to see the different search widgets available, then drag the Homepage Search widget into the 12 column container you just added to the page.
If you click the pencil icon for the Homepage Search widget, you'll see options for Title and Short Description. Text in those fields will show above the search bar. Go ahead and type in How can we help today? for the Title, and Search the Service Catalog and Knowledge Base for assistance as the Short Description.
There is a third option called Typeahead Search. This option allows you to modify the typeahead search widget embedded in the Homepage Search using a JSON object. In this field, enter {title: "Enter keywords to search."}. After saving, this should change the text in the search bar:
The last requirement for our custom homepage is a dynamic list of incidents opened by the current user (whoever happens to be viewing the page). To create that, start by dragging another container, and another size 12 column beneath the Homepage Search container. Search for list in the Widgets tab, and drag the Simple List widget into the new column.
If you click on the pencil/edit icon for the simple list, you'll notice that we have a lot more options available for this widget, than we did for the clock widget. Let's set it up:
- Since this is meant to be a list of incident records, set Table to Incident [
incident]. - The default display value of the Incident table is the Number field. We can customize the primary display field for this list, but in this case, let's leave the Display field set to Number, as it's what people are used to seeing.
- To display some other useful fields in this list widget, scroll down and set the Secondary fields list collector field, so it contains Short description, Opened, State, and Priority.
- Finally, scroll to the bottom of the modal dialog, and click on Save.
- After clicking Save, click Preview at the top of the page. You should now be able to see a list of Incident tickets below your portal home page's search box. However, the list is not filtered, and you'll notice if you try to click on an Incident ticket number, that the link doesn't go anywhere. Thus, the next step is to set this up to only show records submitted by the current user (the user viewing the page). To accomplish that, rather than modify the widget by clicking the pencil/edit icon, we'll edit the instance of this particular widget that's displayed in this page.
Head back to the classic view of ServiceNow (the view with the ServiceNow frame that you see by default after logging in), and navigate to Service Portal | Widget Instances. Each time you use a widget in a portal page, you're effectively creating a new instance of that widget. These instances, and their unique configuration information, are stored in this table.
The Updated field should be the first field on the left, and if you click on the field header, it should sort the list by when each instance was last updated. Make sure it sorts so that more recent updates show up at the top of the list. If it doesn't, click on the header again. The Simple List widget that we just added and set up should be on the top of this list (as it was updated most recently). Click on that row to open up the instance of the simple list widget we created, then follow these steps to fill in the details:
- Set the Title to My Incidents to change the display header of the widget on the portal page.
- Next, use the query builder in the Table and Filter form section to filter the incidents that'll be displayed in the list. We want currently active records, so set the first condition to
[Active][is][true]. - We also want to show only records which were opened by the current user. We'll use a dynamic filter too accomplish this. To add this dynamic filter condition, click and next to the first condition, and set the second condition to
[Opened by] [is (dynamic)] [me]. - In the Fields on List, Appearance form section, you can edit the maximum number of records displayed on the widget. Let's set the Maximum entries value to
20. - The Link to this page field allows you to determine where the user should be directed when clicking on these records. Since we're making a list of tickets, let's select ticket in this reference field, and the user will see the ticket that they've clicked on. Finally, right-click in the header and click Save.