
Lists in ServiceNow can be equated strongly to tables in databases. For the most part, this would be an accurate comparison. Viewing a list, is viewing a representation of a subset of records within a table on ServiceNow's database servers. The columns of that list correspond to fields within the table, and often fields which would show on the form (if configured to do so).
Each table in ServiceNow has a label (a friendly name), and a name. The label is defined in the table dictionary (something we'll discuss later in this chapter), and can contain spaces and other characters that are not allowed in the table's name. The name is often more difficult to remember, but more specific. For example, the label Task may refer to the base task table, problem tasks, catalog tasks, or a multitude of system or custom tables which contain some sort of task. However, the name sc_task is more specific, as a table's name is unique (but its label is not).
Let's start out by creating a custom table. This table will be the home for records created within our application of at least one type, but before we do that, we need to create an update set!
In Chapter 1, The Interface, we briefly mentioned the update set selector at the top-right of the ServiceNow UI. In this chapter, we're going to create one ourselves in order to capture and track our work. We can export it and save in between clones, import it into other instances, or use the update set as a backup. Here's how:
Start by clicking on the System Settings gear menu at the top-right of the ServiceNow frame, in the banner. Then, click on the Developer tab from the left.
Just so we can keep an eye on it, let's add the update set picker to the banner section of the ServiceNow frame (if you haven't done so already) by toggling the Show update set picker in header option to on:
Now we'll see a little drop-down menu just to the left of our profile link and picture. This will help us keep an eye on which update set we have selected, and easily switch if we need to.

Note
Applications in ServiceNow can exist within their own scope, so that—unless explicitly permitted—scripts and resources in one application scope (such as the Global scope) cannot access resources within another scope. Since ServiceNow has several applications which are in a non-global scope, you may want to enable the Show application picker in header toggle as well, so you can see what application scope you're working in!
With the Update Set toggle switched on, click the middle icon that looks like a list ![]() after the Update Set drop-down in the System Settings menu. This will take you to the Update Sets table. To create a new update set, click the New button and fill out some details as before. This time, set the Name field to
after the Update Set drop-down in the System Settings menu. This will take you to the Update Sets table. To create a new update set, click the New button and fill out some details as before. This time, set the Name field to Chapter 2, and click Submit and Make Current.
Note
We're creating our update sets in the same order as we're developing, so as long as we also deploy/push them in the same order, we wouldn't have any issues of overlap. If we create a record in the Chapter 1 update set and then modify it in Chapter 2, that's fine. But if we then tried to migrate those update sets to another instance in the reverse order (first Chapter 2, and then Chapter 1), then the Chapter 2 update set would have us modifying a record that doesn't exist! It is important to maintain the integrity of your update sets, by understanding the order in which they were developed, and the relationship between the sets' contents. One way to do this is using update set batching, which we'll discuss in a later chapter.
After clicking Submit and Make Current, you should be directed back to the Update Sets table list. Let's demonstrate list editing by closing our previous update set (Chapter 1, The Interface) now that we're done with it. This will prevent us from accidentally making potentially conflicting changes to it in the future. To do so, follow these steps:
- Ensure that the State column is displayed in the list view for the Update Sets table. If it isn't, follow these steps to add it:
- Click on the personalize gear icon at the top-left of the list view. If you have Lists V3 enabled, and don't see the gear icon, click the hamburger menu preceding the filter icon at the top-right of the list, and click Personalize List Columns.
- In the Personalize List Columns dialog, select the State field, click the right-arrow button, and then click OK:

- The list should reload, and the State field should be displayed.
- To the right of the row representing the
Chapter 1update set, double-click in the State column, where it says In progress. This should cause the field to become editable within the list view: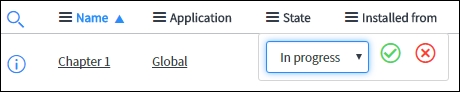
- In the drop-down that appears, select Complete, and click the green checkmark button to save your update.
Note
Not all records can be edited from the list view. Certain tables don't allow it, and ACLs (security rules) still apply. However, it is sometimes possible to bypass certain preventative measures implemented as client-side scripts and policies by editing from the list rather than the form (which is why some tables have list editing disabled). For example, if a client script exists which would remove the Complete option from the State drop-down for our Chapter 1 update set, but we viewed it through the list, we would still have been able to make this change through list editing. That script would not run on the list view.
Now that we've created an update set and marked it as current, we're ready to begin development. As is the case with many (though not all!) ServiceNow applications, we begin our application by creating a new table to house our data. In this case, we're creating a Virtual War Room application, so we'll create a table to hold Virtual War Room tickets.
First, in the application navigator, navigate to System Definition | Tables, where you'll be presented with the list view for the sys_db_object table; or you might say, the Tables table.
Click on the blue New button at the top-left of this list to get started. On the New record form, enter Virtual War Room for the Label, and press Tab. Once you've done that, the Name field should auto-populate with the value u_virtual_war_room. The u_ indicates that this is a custom, user-defined table, as opposed to a table that's built-in with ServiceNow. Scoped applications can also have custom tables which do not have names preceded by u_.
Note
It is generally good practice to give your tables singular labels (Virtual War Room as opposed to Virtual War Rooms) as well as singular names (u_virtual_war_room, as opposed to u_virtual_war_rooms). Most built-in tables in ServiceNow adhere to this standard as well, except for the properties (sys_properties) table. ServiceNow will try to figure out the best way to pluralize the label of a record type, which is used in places like the navigation menu and the top-left of a list. However, you can custom-define the plural form when ServiceNow needs help getting it right. For example, it may pluralize dependency as dependencys rather than dependencies. The singular form would be used as the label on a form displaying one record.
Next, in the Extends table field, we have to determine whether we want our table to extend another table (and thus, inherit the existing fields, labels, and certain business logic). We'll go over what this means in more detail, in a later chapter. For now, since we are going to want access to some of the task-related goodies built in to ServiceNow, let's set our Virtual War Room table to extend the task table by entering Task into the Extends table field, and selecting Task [task] from the drop-down. If it doesn't show up there, you can click the magnifying glass and search for the table record with the name Task.
Note
There are multiple tables with a label of Task, but only one with the name: task. A similar table containing catalog tasks, which was also (until a recent update) labeled Task, is named sc_task. More info on the Task table can be found in Chapter 5, Tasks and Workflows.
Since we want to create a new Application Menu and Module for our application, we'll leave Create module and Create mobile module checked. We'll also leave the Add module to menu option set to -- Create new --, and underneath that field, we'll leave the New menu name field set to the same as our table label: Virtual War Room.
You'll notice that the Columns tab or form section contains a list of Table Columns, which is currently empty. We'll leave this section alone for now, as dictionary entries for many columns are going to automatically appear for our table once we save the new table record, since we're extending another table.
Moving to the Controls tab/section, we've got several more options:
- Extensible: This indicates that other tables are able to extend this table. This might be useful if we were creating a parent table that would have child-tables that needed to share the same custom fields we created, but for our purposes we're going to leave this box un-checked.
- Live feed: This checkbox determines whether the live feed is enabled on this table. The live feed is part of the newer social IT applications, and serves as a place where users can post and share certain content. If live feed is enabled, you can have a sort of twitter-stream-like view of tickets you're interested in, and activity happening on them. Let's go ahead and check this box.
- Auto-number: This allows you to define a prefix (incidents, for example, use INC by default), and the system will automatically number each record in your table, beginning at the number you specify. Let's check the auto-number box, set the prefix to
WAR, and leave the Number and Number of digits fields default.Note
Number prefixes can be virtually any number of characters, but I recommend sticking with 2-5 characters. It is also a very good idea to ensure that they're unique, as certain operations are triggered off the number field (especially on task tables). Having unique prefixes ensures that there won't be duplicate ticket numbers.
- Create access controls: This allows you to create a access controls, and to select (or create) a role to control access to your application. It might make sense down the line, for us to have a separate role that we can grant only to certain major-incident managing groups or users, so go ahead and leave that box checked. The User role field beneath it allows us to select an existing role, or create a new one. The field background color should be green, which means the value currently populated does not correspond to an existing role record, and a new role will be created for it when saved. This type of field is called a suggest field.
- See Chapter 7, User Administration and Security, for info on roles and security.
- Application Access: This tab/section allows us to control application-scope specific settings, but we're not concerned about that right now since we're developing in the Global scope, so go ahead and leave everything here as default.
Note
Whether the Columns, Controls, and Application Access sections display as tabs or stacked form sections, depends on whether you have the Tabbed forms toggle switched on, in the Forms tab of the System Settings cog menu. Just a reminder, this setting is a preference, meaning that it is user-specific, and won't affect other users' experience, or get captured and carried over in update sets.
Finally, right-click in the header and click Save. We could also click the Submit button, but that would redirect us back to the previous page we were on, and we're not ready for that just yet.
After saving the new table record, if you go back into the Columns section, you'll notice that somewhere in the ballpark of 60-70 new columns have appeared automatically! A few of these are default fields created on every table (fields like Created, Updated, Sys ID, and a few others), but the vast majority of the fields you'll see, came from the Task table:

By default, you'll see that the Table Columns list inside the Columns section of the form has several fields shown: Column label, Type, Reference, Max length, Default value, and Display. Since these are rather universal, let's go through each column and make sure we know what it means:
- Column label: This is the friendly name for the column (or, on the form, the field label).
- Type: This determines the type of field created. This dictates the default max length (which you can change), what field properties and attributes are available for this field, and what sort of values will be accepted. Changing a field type after it's been created is very difficult, and not recommended after users are actively using your application, as all data will be lost in all existing records. So, think carefully when choosing a data type!
- Reference: This field is only relevant to certain types of columns which reference records on other tables. We'll go into reference field types in Chapter 4, Understanding Data and Relationships.
- Max length: You can probably guess at what this field governs. It's the maximum length (in characters) that the field will accept. The default value for this is
40for most column types,32for reference fields (since that's the length of a sys ID (a unique identifier of an individual record within the database),4,000for journal fields, and so on.- You can specify whatever length you like here, but keep in mind that the longer the field max length, the greater the overall performance impact when querying, saving, or deleting records in that table.
- Keep in mind that if the table that the field is on extends another table, then the parent table's performance can also be impacted! For this reason, it's best not to create too many additional fields on tables that extend task, since so many others already do; long fields in particular.
- Default value: Also fairly self-explanatory, this is the default value for the column, to be used before the user has selected one, or if a record is saved to the database with that particular field empty.
- Display: Each table can have only one display value. The display value is the single column which is displayed to represent a record as a whole. On the Incident table for example, the display value is the Number column, but some companies will change it to be Short description instead. On the Users table, you might want User ID, or Name to be the display value.
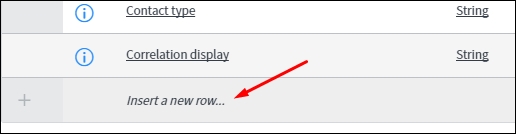
Now that we've got a table, let's go ahead and add some additional fields to our Virtual War Room table, within this list of table columns. To do that, we have two options.
Since List edit insert row (a property of this list of fields) is enabled, option 1 is that we can actually scroll to the bottom of the list and double-click in the bottom row, where it says Insert a new row..., and it'll let us insert a new table column record just by specifying a few values here:
Any values we leave out will just be set to their default values, or blank if they don't have a default value. The only down-side to this, is that it doesn't allow you to see and edit all of the fields that might be relevant when creating a new table column; only those which are shown in this list formatter.
However, we've also got option 2: simply clicking the New button at the top-left of the list formatter. This will take us to the new record form for this particular table (which happens to be the Dictionary table, as all table and column definitions are stored there). This form has built-in logic to (for the most part) show us only fields which are relevant to what we're trying to create.
For our first custom field, let's create one to hold a reference to a particular incident ticket, since Major incidents are the sorts of tickets that we want to have result in war rooms being created for triage and remediation:
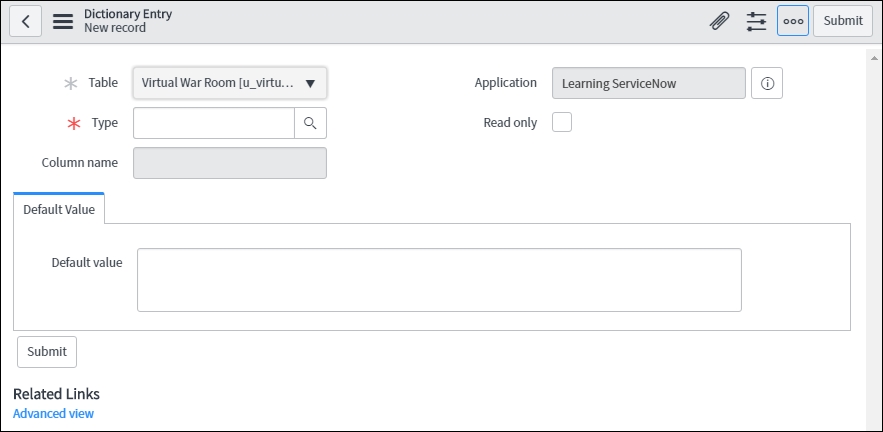
- If you haven't already, click on the blue New button at the top-left of the table columns list, on the
Virtual War Roomtable definition form. - Click on the magnifying glass on the right side of the Type field.
-
At the top-left of the Field Classes list window (next to the filter icon), click on the magnifying glass (
 ) again. Then, under the Label header, enter
 referenceand press Enter. The breadcrumb text next to the filter icon will update, and you should see one field type matching your query, called Reference.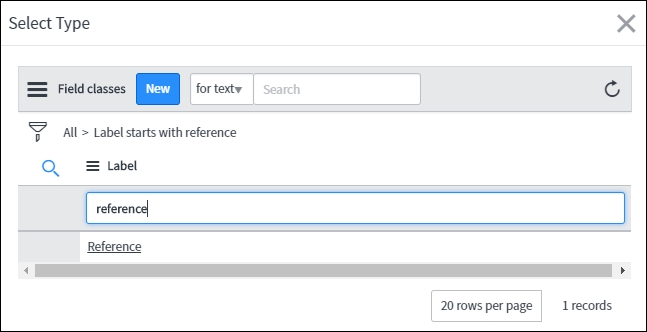
- Click on Reference in the field classes list window, and the Type field will be populated. In that field, you'll see the word
Reference. You'll also notice that several new fields have appeared, based on your selection. - In the Column label field, enter
Major incident. The column name should then auto-populate, and containu_major_incident. You could change it, but this time, let's leave it as-is. - The Max length field can remain blank, as it will automatically be set to its default value for the reference field type (32 characters) after we save. However, we do want to ensure that Virtual War Rooms are not created or worked on without being associated to a Major incident; so over on the right side of the form, tick the box marked Mandatory.
- In the Reference Specification form tab/section, there's a field called Reference. This is where you should enter the table in which the records you're referencing can be found. Since we're dealing with
Major incidentsin our Virtual War Room application, let's have this field reference the Incident [incident] table.- Rather than clicking the magnifying glass this time, try just typing
incidentinto the field. You'll notice a drop-down list appears after a brief moment. You must select the one from that drop-down that is just Incident. It'll have the label (Incident) on the left, and the table name (incident) on the right, not to be confused withincident_taskor anything else: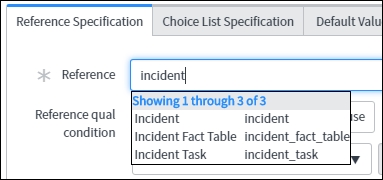
Tip
If the Reference field turns green, it means you didn't select a reference table from the drop-down, and ServiceNow will attempt to create a whole new table for you to reference. This is definitely not what we're looking for. If that happens, re-type
incidentin the Reference field, and make sure to select one of the options that appears below the field.
- Rather than clicking the magnifying glass this time, try just typing
Remember when we clicked on the magnifying glass to the right of the Type field? The window that popped up showed us records from a specific table. This is the table specified in the Reference field in that particular field's dictionary.
- Right-click on the header of the Dictionary Entry form, and click Save. This will submit the record to the database, without returning you to the previous page, so you can continue to work on the record.
Note
Before I save a record, I usually glance up at the top-right of my screen, to make sure that I'm still in the correct update set. However, if you tend to work in multiple windows or tabs, it's easy to change your update set in one tab, but not have it reflect in the other tabs. Since which update set your work is stored in, is determined server-side, you may need to be proactive about ensuring you're still in the right set. To check if you're really in the update set that shows in your banner frame, click on the System Settings gear menu at the top-right, and go to the Developer tab. Click on the far-right refresh icon next to the Update Set picker drop-down, and check to make sure that the selected update set doesn't change after 1 - 5 seconds.
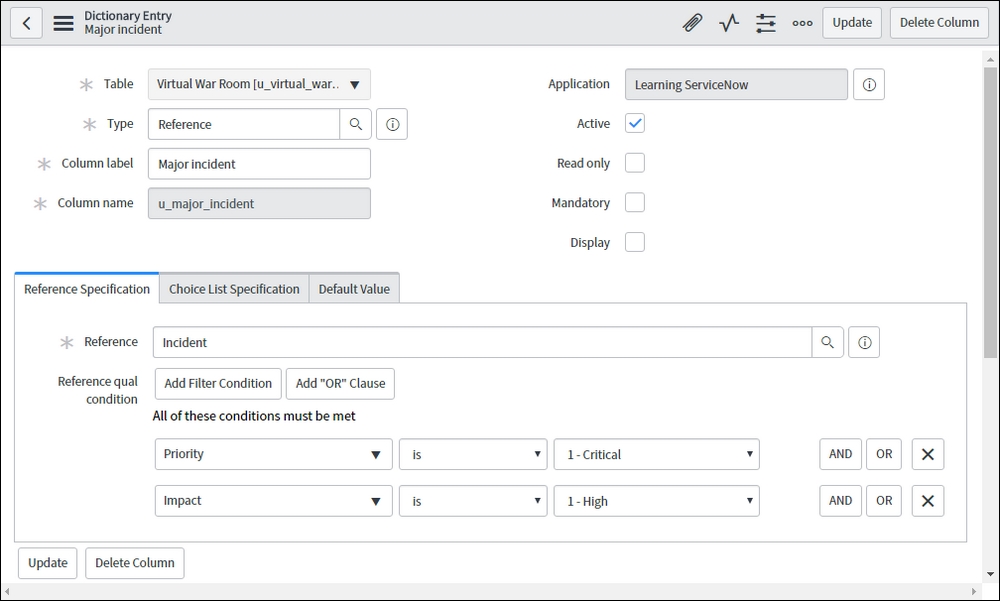
As you may recall, this Virtual War Room application is really meant for only Major incidents. Each company might have different criteria for exactly what constitutes a Major incident, but ITIL implies that generally incidents with the highest priority and the highest impact, are Major incidents.
We did make the Major incident field mandatory, but there's nothing currently preventing someone from creating a Virtual War Room and associating it with a low-priority incident. Luckily, ServiceNow gives us an easy way to filter the types of records that can be selected from a given Reference field, using a Reference qualifier, also known as a reference qualifier condition or simply refqual. This is a condition that is applied to the Reference field, so that only records which match that query can be selected from the relevant field.
In order to ensure that only incidents with the highest priority and impact are selectable, we simply add conditions using the condition builder below the Reference field in the Dictionary Entry form. The conditions should look something like this:

It's also usually a good idea to add a condition to only show active Incidents (Incidents where the Active field is true). Feel free to add that condition as well if you like, then right-click on the header of the content frame, and click Save again. After the frame reloads, it should look something like this:
To return to the table record and column list, you can click the left-facing back arrow at the top-left of the page. In the next section, we'll head over to our application to make sure the new field shows up in the default list view for everyone, as its value is a pretty important bit of information!
In the application navigator filter text box, type Virtual War Room, and you'll see the Virtual War Room application header, as well as the Virtual War Rooms module (automatically pluralized based on our table label). Click on that module, and you should see the Virtual War Rooms list view.
The columns displayed in the list view of a given table, such as the request item (sc_req_item) table, can be either personalized (modified just for you) or configured (modified for all users). You can choose to display any field within a given table in the list view, or even derived fields (fields with data from related records).
If you don't see the Major incident column in the Virtual War Room list view, click on the hamburger menu at the top-left of the content frame, and click on List Layout. On the next page, find the Major Incident field in the list marked Available, and either double-click it, or select it and then click the right-arrow to move it over to the Selected box.

As a reminder, modify a list layout constitutes configuration, unless you select Personalize List Columns. This means that this change is captured in your selected update set.
Next, make sure you have that field selected and click the up-arrow on the right, until it's listed right after Short description.
While we're here, let's remove some superfluous columns as well. Get rid of the Task type and Priority columns by double-clicking them in the Selected box, so that they move back over to Available. Finally, click Save.
Congratulations, you've just created your first custom field on your first custom table in your first custom application in the application navigator. You're catching on quick!
If we wanted to modify the list layout just for us instead of for everyone, we could have clicked the hamburger menu at the top of the content frame, and click Personalize List Columns.
Tip
Users who have personalized the columns that show up in a list, or the order they show up in, will not see the changes made to a list using the above steps, even though the steps should modify the view for everyone! This is because user preferences frequently override system configuration.
In order to see the configured list view, users who have personalized their list layouts will need to click the hamburger menu, go to Personalize List Columns, and then click Reset Columns at the bottom-left of that dialog.
Another major component of lists is the ability to filter them using the condition builder (also sometimes called the query builder). The condition builder is one of the most powerful, and most useful tools in all of ServiceNow, and it can be found doing more than just filtering lists.
Condition builders can be included on forms as a field to store a condition value, and we've already seen how they can be used to filter the options that one can select from a Reference type field, while we were creating the Major incident field for our Virtual War Room application. Let's try out some examples of how the condition builder works. We'll use the incident table as an example, since it should contain a good amount of demo data in your instance, and it's got a lot of different types of fields.
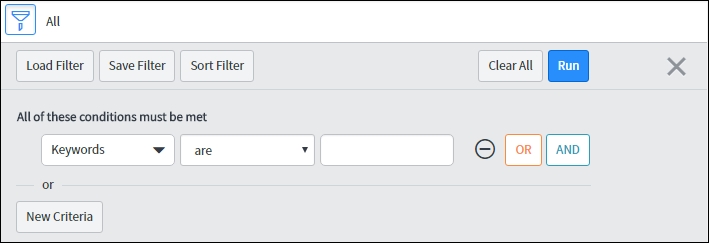
To get started, navigate to Incident | All from the application navigator. In the list that appears, click on the filter icon (![]() ) at the top-left. Let's walk through several example filters, and how to build them using the condition builder.
) at the top-left. Let's walk through several example filters, and how to build them using the condition builder.
For this example, let's build a query that will only show records like this:
Incidents assigned to me that are not closed or cancelled, sorted by when they were last updated (oldest first).
First, let's break this down into components:
- Assigned to is me (the current user, whoever it may be)
- State is not either Closed or Cancelled
- Sort by Updated (high-to-low)
You should be looking at two drop-down fields and one string input field, arranged in a row, like this:
Just like in math and programming, these three fields each represent a component of a condition criteria that looks something like <Field> <Operator> <Value>.
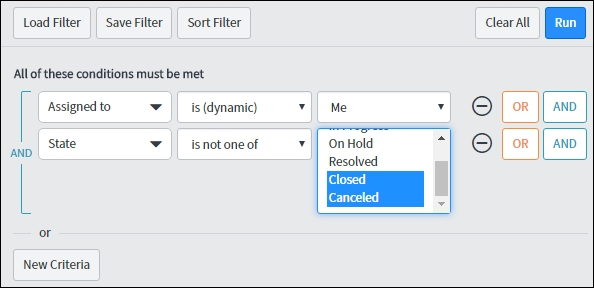
Click on the first drop-down on the left of the condition builder. In this drop-down, you'll see a list of fields on the Incident table. The first thing we want to do is filter based on to whom the incident is assigned, so type assigned to into the filter box at the top of the drop-down list, and then click on Assigned to.
The second field is the operator. This determines the type of comparison we're doing. In this case, we want records where the field is equal to a certain value, so for the operator, we might want to select is. However, if we try to enter a value into the value field on the right side of the condition, we'll see that it expects us to select a user from the Users table (since Assigned to is a Reference field that points to that table). We could select our own user account, but we want this filter to show tickets assigned to whichever user views it, so that won't work. We can't make a separate custom filter for each and every user!
Luckily, for this situation, we have dynamic operators. On Reference fields, we can select the operator is (dynamic) (as opposed to just is), which gives us some dynamic (scripted) options for the value. The first dynamic option in this case, is Me. This runs a script on the server, which replaces Me with whatever user is viewing the list.
Tip
These condition value fields accept JavaScript code, as long as it is preceded by javascript: If you were so inclined, or if you didn't have the is (dynamic) operator, you could use the GlideSystem API to get the sys_id of the current user for your query. You'd select is for the operator, and enter: javascript:gs.getUserID();.
So our first condition should look like this:

In order to add a second condition, we need to click the AND button. If we wanted to add a one or the other type of condition, we could use OR, but we want all of these conditions to match, in order for a record to show up based on this filter.
After clicking AND, a new query condition line will appear. For the first part of this query line, select State from the drop-down. For the operator, choose is not one of. Finally, for the value(s), hold Ctrl, and select both Closed, and Canceled. Your condition builder should now look pretty similar to this:
Finally, click on Run to filter the list of incidents. After running the filter, we then need to sort the list. There are a few ways to sort a list:
- If the field you'd like to use to sort is displayed on the list view, you can simply click on that field header to sort by a to z (low to high). Clicking again sorts in the opposite direction. The down-sides to this method are that you can only sort on columns which display in your list view, and you can't do multi-level sorting.
- You can also click the hamburger menu next to a column header, and choose a direction to sort.
- Alternately, after your query is in place, you can open the condition builder and click on Add Sort or, in List v2, Sort Filter). In the section that displays, you can select one, or even multiple levels of sorting. For example, you could sort just by when the incident was updated, or you could sort by who the caller is, and sub-sort by how long ago the last update was.
For our purposes, we'll just need to sort by one field, and that field happens to be in our default list view. To sort the incident table by when each ticket was last updated, we just have to click on the Updated column header once. That will sort it from low to high. Dates further in the past are considered lower than more recent ones, which are lower still than dates in the future.
Note that although you cannot do multi-level sorting just by clicking on the column headers, you can do something similar by grouping records together based on certain values. For example, if you wanted to see the results of the query we just built using the condition builder, Grouped By Priority, but still sorted, within those groups, by the Updated date, you could simply right-click on the Priority header, and choose Group By Priority.
The earlier lab walked you through creating a query in the condition builder using values stored on the records within the table you're viewing. This is extremely useful functionality, but what if we wanted to filter the list using a data point that is not on the incident itself, but is on one of the related records in a Reference field? For example, what if we wanted to show only incidents where the user in the Caller field is currently active (meaning that they haven't left the company or otherwise had their user account disabled).
In order to accomplish this, we'll need to make use of dot-walking. We'll explore more about dot-walking and how to do it via JavaScript later in this book, but let's have a look at how to do this in the condition builder.
In your existing Incident filter, click AND to add another condition. In the following list of fields, you'll see some fields with a little arrow inside a circle on the right:
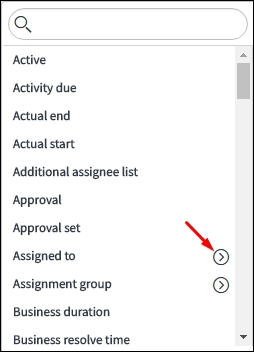
Tip
In List v2, in order to dot-walk, you need to first scroll to the bottom of the list of fields, and click Show Related Fields, then re-open the field drop-down, and select a Reference field from the list, that's followed by an arrow => and then a table name. When you re-open the drop-down list again, you'll see the fields from that table.
This arrow indicates a Reference field that can be dot-walked through. Find the Caller field in that list, and click the arrow to the right of it, and you'll see another list show up to the right. If this list also contains reference fields, you can continue dot-walking through them as well, up to several layers. If possible, it's recommended not to go beyond 3 layers of dot-walking, for performance reasons. For heavily utilized queries, it may even be a good idea to avoid dot-walking more than 1 or 2 layers.