Throughout this book, I've used the MOVE block for control of the motors. I use it in just about every robot I've ever designed, but if you've been paying attention to the NXT-G software as you've worked through the book's exercises, you may have noticed a block that I've yet to cover—the MOTOR block. You'll also look at the RESET MOTOR block, which you might find handy for diagnosing and correcting movement problems.
Figure 24-1 shows the MOTOR block. It works almost exactly like the MOVE block, with but a few exceptions. First, the MOTOR block can only be used to control a single motor; you cannot use it to control two or more motors, so you'll have to drop in two (or more) MOTOR blocks if you wish to have precise control over two or more motors.

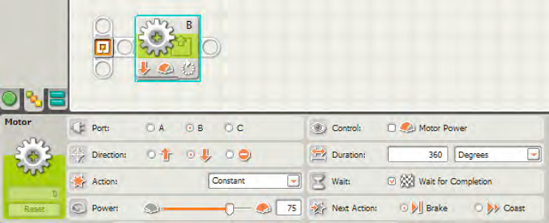
You can use the MOTOR block just like a MOVE block to control the Direction, Power, Duration, and Next Action sections, but the Action, Control, and Wait sections work a little differently. If you leave the Duration set to Unlimited, the Action and Wait sections will be grayed out and unavailable. Only when you configure the MOTOR block to allow for precise control of the Duration (rotations, degrees, or time) will you have access to the Action and Wait sections. Figure 24-2 shows that I've elected to control Port B (Motor B) and wish to configure that motor using degrees for the Duration.
In the Action section, you now have three options from the pull-down menu, as seen in Figure 24-3. These include Ramp Up, Ramp Down, and Constant.

If you choose Ramp Up and execute the program, you'll find that Motor B will increase its rotation speed at a constant rate until it reaches its maximum value for Power (75 in this example). Ramp Down will instruct the motor to reduce its current Power value to zero at a constant rate. In effect, you'll see the robot speed up or slow down at a fixed rate. This is helpful if you're finding your robot jumping and possibly changing its direction due to the sudden acceleration experienced when the motors kick in.
The Constant option in the Action drop-down menu does the exact opposite as Ramp Up or Ramp Down. If you configure a motor's Action section to Constant, the motor will attempt to reach the set Power immediately when the block is executed. This is great if you wish to give your robot an immediate boost of speed, but as I mentioned earlier you may find that your robot may lose some accuracy when it comes to moving in a specific direction. The sudden jump of the motors to maximum speed can often cause the robot to move off course due to slippage of the wheel(s) on a slick surface or a resistance to spin on a difficult surface such as sand or grass, for example.
How might you reduce the chance of this happening? Simple! Place a check in the Control section box labeled Motor Power. This will force the motor to attempt to compensate for slippage or resistance and force all motors to spin at the speed and keep the same velocity.
Finally, if you leave the box labeled Wait for Completion checked, no NXT-G blocks placed after the MOTOR block will execute until the MOTOR block has completed its programmed movement. If, for example, you program motor B to rotate 720 degrees and leave this box checked, only after the motor has completed two rotations will the block placed after it execute. This works similar to the SOUND block; if you wish to allow your program to continue running while the motors are rotating, uncheck this box.
The RESET MOTOR block is shown in Figure 24-4 along with its configuration panel. It does just one thing—reset a motor's internal record-keeping (for how many rotations a motor has made), and that one thing is something you may rarely (or never) use. I have actually never found a strong use for it, but who knows? This may very well be the one block that you've been looking for to make your new robot function properly.

One of the first things you might notice about this block is that its configuration panel is extremely simple. You simply check the ports for the motors (A, B, and/or C) on which you wish to use the RESET MOTOR block. Why would you want to do this? I'll explain.
One of the great things about the NXT servo motors is the ability to pair them, so your robots can move in a more accurate straight line. The Brick sends the proper signal to motors B and C (I'm assuming you're using B and C for your movement control) and ensures that they spin at the same rate. By doing this, your robot is able to travel in fairly accurate straight lines. Imagine if one motor was spinning a little faster or farther than the other—your robot would end up moving in a not-so-straight line. Also, by pairing the motors, you can ensure that both motors are spinning with the same duration, such as 300 degrees or 2.5 rotations. This behavior is one of the advantages of the NXT motors.
Take a look at the following pseudo-code:
Me: SPOT, move forward 360 degrees and wait 3 seconds.
Me: Now, move forward 270 degrees and wait 3 seconds.
Me: Now, move forward 90 degrees and stop.
The NXT-G program for this pseudo-code looks like the one shown in Figure 24-5.

In the program, I've added three MOVE blocks and a couple of WAIT blocks. The first MOVE block moves SPOT forward 360 degrees, and then SPOT waits for 3 seconds. The second MOVE block moves him forward 270 degrees, and then he waits for 3 more seconds. Finally, the third MOVE block moves him forward 90 degrees, and he stops. In all, SPOT has moved forward 720 degrees, or 2 rotations, for motors B and C. Now, I also configured the first two MOVE blocks to Coast in the Next Action section and the third MOVE block to Brake. I did this because I want to demonstrate a little trick that your NXT Brick and its motors perform.
Let's say that after SPOT's first MOVE block executes, SPOT actually rolls forward 380 degrees with the slight coast. On SPOT's second movement, he rolls forward 278 degrees with the coast. Now, if SPOT's final movement forward is 97 degrees, he will have moved a total of 755 degrees, not the expected 720 degrees. But if you upload this program to SPOT and run it, you'll find that SPOT will actually move forward 720 degrees, or 2 rotations. How?
The Brick and motors keep track of the distance SPOT coasts (by continuing to monitor the number of rotations the wheels make during the coasting) and reduce the final movement of the third MOVE block (configured to Brake) to a value of 62 degrees, not 90 degrees. By reducing the final MOVE block to 62 degrees, SPOT is still able to move forward a total of 720 degrees with accuracy (if the final MOVE block was set to Coast instead of Brake, this accuracy could not be guaranteed). It is this "error correction" that the Brick and motors provide that allows your robot to make very precise movements.
What if you don't care about the preciseness of the moves and want to shut off the "error correction" activity of the Brick and motors? Well, that's where the RESET MOTOR block comes into the picture.
Take a look at Figure 24-6, and you'll see SPOT's original program slightly modified.

In this program, SPOT will perform the same actions, but after the first MOVE block has been executed, the RESET MOTOR block will perform its action. Recall that your Brick and motors are communicating and keeping track of the number of degrees that you've programmed SPOT to move. If the first MOVE block causes SPOT to move forward 380 degrees, the RESET MOTOR block simply clears that value (resets to 0), and it's as if SPOT never moved at all. The second MOVE block may move SPOT forward another 277 degrees, but the second RESET MOTOR block resets that value to 0, too. Finally, the third MOVE block moves SPOT forward 90 degrees and then brakes. All in all, SPOT has moved forward a total of 747 degrees, not 720. SPOT moved an additional 27 degrees, because the "error correction" built into the motors has been disabled by the RESET MOTOR blocks.
That's it for the MOTOR and RESET MOTOR blocks. If you decide that you're not concerned with your robot keeping track of its movement durations and prefer to use the Coast feature with your MOVE blocks (maybe to save battery power), then the RESET MOTOR block may be useful to you. For now though, here's an exercise:
Create a program that will spin a single motor a set number of degrees (using the MOTOR block) and then coast to a stop. Send to the LCD display the actual value that the wheel spins due to coasting.
Running this exercise will show how using the Coast feature effects the actual distance a robot will travel versus the programmed value. It gives you a chance to observe the coasting effect and see for yourself how the actual number of wheel rotations might not match up to the programmed value. If you need help, I've included a sample solution at the end of the chapter.
Up next, I'll go over the use of Bluetooth and the SEND MESSAGE and RECEIVE MESSAGE blocks, and you'll learn how to program your NXT robot to communicate with other NXT robots.
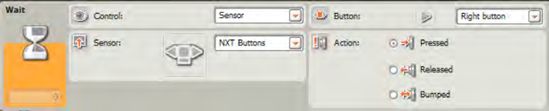
Figures 24-7 through 24-12 show the complete program and configuration panels for Exercise 24-1. Note that the MOTOR block has its Wait for Completion box checked and the Next Action section is set to Coast. After Motor B has completed its rotation, I've added a NXT BUTTON WAIT block that will wait for you to press the Left button. Don't press the Left button until motor B has completely stopped. This will allow the ROTATION SENSOR block to get an accurate reading of the total number of degrees that motor B spun. This value will be sent to the NUMBER TO TEXT block and then to the DISPLAY block so you can see that the actual number of degrees rotated will be greater than the programmed value (of 360). The final WAIT block will wait for you to press the Right button to end the program.