For a chapter dealing with words, this one won't be too wordy. See, it even has a short introduction. You're going to learn to use the TEXT block to give your robot the ability to combine text into sentences and letters into words.
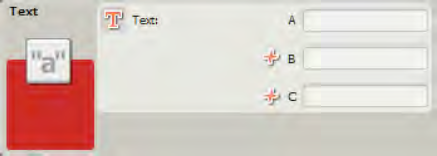
Mindstorms NXT robots can make a lot of noise using the SOUND block. However, if you want to give your robots control over the written word, you'll need to understand the TEXT block and how to use it properly (see Figure 19-1).
Here's another programming word for you to add to your list: string (and I don't mean the kind you use to fly a kite).
"String" is a term that's been around in programming circles forever and is fairly simple to define. A string is a collection of letters, numbers, spaces, special characters, or a combination of any of them. The following are five examples:
The reason I've introduced you to the concept of a string is that the TEXT block has the ability to take up to three different strings and merge them into one larger string value.
Look again at Figure 19-1. The TEXT block can hold three string values: A, B, and C. Notice that all three strings can be entered manually (by you, the programmer) using the configuration panel or they can be submitted to the TEXT block using the input data plugs. Also, keep in mind that the value A will always be on the far left, B in the middle, and C on the right. You cannot change the order in which the three strings will be combined.
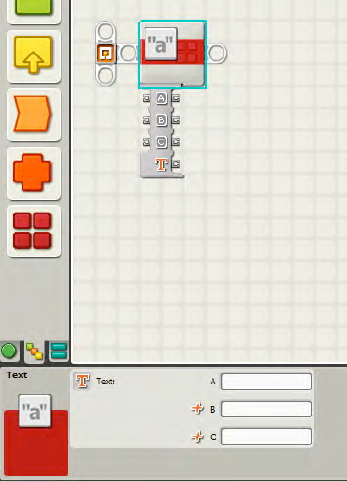
As an example, take a look at Figure 19-2.

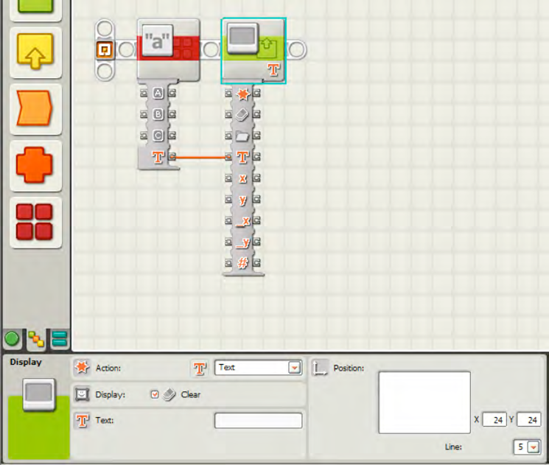
For value A, the text I entered is "I", with no spaces. Value B contains " am" (with a leading space), and value C is " SPOT" (with a leading space). The leading spaces will keep the combined text from looking like "IamSPOT"; instead, the combined text will look like "I am SPOT" when displayed on the screen. Once the text items are combined, how do you display the new string on the screen? You'll first add in a DISPLAY block to show the text on the screen (see Figure 19-3). Then, drag a wire from the output Text data plug (of the TEXT block) into the input Text data plug (on the DISPLAY block). The output Text data plug provides the combined text from A, B, and C.
Next, add a TIME WAIT block, so you can view the text before the program ends and the text disappears. You'll configure the WAIT block for 10 seconds (see Figure 19-4).

When you run the program, it now displays "I am SPOT" on the LCD screen. In Chapter 18, I showed you how to use the VARIABLE block. You could use this block to send text to the TEXT block using the input data plugs (A, B, and/or C). To do this, you would configure three VARIABLE blocks to each hold a bit of text. Drag a wire out of each VARIABLE block into ports A, B, and C and let the TEXT block do the rest!
Now for a short and easy exercise. Create a program that uses the TEXT block to combine three separate strings, each with a length of 10 characters. Use a combination of characters that when displayed on the LCD screen will make it easy for you to count the maximum number of characters that can be displayed on a single line.
The information from this exercise will be useful when it comes time to determine how much text can be squeezed on to a single line. I've included one possible solution at the end of the chapter.
Continue on to the next chapter where I'll show you how to program your robot with some basic math skills. Believe it or not, the more complicated your robot becomes, the more likely it is that it will need to perform some addition, subtraction, or possibly even multiplication and division. Your robot isn't smart enough to do the math itself, so it's going to require a special block that assists it with performing calculations.
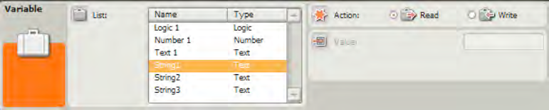
Figures 19-5 to 19-13 show the complete program and configuration panels for Exercise 19-1. Notice that I've configured the DISPLAY block to start displaying any text it receives at a position where X=1. This will place the first character in any string all the way to the left side of the LCD screen. I've also created three variables (String1, String2, and String 3). See Chapter 14 for instructions on creating a variable, one for each of the VARIABLE blocks.
The first three VARIABLE blocks have their Action setting set to Write so I can enter a string of text. The next three VARIABLE blocks (wired to the TEXT block) have their Action setting set to Read so the data stored inside can be read by the TEXT block. (Try wiring the TEXT block using the first three VARIABLE blocks—you'll see that a VARIABLE block set to Write cannot be used to provide that data via its output data plug.)