There's an old saying, "That's like comparing apples to oranges." What it means is that it's sometimes unfair to compare dissimilar objects. I said "sometimes," because at other times it's completely fair. Suppose I hand you one apple and one orange. Which one is heavier? Which one has a larger diameter? These aren't unfair questions, are they?
So sometimes you can compare apples to oranges! And when it comes to your robots, there's a way for your robots to compare things, too—not apples and oranges, but numbers.
Remember that we discussed the concept of Logic back in Chapter 8? True or False? (If you said False, you need to go back and read Chapter 8 again!)
Well, NXT-G comes with a programming block called the COMPARE block that relies on your understanding of Logic.
Suppose I ask you, "Is five greater than three?" Your answer would be, "Yes." When you program, the same question is given to a computer or robot in the form of a statement, "Five is greater than three." This statement, to your robot, is either True or False.
Similarly, if I ask you, "Is the Earth square-shaped?" you would answer, "No." A robot would not be asked this question, but instead told, "The Earth is square-shaped." And it would respond with False.
So, here's an important item to remember: robots respond to statements with True or False. And to do this, robots will rely on the COMPARE block.
Before I show you the COMPARE block, let's create a test program for SPOT using pseudo-code:
Me: SPOT, I want you to create two random numbers between one and nine (number A and number B), show them on the LCD screen, and tell me if A is greater than B.
To do this, we'll start by dropping two RANDOM blocks (see Chapter 14) on to the beam, as shown in Figure 15-1. I've configured both RANDOM blocks with identical settings, as shown in the configuration panel.

Next, I'll convert them to text using two NUMBER TO TEXT blocks (see Figure 15-2). Review Chapter 14 for information on the NUMBER TO TEXT block.
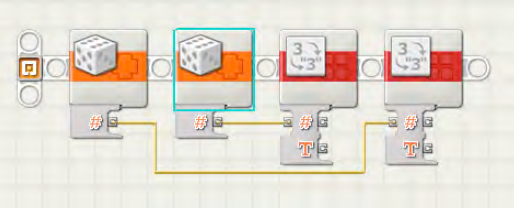
And before we get to the COMPARE block, I'll use a TEXT block to create a statement in the form of "A greater than B," as shown in Figure 15-3. The TEXT block will allow you to enter up to three bits of text in the A, B, and C text fields shown in Figure 15-3. You can also submit text to one of those three text fields using data wires as I've done with the NUMBER TO TEXT blocks (also shown in Figure 15-3).

As you can see from Figure 15-3, the first RANDOM block number is used as input in the second NUMBER TO TEXT block (the fourth block from the left). The second RANDOM block number is used as input in the first NUMBER TO TEXT block (the third block from the left).
For the TEXT block, I have taken the first number (now converted to text) and used it as input to the A data plug. Also, I have taken the second number (now converted to text) and used it as input to the C data plug. I enter the words "greater than" in the B text box. This will create a single sentence (also called a statement): A greater than C (where A and C will be numbers between one and nine).
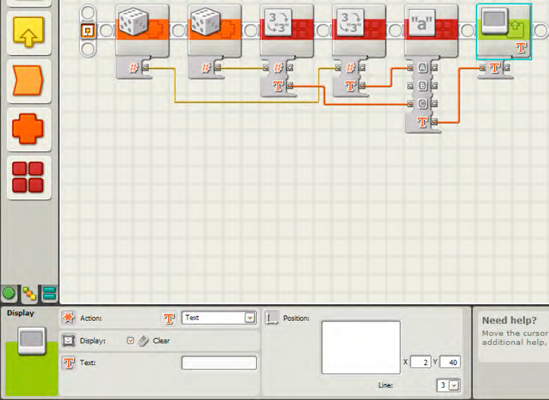
I now send the combined text to a DISPLAY block configured to display text on Line 3 with position X=2 and Y=40 (see Figure 15-4).
Now we're ready to see how the COMPARE block works. (Sorry it took so long to get here, but the COMPARE block by itself can't do anything—we need a good example with things to compare to see it in action.)
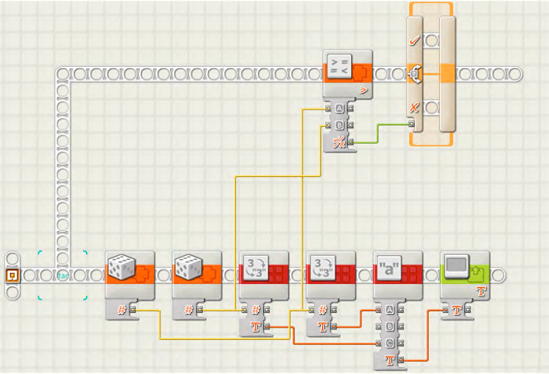
I'm going to break off a new beam to run in parallel. To do this, I hold down the Shift key and drag an extra beam, shown in Figure 15-5.

This parallel beam will let me compare value A to value B at the same time that the numbers are being converted to text. Remember, I want to check the statement "A greater than B" and determine if it is True or False, so not only do I want to put the statement on the screen, but I also need to determine whether A really is greater than B.
The first thing I need to do is drop the COMPARE block onto the new beam, as shown in Figure 15-6.

Notice in Figure 15-6 that the COMPARE block has two input data plugs. I'll take the original random numbers from the NUMBER TO TEXT blocks' output Number data plugs and drag data wires into the two COMPARE block input data plugs.
Note
Back in Chapter 14, I told you that the NUMBER TO TEXT block had an output Number data plug that could be used to keep the number in Number format and not Text format. You'll use this ability now to send these original random numbers into the COMPARE block.
Carefully drag a data wire out of the second NUMBER TO TEXT block (the fourth one from the left) and into value A's input data plug. Do the same for the first NUMBER TO TEXT block (the third from the left) but drag this wire into value B's input data plug. This configuration is shown in Figure 15-7.
Note
Sometimes NXT-G will try to fix your wiring to keep it from becoming a tangled mess. In Figure 15-7 you might notice that the wires coming out of the RANDOM blocks have been split. This happened automatically for me, even after I dragged the wire out of the NUMBER TO TEXT block. After I released my mouse button to complete the wire, NXT-G changed it so the RANDOM block wire split.

Now, click the COMPARE block to view its configuration panel (shown in Figure 15-8).

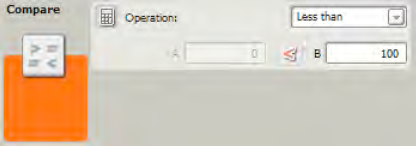
The COMPARE block's configuration panel has a drop-down menu in the Operation section. Click this drop-down, and you'll see three options: Less than, Greater than, and Equals.
If you choose the "Less than" option, the COMPARE block will evaluate the statement "A Less than B" and determine if it is True or False. If you choose the "Greater than" option, the COMPARE block will evaluate the statement "A Greater than B" and determine if it is True or False. And if you choose the "Equals" option, the statement "A Equals B" will be evaluated.
For my example, I chose the "Greater than" option, as shown in Figure 15-8. Now, my program will take the values for A and B and check to see if A is greater in value than B. The COMPARE block does this, and the answer will come from the output Result data plug. A logic data type (True or False) can then be accessed using the COMPARE block's Result data plug, which will supply a logical True or False data signal.
If we go back to the pseudo-code, we'll see that I wanted True or False to be displayed on the LCD screen along with the original statement "A greater than B." To do this, I'm going to use the SWITCH block I covered in Chapter 12.
There are a bunch of items I need to configure for this to work. I drop a SWITCH block after the COMPARE block, and in the Display section, leave the Flat view box checked (see Figure 15-9). In the Control section, I choose Value, and in the Type section, I choose Logic. I also drag a data wire out of the output Result data plug on the COMPARE block and connect it to the input data plug on the SWITCH block.
Next, I need to decide what will happen when the SWITCH block receives a True or a False signal from the COMPARE block. Let's start with the True path in the top portion of the SWITCH block, shown in Figure 15-9.
I want to send the word "True" to the LCD display if the statement is True, so I'll drop in a DISPLAY block that will contain the word "True." This is shown in Figure 15-10.
I also unchecked the Clear box so the statement "A greater than B" doesn't get cleared off the LCD screen. I also set the text to display at X=2 and Y=8 so the word "True" appears below the original statement "A greater than B."

Now I need to configure another DISPLAY block in the False portion of the SWITCH block. Figure 15-11 shows the new DISPLAY block.
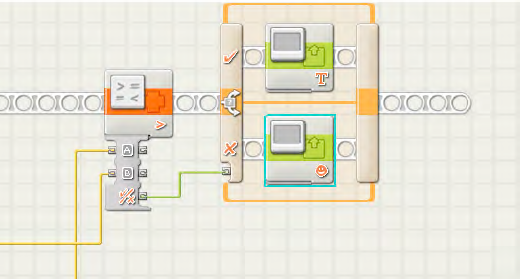
Figure 15-12 shows how I've configured the "False!" DISPLAY block—notice that I've configured it to display the text in the same location, with X=2 and Y=8, and that I've unchecked the Clear box.

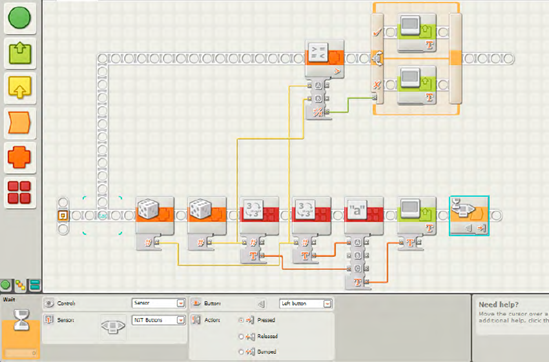
Finally, I drop in a NXT BUTTON WAIT block configured to wait for the left button to be pressed. This will give me time to view the results on the LCD screen (see Figure 15-13).
Let's walk through the program and see how it works. First, two RANDOM blocks generate two numbers, A and B. These numbers are converted to text (with the NUMBER TO TEXT blocks) and these "text numbers" are combined to create a text statement, "A greater than B," which is fed into a DISPLAY block.
After the random numbers are generated, these numbers are also fed into the COMPARE block, which takes the two numbers and looks to see if A is greater than B. If it is, the SWITCH statement executes the DISPLAY block on the True path and displays the word "True!" on the LCD screen. If A is not greater than B, the SWITCH statement executes the DISPLAY block on the False path and displays the word "False!" on the screen.
I encourage you to create this program and test it yourself. You'll gain a better understanding of using wires, and you can tinker with it. Play around with changing the condition to "Less than" or "Equals" and see how the results change.
Think you've got the COMPARE block figured out? Try out Exercise 15-1 before moving on to the next chapter. If you need help, I've placed one possible solution at the end of the chapter.
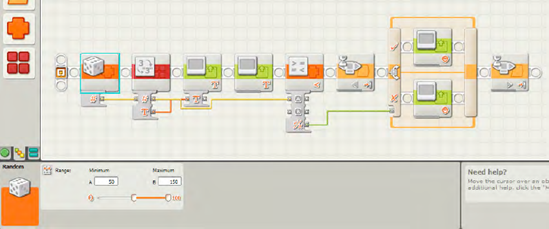
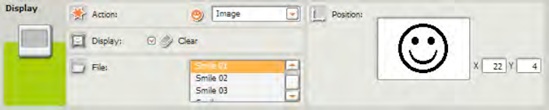
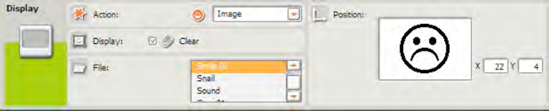
Write a program that generates a random number between 50 and 150. Display this number on the screen with the text "Less than 100?" After the user presses the left button, display a smiley face if the statement is true and a frowning face if the statement is false. Keep displaying the face until the user presses the right button. Then end the program.
When you are finished, continue on to the next chapter, where I'll introduce you to the RANGE block.
Figures 15-14 through 15-23 provide the full program and configuration panels for the solution to Exercise 15-1. Notice that I entered the value of 100 manually in the COMPARE block for the B value.