Sound can be used to give a bot more personality. Think about how boring R2-D2 would be without all the chirps and whistles. Well, you can give your bot plenty to say by using the SOUND block. Sound isn't limited to just giving your bots character, though. Sounds can be useful as a way to judge your bot's progress through a maze, for example, with the bot programmed to issue specific sounds when it makes a left or encounters a dead end. And if you find that the sound you need for your robot doesn't exist—well, users of NXT-G 2.0 will find a new feature that allows them to record and use custom sounds using the SOUND block! Read on for all the details on the SOUND block.
When you drop in the SOUND block on the beam, you are given access to the configuration panel shown in Figure 6-1.

The first section I want to cover is the Action section. You have two options: Sound File or Tone.
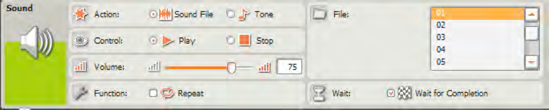
Select the Sound File option, and take a look at Figure 6-2. See the section called File? Clicking the Sound File option opens the File section; the File section contains a large collection of prerecorded sounds that your bot can play through the Brick's speaker. Click one of the sound files, and if your computer has speakers, you will hear the sound file play. There are over 100 unique sound files that you can select from the list.

Note
If you are using NXT-G 2.0, I'll show you later in the chapter how to use the built-in Sound Editor that allows you to modify existing sounds or create your own! If you follow the instructions carefully, any new sounds you add will appear in the File listing in Figure 6-2.
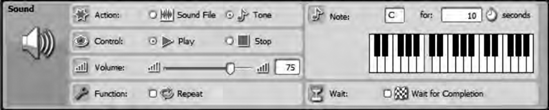
Now, select the other option, Tone. Notice that the File section changes to a section called Note (see Figure 6-3).

The Note section provides you with a few options. The easiest option is to simply click one of the piano keys. You will hear the tone played if your computer has speakers attached. Notice that when you click on a key, the note you click is displayed in the text box above the keys in the form of a letter: A, B, C, D, E, F, or G (with sharps for the black keys).
The other option available in the Note section is the ability to specify how long the note will play. Type a number in the text box for the number of seconds to play the note.
That covers the Action section; the remaining sections for the SOUND block (Control, Volume, Function, and Wait) are the same regardless of whether you choose the Sound File or Tone option. Now, let me explain each of these remaining sections.
The second section on the SOUND block is Control. This section has two options: Play and Stop (see Figure 6-4).
The Play option is simple. Select it, and any sound file or tone you selected in the Action section will play. Not too difficult, right?
The Stop option requires a little more explanation. To do this, I need to jump ahead to the Function section (see Figure 6-5).
The Function section has only one option: Repeat. If the box is checked, the Sound File or Tone will continue to play until your program ends, or until another SOUND block is reached with the Stop option selected in the Control section. If the box is unchecked, the sound file or tone will play only one time.
So, you can see that the Stop option is useful only when you have another SOUND block that is continually playing.
OK, now for the Volume section. You can see in Figure 6-6 that the Volume control can be changed either by using the slider or by typing a value (0 to 100) in the text box. You will have to experiment with the Volume control to determine what works best for your robots, but keep in mind that loud sounds will use up more battery power than sounds played at a lower volume.
The last section in the SOUND block is the Wait section (see Figure 6-7). When you have selected a sound file or tone to play and the Repeat box (in the Function section) is not checked, the Wait for Completion checkbox is available.
If you place a check in the Wait for Completion box, the Sound File or Tone you choose will play completely before any further programming blocks are executed. Let me give you an example using pseudo-code: SPOT, play me a C note for ten seconds and then move forward five rotations.
Now, here's how I will convert the pseudo-code into a NXT-G program. First, I drop in a SOUND block and configure it to play a C note for ten seconds (see Figure 6-8). I'm going to leave the Wait for Completion box unchecked and set the Volume to 75.
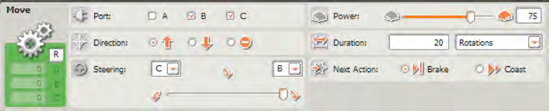
Next, I'm going to drop in a MOVE block (see Figure 6-9). I'll configure this MOVE block to spin motor B and motor C FORWARD for five rotations and then Brake. I'm also going to set Power at 50.

Next, I save the program, upload it to SPOT, and run it. Go ahead and create and run this same program on your bot. What happens?
Well, I pressed the Run button and the C note started to play. But before the C note stopped, motors B and C started spinning. What happened?
Go back to Figure 6-8, and notice that the Wait For Completion box is unchecked. This means that when the SOUND block starts playing, the program will continue to the MOVE block that spins the motors. But that's not what I wanted SPOT to do. Take a look again at the pseudo-code: SPOT, play a C note for ten seconds and then move forward five rotations.
I wanted SPOT to play the C note for ten seconds before moving forward. To do this, I simply need to go back to my SOUND block and check the Wait for Completion box. This will tell SPOT to wait until the SOUND block is finished (ten seconds) before continuing with the program. So, I make this change (see Figure 6-10) and run the program again.

This time, SPOT does exactly what I wanted him to do. He plays the C note for ten seconds, and when the SOUND block is finished, motors B and C spin, and SPOT moves forward five rotations. Perfect!
Now you can add sound files and tones to your robots to give them more personality. But before we finish this chapter, let me also tell you that sounds can be used when testing your robots. For example, in a complex program you can drop in a SOUND block to let you know when the robot has reached a certain portion of the program. Let's say you want to know when your robot has reached the part of a program where it has to decide between turning left and turning right. You could place a SOUND block directly in front of the MOVE blocks, and program a sound to play when turning left and a different sound for turning right. After you've tested and verified the program is working properly, you can remove the SOUND blocks and run the program normally. In this example, SOUND blocks give you an idea of where a robot's program is currently executing by giving you an audible alert, which is very useful for troubleshooting and testing.
NXT-G comes with over 100 pre-programmed sounds from which to select, but maybe you're wishing for a unique sound that's not in the list? If so, and you're running NXT-G 2.0, you are in luck! The newest version of NXT-G comes with a built-in tool called Sound Editor, which will allow you to create your own sounds for use with your robots—up to five seconds in length. Click on the Tools menu and select Sound Editor and the new tool will open, as shown in Figure 6-11.

You must connect an external microphone to your computer or laptop if it does not have one already built in. Press the Record button and begin recording your voice or other sound effect. Keep in mind that your final sound will be limited to five seconds, but you can record as long as you like; you'll be required to edit it down before saving the file. Press the Record button again to stop the recording process.
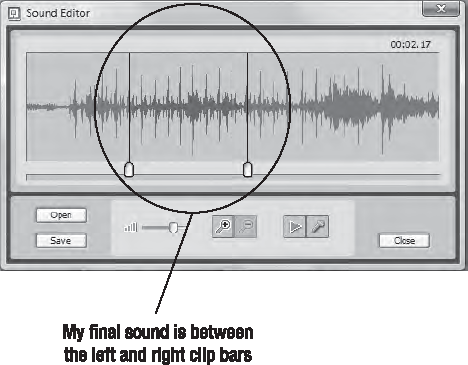
Figure 6-12 shows that I've recorded myself saying, "That looks dangerous!" I've recorded it over and over so I can find the one that sounds best. I can use the Play button to listen to my recording.

You next use the Left Clip and Right Clip bars indicated in Figure 6-13 to edit down your recorded sound to a five-second clip. If the sound wave between the two clip bars is red in color, the sound file is still too long. Continue to drag the left and right clip bars until the sound wave turns green.
Now all that's left is to save your sound file so you can use it. Click on the Save button and a window will appear, like the one in Figure 6-14. If you wish to use the sound with your robot, don't make any changes to the file's location; the default path provided will save the file and allow you to select it from within a SOUND block.

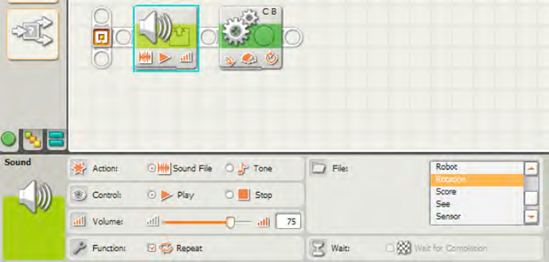
Give your sound a short but easy-to-remember name and click the Save button. I've named mine "Dangerous." Let's now see if I can use it. I've dragged a SOUND block into the program, shown in Figure 6-15, and selected the File option. As you can see in Figure 6-15, the sound Dangerous appears in the list.

There are a few more things you can do with the Sound Editor. You can click the Open button and open an existing sound file (either one of the pre-configured sounds or one of your own) and perform more editing on it by using the left and right clip bars to increase or decrease its length. You can use the Volume slider to pre-configure the volume of your new sound as well as use the Zoom-in (and Zoom-out) button to fine-tune your sound recording and minimize its length. Experiment with the buttons a bit and you'll see how easy the Sound Editor is to use.
Note
You should know that all sounds saved to your computer using the Sound Editor are stored as files with an .RSO file extension. This means you can go out on the Internet and search for sound effects saved in the .RSO format that other NXT owners have created and are sharing; if you find one you like, save it to your hard drive, open Sound Editor, click the Open button, browse to the location of the sound file, and use the controls to edit it as needed.
That's it for the SOUND block, but I want to leave you with a couple of easy exercises to give you some hands-on practice with this new block. You can find my solutions at the end of the chapter.
Write a program for your robot that will have it spin in circles at the same time that it plays one sound file over and over. Set a limit for the MOVE block so it will stop after 20 rotations and the program will end.
Now, before we investigate any new blocks, I want to go over the different ways your robots receive input—this includes motors, sensors, timers, and the buttons on the Brick. The rest of the blocks that we'll be covering later in the book will all depend, in some manner, on your understanding of how sensors, motors, and buttons are used to send and receive signals. A good understanding of Chapter 7 will help you to create some really powerful and interesting programs for your robots, so let's keep moving forward.
Following are a couple of possible solutions to the exercises. Remember, your solutions may not exactly match my own.
Figures 6-16 and 6-17 show the program and the two configuration panels used in my solution to Exercise 6-1. Notice that the SOUND file is set to loop so it plays over and over. Since the Wait for Completion box is disabled, after the SOUND file starts to play, the MOVE block will immediately start the robot spinning. After 15–20 rotations, the program will terminate.
Figures 6-18 through 6-23 show the program and the six configuration panels used in my solution. In all three SOUND blocks I have left the Wait for Completion box checked; this will keep a MOVE block from starting until after its matching SOUND block has executed.