
That's a strange title, isn't it? You can pick anything you like and make it the title. But that doesn't mean the material covered in this chapter will change. Nope, this chapter covers two special types of block called the VARIABLE block and the CONSTANT block. You'll find these blocks useful when you need to store a piece of information for later use. This is a lengthy chapter, so there won't be any exercises. But the information here is very valuable for giving your robots the ability to save information and use it later, so take it slow and really try to understand how and when to use both new block types. So let's take a look.
Let's imagine for just a moment that you want to give SPOT some information to remember. This information consists of some words, a few numbers, and a couple of logical True/False values. SPOT has the ability to place each piece of information in a virtual folder that exists in his memory. That information, however, will disappear when the program ends or the brick is turned off. Here's the pseudo-code:
Me: SPOT, will you please store the words "pizza" and "cheesecake" in your memory?
Me: SPOT, I also need you to store the numbers "50" and "200" in your memory.
Me: SPOT, will you also please store one logical "True" and one logical "False" in your memory?
Now, before we convert this pseudo-code to an NXT-G program, I need to tell you a little bit about how an NXT-G program stores information, changes it, and retrieves it. All of this can be done using the VARIABLE block or the CONSTANT block. I'm going to cover the VARIABLE block first because once you understand how it works, you'll also know how to use the CONSTANT block because it works in an almost identical manner (but with one big exception that I'll reveal later).
A VARIABLE block can be used to do one of two things:
Information can be written to a virtual folder that is stored in memory.
Information can be read from a virtual folder that is stored in memory.
These virtual folders are also known as variables. An NXT-G variable can be configured to hold only one of three types of data: Text, Number, or Logic (True or False).
Text is easy enough; my pseudo-code tells SPOT to store "pizza" and "cheesecake," but it could just as easily have told SPOT to store the letter "A" or the sentence "My name is SPOT."
Numbers are even easier: when an NXT-G 2.0 VARIABLE block is configured to hold a number, it can be only a positive or negative number. Examples include 5, −3.0, and 101.25. For NXT-G 1.0 software users, however, the VARIABLE block is limited to only positive and negative integer values, so numbers such as 4.5 or −10.2 will be rounded to the nearest integer (5 and −10 for my examples).
Logic values have only two choices: True or False. An NXT-G VARIABLE block configured to hold a logical value can hold only True or False and nothing else.
OK, now it's time to take a look at the VARIABLE block. This block is found on the Complete Palette on the Data fly-out menu. Select the VARIABLE block, and drop it on the beam (see Figure 18-1).
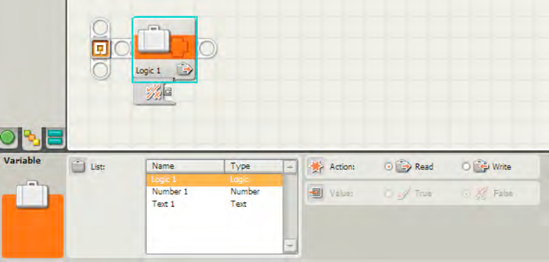
I mentioned to you that information can be read from or written to a VARIABLE block. In Figure 18-1, you'll notice that, by default, the first time you drop a block on the beam it is configured to Read (in the Action section) a Logic Type value. The variable also has a Name assigned to it: Logic 1.
This means that if True or False is stored in the variable, this value can be read from the variable. Notice that the Value section is grayed out; it isn't available for you to edit. Also notice that the default value selected in the Value section is False.
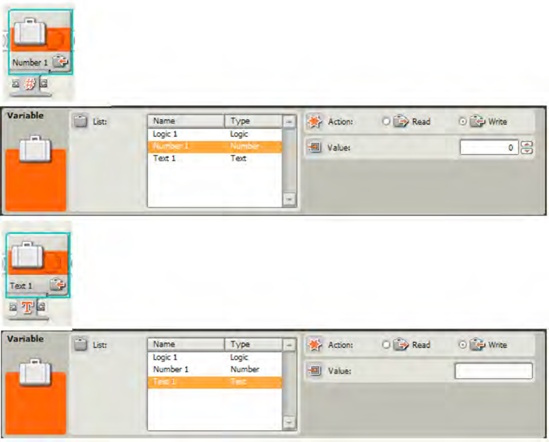
Before I show you how to change this, select the variable named Number 1 in the VARIABLE block's configuration panel (see Figure 18-2).

If you choose Number 1 as the variable name, you'll see that the default value stored is zero (0). This number is the value that will be read from the variable named Number 1.
Next, choose Text 1 in the VARIABLE block's configuration panel (see Figure 18-3).

If you choose Text 1 as the variable name, the default value stored is blank; there is no text stored in the Text 1 variable.
In Figures 18-1, 18-2, and 18-3, notice also that the each of the blocks has only one output data plug. This matches what we know about a VARIABLE block with the Action section configured to Read. The variables can only be read from; other blocks (a DISPLAY block, for example) would use a data wire from this output data plug as input. This is "reading from" the variable.
I want to make sure you understand this concept, so take a look at Figure 18-4, and I'll explain it further.

In Figure 18-4, I've connected a VARIABLE block called Logic 1 to a SWITCH block. The SWITCH block's configuration panel is visible in Figure 18-4, and you can see that I've configured it to check for a Logic value in the Type section. When the program is executed, the SWITCH block will read the value from the VARIABLE block. If the value is True, the SWITCH block will execute the SOUND block I've dropped in the True tab. If the value is False, the SWITCH block will execute a MOVE block that I dropped in the False tab.
Now, that example involved reading the data directly from the VARIABLE block. What if I want to put some data in? Then I'd have to write some data into the block. Here is how you do it.
Take a look at Figure 18-5. In this figure, I've selected Write in the Action section.

In Figure 18-5, I can change the logic value. Remember that the default is False, so I've changed it to True. Did you also notice the input data plug that was added on the data hub? This means that I could actually have the True or False value determined by a data wire from another block. (In this example, the data wire must carry a logic value of True or False; anything else would give me a broken wire that wouldn't work. Likewise, if the List section has Number or Text selected, the input data wire must be providing a data type of the selected item.)
Figure 18-6 shows the configuration panels for the Number 1 and Text 1 blocks. I'm including them, because I want you to see how you can modify the data when the Action option is set to Write. For the Number 1 variable, you can type either a positive or a negative value in the Value field. For the Text 1 variable, you can type words, sentences, or even entire paragraphs in the Value field.
After you've modified the data in a variable block, you can either close the variable by selecting Read in the Action menu (this prevents the data from being changed) or leave the block alone. If you choose to leave the Action section option as Write, you can drag a data wire from another block to the input data plug on the variable block (just remember that the type of data wire going into the input data plug must match the type of data the variable is configured to hold—Text, Number, or Logic).
Now, let's go back to the original pseudo-code I gave SPOT:
Do you see a problem? I've got two pieces of text to store and two number values. I already know that a variable block can hold only one piece of data. If I store the number 50, for example, in the Number 1 variable, where will I store the number 200? And I can store "pizza" in the Text 1 variable, but what about "cheesecake?"
The answer is simple. NXT-G allows you to create as many variables as you need. You can even rename a variable from something like Text 1 to something easier to remember like "Food," or Number 1 to something like "Test Scores." Here's how it's done.
If you need to create another variable, start by clicking the Edit menu at the top of the NXT-G software. Click the menu option labeled Define Variables.
A small window, like the one shown in Figure 18-7, opens.

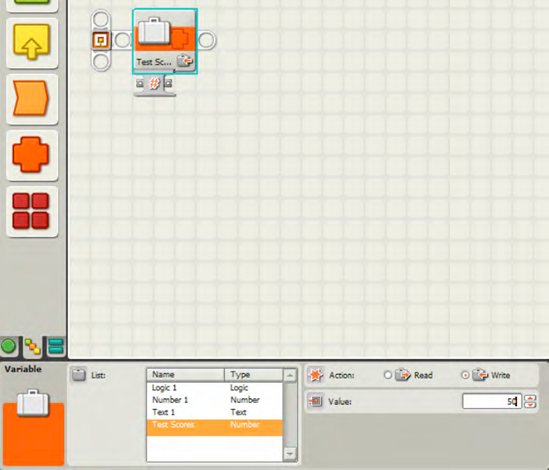
Click the Create button, and a new variable will appear in the List section with a default name like MyVariable_1 (see Figure 18-8).

You can change the name of the variable by typing a new name in the Name field. Select the type of data the variable will contain in the drop-down menu in the Datatype section. I've named my new variable Test Scores and configured it to hold a Number (see Figure 18-9). You can click the Create button again to make another variable. Click the Close button when you are finished.

Now, when you drop a VARIABLE block on the beam, you'll notice that your new variable appears as a selection in the List section (see Figure 18-10). Using this method, you can create as many Text, Number, and Logic variables as you need.
OK, now you know how to put data into a variable (Write) and how to get data from a variable (Read). You also know how to create additional variables. Now you need to learn how to use variables throughout your programs.
Here's a bit of pseudo-code for SPOT:
Me: SPOT, count from one to three and then check whether your Left button is pressed. If it is pressed, send a True logic value to a
VARIABLEblock titled Pressed. If it is not pressed, send a False logic value to theVARIABLEblock.Me: Next, count down from three to one. When finished counting down, display on the LCD screen "Pressed" or "Not Pressed" depending on the True/False logic value read from the
VARIABLEblock.Me: End the program after your right button is pressed.
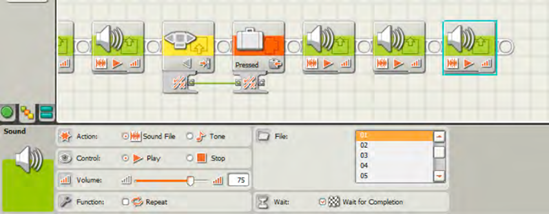
I'll first start off by dropping three SOUND blocks configured to count up from one to three. All three SOUND blocks are shown in Figure 18-11 along with the last block's configuration panel.

I'll next drop in an NXT BUTTONS SENSOR block and configure it to detect the press of the Left button (see Figure 18-12).

I created a new VARIABLE block called "Pressed" that holds a Logic value. I next drop a VARIABLE block after the NXT BUTTONS SENSOR block. I choose my new variable, Pressed, and in the Action section, I choose Write. I also drag a data wire out of the NXT BUTTONS SENSOR block's output data plug into the input data plug on the VARIABLE block (see Figure 18-13).
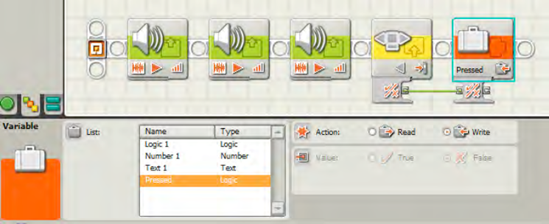
If the Left button is pressed immediately after the count-up from one to three, the NXT BUTTONS SENSOR block will detect the press and change the logic value to True. When the program starts, the initial value will be False, but it will change to True if the Left button is bumped at the end of the count-up.
Next, I want SPOT to count down from three to one. I'll drop another three SOUND blocks into the program. Figure 18-14 shows these three SOUND blocks and the configuration panel for the last SOUND block.
After the countdown ends, we need to display "Pressed" or "Not Pressed" on the LCD screen. To do this, we'll drop in another VARIABLE block. This time I'm going to choose my Pressed variable again, but I'm changing its Action section option to Read (see Figure 18-15).
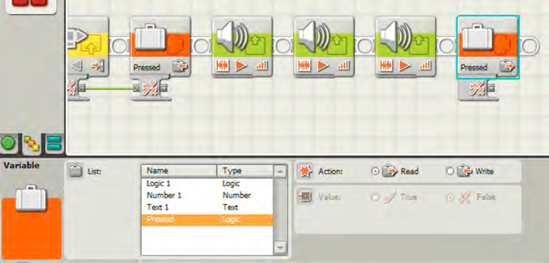
Now, I drop in a SWITCH block and configure it to read a Logic value (see Figure 18-16), and I've turned off Flat view so the SWITCH block is visible in its tabbed format. I've also dragged a data wire from the VARIABLE block to the SWITCH block that contains the value True or False. I've also dropped a DISPLAY block in the True tab (of the SWITCH block) and configured it to display "Pressed" (this isn't shown in the configuration panel in Figure 18-16, but it is easy enough to figure out).

On the False tab, I place another DISPLAY block that clears the LCD screen and puts the words "Not Pressed" on the screen (see Figure 18-17).

Finally, I drop in an NXT BUTTON WAIT block to wait until the Right button is pressed; this will give me time to view the results on the screen (see Figure 18-18).

Now run the program. Try it a few times—press the Left button immediately after the count-up ends, or don't press it. Your decision to press or not press the button will be converted to a True or False value that is written to the Pressed variable. After the countdown, the Pressed variable is read by the SWITCH block, and the proper text is written on the LCD screen.
Variables are a powerful way for your robot to store away information—and to use that data later. Once the variable has been created and data written to it, that data will be available anytime you need it—well, at least until the program ends. If you want to store data for use after the program ends and/or after the power has been turned off, you'll need a different type of block. And that's where the CONSTANT block becomes useful.
When you use the VARIABLE block in a program, any variable value (Number, Text, or Logic) will be saved only while the program is running. Once the program ends, your variable data is gone. Normally this isn't a big deal; you typically program your robots to use variables that are useful only at the time the program is running.
But what if there's a value that often changes but is used by multiple programs uploaded to your robot? For example, let's imagine a program (Program 1) that stops the robot 12 inches from a FINISH LINE and has the robot do a little dance before finishing. Let's say that the initial distance between the STARTING LINE and the FINISH LINE is 24 rotations. Program 1 could instruct the robot with a MOVE block to roll 20 rotations (four rotations short of the FINISH LINE) to stop just before it crosses the FINISH LINE and do a little dance before finishing.
Let's also imagine another program (Program 2) that should have the robot roll half the distance between the STARTING LINE and FINISH LINE before doing its dance; you'd program it with a MOVE block configured to roll the robot forwards 12 rotations. When the robot reaches this point, it stops, does a dance, and then continues to the finish line.
Finally, let's have a third program (Program 3) that rolls the robot forward 1/4 of the total distance or six rotations, has the robot do a little dance, and then continues rolling it to the FINISH LINE. Once again, you could just configure the MOVE block to roll forward six rotations before beginning the dance routine.
You should be able to program these three programs easily. But what happens if I change the distance between the STARTING LINE and FINISH LINE to 48 rotations? Now you have to go into all three programs (Program 1, Program 2, and Program 3) and change a bunch of MOVE blocks' configuration panels.
There should be an easier way to save important values between programs... and there is! It's called the CONSTANT block.
Like the VARIABLE block, the CONSTANT block can store a single value—a number, a logic value, or a string of text. This value is then stored on the NXT brick and is referred to as a "global constant." As long as you don't delete the program, this value will stay on the brick even when the power is turned off! Because it stays on the brick, you can use the CONSTANT block in other programs to read the value stored as a constant on the brick. That's the "global" part—it's available everywhere (well, at least by any program that's stored on your brick).
To show you how it works, I'm going to create new program (with the name Distance) that creates a constant called "StartToFinish" that holds a value equal to the distance (in inches) between the STARTING LINE and the FINISH LINE. Figure 18-19 shows the single block contained in this program.

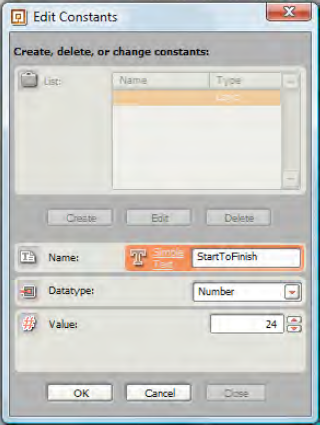
Before I use this CONSTANT block I need to create a constant that will hold the distance (in inches) between the STARTING LINE and FINISH LINE. To do this I click on the Edit menu and select the Define Constants option. A window appears, as shown in Figure 18-20.

Now I need to provide a name and data type for the constant. I click the Create button (see Figure 18-20) and enter "StartToFinish" for the Name, and I select Number from the Data Type drop-down menu and enter a value (24 for this example) in the Value section, as shown in Figure 18-21.
Click the OK button and then click the Close button to close the Edit Constants window.
Now, click on the single CONSTANT block in your program (see Figure 18-19) and select the "Choose From List" option in its configuration panel. The new constant, StartToFinish, is listed in the right column of the configuration panel. Click on it to select it. Save the program (name it "Distance") and upload it to the brick.
Now it's time to create Program 1 that will use the value stored in the constant StartToFinish. I'll create a new program called Program1 and drop in a CONSTANT block, as shown in Figure 18-22.

Notice in Figure 18-22 that I can define a new constant by simply entering the name of the constant in the Name section and selecting the Data Type from the drop-down menu (rather than selecting Define Constants from the Edit menu). But because I've already configured a constant named "StartToFinish" and uploaded it to my brick I want to select the "Choose from list" option shown in Figure 18-22. When I select that option, a list of available constants is displayed on the right side of the configuration panel, as shown in Figure 18-23.

If you'll remember, the function of Program 1 was to have your robot roll forward the total distance minus four rotations before doing a dance. Before we knew about the CONSTANT block, we would simply have dropped in a MOVE block and configured it to roll the robot forward for 20 rotations.
But now, we can use the CONSTANT block (that's holding a value of 24) with a MATH block to do a little calculation. I'll cover the MATH block in more detail in Chapter 20, but for now just know that the MATH block can be used to add, subtract, multiply, and more. Figure 18-24 shows that I'll be using it to take the CONSTANT block's value (24) and subtract four from it. I first drag a data wire out of the CONSTANT block and into the input plug A for the MATH block. I've also used the MATH block's configuration panel to set the value of B to four and configured the Operation to perform a Subtraction operation. B will be subtracted from A and that value will be supplied to a MOVE block.

Next, I drop in a MOVE block configured for Rotations and drag a data wire out of the MATH block and into the MOVE block's Duration data plug. This is shown in Figure 18-25.

Now all that's left is to drop in a few MOVE blocks to get the robot to dance and then roll forward four rotations to the FINISH LINE. (I'll leave that up to you to program—make it as simple or as complex a dance as you like.)
With Program 2, you'll create a similar program but you can use the MATH block to divide the value provided by the CONSTANT block by two (divide it in half) and send that value to the MOVE block. Program 3 will use a MATH block to divide the CONSTANT block value by four and send that value to the MOVE block (1/4 the total distance).
So, why not simply use a bunch of MOVE blocks instead of the CONSTANT and MATH blocks? Think about this—what happens now when I change the total distance between the STARTING LINE and FINISH LINE to 48? Or 100? With MOVE blocks, you'll need to open up all three programs (Program 1, 2, and 3) and change the values in the specific MOVE blocks.
But not with CONSTANT blocks. Now, all I need to do is open up the original program titled "Distance" and change the value (24) to the new distance. I save the program, upload it to my brick, and run the program. Now the constant value has been changed, and Programs 1, 2, and 3 do not have to be opened and modified. They will each take the current value stored in the constant StartToFinish and use it to calculate the proper distance to move. Cool, huh?
Deciding when to use a VARIABLE block vs. when to use a CONSTANT block shouldn't be confusing. Here are a few suggestions to help you determine when to use one over the other:
Use a
VARIABLEblock to hold a value needed only in a single program.Use a
CONSTANTblock to provide a fixed value to multiple programs stored on your brick.Use a
VARIABLEblock if you need a value to be changed while running a single program.Use a
CONSTANTblock to provide a value that will not change while running multiple programs.
Keep in mind that the CONSTANT block can provide text as well as logic data values. You could easily program a CONSTANT block to hold your name (text) and provide that on the LCD screen for every program you run. When someone runs a program, it could display "Program by YOUR NAME" where YOUR NAME is provided by a CONSTANT block stored on the brick.
Likewise, a CONSTANT block could hold a True logic value that you'll always use with a COMPARE block (refer back to Chapter 15). When performing an AND operation with this CONSTANT value, only a second True logic type will produce a True output from the COMPARE block.
Variables and constants are important concepts to understand when it comes to programming your robots. If you wish to build and program more complex robots, you'll need to understand the VARIABLE and CONSTANT blocks and how best to use them to give your robots better decision-making abilities.
In the next chapter, I'll show you how to use the TEXT block. It's a handy way to provide information on the LCD screen, including instructions as well as results from tests your robot performs. The TEXT block allows for a bit of formatting and combining of text to give you some control over how text is displayed.