
When it comes to the Sound and Light sensors, you will find that the minimum and maximum values of these two sensors can change from environment to environment. If your robot, for example, is located in a well-lit room, the minimum value (darkest spot in the room) will be substantially different from the minimum value the sensor obtains in a poorly lit room.
Note
The NXT 2.0 robotics kit does not come with the Light or Sound sensors, but you may still find yourself using them one day, so it's worth knowing not only how to use these sensors with your 2.0 brick but also how to calibrate them.
This chapter will show you how to use the CALIBRATE block (and the Calibrate Sensor tool built into the 2.0 software), so you can trust the values your Sound and Light sensors are receiving. There's no exercise in this chapter, but I do encourage you to plug in a Sound and Light sensor to your brick and test the Calibrate Sensors Tool if you are an NXT-G 2.0 user.
The CALIBRATE block is available only for the Light sensor (both NXT and RIS versions) and the Sound sensor. Figure 23-1 shows the basic CALIBRATE block and its configuration panel.
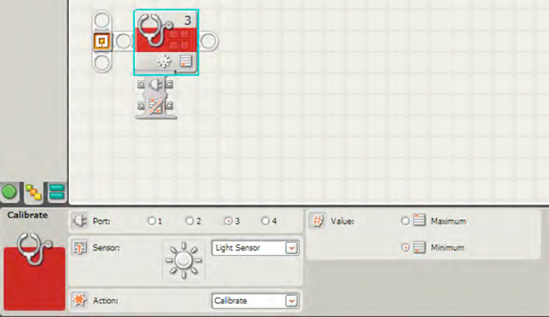
Using the drop-down menu in the Sensor section, you can choose Light sensor or Sound sensor. The Port section is simple enough; just select the port number where the sensor you wish to calibrate is plugged in.
The Action section has a drop-down menu with two options: Calibrate and Delete. Calibrate is the typical option you will select, but if you wish to reset the minimum or maximum values for a sensor, choose the Delete option to delete the current settings, and then use additional CALIBRATE blocks to obtain new values.
The Value section is where you will choose to calibrate or delete the minimum or maximum value. This is important to remember: one CALIBRATE block is required to calibrate (or delete) the minimum value and an additional CALIBRATE block is needed to calibrate (or delete) the maximum value. However, if you choose to use only one CALIBRATE block, the good news is that calibrating one value (the minimum value, for example) will automatically calibrate the other value. To be safe, though, it's probably best to always use one CALIBRATE block for the minimum value and another for the maximum value.
There is one additional feature of the CALIBRATE block you need to know about, and it relates to multiple Sound or Light sensors. If you are using two or more of the same type of sensor, the minimum and maximum values obtained from two CALIBRATE blocks will apply to all sensors of that type. There is no need, for example, to have six CALIBRATE blocks for three Sound sensors—one block can be used to set the minimum values for all three Sound sensors and another block to set the maximum values.
And how do you actually calibrate your robot's sensors to the environment where it will be performing actions? The answer is simple, and I'll give you examples for both the Sound sensor and the Light sensor.
Let's look at the Light sensor first. If you've built a robot with a Light sensor (or multiple Light sensors) and you want to calibrate them to the current surroundings, the first thing you need to do is place two CALIBRATE blocks inside your program, preferably at the beginning of the program. The help documentation included with your NXT kit has a great suggestion, and I'm going to use it here with a sample of the NXT-G program code.
Take a look at Figure 23-2.
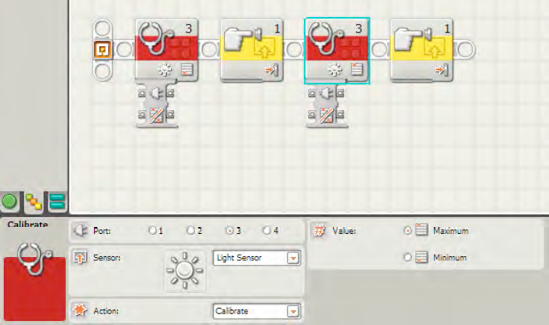
In this example, I've placed two CALIBRATE blocks. The first one is set to calibrate the minimum value for the Light sensor. The second block is set to calibrate the maximum value for the Light sensor. After the first CALIBRATE block, I've placed a TOUCH SENSOR WAIT block that simply waits for the sensor's button to be pressed. I've done the same thing for the second CALIBRATE block. This bit of NXT-G code can be placed at the beginning of your NXT-G program for your robot.
Now, the first thing I do is place the robot in the darkest (or least lighted) area of the room. When I've done this, I press the Touch sensor button. This allows the first CALIBRATE block to obtain the minimum value for the room.
Next, I take the robot and place it in the brightest area of the room. I press the Touch sensor button, and the second CALIBRATE block obtains the maximum value for the room.
And that's it! Now, if I've programmed my robot to use the Light sensor at any point in its program, the Light sensor should react properly based on any conditions I've programmed (such as "Turn Left if the Light sensor obtains a value over 30").
For the Sound sensor, I perform the exact same steps. Figure 23-3 shows the same NXT-G code but with the Sound sensor configured for calibration.
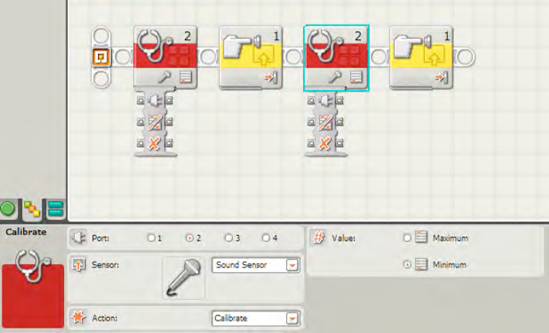
In this example, I would try to place the robot in the quietest point in the room. This could be difficult, as I cannot predict factors such as observers or other potential sources of sound, but I'll do my best. I press the Touch sensor button, and the first CALIBRATE block will obtain the minimum value for the Sound sensor. Next, I'll place the robot in what I think will be the noisiest part of the room and press the Touch sensor button. The maximum value for the Sound sensor is now set.
One thing to note with the Sound sensor is the proximity of the sensor to the NXT motors. Keep in mind that when your robot is using any or all of its motors, the sound from the motors can influence the Sound sensor if you have programmed it to use the sound level for decision-making. You'll have to experiment and test your robots to determine the proper settings to configure for your Sound sensor triggers. You might program SPOT to turn left if the sound level is less than 20, but the sound coming from the NXT motors might cause the Sound sensor to evaluate the sound level as 22 or 23 when all other conditions are correct for a left turn. That's why it always pays to test, test, test.
The CALIBRATE block allows you to calibrate the sensors wherever the robot is located. This means that during a competition or a test where you don't have access to your computer or laptop, you will still have the ability to set the minimum and maximum values for these sensors and have them calibrated to the specific lighting and sound conditions your robot is experiencing. There is also a tool that you can use that exists outside your program.
A few CALIBRATE blocks won't substantially increase the size of your program, but if you do have access to your computer or laptop, you can save a little bit of storage space on your brick by removing the CALIBRATE blocks and instead using the Calibrate Sensors Tool, shown in Figure 23-4.
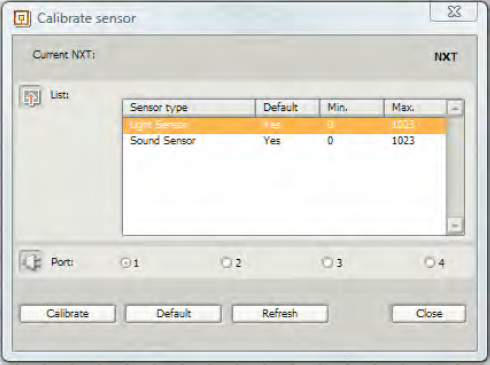
To open the Calibrate Sensors Tool, connect your brick to your computer or laptop with a USB cable and turn the brick on. You'll also need to connect at least one of the sensors, or the List area shown in Figure 23-4 will be grayed out and unavailable.
After connecting your brick and turning it on, open the NXT-G software, click on the Tools menu, and select Calibrate Sensors from the drop-down menu. This will open the screen shown in Figure 23-4.
Using the Calibrate Sensors Tool works best with a laptop, when you can carry your brick (or robot) and the laptop to various locations where your robot will execute a program. If you've got the Light Sensor plugged in, for example, carry the laptop and robot to the darkest location where your robot will operate. Examples include under a table or maybe inside a tunnel.
On the tool's screen, make sure you select the sensor you'll be using (Light sensor for this example) as well as the port number you've got it plugged into (Port 1 for this example). Place the robot in the darkest location and press the Calibrate button. On the brick's screen, you'll hear a beep after the calibrate program is executed. The LCD screen will indicate it is taking a minimum reading and that you should press the Enter button (orange button) to capture the reading. Press the Enter button once.
Next, carry your robot and laptop to the brightest location where your robot is likely to operate. Examples include directly under a light or as close to a window as possible. Look at the LCD screen and you'll see a message asking you to press the Enter button to capture the maximum value. Press the Enter button once.
Finally, click the Refresh button on the Calibrate Sensors Tool and you'll see that the minimum and maximum values change to reflect the robot's current lighting conditions. This is shown in Figure 23-5.

The process works the same for the Sound sensor. In this case, you'll want to carry your robot and laptop to the quietest spot where the robot will operate. Press the Calibrate button and follow the on-screen instructions to capture the minimum value. Next you'll carry the robot and laptop to the loudest area the robot might encounter and perform the same steps to capture the maximum value.
Disconnect your robot from the laptop when done and your robot's Sound and Light sensors will be properly calibrated. To reset the sensors to the default conditions, simply reconnect your brick, launch the Calibrate Sensors Tool, and click the Default button, which will reconfigure the minimum and maximum values to their original settings.
Well, that does it for the CALIBRATE block. In Chapter 24, I'm going to show you how to program your bot to reset its motors, which is useful if you are monitoring motor rotation, for example. Keep reading to find out how it works.