12. System Security
System security is about as important an IT topic as there is these days. A key responsibility of a system administrator is keeping data secure and safe. In the Internet age, this requires more diligence and preparation that ever before. Even on systems inside a firewall, it is urgent to prepare and monitor for intrusions. This chapter begins by defining system security. It then tackles the issue of prevention, focusing on troubleshooting SSH and system hardening issues.
What Is System Security?
The word “security” in general usage is synonymous with “safety,” but as a technical term, “security” means not only that something is secure but that it has been secured. Systems security is a process by which the physical host and the data on it are made safe from unauthorized access, but just as important, they are available to those who need access.
One thing that we must understand is that security through obscurity is not security. It is just luck. Many system administrators rely on the fact that they are behind a firewall or that their system is one of many. This is just perceived security, not real security.
Host Versus Network Security
Two major categories of security exist: host-based and network-based. Host-based security is used to ensure the safety of individual computer systems and their data. Network security is used to ensure the security of the network connections between internal hosts and also between the internal and external networks.
The two are necessarily intertwined. An insecure network unnecessarily exposes the hosts to testing and attacks. Likewise, insecure systems can provide an initial path into a network and give a safe haven to bad guys. The scope of this chapter is mainly host security, not network security, but network security is vital, and more information can be found in such titles as The Tao of Network Security Monitoring: Beyond Intrusion Detection by Richard Bejtlich (Boston: Addison-Wesley, 2004).
What Is Vulnerability?
Vulnerability is a weakness that can be exploited and used to attack a host. There are many forms of vulnerabilities. An example is a defect in the software running on a host that allows unintended access to the system. Mitre.org defines vulnerability as follows (from http://cve.mitre.org/about/terminology.html):
A “universal” vulnerability is one that is considered a vulnerability under any commonly used security policy which includes at least some requirements for minimizing the threat from an attacker. (This excludes entirely “open” security policies in which all users are trusted, or where there is no consideration of risk to the system.)
The following guidelines, while imprecise, provide the basis of a “universal vulnerability” definition. A universal vulnerability is a state in a computing system (or set of systems) which either
• Allows an attacker to execute commands as another user
• Allows an attacker to access data that is contrary to the specified access restrictions for that data
• Allows an attacker to pose as another entity
• Allows an attacker to conduct a denial of service
The following guidelines provide the basis for a definition of an “exposure.” An exposure is a state in a computing system (or set of systems) that is not a universal vulnerability, but either:
• Allows an attacker to conduct information-gathering activities
• Allows an attacker to hide activities
• Includes a capability that behaves as expected, but can be easily compromised
• Is a primary point of entry that an attacker may attempt to use to gain access to the system or data
• Is considered a problem according to some reasonable security policy
So an exposure is less severe than a vulnerability but is still of concern. Using a password-less user login would be a vulnerability, whereas running an insecure service such as TELNET or FTP would be an exposure.
Classes of Host Vulnerabilities
Two main classes of host vulnerabilities exist: local and remote vulnerabilities. A local vulnerability can only be exploited by a user who is authenticated and logged into the system. A remote vulnerability can be exploited without a user being logged in, and it is usually executed from another host system that is already compromised.
A local vulnerability is dangerous, but the attacker must obtain a level of penetration to use it, which somewhat lessens the risk. Remote vulnerabilities are much more risky and should be closed immediately. Both involve risk, but remote vulnerabilities are inherently riskier and therefore should be addressed immediately.
In Figure 12-1, you can see a sample network diagram. This is a fairly common configuration, including a connection to the Internet, a DMZ network, and an intranet. A DMZ network is a network that is open to inbound traffic from the Internet. Public mail and Web servers reside in a DMZ. This setup enables you to limit public access to your internal networks. The host security is much tighter on a host deployed in a DMZ than one on an intranet because of the greater risk involved in the DMZ. In a perfect world, all systems would be invulnerable to attack, but this provision would take unlimited resources (or a system that is powered off and locked in a cabinet). Unfortunately, all systems must balance risk with cost (see Figure 12-2). There must be just enough security to decrease the risk to an acceptable level. That level is different for each situation. The cost to reduce the risk to an acceptable level varies depending on the amount of risk to which the host is exposed. The goal is to invest enough in security to reach the point where security and cost are equally balanced.
Figure 12-1. A sample network diagram

Types of Vulnerabilities and Exposures
Multiple types of vulnerabilities and exposures must be defined so that we can understand the common risk types. The vulnerabilities and exposures include the following:
• Software defect—This is by far the most common risk you will encounter. A defect can be in operating system software or application software. Defects in the OS are typically more worrisome, but an application defect can be just as troublesome. For example, a defect in a database management system (DBMS) that allows customers’ data to be viewed by unauthorized people on the Web is just as damaging as revealing that same data through an OS defect. Examples of software defects that typically cause these types of problems are buffer overflows, design problems that allow access to functions that should be disallowed, allowing malformed input, allowing access to files or data that should be disallowed, and so on.
• Clear text data captured—With the advent of WiFi, this risk has become more common. If user, password, or other data is transmitted across open networks in clear text, it can be intercepted and used. A classic example is the difference between TELNET and SSH. TELNET transmits all data including passwords and login names in clear text. If bad guys are on the network and have their network card in promiscuous mode, they can sniff out the login information and gain access to a system. SSH uses encryption on all traffic and is inherently more secure. The same issues arise when using FTP instead of SFTP.
• Weak passwords—Crackable or easily guessable passwords are a common way for hackers to gain initial access to a system. This vulnerability allows them to peel back one layer of the security onion and makes it much easier for them to use other methods to gain unauthorized super user access.
• Spoofing—Spoofing occurs when an attacker pretends to be an entity and takes over communication between systems. For example, if SystemA and SystemB are communicating, the attacker could set up SystemC to use SystemB’s IP address, hostname, and so on. The hacker could then use a DoS attack to knock SystemB offline and take over the “conversation” with SystemA.
• Social engineering attack—This attack consists of an insider who unknowingly gives out sensitive data to a hacker (phishing). This can take place through email, phone, the Web, and so on. The end goal is for the hacker to obtain account information or personal data for illicit use. Many times this is accomplished when the hacker impersonates a person in authority or a trusted entity (such as a bank).
• Physical attack—Security personnel don’t always adequately address this type of vulnerability. It is easy to boot a host off a floppy and take control of it. A hacker can also just steal a system. Another overlooked possibility is to buy decommissioned systems and then use tools to recover deleted data from a hard drive.
• Carelessness—Carelessness is a human error that hackers exploit to gain access to a system that is exposed through negligence or stupidity. Two classic examples are using the default password and writing down a password.
• Denial of service—“A denial-of-service attack (also, DoS attack) is an attack on a computer system or network that causes a loss of service to users, typically the loss of network connectivity and services by consuming the bandwidth of the victim network or overloading the computational resources of the victim system” (from http://en.wikipedia.org/wiki/Denial_of_service). Examples are invalid packet floods, valid packet floods, and service floods such as HTTP attacks.
• Access controls not restricted enough—This condition occurs when permission to access a resource (a service, file, directory, system, etc.) is not properly restricted.
• Espionage—This attack consists of an insider knowingly working with a hacker to obtain account information or personal data for illicit use.
General Steps to Increase Host Security
We recommend four general steps to increase host security.
- Preparation—The first step is to obtain the knowledge necessary to understand security and then use that to plan a defense in depth.
- Planning—Security should be an ongoing process, not just something you do once. Planning and education should be continual. Any security plan is only as good as its weakest point. After an attacker breaches a single point of defense, the other points become easier to breach. The security plan should also include training for employees, auditing, and so on. It should also include steps to report and repair hosts after a breach. The quicker a breach is caught and corrected, the less time an attacker has to compromise other systems.
- Prevention—We discuss this topic in much more depth later, but it is much easier to prevent an attack than to recover from one. We can use multiple strategies to accomplish prevention:
• Encryption
• System hardening
• Password hardening
• Physical security
• Monitoring for unsuccessful attack patterns
• Vetting and verification of identity
• Patching
• System probing
- Postvention—This is a strange term, but there are some good techniques that can’t be called prevention. Looking for signatures of a successful attack, notifying authorities, closing a discovered vulnerability, and fixing the affected systems are examples of postvention.
Monitoring for breaches is very important. It can be accomplished using tools such as Chkrootkit, Rkhunter, Tripwire, and Logwatch.
Prevention
As the old saying goes, “An ounce of prevention is worth a pound of cure.” It is much easier and cheaper to prevent security incursions than it is to repair them after the fact. A glance at the headlines reveals a parade of companies who realized too late that they had security problems and had exposed customer data at risk. Even systems behind “secure” firewalls can be at risk and need to have preventative plans in place.
Encryption with SSH
The Secure Shell protocol (SSH) is a method to connect to remote machines through an encrypted network stream. This method prevents packets of data, such as your password, from being intercepted as they travel across the network. SSH provides remote shell access, file transfer, key-based user and host authentication, X11 sessions through the open SSH tunnel, and TCP/IP tunneling through port redirection.
Two SSH versions are available for use: version 1 and version 2. It is recommended that you use only version 2 clients because version 1 has known security vulnerabilities. Version 2 also includes Secure FTP (SFTP), which provides an interface that is easier to use for transferring files than secure copy (SCP).
SSH has four main key types: public host keys, private host keys, public user keys, and private user keys.
The SSH server that runs on most Linux systems is OpenSSH (http://www.openssh.org/). OpenSSH is a free version of the SSH protocol suite of network connectivity tools. In SSH version 1 mode, OpenSSH only supports 3DES and Blowfish encryption standards. In SSH version 2 mode, OpenSSH 3DES, Blowfish, CAST128, Arcfour, and AES encryption standards are supported.
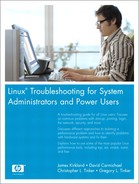
OpenSSH also provides the client binaries for Linux, shown in Table 12-1.
Table 12-1. OpenSSH Client Binaries
The output from a system installed with Red Hat Enterprise Linux 3.0 and OpenSSH 3.6.1 looks like this:
# rpm -qa | grep -i ssh
openssh-config-3.6.1p2-18c
openssh-3.6.1p2-33.30.3
openssh-clients-3.6.1p2-33.30.3
openssh-server-3.6.1p2-33.30.3
OpenSSH’s RSA/DSA key authentication system is one of its biggest features. It is an alternative to the regular password authentication system used by OpenSSH.
OpenSSH key pair authentication uses a pair of specially generated cryptographic keys: the private key and the public key. These key-based authentication systems make it possible to initiate secure connections without having to type in a password. Instead, you type in the key password. The keys are generated with ssh-keygen.
You can also use ssh-agent to cache the key and its password in memory, enabling you to log into any system containing your public key with no password at all. RSA and DSA keys are also used to identify each host.
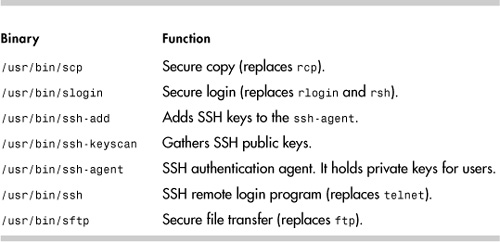
OpenSSH keeps system configuration files in several locations. It is important to know these files and what they do. The location varies based on the distribution. They are generally in either /etc/ssh or /etc/sshd, but a few older distributions put the files directly in the /etc directory. Table 12-2 lists the OpenSSH configuration files.
Table 12-2. OpenSSH System Configuration Files
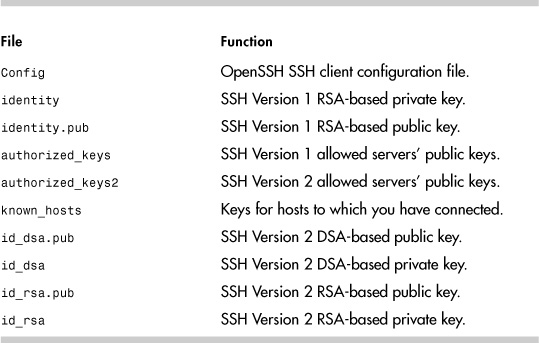
A user’s configuration files are typically kept in the ~/.ssh directory (see Table 12-3).
Table 12-3. User Configuration Files
PuTTY (http://www.chiark.greenend.org.uk/~sgtatham/putty/) is a commonly used SSH client for both Microsoft Windows and Linux systems (see Figure 12-3). It makes port forwarding and setting SSH options much easier. It gives the user the same functionality as the OpenSSH client except for file transfer. WinSCP (http://winscp.net/eng/index.php) is a good client to fill this file transfer functionality gap.
Figure 12-3. The PuTTY configuration tool
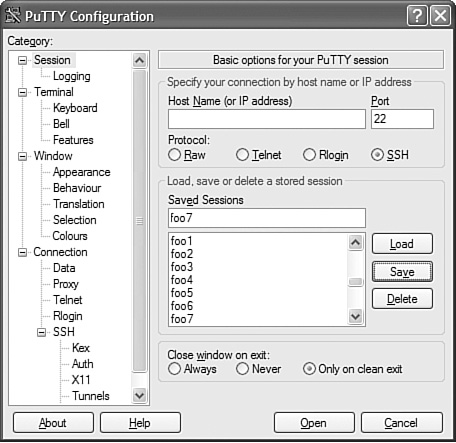
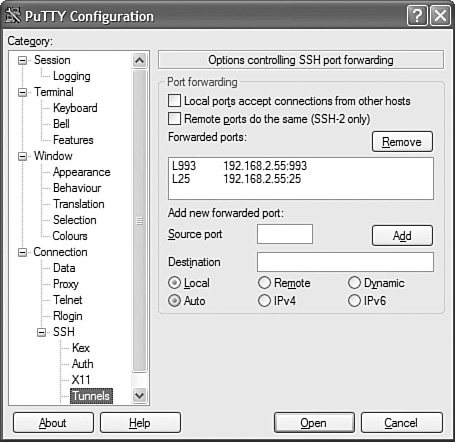
Figure 12-4 shows the PuTTY options for configuring SSH tunneling.
Figure 12-4. Configuring SSH tunnels
A tunnel is an encrypted connection that connects two computers across an open network (see Figure 12-5). This is one of the most useful features of SSH. Tunneling enables insecure network traffic between systems to be encrypted and encapsulated without having to change how the overlaying applications or protocols work.
Figure 12-5. SSH Tunnel example
So in the example in Figure 12-5, you can establish the session by issuing the following command:
ssh -L 110:mailserver:110 -L 515:Printer:515 -l username -N firewall
You can also map remote ports to nonstandard local ports. This enables you to continue using these ports to communicate to other systems on these ports. Otherwise all traffic to these ports is intercepted by SSH. If you want the POP3 traffic to be transported through a non-privileged port, you can run the following command:
ssh -L 1610:mailserver:110 -L 515:Printer:515 -l username -N firewall
The email program on the client now can grab POP3 mail from the mailserver through port 1601 and can leave port 110 free for non-SSH tunneled POP3 traffic. You can also forward SMTP for outgoing mail through port 25.
The user can then test the connection:
# telnet localhost 1601
Trying 127.0.0.1...
Connected to localhost.
Escape character is '^]'.
+OK mailserver.example.org Cyrus POP3 v2.2.10-Invoca-RPM-2.2.10-3.fc3
server ready <2107198432.1112551972@ mailserver.example.org>
# telnet localhost 515
Trying 127.0.0.1...
Connected to localhost.
Escape character is '^]'.
This output shows that both tunnels are working.
X11 traffic can also be forwarded through the tunnel, but SSH has integrated this into the daemon. A detailed description from the ssh(1) man page follows:
X11 and TCP forwarding
If the ForwardX11 variable is set to 'yes' (or see the description of the
-X and -x options described later) and the user is using X11 (the DISPLAY
environment variable is set), the connection to the X11 display is
automatically forwarded to the remote side in such a way that any X11
programs started from the shell (or command) will go through the
encrypted channel, and the connection to the real X server will be made
from the local machine. The user should not manually set DISPLAY.
Forwarding of X11 connections can be configured on the command line or in
configuration files.
Troubleshooting Typical SSH Problems
One crucial task is gathering logs and data from SSH failures. You can perform this task in several ways. You can increase the verbosity of both the SSH server and client. The nodes /var/log/messages and /var/log/secure should give you some other details as to what is causing issues.
From the ssh(1) man page:
-v Verbose mode. Causes ssh to print debugging messages about its
progress. This is helpful in debugging connection, authentication, and
configuration problems. Multiple -v options increases the verbosity.
Maximum is 3.
From the sshd(8) man page:
-d Debug mode. The server sends verbose debug output to the system
log, and does not put itself in the background. The server also will not
fork and will only process one connection. This option is only intended
for debugging for the server. Multiple -d options increase the debugging
level. Maximum is 3.
Newer versions of sshd might also have a -v debug option as well. You also should confirm that sshd is actually running.
# ps -ef |grep ssh
root 7714 1 0 Dec02 ? 00:00:00 /usr/sbin/sshd -o
PidFile=/var/run/sshd.init.pid
Connection and Login Failures
You might encounter several connection and login failure scenarios using SSH. They are easily corrected if you know what to look for. Generally they can be addressed by looking at /var/log/messages and setting ssh into verbose mode.
Scenario 12-1: Host Key Mismatch
The user tries to SSH to the host stapler.example.org, but it fails with the following message:
# ssh stapler
Host key verification failed.
The entry in the ~/.known_hosts for stapler is:
stapler,192.168.48.127 ssh-rsa
3NzaC1yc2EAAAABIwAAAIEA1OOYLo55uYHeG0aYoXQpMVgCmOtydMgolYI7rM3dDAgvorAmEi
pcDU5cDtr7n51L5ykwv/N5nt74fDC+sjwDLKYiXW7KYLLWcnpIC3WWOI3zKa8sQRQ7z2Es6Fg
ahYOa1FpDOQQiKUCbFSc0fUNwBrRpWQgZMgPjf94IqENdhx8=
On stapler, the contents of /etc/ssh/ssh_host_rsa_key.pub are:
ssh-rsa
CCCCZ3NzaC1yc2EAAAABIwAAAIEA1OOYLo55uYHeG0aYoXQpMVgCmOtydMgolYI7rM3dDAgvo
rAmEipcDU5cDtr7n51L5ykwv/N5nt74fDC+sjwDLKYiXW7KYLLWcnpIC3WWOI3zKa8sQRQ
7z2Es6FgahYOa1FpDOQQiKUCbFSc0fUNwBrRpWQgZMgPjf94IqENdhx8=
The mismatch between these two entries is causing the problem. A typical cause is that stapler might have been reinstalled or changed. If you know the cause of the change and are satisfied, you can delete the entry in known_hosts and reconnect. You receive the following message:
# ssh stapler
The authenticity of host 'stapler (192.168.48.127)' can't be established.
RSA key fingerprint is dd:4f:gg:e0:69:1e:a7:c2:d1:6f:0f:ff:a5:ac:47:74.
Are you sure you want to continue connecting (yes/no)? yes
Warning: Permanently added 'stapler,192.168.48.127' (RSA) to the list of
known hosts.
Scenario 12-2: The User Put His or Her Public Key into authorized_keys But Key-Based Authentication Still Doesn’t Work
This problem can be caused by open permissions on ~/.ssh or files underneath it. For example,
# ) ssh -v stapler
OpenSSH_3.6.1p2, SSH protocols 1.5/2.0, OpenSSL 0x0090701f
debug1: Reading configuration data /etc/ssh/ssh_config
debug1: Applying options for *
debug1: Rhosts Authentication disabled, originating port will not be
trusted.
debug1: Connecting to stapler [192.168.48.127] port 22.
debug1: Connection established.
debug1: identity file /home/jxk/.ssh/identity type 1
debug1: identity file /home/jxk/.ssh/id_rsa type -1
debug1: identity file /home/jxk/.ssh/id_dsa type -1
debug1: Remote protocol version 1.99, remote software version
OpenSSH_3.6.1p2
debug1: match: OpenSSH_3.6.1p2 pat OpenSSH*
debug1: Enabling compatibility mode for protocol 2.0
debug1: Local version string SSH-2.0-OpenSSH_3.6.1p2
debug1: SSH2_MSG_KEXINIT sent
debug1: SSH2_MSG_KEXINIT received
debug1: kex: server->client aes128-cbc hmac-md5 none
debug1: kex: client->server aes128-cbc hmac-md5 none
debug1: SSH2_MSG_KEX_DH_GEX_REQUEST sent
debug1: expecting SSH2_MSG_KEX_DH_GEX_GROUP
debug1: SSH2_MSG_KEX_DH_GEX_INIT sent
debug1: expecting SSH2_MSG_KEX_DH_GEX_REPLY
debug1: Host 'stapler' is known and matches the RSA host key.
debug1: Found key in /home/jxk/.ssh/known_hosts:40
debug1: ssh_rsa_verify: signature correct
debug1: SSH2_MSG_NEWKEYS sent
debug1: expecting SSH2_MSG_NEWKEYS
debug1: SSH2_MSG_NEWKEYS received
debug1: SSH2_MSG_SERVICE_REQUEST sent
debug1: SSH2_MSG_SERVICE_ACCEPT received
debug1: Authentications that can continue: publickey,password,keyboard-
interactive
debug1: Next authentication method: publickey
debug1: Offering public key: /home/jxk/.ssh/identity
debug1: Authentications that can continue: publickey,password,keyboard-interactive
debug1: Trying private key: /home/jxk/.ssh/id_rsa
debug1: Trying private key: /home/jxk/.ssh/id_dsa
debug1: Next authentication method: keyboard-interactive
debug1: Authentications that can continue: publickey,password,keyboard-
interactive
debug1: Next authentication method: password
jxk@stapler's password:
debug1: Authentication succeeded (password).
debug1: channel 0: new [client-session]
debug1: Entering interactive session.
debug1: channel 0: request pty-req
debug1: channel 0: request shell
debug1: channel 0: open confirm rwindow 0 rmax 32768
In this case, the problem can be solved by executing the following on both the server and your local computer. Permissions are enforced by sshd. There also must be one key per line in the authorized_keys files. Line breaks are not allowed in a key.
# chmod -R 600 ~/.ssh/*
# chmod 700 ~/.ssh
# ssh -v stapler
OpenSSH_3.6.1p2, SSH protocols 1.5/2.0, OpenSSL 0x0090701f
debug1: Reading configuration data /etc/ssh/ssh_config
debug1: Applying options for *
debug1: Rhosts Authentication disabled, originating port will not be
trusted.
debug1: Connecting to stapler [192.168.48.127] port 22.
debug1: Connection established.
debug1: identity file /home/jxk/.ssh/identity type 1
debug1: identity file /home/jxk/.ssh/id_rsa type -1
debug1: identity file /home/jxk/.ssh/id_dsa type -1
debug1: Remote protocol version 1.99, remote software version
OpenSSH_3.6.1p2
debug1: match: OpenSSH_3.6.1p2 pat OpenSSH*
debug1: Enabling compatibility mode for protocol 2.0
debug1: Local version string SSH-2.0-OpenSSH_3.6.1p2
debug1: SSH2_MSG_KEXINIT sent
debug1: SSH2_MSG_KEXINIT received
debug1: kex: server->client aes128-cbc hmac-md5 none
debug1: kex: client->server aes128-cbc hmac-md5 none
debug1: SSH2_MSG_KEX_DH_GEX_REQUEST sent
debug1: expecting SSH2_MSG_KEX_DH_GEX_GROUP
debug1: SSH2_MSG_KEX_DH_GEX_INIT sent
debug1: expecting SSH2_MSG_KEX_DH_GEX_REPLY
debug1: Host 'stapler' is known and matches the RSA host key.
debug1: Found key in /home/jxk/.ssh/known_hosts:40
debug1: ssh_rsa_verify: signature correct
debug1: SSH2_MSG_NEWKEYS sent
debug1: expecting SSH2_MSG_NEWKEYS
debug1: SSH2_MSG_NEWKEYS received
debug1: SSH2_MSG_SERVICE_REQUEST sent
debug1: SSH2_MSG_SERVICE_ACCEPT received
debug1: Authentications that can continue: publickey,password,keyboard-
interactive
debug1: Next authentication method: publickey
debug1: Offering public key: /home/jxk/.ssh/identity
debug1: Server accepts key: pkalg ssh-rsa blen 148 lastkey 0x8718d38 hint 0
debug1: PEM_read_PrivateKey failed
debug1: read PEM private key done: type <unknown>
Enter passphrase for key '/home/jxk/.ssh/identity':
debug1: read PEM private key done: type RSA
debug1: Authentication succeeded (publickey).
debug1: channel 0: new [client-session]
debug1: Entering interactive session.
debug1: channel 0: request pty-req
debug1: channel 0: request shell
debug1: channel 0: open confirm rwindow 0 rmax 32768
You could also change the value of StrictModes to no in the sshd_config file, but this approach is insecure and not recommended.
Scenario 12-3: SSH Is Receiving Connection Refused Messages
This problem has several possible causes. The most common is that iptables is blocking access to the ports needed by SSH. You can check with the following command:
# iptables -L | grep -i ssh
DROP tcp -- anywhere anywhere tcp dpt:ssh
flags:SYN,RST,ACK/SYN
As you can see in this example, TCP packets going to port 22 (the SSH port) are set to drop. You can edit the iptables configuration file in /etc/sysconfig/iptables and change the line for port 22. In this case,
-A RH-Lokkit-0-50-INPUT -p tcp -m tcp --dport 22 -j DROP --syn
would be changed to
-A RH-Lokkit-0-50-INPUT -p tcp -m tcp --dport 22 -j ACCEPT -syn
If there is no line for port 22, you could append one to add the ACCEPT syntax. iptables would need to be restarted for any changes to take effect.
Scenario 12-4: Correct Password Generates Error
A user is trying to connect to a system using SSH, and she receives the following error:
Password (incorrect) for user on host hostname:
The password has been verified as correct. The server to which the user is trying to connect has SSH password authentication turned off. The daemon is configured to use alternate forms of authentication such as PAM or keys. For OpenSSH, in the /etc/ssh/ sshd_config file on the server, the PasswordAuthentication option is set to no.
Functionality Failures
After you have your connection and login problems solved, you can run into a couple of functionality-related problems.
Scenario 12-5: X11 and/or Agent Forwarding Does Not Work
Check your ssh_config and sshd_config files. The default configuration files disable authentication agent and X11 forwarding. To enable this forwarding, put the following line in sshd_config:
X11Forwarding yes
Then place the following lines in ssh_config:
ForwardAgent yes
ForwardX11 yes
If this is set and X11 forwarding is still not working, check whether your DISPLAY variable is set correctly. Sometimes it doesn’t map correctly. This problem is usually caused by either not having the X11 server running before you SSH into the remote system or by having a line in your login scripts (such as .bashrc or .bash_profile) that manually sets the DISPLAY variable (such as export DISPLAY=hostname.example.org:0.0). The display number changes based on how many other displays are in use.
It usually starts at 10. If you run the following example, you should see the window shown in Figure 12-6 appear.
$ echo $DISPLAY
$ xclock
Error: Can't open display:
$ export DISPLAY=localhost:0
$ xclock
Error: Can't open display: localhost:0
$ export DISPLAY=localhost:10
$ xclock

Scenario 12-6: The User Created a Tunnel and the Application Won’t Connect
The most common cause of this problem is that the user is trying to connect using the remote host name instead of localhost.
# ssh -L 110:mailserver:110 -L 515:Printer:515 -l username -N firewall
# ftp ftp.example.org
ftp: ftp.example.com: Name or service not known
ftp>
# ftp localhost
Trying 127.0.0.1...
Connected to ftp.example.org (192.168.22.105).
220 ftp.example.org FTP server (example.com version w02) ready.
Name (ftp.example.com:jxk):
System Hardening with netfilter/iptables
netfilter and iptables together make up the standard firewall software for the Linux 2.4 and 2.6 kernels. They are the replacement for the 2.2 kernel ipchains, nat, and proxying facilities. netfilter is the kernel portion of the firewall software, and iptables consists of the user utilities used to manage the firewall.
netfilter enables the system administrator to define rules for dealing with network packets. A packet is the fundamental unit of information transmission in TCP/IP networking.
The netfilter rules are then grouped into chains. A chain is an ordered list of rules. The chains are then grouped into tables. Each table is associated with a different class of packet processing. Each chain is responsible for filtering or modifying packets as they come through the chain. Filtering is the process of either blocking or allowing the packets as they travel through the system.
Each chain contains a manifest of rules. When a packet is sent to a chain, it is compared against each rule in the chain in order. The rules provide a specification that shows which packets match it and a target that shows iptables what to do with the packet if it is matched by that rule. Every network packet arriving at or leaving from the computer traverses at least one chain, and each rule on that chain attempts to match the packet. If the rule matches the packet, the traversal stops, and the rule’s target dictates what to do with the packet. If a packet reaches the end of a chain without being matched by any rule on the chain, the chain’s policy target dictates what to do with the packet.
There are three statically defined tables. Users cannot change the tables, but they can modify the chains that each table contains. The three tables are described in Table 12-4.
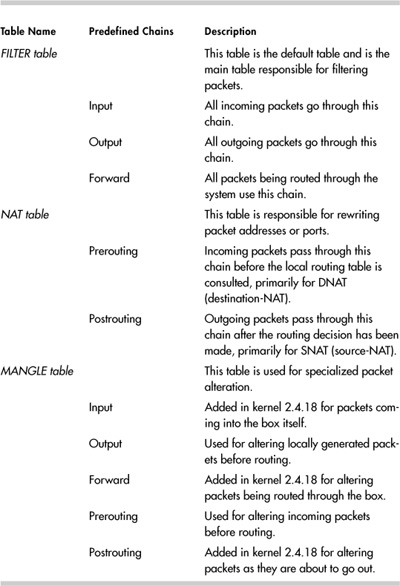
The man page for iptables(8) gives a good description of targets of chains. This is further illustrated by Figure 12-7.
Figure 12-7. netfilter/iptables flow example
A firewall rule specifies criteria for a packet, and a target. If the
packet does not match, the next rule in the chain is the examined; if it
does match, then the next rule is specified by the value of the target,
which can be the name of a user-defined chain or one of the special
values ACCEPT, DROP, QUEUE, or RETURN.
ACCEPT means to let the packet through. DROP means to drop the packet on
the floor. QUEUE means to pass the packet to userspace (if supported by
the kernel). RETURN means stop traversing this chain and resume at the
next rule in the previous (calling) chain. If the end of a built-in
chain is reached or a rule in a built-in chain with target RETURN is
matched, the target specified by the chain policy determines the fate of
the packet.
An example of a user-defined target is RH-Firewall-1-INPUT. This target is used by default on Red Hat Enterprise Linux 3.0. It is used like a subroutine to the Input chain.
There are a few additional special values beyond ACCEPT, DROP, QUEUE, or RETURN. They are LOG, MARK, MASQUERADE, MIRROR, QUEUE, REDIRECT, REJECT, TOS, TTL, ULOG, SNAT, and DNAT.
What Is NAT?
Network Address Translation (NAT) is commonly used to enable multiple systems on a private network to share one public IP address. The public IP address is owned by a dual-homed device that commonly acts as a router and firewall. NAT enables the user to shield addresses on the internal network from addresses on the Internet network. NAT rewrites the source and/or destination addresses of IP packets as they pass through the router/firewall (see Figure 12-8).
MANGLE Table
Whereas the NAT table enables you to change the source and destination IP addresses to do site hiding, the MANGLE table enables you to change other characteristics within the TCP/IP packet. There are only a few targets that are only valid in the MANGLE table. These are TOS (Type Of Service), TTL (Time To Live), and MARK (used to set special mark values in the packets).
So why would a system administrator use mangling? It is most common in load balancing and QoS (Quality of Service) applications. An example of this might be these rules:
iptables -A PREROUTING -t mangle -p tcp --dport 29005 -j TOS --set-tos
Maximize-Throughput
iptables -A PREROUTING -t mangle -p udp --sport 29015 -j TOS --set-tos
Minimize-Delay
Configuration with iptables
The first decision most system administrators make when configuring iptables is the default policy for the FILTER table. This is one of the most important decisions and many times is the least considered. Should all packets that do not match any rule be accepted, dropped, or handled in some other way? If you set the default to accept the packets, it is much easier on the system administrator, but it is inherently insecure. If you drop the packets by default, any network service troubleshooting must include iptables as a consideration.
The most-used commands to tell the state of iptables are iptables -L and iptables --list. You can specify a particular chain to any of the -list commands, or you can use no other options, in which case it prints all the chains. Adding -n to this command changes the output from hostnames to IP addresses. By default, iptables only reports on the FILTER table. You must use the -t option to specify a different table. Finally, the -v option provides statistics on the output.
# iptables -L
Chain INPUT (policy ACCEPT)
target prot opt source destination
LOG all -- anywhere anywhere LOG level
debug pre
fix 'BANDWIDTH_IN:'
RH-Lokkit-0-50-INPUT all -- anywhere anywhere
Chain FORWARD (policy ACCEPT)
target prot opt source destination
LOG all -- anywhere anywhere LOG level
debug pre
fix 'BANDWIDTH_OUT:'
LOG all -- anywhere anywhere LOG level
debug pre
fix 'BANDWIDTH_IN:'
RH-Lokkit-0-50-INPUT all -- anywhere anywhere
Chain OUTPUT (policy ACCEPT)
target prot opt source destination
LOG all -- anywhere anywhere LOG level
debug pre
fix 'BANDWIDTH_OUT:'
Chain RH-Lokkit-0-50-INPUT (2 references)
target prot opt source destination
ACCEPT udp -- router anywhere udp
spt:domain dpts
:1025:65535
ACCEPT udp -- router anywhere udp
spt:domain dpts
:1025:65535
DROP all -- 192.168.6.6 anywhere
DROP all -- 197.15.43.3 anywhere
DROP all -- 198.229.244.130 anywhere
ACCEPT udp -- anywhere anywhere udp dpt:ntp
ACCEPT tcp -- anywhere anywhere tcp dpt:smtp
flags:
SYN,RST,ACK/SYN
ACCEPT tcp -- anywhere anywhere tcp
dpts:netbios-ns
:netbios-ssn
ACCEPT tcp -- anywhere anywhere tcp dpt:http
flags:
SYN,RST,ACK/SYN
ACCEPT tcp -- anywhere anywhere tcp dpt:ssh
flags:S
YN,RST,ACK/SYN
ACCEPT tcp -- anywhere anywhere tcp dpt:https
ACCEPT tcp -- anywhere anywhere tcp dpt:imaps
ACCEPT tcp -- anywhere anywhere tcp dpt:imap
ACCEPT all -- anywhere anywhere
DROP tcp -- anywhere anywhere tcp
dpts:0:1023 fla
gs:SYN,RST,ACK/SYN
DROP tcp -- anywhere anywhere tcp dpt:nfs
flags:S
YN,RST,ACK/SYN
DROP udp -- anywhere anywhere udp
dpts:0:1023
DROP udp -- anywhere anywhere udp dpt:nfs
DROP tcp -- anywhere anywhere tcp
dpts:x11:6009 f
lags:SYN,RST,ACK/SYN
DROP tcp -- anywhere anywhere tcp dpt:xfs
flags:S
YN,RST,ACK/SYN
# iptables -L OUTPUT
Chain OUTPUT (policy ACCEPT)
target prot opt source destination
LOG all -- anywhere
# iptables -L OUTPUT -v
Chain OUTPUT (policy ACCEPT 1907K packets, 1110M bytes)
pkts bytes target prot opt in out source
destination
1754K 1040M LOG all -- any eth0 anywhere
anywhere LOG level debug prefix 'BANDWIDTH_OUT:'
# iptables -L -t mangle
Chain PREROUTING (policy ACCEPT)
target prot opt source destination
TOS tcp -- anywhere anywhere tcp
dpt:29005 TOS set Maximize-Throughput
Chain INPUT (policy ACCEPT)
target prot opt source destination
Chain FORWARD (policy ACCEPT)
target prot opt source destination
Chain OUTPUT (policy ACCEPT)
target prot opt source destination
Chain POSTROUTING (policy ACCEPT)
target prot opt source destination
If the netfilter/iptables is disabled, you will likely see this type of output:
# iptables -L
Chain INPUT (policy ACCEPT)
target prot opt source destination
Chain FORWARD (policy ACCEPT)
target prot opt source destination
Chain OUTPUT (policy ACCEPT)
target prot opt source destination
[root@sanctus net]# service iptables status
Firewall is stopped.
If you are not sure what a port maps to or what port a service is on, you can grep it out of /etc/services:
# grep 25 /etc/services
smtp 25/tcp mail
smtp 25/udp mail
So in this case, the service running on port 25 was SMTP (Simple Mail Transport Protocol).
The next diagnostic command of note is conntrack. conntrack contains all the different connections currently tracked by netfilter. It serves as a basic reference for the current state of a connection. This table is read-only.
# less /proc/net/ip_conntrack
tcp 6 163770 ESTABLISHED src=192.168.5.54 dst=200.157.35.3 sport=80
dport=41057 packets=3 bytes=4260 [UNREPLIED] src=200.157.35.3
dst=192.168.5.54 sport=41057 dport=80 packets=0 bytes=0 mark=0 use=1
tcp 6 163783 ESTABLISHED src=192.168.5.54 dst=200.157.35.3 sport=80
dport=41029 packets=3 bytes=4260 [UNREPLIED] src=200.157.35.3
dst=192.168.5.54 sport=41029 dport=80 packets=0 bytes=0 mark=0 use=1
tcp 6 307635 ESTABLISHED src=192.168.5.54 dst=216.230.44.66 sport=80
dport=20641 packets=3 bytes=4260 [UNREPLIED] src=216.230.44.66
dst=192.168.5.54 sport=20641 dport=80 packets=0 bytes=0 mark=0 use=1
tcp 6 21086 ESTABLISHED src=192.168.2.63 dst=192.168.5.54 sport=1067
dport=143 packets=1 bytes=46 src=192.168.5.54 dst=192.168.2.63 sport=143
dport=1067 packets=0 bytes=0 mark=0 use=1
tcp 6 431988 ESTABLISHED src=192.168.2.26 dst=192.168.5.54
sport=2186 dport=22 packets=27360 bytes=2221935 src=192.168.5.54
dst=192.168.2.26 sport=22 dport=2186 packets=31472 bytes=2971402
[ASSURED] mark=0 use=1
tcp 6 56 TIME_WAIT src=127.0.0.1 dst=127.0.0.1 sport=33591 dport=25
packets=17 bytes=1104 src=127.0.0.1 dst=127.0.0.1 sport=25 dport=33591
packets=12 bytes=1012 [ASSURED] mark=0 use=1
udp 17 116 src=192.168.5.54 dst=192.168.2.1 sport=47997 dport=53
packets=13 bytes=958 src=192.168.2.1 dst=192.168.5.54 sport=53
dport=47997 packets=13 bytes=1593 [ASSURED] mark=0 use=1
Example iptables Commands
This section presents several examples of commonly used iptables commands. It walks you through listing, flushing, deleting, and creating iptables configurations through the command line.
Note that for Red Hat and Debian, the iptables binaries are located in /sbin. With SUSE, the binaries are located in /usr/sbin.
Look at the examples of the following commands.
Clearing iptables configuration:
# iptables --flush
# iptables --delete-chain
Setting the default policy to drop for the input chain:
# iptables -P INPUT DROP
Setting iptables to accept all connections on the loopback address:
# iptables -I INPUT 1 -i lo -j ACCEPT
Changing iptables to drop traffic on certain ports to stop unauthorized access:
# iptables -A RH-Lokkit-0-50-INPUT -p tcp -m tcp --dport 137:139 -j ACCEPT
# iptables -A INPUT -p TCP --dport 135 -s 0/0 -j DROP
Change iptables to allow outgoing traffic from certain hosts:
# iptables -A FORWARD -p ALL -s 192.168.9.3 -j ACCEPT
Deleting a rule:
From the iptables(8) man page:
-D, --delete
Delete one or more rules from the selected chain. There are two versions
of this command: the rule can be specified as a number in the chain
(starting at 1 for the first rule) or a rule to match.
# iptables -D 1
# iptables -D 2
Saving the Configuration
Any changes to netfilter/iptables are volatile—they only last until the next system reboot. The only way around this is to save the rules into the system configuration file. This file resides in different places on different distributions.
The SUSE configuration file typically resides in /etc/sysconfig/SuSEfirewall2. The Debian configuration file typically resides in /etc/default/iptables. The Red Hat configuration file typically resides in /etc/sysconfig/iptables. The /etc/sysconfig/ iptables file is actually the location for the Gnome Lokkit version of the configuration file. This is what Red Hat uses, but it could also be used on other distributions.
# iptables-save > /etc/sysconfig/iptables
# iptables-restore > /etc/sysconfig/iptables
Stopping, Verifying Status, and Starting iptables
The chkconfig command updates and queries runlevel information for system services. This is the first step in verifying that a service is running. This command is covered in depth in Chapter 1, “System Boot, Startup, and Shutdown Issues,” but some differences are covered here for iptables.
# chkconfig --list iptables
iptables 0:off 1:off 2:on 3:on 4:on 5:on 6:off
You can also use chkconfig to enable or disable a system service from running at boot.
# chkconfig iptables on
# chkconfig iptables off
You can use the scripts in /etc/init.d or the service command to stop, verify status, and start a service between system boots.
# /etc/init.d/iptables stop
# /etc/init.d/iptables start
# /etc/init.d/iptables restart
# /etc/init.d/iptables status
Aborting iptables initd: unknown command(s): "status".
ls: /var/lib/iptables: Permission denied
/etc/init.d/iptables options:
start|restart|reload|force-reload
load the "active" ruleset
save <ruleset>
save the current ruleset
load <ruleset>
load a ruleset
stop
load the "inactive" ruleset
clear
remove all rules and user-defined chains, set default policy to
ACCEPT
halt
remove all rules and user-defined chains, set default policy to DROP
Troubleshooting Examples
How do you tell whether the system is accepting or rejecting connections on certain ports? How do you know whether a daemon is listening or talking over a port? The following examples assist you in making these determinations.
Scenario 12-7: Open Ports
nmap enables you to scan a host for open ports.
# nmap hostname
Starting nmap3.81(http://www.insecure.org/nmap/)at2005-04-1713:43EDT
Interesting ports on hostname (192.168.5.54):
(The 1644 ports scanned but not shown below are in state: closed)
PORT STATE SERVICE
22/tcp open ssh
25/tcp open smtp
80/tcp open http
110/tcp open pop3
111/tcp open rpcbind
139/tcp open netbios-ssn
143/tcp open imap
443/tcp open https
445/tcp open microsoft-ds
515/tcp open printer
555/tcp open dsf
631/tcp open ipp
783/tcp open hp-alarm-mgr
993/tcp open imaps
995/tcp open pop3s
2000/tcp open callbook
2500/tcp open rtsserv
3306/tcp open mysql
10000/tcp open snet-sensor-mgmt
Scenario 12-8: Closed Ports
Problems with closed ports (SNMP, for example) also can be detected by using nmap and netstat to determine which ports are being listened to, as opposed to iptables, which shows which ports are open.
# nmap -sT -O localhost
Starting nmap 3.81 (http://www.insecure.org/nmap/) at 2005-04-17 13:45 EDT
Interesting ports on localhost (127.0.0.1):
(The 1644 ports scanned but not shown below are in state: closed)
PORT STATE SERVICE
22/tcp open ssh
25/tcp open smtp
80/tcp open http
110/tcp open pop3
111/tcp open rpcbind
139/tcp open netbios-ssn
143/tcp open imap
443/tcp open https
445/tcp open microsoft-ds
515/tcp open printer
555/tcp open dsf
631/tcp open ipp
783/tcp open hp-alarm-mgr
993/tcp open imaps
995/tcp open pop3s
2000/tcp open callbook
2500/tcp open rtsserv
3306/tcp open mysql
10000/tcp open snet-sensor-mgmt
Device type: general purpose
Running: Linux 2.4.X|2.5.X|2.6.X
OS details: Linux 2.5.25 - 2.6.3 or Gentoo 1.2 Linux 2.4.19 rc1-rc7),
Linux 2.6.3 - 2.6.8
Uptime 4.833 days (since Tue Apr 12 17:47:12 2005)
Nmap finished: 1 IP address (1 host up) scanned in 2.300 seconds
You can then run the following:
# netstat -anp | grep 10000
tcp 0 0 0.0.0.0:10000 0.0.0.0:* LISTEN 4546/perl
udp 0 0 0.0.0.0:10000 0.0.0.0:* 4546/perl
# lsof -i | grep 10000
miniserv. 4546 root 5u IPv4 11329 TCP *:10000 (LISTEN)
miniserv. 4546 root 6u IPv4 11330 UDP *:10000
# netstat -ln
Active Internet connections (only servers)
Proto Recv-Q Send-Q Local Address Foreign Address State
tcp 0 0 0.0.0.0:32769 0.0.0.0:* LISTEN
tcp 0 0 0.0.0.0:32772 0.0.0.0:* LISTEN
tcp 0 0 0.0.0.0:743 0.0.0.0:* LISTEN
tcp 0 0 0.0.0.0:111 0.0.0.0:* LISTEN
tcp 0 0 0.0.0.0:21 0.0.0.0:* LISTEN
tcp 0 0 127.0.0.1:631 0.0.0.0:* LISTEN
tcp 0 0 0.0.0.0:23 0.0.0.0:* LISTEN
tcp 0 0 127.0.0.1:25 0.0.0.0:* LISTEN
tcp 0 0 :::22 :::* LISTEN
udp 0 0 0.0.0.0:32768 0.0.0.0:*
udp 0 0 0.0.0.0:32769 0.0.0.0:*
udp 0 0 0.0.0.0:514 0.0.0.0:*
udp 0 0 0.0.0.0:651 0.0.0.0:*
udp 0 0 0.0.0.0:740 0.0.0.0:*
udp 0 0 0.0.0.0:111 0.0.0.0:*
udp 0 0 0.0.0.0:631 0.0.0.0:*
udp 0 0 0.0.0.0:633 0.0.0.0:*
Active UNIX domain sockets (only servers)
Proto RefCnt Flags Type State I-Node Path
unix 2 [ ACC ] STREAM LISTENING 7311 /tmp/.ICE-
unix/2790
unix 2 [ ACC ] STREAM LISTENING 6599 /tmp/.X11-
unix/X0
unix 2 [ ACC ] STREAM LISTENING 7365 @/tmp/fam-root-
unix 2 [ ACC ] STREAM LISTENING 6536 /tmp/.gdm_socket
unix 2 [ ACC ] STREAM LISTENING 7644 /tmp/mapping-root
unix 2 [ ACC ] STREAM LISTENING 4666 /var/run/
acpid.socket
unix 2 [ ACC ] STREAM LISTENING 5108 /var/run/
dbus/system_bus_socket
unix 2 [ ACC ] STREAM LISTENING 1923392 /tmp/orbit-
root/linc-e2f-0-bbfff546128b
unix 2 [ ACC ] STREAM LISTENING 7147 /tmp/orbit-
root/linc-ae6-0-4dad07126929d
unix 2 [ ACC ] STREAM LISTENING 7330 /tmp/orbit-
root/linc-b30-0-58a7a2fcd05ba
unix 2 [ ACC ] STREAM LISTENING 4932 /dev/gpmctl
unix 2 [ ACC ] STREAM LISTENING 7350 /tmp/orbit-
root/linc-b32-0-2655db2aeda0a
unix 2 [ ACC ] STREAM LISTENING 7460 /tmp/orbit-
root/linc-b58-0-621592d496fed
unix 2 [ ACC ] STREAM LISTENING 7490 /tmp/orbit-
root/linc-b5c-0-3d2be190ec0ee
unix 2 [ ACC ] STREAM LISTENING 7512 /tmp/orbit-
root/linc-b60-0-3d2be190f2ac4
unix 2 [ ACC ] STREAM LISTENING 7533 /tmp/orbit-
root/linc-b5e-0-6fdfda4710351
unix 2 [ ACC ] STREAM LISTENING 7573 /tmp/orbit-
root/linc-b62-0-6fdfda475dd4e
unix 2 [ ACC ] STREAM LISTENING 7613 /tmp/orbit-
root/linc-b6b-0-42041c2cbc4d6
unix 2 [ ACC ] STREAM LISTENING 7669 /tmp/orbit-
root/linc-b66-0-592c61f838cde
unix 2 [ ACC ] STREAM LISTENING 7690 /tmp/orbit-
root/linc-b79-0-4b667834a27c1
unix 2 [ ACC ] STREAM LISTENING 7718 /tmp/orbit-
root/linc-b7b-0-4b667834f2d60
unix 2 [ ACC ] STREAM LISTENING 7752 /tmp/orbit-
root/linc-b7d-0-349f4c4e688f5
unix 2 [ ACC ] STREAM LISTENING 7781 /tmp/orbit-
root/linc-b7f-0-349f4c4e8bd45
unix 2 [ ACC ] STREAM LISTENING 7813 /tmp/orbit-
root/linc-b81-0-281c194d3e01
unix 2 [ ACC ] STREAM LISTENING 5032 /tmp/.font-
unix/fs7100
unix 2 [ ACC ] STREAM LISTENING 7320 /tmp/keyring-
b4Tynh/socket
unix 2 [ ACC ] STREAM LISTENING 7057 /tmp/ssh-
ifzjtp2817/agent.2817
unix 2 [ ACC ] STREAM LISTENING 7114 @/tmp/dbus-
q34OAqqJlD
Scenario 12-9: iptables Rules Not Showing Up on Boot or Disappearing
This problem typically happens when someone shuts down iptables. You can diagnose this issue with the following command.
# /etc/init.d/iptables status
Table: filter
Chain INPUT (policy ACCEPT)
target prot opt source destination
RH-Firewall-1-INPUT all -- 0.0.0.0/0 0.0.0.0/0
Chain FORWARD (policy ACCEPT)
target prot opt source destination
RH-Firewall-1-INPUT all -- 0.0.0.0/0 0.0.0.0/0
Chain OUTPUT (policy ACCEPT)
target prot opt source destination
Chain RH-Firewall-1-INPUT (2 references)
target prot opt source destination
ACCEPT all -- 0.0.0.0/0 0.0.0.0/0
ACCEPT icmp -- 0.0.0.0/0 0.0.0.0/0 icmp type 255
ACCEPT all -- 0.0.0.0/0 0.0.0.0/0 state
RELATED,ESTABLISHED
ACCEPT tcp -- 15.45.88.52 0.0.0.0/0 state NEW
tcp dpt:382
ACCEPT tcp -- 0.0.0.0/0 0.0.0.0/0 state NEW
tcp dpt:135
ACCEPT tcp -- 0.0.0.0/0 0.0.0.0/0 state NEW
tcp dpt:25
ACCEPT tcp -- 0.0.0.0/0 0.0.0.0/0 state NEW
tcp dpt:22
REJECT udp -- 0.0.0.0/0 0.0.0.0/0 state NEW
udp dpts:0:1023 reject-with icmp-port-unreachable
REJECT tcp -- 0.0.0.0/0 0.0.0.0/0 state NEW
tcp dpts:0:1023 reject-with icmp-port-unreachable
REJECT udp -- 0.0.0.0/0 0.0.0.0/0 state NEW
udp dpt:2049 reject-with icmp-port-unreachable
REJECT tcp -- 0.0.0.0/0 0.0.0.0/0 state NEW
tcp dpt:2049 reject-with icmp-port-unreachable
REJECT tcp -- 0.0.0.0/0 0.0.0.0/0 state NEW
tcp dpts:6000:6009 reject-with icmp-port-unreachable
REJECT tcp -- 0.0.0.0/0 0.0.0.0/0 state NEW
tcp dpt:7100 reject-with icmp-port-unreachable
ACCEPT tcp -- 0.0.0.0/0 0.0.0.0/0 state NEW
tcp dpt:5555
REJECT all -- 0.0.0.0/0 0.0.0.0/0 reject-with
icmp-host-prohibited
Show output
Scenario 12-10: Rule Order Issues
One important concept that causes trouble for many administrators is rule order. For example, if you set all TCP packets to REJECT as the first rule in a chain, any subsequent rules that try to ACCEPT packets are ignored.
A good idea is to structure the chain similarly to the following:
accept (unlogged)
drop (unlogged)
log
accept
default policy
TCP wrappers
UNIX permissions
Patching
Patching is not a replacement for good security, but it is important. Make sure to verify that packages are genuine and come from the vendor. You should also verify their md5sum.
# md5sum VMware-workstation-5.5.0-18007.i386.rpm
df4fe57c8e8650b529f8cbb1226b6b2d VMware-workstation-5.5.0-18007.i386.rpm
The md5sum supplied by the software vendor for the RPM file is:
md5sum:df4fe57c8e8650b529f8cbb1226b6b2d
It is common for hackers to dummy a package up to look authentic and include compromised binaries in the package.
Recovery After Being Hacked
Unfortunately the best way to recover after being hacked is to disconnect the network cable and reinstall the system. It might be possible to salvage some files from the system before reinstalling, but you must be very careful because you might inadvertently place a file back on the system that could re-compromise it. Reinstall instead!
Summary
System security is a vocation. I hope that this introduction to the topic and how to troubleshoot it under Linux gives you a jumping off point. It is key that you understand how the Linux networking, filesystem, authentication, and other subsystems work to truly understand the security implications of each. It is also crucial that you treat security as a continuum. There is no state of complete security, only states of relative insecurity.