14. Login Problems
User login attempts can fail for many reasons. The account could have been removed or the password changed. Linux provides password aging to force users to change their passwords regularly. A password can have a maximum age after which the account is locked. If a user notifies you that his login attempts fail, the first thing to check is whether he is permitted to log in.
Linux does not provide a meaningful explanation for why logins fail. This is part of good security because few hints are given to would-be intruders. It does make troubleshooting more complex, however. This chapter explains the commands needed to troubleshoot login failures and explains the authentication components. If you follow the steps explained in this chapter, you should be able to understand and correct login failures.
We separate this chapter into the following topics:
• /etc/passwd,/etc/shadow, and password aging—We explain the structure of /etc/passwd and /etc/shadow. We demonstrate how to look at and modify the password aging information in accounts. This is important because a login attempt can fail because of the password aging settings for the account.
• Login failures due to Linux configuration—Some examples include when the login is disabled because system maintenance is being performed and root login is refused because it is attempted from somewhere other than the console.
• Pluggable Authentication Modules (PAM) configuration—PAM provides a configurable set of authentication rules that is shared by applications such as login, KDE, SSH, and so on.
• Shell problems—If a user logs in but does not get the shell prompt or the application doesn’t start, there may be a problem with the shell configuration. We discuss some common shell issues.
• Password problems—Finally, we provide a short program to validate user passwords.
/etc/passwd, /etc/shadow, and Password Aging
One of the first things to do when troubleshooting a login failure is to confirm that the account exists. The finger command shows user information, but because /etc/passwd has read permissions for all, we prefer just to grep for the user name.
$ grep bob /etc/passwd
bob:x:515:515::/home/bob:/bin/bash
We are only confirming that there is an /etc/passwd line for this user to prove that the account hasn’t been removed.
/etc/passwd and /etc/shadow
Account information is stored in two files: /etc/passwd and /etc/shadow. All users can view the /etc/passwd file:
$ ls -l /etc/passwd
-rw-r--r-- 1 root root 2423 Jan 21 11:17 /etc/passwd
The /etc/passwd file has seven fields, as shown in Table 14-1.
Table 14-1. /etc/passwd Fields
The /etc/passwd file is completely explained in the passwd(5) man page. We are interested in the password field for the purposes of this chapter. The password field does not contain the encrypted password. It should have an “x” instead. The password field did contain the password when UNIX was first released. As computers became more powerful, though, viewable encrypted passwords left systems vulnerable to brute force attacks. Thus, the password was moved to a new file that can only be read by root. This file is /etc/shadow. In Linux, the /etc/shadow file is delivered in the shadow-utils package.
$ ls -l /etc/shadow
-r-------- 1 root root 1974 Jan 22 13:30 /etc/shadow
Let’s look at the /etc/shadow entry for an account. The grep command is an easy way to view /etc/shadow.
$ grep bob /etc/shadow
grep: /etc/shadow: Permission denied
Right. We must switch to root.
#grep bob /etc/shadow
bob:$1$lIDEzDIs$mVFLa6ZVsSolJS8yPc3/o.:12800:0:99999:7:::
The /etc/shadow file contains password aging information as well as the password. The fields separated by “:” are explained in Table 14-2.
Table 14-2. /etc/shadow Fields
The /etc/shadow date fields are in days since January 1st, 1970. The password expiration date is the result of adding the date the password was last changed field and the maximum age of password field. See the shadow(5) man page for more details.
chage, passwd, and usermod
The chage, passwd, and usermod commands can be used to modify password aging parameters. The usermod command duplicates some but not all the password aging features of chage. The chage -l username syntax is a good way to view the password aging settings for accounts. The following example shows the default password aging information for an account:
#chage -l bob
Minimum: 0 field 4 /etc/shadow
Maximum: 99999 field 5 /etc/shadow
Warning: 7 field 6 /etc/shadow
Inactive: -1 field 7 /etc/shadow
Last Change: Jan 17, 2005 field 3 /etc/shadow
Password Expires: Never field 3 + field 5
Password Inactive: Never field 3 + field 5 + field 7
Account Expires: Never field 8 /etc/shadow
Let’s look at the password aging example. A user tries to log in on January 19, 2005 using ssh, but the term window is disconnected immediately after entering the password:
login as: dbadmin3
Sent username "dbadmin3"
TIS authentication refused.
[email protected]'s password:
The login attempt doesn’t identify the problem. The chage -l username command shows that the account expired yesterday, preventing logins.
#chage -l dbadmin3
Minimum: 0
Maximum: 99999
Warning: 7
Inactive: -1
Last Change: Jan 17, 2005
Password Expires: Never
Password Inactive: Never
Account Expires: Jan 18, 2005
The Password Inactive and Account Expires dates prevent a user from logging in. When the Password Expires date is reached, the user should be forced to change his or her password during login. However, ssh will just fail the login attempt.
Table 14-3 shows the more useful chage syntaxes.
Here is an example showing a change to the maximum password lifetime. Password lifetime is field 5 of /etc/shadow.
#grep dbadmin /etc/shadow
dbadmin:$1$TuCLLDqz$Fc1YnK309QXT6TJMOagdZ.:12841:0:99999:7:::
We can use grep to see this information, but chage is nicer.
#chage -l dbadmin
Minimum: 0
Maximum: 99999
Warning: 7
Inactive: -1
Last Change: Feb 27, 2005
Password Expires: Never
Password Inactive: Never
Account Expires: Never
Now let’s set the maximum password lifetime using chage.
#chage -M 30 dbadmin
We can use grep to see that the password aging field is now 30.
#grep dbadmin /etc/shadow
dbadmin:$1$TuCLLDqz$Fc1YnK309QXT6TJMOagdZ.:12841:0:30:7:::
Once again, chage -l username offers nicer output.
# chage -l dbadmin
Minimum: 0
Maximum: 30
Warning: 7
Inactive: -1
Last Change: Feb 27, 2005
Password Expires: Mar 29, 2005
Password Inactive: Never
Account Expires: Never
A -1 for either a date or days field clears the field from /etc/shadow. Here is an example demonstrating how to reset the Account Expires date, which is field 8. Once again, we look at the password aging information with both grep and chage so that we can clearly see which field is being changed.
#grep lori /etc/shadow
lori:$1$cQG1pnOz$UHRmboguvqvOyJv5wAbTr/:12805:0:30:7::12847:
chage -l lori
Minimum: 0
Maximum: 30
Warning: 7
Inactive: -1
Last Change: Jan 22, 2005
Password Expires: Feb 21, 2005
Password Inactive: Never
Account Expires: Mar 05, 2005
Here chage is used to clear the account expiration date.
#chage -E -1 lori
#chage -l lori
Minimum: 0
Maximum: 30
Warning: 7
Inactive: -1
Last Change: Jan 22, 2005
Password Expires: Feb 21, 2005
Password Inactive: Never
Account Expires: Never
Field 8 is empty.
#grep lori /etc/shadow
lori:$1$cQG1pnOz$UHRmboguvqvOyJv5wAbTr/:12805:0:30:7:::
The usermod command can set the account expiration date and the number of days after the password expires when the account is locked. The syntax is shown for each in Table 14-4.
Table 14-4. usermod Password Aging Syntax
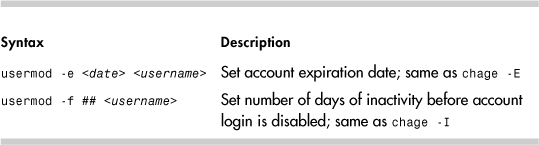
The following example is similar to the previous chage example. This time, usermod is used to change the account expiration date, which is field 8 in /etc/shadow.
#grep dbadmin /etc/shadow
dbadmin:$1$TuCLLDqz$Fc1YnK309QXT6TJMOagdZ.:12841:0:30:7:::
chage -l dbadmin
Minimum: 0
Maximum: 30
Warning: 7
Inactive: -1
Last Change: Feb 27, 2005
Password Expires: Mar 29, 2005
Password Inactive: Never
Account Expires: Never
#usermod -e 2006-01-03 dbadmin
#grep dbadmin /etc/shadow
dbadmin:$1$TuCLLDqz$Fc1YnK309QXT6TJMOagdZ.:12841:0:30:7::13151:
#chage -l dbadmin
Minimum: 0
Maximum: 30
Warning: 7
Inactive: -1
Last Change: Feb 27, 2005
Password Expires: Mar 29, 2005
Password Inactive: Never
Account Expires: Jan 03, 2006
Let’s remove the Account Expires date:
#chage -E -1 dbadmin
#grep dbadmin /etc/shadow
dbadmin:$1$TuCLLDqz$Fc1YnK309QXT6TJMOagdZ.:12841:0:30:7:::
#chage -l dbadmin
Minimum: 0
Maximum: 30
Warning: 7
Inactive: -1
Last Change: Feb 27, 2005
Password Expires: Mar 29, 2005
Password Inactive: Never
Account Expires: Never
The passwd command can change the password aging fields too. The passwd aging options are shown in Table 14-5.
Table 14-5. passwd Password Aging

The usermod and passwd commands can also disable an account. The different syntaxes are shown in Table 14-6.
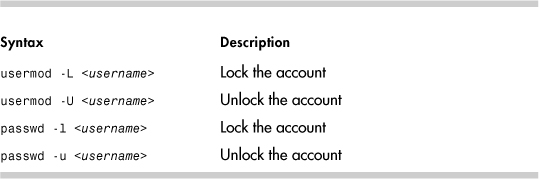
A ! in the password field of /etc/shadow indicates a locked account. Notice the change in the password field after usermod is used to lock an account.
#grep dbadmin /etc/shadow
dbadmin:$1$TuCLLDqz$Fc1YnK309QXT6TJMOagdZ.:12841:0:30:7:::
#usermod -L dbadmin
grep dbadmin /etc/shadow
dbadmin:!$1$TuCLLDqz$Fc1YnK309QXT6TJMOagdZ.:12841:0:30:7:::
The chage -l output doesn’t indicate that the account is locked.
#chage -l dbadmin
Minimum: 0
Maximum: 30
Warning: 7
Inactive: -1
Last Change: Feb 27, 2005
Password Expires: Mar 29, 2005
Password Inactive: Never
Account Expires: Never
The account can be unlocked with usermod -U, passwd -u, or by changing the password with the passwd command as root. Why can’t the user change the password, assuming he or she is already logged in? Because the user is prompted for the current password before being granted the authority to change the password. The user doesn’t know the password anymore because a ! character was added when the account was locked. Root isn’t required to enter the current password, which enables the root user to unlock the account with passwd.
The following is an example of a locked account being unlocked with passwd.
#grep dbadmin /etc/shadow
dbadmin:!$1$8nF5XmBG$Pckwi8Chld..JgP5Zmc4i0:12841:0:30:7:::
#passwd -u dbadmin
Unlocking password for user dbadmin.
passwd: Success.
#grep dbadmin /etc/shadow
dbadmin:$1$8nF5XmBG$Pckwi8Chld..JgP5Zmc4i0:12841:0:30:7:::
/etc/passwd and /etc/shadow Corruption
The passwd and shadow files can be corrupted in numerous ways: /etc/shadow might have been restored while /etc/passwd was not, incorrect file permissions could cause problems, and so on. Let’s look at what happens if someone edits /etc/shadow to clear password aging information while a user attempts to change his password. Look at Dave’s /etc/shadow line:
dave:$1$dkdAH.dQ$DU1t04WOFGjF4BGymI/ll0:12802:0:2:7:::
The system administrator is using vi to edit /etc/shadow. Before the system administrator saves the file, Dave changes his password successfully by using the passwd command. /etc/shadow shows the change to the password field:
dave:$1$VGCA.Vk8$9u2b8W5eCWjtOdt6ipOlD0:12804:0:2:7:::
Now the system administrator saves /etc/shadow. When the administrator tries to save the file, he sees:
WARNING: The file has been changed since reading it!!!
Do you really want to write to it (y/n)?
Hopefully, the system administrator replies n and tries again. If not, Dave loses his password change. Look at what happens to Dave’s password. It changes back to the previous value:
#grep dave /etc/shadow
dave:$1$dkdAH.dQ$DU1t04WOFGjF4BGymI/ll0:12802:0:2:7:::
Be careful when making changes to /etc/passwd or /etc/shadow. Always try to use a command to make changes instead of editing the file.
pwck
Linux provides the pwck command to look for /etc/passwd and /etc/shadow problems. This command validates field entries and looks for duplicate lines. No output from pwck means it didn’t identify any problems. It will not find all problems, so you might need to inspect the passwd and shadow files line by line to confirm the lines are correct. The following error is caused by user rob not having an entry in /etc/shadow. The pwck command didn’t catch it.
passwd rob
Changing password for user rob.
passwd: Authentication token manipulation error
Login Failures Due to Linux Configuration
We saw how password aging can prevent individual users from logging in. Now we show how to restrict where root can log in by using /etc/securetty. Login for every non-root attempt can be prevented with /etc/nologin.
/etc/securetty
The /etc/securetty file is intended as a method for limiting root logins to a list of tty devices. If /etc/securetty exists, root login is permitted only from those devices. For example:
console
vc/1
vc/2
vc/3
vc/4
vc/5
vc/6
vc/7
vc/8
vc/9
vc/10
vc/11
tty1
tty2
tty3
tty4
tty5
tty6
tty7
tty8
tty9
tty10
tty11
tty12
Note
The tty devices are for the KDE virtual console windows. The vc devices are the virtual console devfs devices.
It is common practice to restrict root login to the console. This forces users to su - root after a normal login. This practice makes it easy to track who all those root logins are. The /var/log/messages file shows the su attempts:
Jan 19 13:41:28 sawnee sshd(pam_unix)[3008]: session opened for user dave
by (uid=501)
Jan 19 13:41:36 sawnee su(pam_unix)[3043]: session opened for user root
by dave(uid=501)
Please note that whether /etc/securetty is honored depends on the PAM configuration for each login method and whether the login application uses PAM. The PAM configuration file for the login application needs the auth (authentication) pam_securetty.so module. See the PAM configuration section for details.
/etc/nologin
The /etc/nologin file gives the system administrator a way to keep users off the Linux system during maintenance. If /etc/nologin exists, non-root login attempts fail, and the contents of /etc/nologin are displayed. For example:
#cat /etc/nologin
Sorry. System Maintenance in progress. System unavailable until 15:00 on
1/19.
When someone attempts to log in, he or she sees
Red Hat Linux release 9 (Shrike)
Kernel 2.4.20-8 on an i686
sawnee.somecomp.com login: dave
Password:
Sorry. System Maintenance in progress. System unavailable until 15:00 on
1/19.
Login incorrect
login:
A zero-byte /etc/nologin disables non-root logins but prints no special message. Please note that whether /etc/nologin is honored depends on the PAM configuration for each login method. The PAM configuration file for the login application needs the auth “pam_nologin.so” module. See the PAM configuration section for details.
SSH does not look at the /etc/nologin file. A login attempt using ssh succeeds when /etc/nologin exists.
PAM
Linux-PAM is the Linux implementation of PAM. HPUX, Solaris, and other operation systems use PAM. Linux-PAM is a package designed to handle user authentication, which means each application does not need to include a routine to ask for a password, encrypt it with crypt(2), and compare it against the entry in /etc/shadow. PAM does much more than just verifying passwords, however. The access rules can be changed by editing a single PAM configuration file. PAM is a very important part of Linux security. Applications must be written to use PAM.
The heart of PAM is the configuration directory /etc/pam.d or configuration file /etc/pam.conf for older implementations of PAM.
A PAM-enabled application uses a configuration file in /etc/pam.d or a block of lines in /etc/pam.conf. Let’s look at /etc/pam.d first because it is the newer and more common method. PAM looks for a configuration file with the name of the application. If one doesn’t exist, the file other is used. The login file in /etc/pam.d shows the PAM modules used for the login application. The following is a sample /etc/pam.d/login file from a Red Hat Enterprise Linux AS release 3 system:
#%PAM-1.0
auth required pam_securetty.so
auth required pam_stack.so service=system-auth
auth required pam_nologin.so
account required pam_stack.so service=system-auth
password required pam_stack.so service=system-auth
session required pam_stack.so service=system-auth
session optional pam_console.so
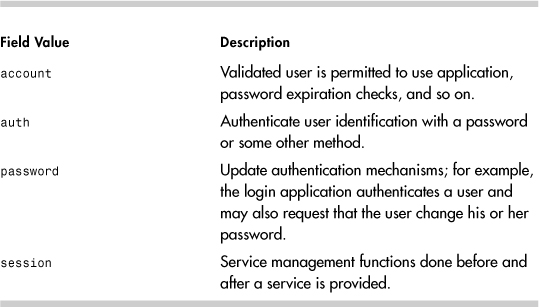
The files in /etc/pam.d have four fields: function, priority, module name, and module arguments. The group of modules in a PAM configuration file is called a module stack. Linux distributions have different authorization modules, but they follow the same format.
Function
Four functions can be configured: account, authentication, password, and session (see Table 14-7). As you can see from the login example, all four can be used by the same application.
Table 14-7. PAM Function Field Values
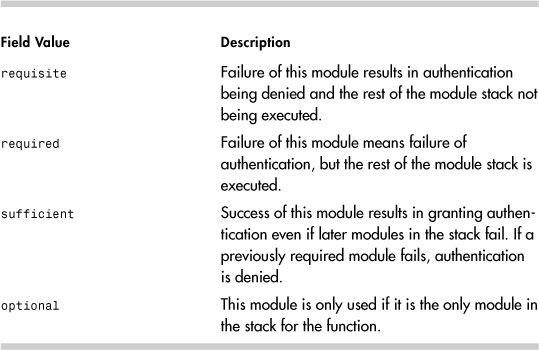
Priority
The priority field determines what happens if the module fails to grant the function. This field has four allowable values (see Table 14-8).
Table 14-8. PAM Priority Field Values
Module Name
This is the full path of the module to be used or the name of a file in /lib/security.
Arguments
Some modules take arguments. These are documented in the module README files. The location of the PAM README files varies, but the files are probably in a subdirectory of /usr/share/doc/. Use rpm -q -filesbypkg pam_ if you are having trouble finding the README files.
/etc/pam.d
The following is from a Red Hat 3.0ES system, and it demonstrates how many applications rely on PAM to perform authorization tasks.
# ls -ld /etc/pam.d
drwxr-xr-x 2 root root 4096 Oct 30 04:25 /etc/pam.d
# ls /etc/pam.d
authconfig printconf-tui redhat-config-users
authconfig-gtk printtool redhat-config-xfree86
bindconf reboot redhat-install-packages
chfn redhat-cdinstall-helper redhat-logviewer
chsh redhat-config-authentication redhat-switch-mail
cups redhat-config-bind redhat-switch-mail-nox
dateconfig redhat-config-date rhn_register
ethereal redhat-config-httpd samba
gdm redhat-config-keyboard screen
gdm-autologin redhat-config-language serviceconf
gdmsetup redhat-config-mouse setup
halt redhat-config-netboot smtp
hwbrowser redhat-config-network smtp.sendmail
imap redhat-config-network-cmd sshd
internet-druid redhat-config-network-druid su
kbdrate redhat-config-nfs sudo
kde redhat-config-packages synaptic
kppp redhat-config-printer system-auth
login redhat-config-printer-gui up2date
neat redhat-config-printer-tui up2date-config
other redhat-config-proc up2date-nox
passwd redhat-config-rootpassword webmin
pop redhat-config-samba xdm
poweroff redhat-config-securitylevel xscreensaver
ppp redhat-config-services xserver
printconf redhat-config-soundcard
printconf-gui redhat-config-time
/etc/pam.conf
If /etc/pam.d exists, /etc/pam.conf is ignored. The /etc/pam.conf file lines are identical to those of /etc/pam.d except that they contain one extra field. The lines in /etc/pam.conf contain the session name as the first field. The session name identifies the stack to which a line belongs.
/lib/security
The libraries supporting the /etc/pam.d authorization modules all have 755 permissions and are owned by root with group root. The following is from a Red Hat 9.0 system:
#ls -ld /lib/security
drwxr-xr-x 3 root root 4096 May 18 2004 /lib/security
#ls -l /lib/security
total 1276
-rwxr-xr-x 1 root root 9696 Feb 10 2003 pam_access.so
-rwxr-xr-x 1 root root 6320 Feb 10 2003 pam_chroot.so
-rwxr-xr-x 1 root root 47584 Feb 10 2003 pam_console.so
-rwxr-xr-x 1 root root 12964 Feb 10 2003 pam_cracklib.so
-rwxr-xr-x 1 root root 3404 Feb 10 2003 pam_deny.so
-rwxr-xr-x 1 root root 11592 Feb 10 2003 pam_env.so
drwxr-xr-x 2 root root 4096 Nov 6 2003 pam_filter
-rwxr-xr-x 1 root root 11208 Feb 10 2003 pam_filter.so
-rwxr-xr-x 1 root root 6048 Feb 10 2003 pam_ftp.so
-rwxr-xr-x 1 root root 11148 Feb 10 2003 pam_group.so
-rwxr-xr-x 1 root root 7540 Feb 10 2003 pam_issue.so
-rwxr-xr-x 1 root root 59508 Jan 30 2003 pam_krb5afs.so
-rwxr-xr-x 1 root root 57464 Jan 30 2003 pam_krb5.so
-rwxr-xr-x 1 root root 8468 Feb 10 2003 pam_lastlog.so
-rwxr-xr-x 1 root root 39080 Jan 25 2003 pam_ldap.so
-rwxr-xr-x 1 root root 12324 Feb 10 2003 pam_limits.so
-rwxr-xr-x 1 root root 10740 Feb 10 2003 pam_listfile.so
-rwxr-xr-x 1 root root 9620 Feb 10 2003 pam_localuser.so
-rwxr-xr-x 1 root root 9664 Feb 10 2003 pam_mail.so
-rwxr-xr-x 1 root root 16652 Feb 10 2003 pam_mkhomedir.so
-rwxr-xr-x 1 root root 4272 Feb 10 2003 pam_motd.so
-rwxr-xr-x 1 root root 4856 Feb 10 2003 pam_nologin.so
-rwxr-xr-x 1 root root 3708 Feb 10 2003 pam_permit.so
-rwxr-xr-x 1 root root 46336 Feb 10 2003 pam_pwdb.so
-rwxr-xr-x 1 root root 11372 Feb 10 2003 pam_rhosts_auth.so
-rwxr-xr-x 1 root root 3936 Feb 10 2003 pam_rootok.so
-rwxr-xr-x 1 root root 6544 Feb 10 2003 pam_securetty.so
-rwxr-xr-x 1 root root 5520 Feb 10 2003 pam_shells.so
-rwxr-xr-x 1 root root 43588 Aug 15 2003 pam_smb_auth.so
-rwxr-xr-x 1 root root 468260 Apr 5 2003 pam_smbpass.so
-rwxr-xr-x 1 root root 11132 Feb 10 2003 pam_stack.so
-rwxr-xr-x 1 root root 10676 Feb 10 2003 pam_stress.so
-rwxr-xr-x 1 root root 13752 Feb 10 2003 pam_tally.so
-rwxr-xr-x 1 root root 9752 Feb 10 2003 pam_time.so
-rwxr-xr-x 1 root root 10544 Feb 10 2003 pam_timestamp.so
lrwxrwxrwx 1 root root 11 Nov 6 2003 pam_unix_acct.so
-> pam_unix.so
lrwxrwxrwx 1 root root 11 Nov 6 2003 pam_unix_auth.so
-> pam_unix.so
lrwxrwxrwx 1 root root 11 Nov 6 2003 pam_unix_passwd.so
-> pam_unix.so
lrwxrwxrwx 1 root root 11 Nov 6 2003 pam_unix_session.so
-> pam_unix.so
-rwxr-xr-x 1 root root 48544 Feb 10 2003 pam_unix.so
-rwxr-xr-x 1 root root 9148 Feb 10 2003 pam_userdb.so
-rwxr-xr-x 1 root root 4644 Feb 10 2003 pam_warn.so
-rwxr-xr-x 1 root root 7788 Feb 10 2003 pam_wheel.so
-rwxr-xr-x 1 root root 13348 Apr 5 2003 pam_winbind.so
-rwxr-xr-x 1 root root 13860 Feb 10 2003 pam_xauth.so
Linux-PAM Resources
The previous coverage is just a brief explanation of Linux-PAM that is needed before we start looking at troubleshooting PAM problems. Detailed PAM information can be found in The System Administrators’ Guide, The Module Writers’ Manual, and The Application Developers’ Manual available from the Linux-PAM home page (http://www.kernel.org/pub/linux/libs/pam/) under the “online documentation” link. There is also a PAM man page and documentation in /usr/share/doc. The pam(8) man page is excellent as well.
Troubleshooting PAM
The lab instructor for my first college programming class gave us good advice. He said that we would have bugs in our code that we could not find. We would look very hard and still not find the cause. He said eventually we would decide the problem was caused by a hardware or compiler issue. He said we would be wrong. The point of his lecture was that yes, problems with compilers sometimes occur, and CPUs and memory chips sometimes fail, but it was more likely that our code was buggy. He did not want a bunch of freshman annoying the IT department.
There certainly might be bugs in PAM or a PAM module. Before going there, however, please look over the following questions to confirm that PAM is installed properly. Use rpm to verify all PAM packages, modules, libraries, and so on. If a module has been customized, put the default version back and test with it. The same goes for the application using PAM. The problem may be with sshd or login and not PAM.
• Are PAM modules or libraries missing?
• Have PAM modules or libraries been changed?
• Have PAM directory or file permissions been modified?
Scenario 14-1: Missing Stack Prevents Login
In the next example, the /etc/pam.d/login module is missing, and no one can log in.
Red Hat Linux release 9 (Shrike)
Kernel 2.4.20-8 on an i686
sawnee.somecomp.com login: root
Login incorrect
Login incorrect
Login incorrect
Login incorrect
Red Hat Linux release 9 (Shrike)
Kernel 2.4.20-8 on an i686
sawnee.somecomp.com login:
The user never even gets an opportunity to enter the password. Because there is no /etc/pam.d/login module, the default module, /etc/pam.d/other, is used. The other file denies authorization outright:
#cat /etc/pam.d/other
#%PAM-1.0
auth required /lib/security/$ISA/pam_deny.so
account required /lib/security/$ISA/pam_deny.so
password required /lib/security/$ISA/pam_deny.so
session required /lib/security/$ISA/pam_deny.so
What happens if other is missing too?
Red Hat Linux release 9 (Shrike)
Kernel 2.4.20-8 on an i686
sawnee.somecomp.com login: root
login: PAM Failure, aborting: Critical error - immediate abort
Red Hat Linux release 9 (Shrike)
Kernel 2.4.20-8 on an i686
sawnee.somecomp.com login:
PAM does not grant authorization if there is no authorization module. The solution is to create the /etc/pam.d/login file or restore it from backup. If there is an open root session, we can make the fix. If there is none, the box must be booted to single user mode and the fix made from there. Refer to Chapter 1, “System Boot, Startup, and Shutdown Issues,” if this subject is not familiar.
Scenario 14-2: Missing /etc/pam.d Prevents Login
A user tries to connect with ssh, but the window closes immediately after the user enters the user name. Again, no one can log in. Login at the console yields the following:
sawnee.somecomp.com login: dave
login: PAM Failure, aborting: Critical error - immediate abort
This problem has symptoms similar to the missing /etc/pam.d/login example. If there were an open root session, we could troubleshoot PAM. Because there are none, the box must be booted to single user mode. In single user mode, we can quickly see that there is no /etc/pam.d directory. After reading this chapter, the solution should be pretty obvious. We need to create the pam.d directory and one module for system access:
#cd /etc
#mkdir pam.d
#chmod 755 pam.d
#cd pam.d
Create a file called login with the following entries:
auth required pam_permit.so
account required pam_permit.so
password required pam_permit.so
session required pam_permit.so
Then run init 3 to boot to multiuser mode. No sense trying to start KDE or Gnome because PAM is missing all those modules. Login from the console should be enabled now that we added the login module. Now the /etc/pam.d contents can be restored from backup or whatever else is needed. The temporary login module we show enables any valid user to access the system. This approach doesn’t seem secure, but then again, the only place to log in is from the console. There is no ssh or other module. If other access points use login besides the console, though, this might not be the best choice. In that event, it might be better to stay in single user mode and restore the /etc/pam.d from there.
For whatever reason, it might not be possible to use the previous procedure in single user mode. Maybe Linux does not boot at all, or the root filesystem is read-only, and the /etc/pam.d/login file can’t be created. If this happens, boot from a recovery CD or floppy. After the box is booted with this method, the repairs to /etc/pam.d can be made. Chapter 1 explains booting from recovery CDs and floppy disks.
Validate Modules
The rpm command verifies that the files in a package are the same as when they were installed. If an application isn’t acting right, and PAM is suspected, try verifying that the module is the same as when it was delivered. For example,
#rpm -V -f /etc/pam.d/login
.......T c /etc/pam.d/login
The T means the timestamp has changed, and the c indicates /etc/pam.d/login is a configuration file. Please note that the previous syntax verifies the package that delivered the login file and not just the login file itself.
The rpm command is a valuable troubleshooting tool. If you have not read through the rpm(8) man page, you should consider it.
It can be tempting just to verify the PAM packages, but this approach does not prove that the modules are ok. The modules are delivered by the applications that use them. For example:
#rpm -q -f /etc/pam.d/login
util-linux-2.11y-9.progeny.1
#rpm -q -f /etc/pam.d/sshd
openssh-server-3.5p1-11.progeny.2
#rpm -q -f /etc/pam.d/samba
samba-2.2.7a-8.9.0
Bugs in PAM
After ruling out installation and configuration issues, it might be time to look for known bugs. Search not only the PAM Web site but also the application sites. If you think you have found a problem with the sshd PAM module, check to see what package delivered it:
# rpm -q -f /etc/pam.d/sshd
openssh-3.7.1p2-113
Look at the documentation supplied with the application to see whether this is a known issue:
# rpm -q --filesbypkg openssh-3.7.1p2-113
(some lines omitted)
openssh /etc/pam.d/sshd
(some lines omitted)
openssh /usr/share/doc/packages/openssh
openssh /usr/share/doc/packages/openssh/CREDITS
openssh /usr/share/doc/packages/openssh/ChangeLog
openssh /usr/share/doc/packages/openssh/LICENSE
openssh /usr/share/doc/packages/openssh/OVERVIEW
openssh /usr/share/doc/packages/openssh/README
openssh /usr/share/doc/packages/openssh/README.SuSE
openssh /usr/share/doc/packages/openssh/README.kerberos
openssh /usr/share/doc/packages/openssh/RFC.nroff
openssh /usr/share/doc/packages/openssh/TODO
openssh /usr/share/man/man1/scp.1.gz
openssh /usr/share/man/man1/sftp.1.gz
openssh /usr/share/man/man1/slogin.1.gz
openssh /usr/share/man/man1/ssh-add.1.gz
openssh /usr/share/man/man1/ssh-agent.1.gz
openssh /usr/share/man/man1/ssh-copy-id.1.gz
openssh /usr/share/man/man1/ssh-keyconverter.1.gz
openssh /usr/share/man/man1/ssh-keygen.1.gz
openssh /usr/share/man/man1/ssh-keyscan.1.gz
openssh /usr/share/man/man1/ssh.1.gz
openssh /usr/share/man/man5/ssh_config.5.gz
openssh /usr/share/man/man5/sshd_config.5.gz
openssh /usr/share/man/man8/sftp-server.8.gz
openssh /usr/share/man/man8/ssh-keysign.8.gz
openssh /usr/share/man/man8/sshd.8.gz
Finally, search the Internet for known issues. For sshd, http://www.openssh.com/report.html and http://bugzilla.mindrot.org/ are good places to start.
Shell Problems
If a user can log in and get past the password prompt but still has problems, there is a good chance the problem is with the configuration.
User Profile Files
Login shells source several files during login. These files enable a user’s environment to be customized. This is where the environment variables such as PATH, PS1 (shell prompt), and MAIL are set. Because these files can be customized, there is a chance that they will cause login problems.
The bash shell is the most commonly used Linux login shell and is the default when adding users with useradd. The files executed at login in order are:
/etc/profileuser home directory/.bash_profileuser home directory/.bash_loginuser home directory/.profile
All these files do not have to be present. The /etc/profile configuration file is executed by all users. If there is a problem in /etc/profile, it should affect all users. If just a few users are having a problem, /etc/profile is probably not the cause.
The easiest way to troubleshoot this issue is to temporarily replace the dot files with the default versions from /etc/skel and see whether the problem still occurs. If not, move the custom dot configuration files back one at a time until the problem file is found.
The following is from a Red Hat 3.0ES system:
# ls -al /etc/skel
total 52
drwxr-xr-x 4 root root 4096 Feb 11 05:51 .
drwxr-xr-x 72 root root 8192 Feb 12 06:41 ..
-rw-r--r-- 1 root root 24 Aug 18 13:23 .bash_logout
-rw-r--r-- 1 root root 191 Aug 18 13:23 .bash_profile
-rw-r--r-- 1 root root 124 Aug 18 13:23 .bashrc
-rw-r--r-- 1 root root 5542 Sep 16 2003 .canna
-rw-r--r-- 1 root root 237 Feb 3 10:55 .emacs
-rw-r--r-- 1 root root 120 Aug 24 08:44 .gtkrc
drwxr-xr-x 3 root root 4096 Aug 12 2002 .kde
drwxr-xr-x 2 root root 4096 Feb 11 05:49 .xemacs
-rw-r--r-- 1 root root 220 Nov 28 2002 .zshrc
Note
If you use ls -l /etc/skel, you won’t see any files. The -a option shows files that start with a dot (.).
The configuration files in /etc/skel are what useradd puts in a newly added user’s home directory.
Password Problems
Have you ever had a user call and say she could not log in because the system wouldn’t take her password? Is there something wrong, or did she forget the password? You could just reset it, but then your user blames Linux, and you blame the user. Maybe there really is a problem. How do you tell?
The encrypted password is a one-way encryption. The user enters a password when logging in. This password is used along with the two “salt” characters from /etc/shadow to encrypt the password. If this encrypted password matches the encrypted password in /etc/shadow, the authentication succeeds. This is done with the crypt(3) function. There is no method to take the encrypted password and reverse the process to learn the unencrypted password.
We want to offer a short program that takes salt characters and a clear text password as input and outputs the encrypted password. You tell the user her salt characters. She runs the program, passing the salt characters and password as input, and gives you the output. You can compare this to her encrypted password in /etc/shadow. If it doesn’t match, the user doesn’t know the correct password.1
#include <unistd.h>
#include <crypt.h>
#include <stdio.h>
#include <stdlib.h>
#include <errno.h>
#include <strings.h>
main(argc, argv)
int argc;
char *argv[];
{
/* crypt_password.c takes two arguments. The first is comprised of 2 salt
characters. The second field is the password which can be 8 characters.
See the crypt(3) man page for details. */
if (argc ^= 3) {
printf(" USAGE: crypt_password SALT_CHARS PASSWORD
");
return 1;
}
char salt[3];
char passwd[80];
strcpy(salt, argv[1]);
strcpy(passwd, argv[2]);
printf("%s
", crypt(passwd, salt));
}
The program can be compiled with the following command:
gcc -o crypt_password -lcrypt crypt_password.c
Let’s say a user calls with the complaint that a password no longer works.
sawnee login: dbadmin
Password:
Login incorrect
sawnee login: dbadmin
Password:
Login incorrect
We run chage -l dbadmin to verify that the account isn’t disabled:
# chage -l dbadmin
Minimum: 0
Maximum: 99999
Warning: 7
Inactive: -1
Last Change: Feb 15, 2005
Password Expires: Never
Password Inactive: Never
Account Expires: Never
The account is not expired. We may start to think the user just forgot the password. We can use the encrypt_password.c program to check. We need two pieces of information: the salt characters and the password.
The salt characters are the first two in the /etc/shadow password field. For dbadmin, the salt characters are f0. We can also look for a ! as the first character of the password, which would indicate the account is locked:
# grep dbadmin /etc/shadow
dbadmin:f0OFhXhLSMWy6:12829:0:99999:7:::
The user takes her salt characters f0 and her password d9a9mi123 and tries them with crypt_password:
# ./crypt_password f0 d9a9mi123
f0MugCavWrWaE
We can’t tell what the password is, but we learned it is not d9a9mi123.
Summary
We stated that a Linux login attempt can fail for many reasons. The information provided in this chapter should enable the reader to troubleshoot login problems more effectively:
• If a user can’t log in, use chage to see whether login for the account is disabled due to password aging settings.
• If login only fails for the root user, try logging in as a normal user and using su to switch to root because /etc/securetty might exist but contain no devices.
• If at least one user can log in, the global login restriction file /etc/nologin is not the trouble. If all users are having login problems, check for /etc/nologin and look for PAM module problems.
• If you are still having problems, you could try creating a new user with the default dot configuration files to verify that customization of .bash_profile or some other dot file is not preventing successful logins.
Endnote
1 Thanks to Bruce Laughlin in the Hewlett-Packard expert center for contributing this crypt program.