1. System Boot, Startup, and Shutdown Issues
There is no question that startup issues can really cause anxiety for system administrators. We reboot a box and anxiously wait to see it respond to ping so we know it is coming up ok. But what do we do if Linux doesn’t boot up? Can we resolve the problem, or is it simpler to just reinstall? Reinstalling Linux is easy if we are properly prepared. Yet we sometimes wonder whether we have good backups and contemplate an evening at work reloading the box. Chapter 9, “Backup/Recovery,” helps you prepare for the time when Linux must be reinstalled, but hopefully after reading this chapter, you will be able to resolve Linux startup issues with confidence.
Startup issues are difficult to fix because Linux first must be started somehow so that troubleshooting can begin. You must have a good understanding of the Linux three-part boot process to troubleshoot startup problems. The following key topics are discussed in this chapter:
• The bootloaders GRUB and LILO
• The init process
• The startup and shutdown scripts
• Fixing problems with the root filesystem
The bootloader is the first software to execute from disk at boot time. The purpose of the bootloader is to start the Linux kernel. GRUB and LILO are the most common bootloaders, and this chapter only discusses these. Both make it easy to configure boot menu choices of different kernels and boot disks.
The init process is the first process started by the Linux kernel during boot. The init process is responsible for starting processes during boot up and when changing runlevels. The rc subsystem is run by init at each runlevel to start and stop the processes for that runlevel. We examine the concept of runlevels in this chapter. init is the parent of every other process.
Linux starts a lot of services at boot up. Networking services, cron, and syslog are just a few. The rc subsystem starts these services. We look at how the rc scripts work and how to troubleshoot them in this chapter.
This chapter explains all these topics in detail. The examples provided demonstrate solutions for common Linux boot problems. In addition, this chapter covers creating rescue CDs and fixing common problems with the root filesystem that prevent Linux from starting.
Bootloaders
The bootloader displays the boot menu that appears during Linux startup. Bootloaders are not unique to Linux. They are the bridge between the BIOS and an operating system, whether it is Linux, Windows, or UNIX.
The bootloader loads the Linux kernel and initial ram disk1 and then executes the kernel. The BIOS determines which source (hard disk, floppy, CD, etc.) to boot from. The Master Boot Record (MBR) is then loaded, and the bootloader is executed from the selected device.
The operating system load programs or bootloaders covered in this chapter are the GRand Unified Bootloader (GRUB) and LInux LOader (LILO), and we concentrate on the Red Hat and SUSE distributions. This section explains how the bootloaders work, what parts they have, and how to fix common problems with them. This section also discusses how to boot when the bootloader fails.
GRUB
GRUB is the bootloader most commonly used to start installed Linux systems. GRUB identifies the Linux kernel that should be used to boot the system and loads and then executes the kernel. If you installed Linux recently, there is a good chance that GRUB was installed too and serves as the bootloader.
This section examines the features of GRUB and how to fix problems with GRUB. We start with an overview of how GRUB works. Next, we demonstrate the features used for troubleshooting and resolving boot problems. We include examples to show how to boot to single user mode, how to correct a bad GRUB configuration, and how to repair the MBR when it is overwritten or corrupted. GRUB has rich configuration features that are covered well in the GRUB info manual. We won’t try to duplicate that information here.
Before discussing GRUB, we need to briefly explain the MBR. The MBR of a hard disk is located in the first sector and is used to load and start the operating system. The MBR contains the partition table and an extremely small program called the bootloader. More information about the MBR can be found in Chapter 6, “Disk Partitions and Filesystems.”
GRUB is a two-stage bootloader:
- Stage 1 is installed in the MBR and is 446 bytes in length. Stage 1’s only job is to load and execute Stage 2, although it may use an intermediate step called Stage 1.5 if filesystem support is needed.
- Stage 2 loads and executes the kernel. It displays the boot menu and provides a shell environment that can be used to specify a kernel location. Stage 2 is normally located in
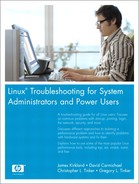
/boot/grub. The GRUB boot menu is displayed on the console after the hardware BIOS messages. The menu contains a list of kernels that can be booted with the default kernel highlighted. Figure 1-1 shows a typical GRUB boot menu. This example has two Linux boot disks. One disk contains Red Hat Linux with three different kernel choices available, and the other disk contains SUSE Linux. One SUSE kernel choice is listed on the menu.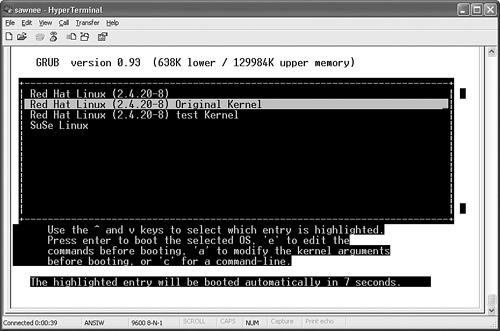
The menu choices are from an ASCII configuration file named /boot/grub/grub.conf for Red Hat and /boot/grub/menu.lst for SUSE. The GRUB configuration file can be edited as needed. Figure 1-1 shows a GRUB configuration with two Linux installations. Each has a /boot partition and a grub.conf or menu.lst configuration file. Whichever Linux install wrote the MBR is the one whose /boot is used at startup. The GRUB menu can be customized using different backgrounds and colors. The screenshots in this chapter show GRUB output from a serial console window. Typically, there is a graphical menu of kernels to boot. Each menu choice has a group of lines consisting of a menu item title and the kernel location for this choice. The highlighted Red Hat entry in Figure 1-1 consists of the following lines in grub.conf.
title Red Hat Linux (2.4.20-8) Original Kernel
root (hd0,0)
kernel /vmlinuz-2.4.20-8 ro root=LABEL=/
initrd /initrd-2.4.20-8.img
This is an example of a very simple kernel definition in grub.conf. Each grub.conf line begins with a keyword. The keywords used in Figure 1-1 are:
• title—Begins a new menu choice. The text following the title keyword is displayed on the GRUB menu at boot up.
• root—Specifies the partition where the boot directory is located.
• kernel—Specifies the path to the kernel to boot along with the options to pass.
• initrd—Sets up a ram disk.
Note
All the GRUB options are identified in the GRUB info file.
Please notice the disk partition (hd0,0) that is identified as the location of the boot partition. With GRUB, the disks are numbered starting from zero, as are the partitions. The second disk would be hd1, the third hd2, and so on. The root partition in the previous example is the first partition on the first hard disk. Floppy disks are identified as fd rather than hd.
A complete sample grub.conf file is shown here:
# Set up the serial terminal, first of all.
serial --unit=0 --speed=9600 --word=8 --parity=no --stop=1
terminal --timeout=10 serial console
# Set default kernel selection. Numbering starts at 0.
default=1
# 10 second delay before autoboot
timeout=10
# Comment out graphical menu
# splashimage=(hd0,0)/grub/splash.xpm.gz
title Red Hat Linux (2.4.20-8)
root (hd0,0)
kernel /bzImage ro root=LABEL=/
initrd /initrd-2.4.20-8.img
title Red Hat Linux (2.4.20-8) Original Kernel
root (hd0,0)
kernel /vmlinuz-2.4.20-8 ro root=LABEL=/
initrd /initrd-2.4.20-8.img
title Red Hat Linux (2.4.20-8) test Kernel
root (hd0,0)
kernel /vmlinuz.tset ro root=LABEL=/
initrd /initrd-2.4.20-8.img
title SuSe Linux
kernel (hd1,0)/vmlinuz root=/dev/hdb3 splash=silent text desktop
showopts
initrd (hd1,0)/initrd
The focus of this chapter is on troubleshooting, not on thoroughly explaining how GRUB works. That information is already available. GRUB has an excellent user manual that explains all the different options and syntax. Visit http://www.gnu.org/software/grub/ to obtain the manual and get the latest GRUB news.
GRUB provides a whole lot more than just the capability to select different kernels from a menu. GRUB allows the menu choices to be modified and even allows a shell-like command interface to boot from kernels not listed on the menu. GRUB makes it easy to correct problems that keep Linux from booting.
Editing the Menu Choices with GRUB
GRUB allows the boot menu choices to be edited by pressing e. GRUB enables users to edit the configuration of the menu choices. This means users can correct problems with grub.conf that prevent Linux from starting. Figure 1-2 shows a GRUB screen after pressing e.
Figure 1-2. GRUB menu edit screen
Let’s see how this feature can help us resolve a boot problem.
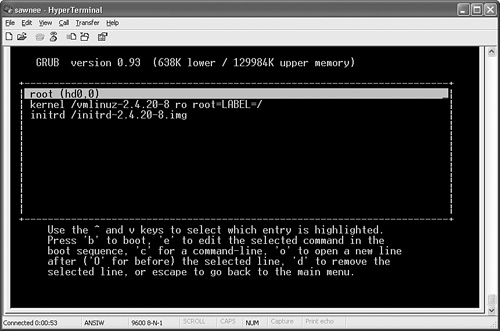
Figure 1-3 is a console message that no system administrator wants to see. Pressing the space bar just brings up the GRUB menu again. The timer might be restarted too. GRUB tries to boot the same kernel again when the timer expires. If this attempt fails, the screen is displayed again without the timer.
Figure 1-3. GRUB boot error message
The Error 15 tells us that the kernel specified in grub.conf can’t be found. Fortunately, GRUB permits editing the configuration. Pressing e gets the commands for the selected boot entry, as shown in Figure 1-4.
Figure 1-4. GRUB kernel configuration editing

If we arrow down to the kernel line and press e, we get the edit screen shown in Figure 1-5.
Figure 1-5. GRUB shell interface
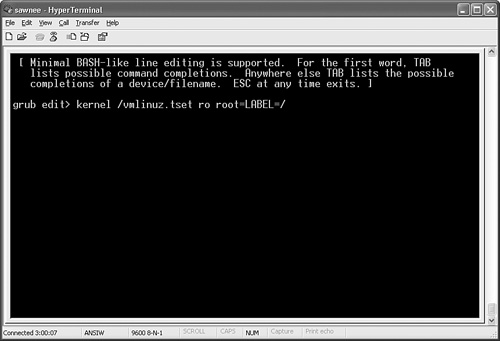
We can use the arrow keys and Backspace to make changes just like the BASH shell. Press Enter when done to return to the previous screen. Press Esc to exit to the previous screen without keeping changes. We fix the typo by changing vmlinuz.tset to vmlinuz.test and press Enter. Now, the menu choice in Figure 1-6 looks better.
Figure 1-6. GRUB kernel configuration editing

Press b to boot. Hopefully it works and Linux starts. If it still doesn’t work, GRUB lets us try again. The kernel line can also be used to boot Linux to single user or emergency mode.
Booting to Single User Mode and Emergency Mode
Occasionally it is necessary to perform system maintenance in a minimalist environment. Linux provides single user mode for this purpose. In single user mode (runlevel 1), Linux boots to a root shell. Networking is disabled, and few processes are running. Single user mode can be used to restore configuration files, move user data, fix filesystem corruption, and so on. It is important to know how to boot Linux to single user mode for the times when the boot to multiuser mode fails. Figure 1-7 is a typical SUSE console screen when booting to single user mode.
Figure 1-7. SUSE single user mode boot console output
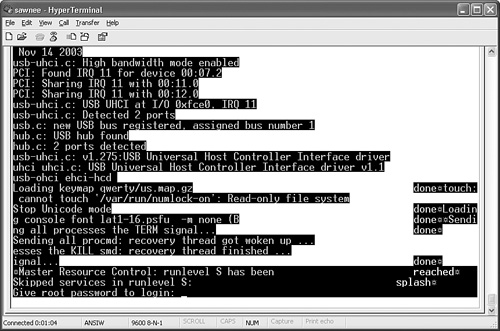
Note that SUSE requires the root password in single user mode. Red Hat, however, does not, which makes it easy to change the root password if it is lost. We explain later in this chapter how to reset a lost root password with a rescue CD-ROM.
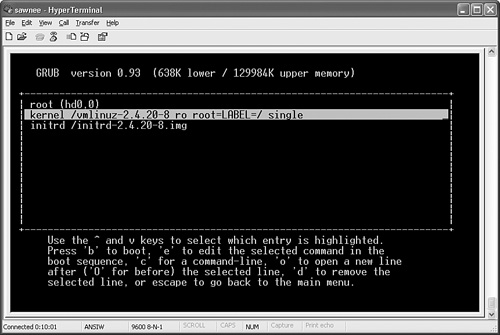
If Linux boots from the kernel but then hangs, encounters errors during the startup scripts, or cannot boot to multiuser mode for some other reason, try single user mode. Just interrupt the GRUB auto boot, edit the kernel line, and add single to the end. Figure 1-8 is a screenshot of a Red Hat single user mode boot.
Figure 1-8. GRUB single user mode boot
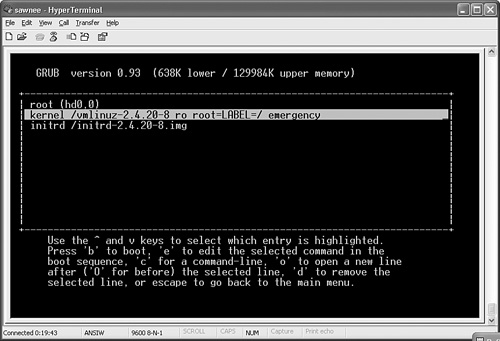
Booting to emergency mode is accomplished by adding emergency to the end of the command line. Emergency mode is a minimalist environment. The root filesystem is mounted in read-only mode, no other filesystems are mounted, and init is not started. Figure 1-9 shows a Red Hat emergency mode boot.
Figure 1-9. GRUB emergency mode boot
What if we want to boot a kernel that is not on the menu? The next section looks at the editor features provided with GRUB.
Command-Line Editing with GRUB
The GRUB command line can be invoked by pressing c, and it can be used to boot a kernel that is not on the menu. Users can enter their own root, kernel, and initrd lines. Press c and you get
grub>
GRUB supports tab line completion to list matches for device files and kernels. The previous Red Hat menu example can be used as a template for commands that could be used to boot the system from the GRUB command line.
For example, press Tab after typing the following, and GRUB completes the device if only one choice is available or lists all the matches if multiple matches exist:
grub> root (h
For a single-disk Linux installation with one IDE drive, GRUB fills in
grub> root (hd0,
Complete the rest of the root definition so that the line reads
grub> root (hd0,0)
Press Enter, and GRUB responds
Filesystem type is ext2fs, partition type 0x83
Now choose a kernel. Enter the following and press Tab:
grub> kernel /v
GRUB responds by filling in the rest of the unique characters (vmlinu) and showing the matches:
Possible files are: vmlinuz vmlinux-2.4.20-8 vmlinuz-2.4.20-8
vmlinuz.good vmlinuz-2.4.20-dave
grub> kernel /vmlinu
Note
All the kernels in /boot do not necessarily have entries in the grub.conf file.
Tab completion makes it easy to boot a kernel even when the exact spelling isn’t known. After the commands are entered, just type boot to boot Linux. This technique can also be used if the grub.conf file was renamed or erased.
Problems with the MBR
We mentioned earlier that GRUB inserts its stage1 file in the MBR. It is important to know how to restore the MBR if it becomes corrupted.
Reinstall MBR with GRUB stage1
Creating a dual-boot Linux system such as the Red Hat/SUSE example in Figure 1-1 is a nice way to create a fallback position for system changes and to test a new Linux distribution. A small downside is that the GRUB stage1 information in the MBR can be overwritten by the second install. In our example, Red Hat is installed on the first disk, and SUSE is installed on the second. After SUSE is installed, however, the SUSE GRUB menu is displayed instead of the Red Hat menu that we are used to and that has been customized for our installation. An easy way exists to fix the MBR, though. In Figure 1-10, we’ve reinstalled the GRUB stage1 file to the MBR following the instructions in the GRUB manual, which is available at http://www.gnu.org/software/grub/manual/.

The root (hd0,0) command sets the (hd0,0) partition as the location of the boot directory. This command tells GRUB in which partition the stage2 and grub.conf or menu.lst files are located.
The find /boot/grub/stage1 command in Figure 1-10 returned the first stage1 entry it found. Both disks should have this file. In this instance, GRUB shows the stage1 file from the second disk. Because we want GRUB to format the MBR on the first disk, /dev/hd0 is used.
The setup (hd0) command writes the MBR of the selected disk or partition.
Using a Boot Floppy to Repair the MBR
It is a good idea to create a GRUB boot floppy or CD and print or archive the GRUB configuration file (/boot/grub/grub.conf for Red Hat and /boot/grub/menu.lst for SUSE) for use when GRUB won’t start or won’t display the GRUB menu. The following code illustrates how to create the boot floppy, as explained in Section 3.1 of the GRUB manual (http://www.gnu.org/software/grub/manual/grub.pdf):
cd /usr/share/grub/i386-pc
# dd if=stage1 of=/dev/fd0 bs=512 count=1
1+0 records in
1+0 records out
# dd if=stage2 of=/dev/fd0 bs=512 seek=1
153+1 records in
153+1 records out
#
The dd if=stage1 of=/dev/fd0 bs=512 count=1 command copies the GRUB MBR file (stage1) to the beginning of the floppy to make it bootable. The command dd if=stage2 of=/dev/fd0 bs=512 seek=1 skips one 512-byte block from the beginning of the floppy and writes the stage2 file.
If GRUB fails to run when the computer is started, you can use this floppy to boot to the GRUB prompt. Enter the commands from the grub.conf file at the GRUB command line to boot Linux. Use tab completion to find a good kernel if there is no grub.conf archive to which to refer.
Creating a boot CD is just as easy. Section 3.4 of the GRUB manual contains the instructions for making a GRUB boot CD. Here are the instructions (without the comments):
$ mkdir iso
$ mkdir -p iso/boot/grub
$ cp /usr/lib/grub/i386-pc/stage2_eltorito iso/boot/grub
$ mkisofs -R -b boot/grub/stage2_eltorito -no-emul-boot
-boot-load-size 4 -boot-info-table -o grub.iso iso
Now just burn the grub.iso file created by mkisofs to a CD. The instructions are for GRUB version 0.97. If an earlier version of GRUB is installed on your Linux system, the /usr/lib/grub/i386-pc/stage2_eltorito file might not exist. In that case, download version 0.97 of GRUB from http://www.gnu.org/software/grub/ and follow the INSTALL file instructions for running configure and make, which produces the stage2_eltorito file. Running configure and make does not affect the version of GRUB installed in /boot on your Linux system.
LILO
The LILO bootloader is similar to GRUB in that it provides menu-based kernel selection. LILO is a two-stage bootloader. Both Stage 1 and Stage 2 are kept in one file, usually /boot/boot.b. The first stage of the LILO bootloader occupies the boot sector, usually the MBR. It relies on the BIOS to load the following:
• The boot sector (second stage)
• The message to be displayed at boot up
• The kernels that can be selected for booting
• The boot sectors of all other operating systems that LILO boots
• The location of all the previous files (map file)
The key to LILO is the map file (/boot/map). This file is created by the /sbin/lilo command. LILO does not understand filesystems. The physical location of the files is stored in the map file. Thus, if the files move, /sbin/lilo must be run. If a new kernel is built, /sbin/lilo must be run to map the new location and size. Because this information is encoded in the map file, LILO doesn’t provide a shell-like environment as GRUB does to manually enter kernel location information at boot time. The /sbin/lilo command reinstalls LILO because it writes the MBR.
The /etc/lilo.conf configuration file specifies kernel locations and LILO configuration. The following is a very basic /etc/lilo.conf file for a two-disk configuration with Red Hat on the first disk and SUSE on the second:
prompt
serial=0,9600
# wait 10 seconds to autoboot
timeout=100
# location of boot sector to write
boot=/dev/hda
# location to write map file
map=/boot/map
# identify bootloader location
install=/boot/boot.b
linear
# set default kernel for autoboot
default=SuSE
# RedHat
image=/boot/vmlinuz-2.4.20-8
label=RedHat
initrd=/boot/initrd-2.4.20-8.img
read-only
append="root=LABEL=/ console=ttyS0,9600"
# SuSE
image=/suse_root_hdb/boot/vmlinuz
label=SuSE
initrd=/suse_root_hdb/boot/initrd
append="root=/dev/hdb3 splash=silent text desktop showopts
console=ttyS0,9600"
The /etc/lilo.conf file has many options, which are explained in the lilo.conf(5) man page. Lines starting with # are comments and are ignored by /sbin/lilo. Table 1-1 provides a description of the global entries used in this file.
Table 1-1. /etc/lilo.conf Global Keywords Definitions

Many more keywords exist, and explaining them all is beyond the scope of this chapter. Our goal is to show how LILO works and how to fix problems. LILO is well documented in the lilo.conf(5) and lilo(8) man pages, as well as the excellent LILO README supplied with the LILO package.
Most LILO installations display a nice graphical menu at boot that lists all the kernels from /etc/lilo.conf. The kernels are listed by using the message option:
message=/boot/message
The examples we use are from the text LILO output from a serial console. Figure 1-11 shows what the normal boot screen looks like if the message line is not included in /etc/lilo.conf.
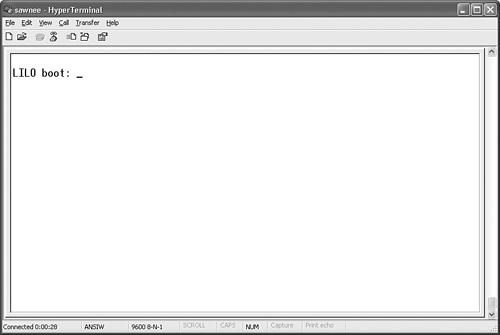
If no keys are pressed, LILO boots the default entry from /etc/lilo.conf. If the default variable is not set, the first image entry in /etc/lilo.conf is booted. Press Tab to interrupt autoboot and see the list of boot entries. Figure 1-12 shows the display after Tab is pressed.
Figure 1-12. LILO boot choices
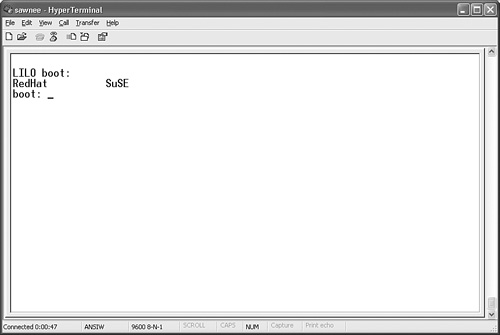
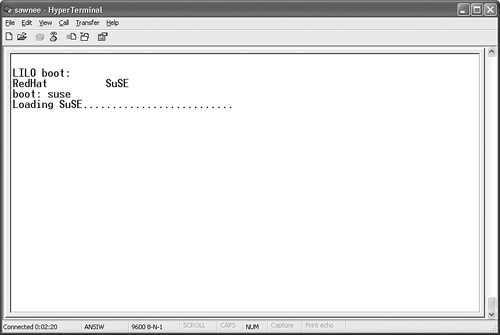
It is easy to pick a different kernel. Just type the name of the entry and press Enter. The SUSE kernel is chosen in Figure 1-13.
Figure 1-13. Selecting a kernel to boot with LILO
We can append parameters to the kernel command line too. Figure 1-14 demonstrates how to boot to single user mode (init runlevel 1).
Figure 1-14. Booting single user mode with LILO

Booting to emergency mode is achieved the same way. Just add emergency to the command line. As we stated earlier, emergency mode is a minimalist environment. The root filesystem is mounted in read-only mode, no other filesystems are mounted, and init is not started.
Booting When GRUB or LILO Doesn’t Work
A boot floppy can be created to boot a Linux box when the /boot filesystem is damaged or missing files.
Red Hat provides the command mkbootdisk2 to create a bootable floppy. The root filesystem that is mounted when booting from this floppy is specified in /etc/fstab. Thus, the root filesystem must be in good condition. Otherwise, the box starts to boot but then fails when trying to mount /. This is not a rescue utilities disk. It is just a way to boot Linux when /boot is missing files or is damaged. See the mkbootdisk(8) man page for full details. This command works with both LILO and GRUB bootloaders.
Here is an example of making the boot floppy:
# mkbootdisk --device /dev/fd0 -v 2.4.20-8
Insert a disk in /dev/fd0. Any information on the disk will be lost.
Press <Enter> to continue or ^C to abort:
Formatting /tmp/mkbootdisk.zRbsi0... done.
Copying /boot/vmlinuz-2.4.20-8... done.
Copying /boot/initrd-2.4.20-8.img... done.
Configuring bootloader... done.
20+0 records in
20+0 records out
Here is what the console shows when booting from this floppy:
SYSLINUX 2.00 2002-10-25 Copyright (C) 1994-2002 H. Peter Anvin
Press <return> (or wait 10 seconds) to boot your Red Hat Linux system
from /dev/hda2. You may override the default linux kernel parameters by
typing "linux <params>", followed by <return> if you like.
boot:
Boot to single user mode by appending single to the boot command like this:
boot: linux single
The mkbootdisk floppy makes repairing /boot easy. For example, suppose LILO displays only the following during boot:
LI
This result means LILO encountered a problem while starting. During boot, LILO displays L I L O one letter at a time to indicate its progress. The meaning of each is described in Chapter 6. When only LI is displayed, the first stage bootloader could not execute the second stage loader. Maybe the file was moved or deleted. What now? We can use the mkbootdisk floppy. The floppy boots Linux, mounts / from the hard disk, and Linux runs normally. After fixing the problem in /boot, don’t forget to run lilo -v to update the MBR.
A mkbootdisk floppy is a good recovery tool. We discuss recovery CDs later in this chapter.
The init Process and/etc/inittab File
When a Linux system is booted, the first process that the kernel starts is /sbin/init. It is always process id (PID) 1 and has a parent process id (PPID) of 0. The init process is always running.
root 1 0 0 14:05 ? 00:00:08 init [3]
The /etc/inittab file is the configuration file for /sbin/init. /etc/inittab identifies the processes that init starts, and it can be customized as desired. Few environment variables are set when a process is started by init. The inittab lines have four colon-separated fields:
<id>:<runlevels>:<action>:<command>
Let’s look at the meaning of each.
• id—The inittab id consists of one to four characters that identify the inittab line. The id must be unique.
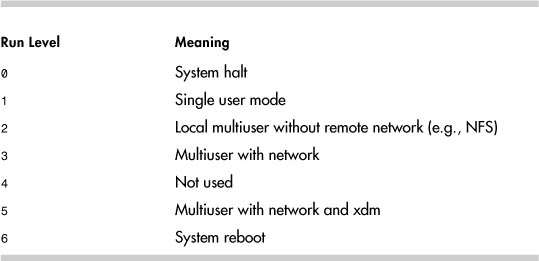
• runlevels—The runlevels field contains one or more characters, usually numbers identifying the runlevels for which this process is started. Table 1-2 lists the runlevel meanings.
• action—The keyword in this field tells init what action to take. The more common keywords are shown in Table 1-3.
Table 1-3. inittab Keywords for the action Field

• command—This field specifies the path of the command that init executes.
See the inittab(8) man page for the complete list of inittab action keywords and a more detailed example of the /etc/inittab file. The following is a typical /etc/inittab file from a SUSE 9.0 system. The lines controlling startup and shutdown are bolded.
#
# /etc/inittab
#
# Copyright (c) 1996-2002 SuSE Linux AG, Nuernberg, Germany. All rights
# reserved.
#
# Author: Florian La Roche, 1996
# Please send feedback to http://www.suse.de/feedback
#
# This is the main configuration file of /sbin/init, which
# is executed by the kernel on startup. It describes what
# scripts are used for the different runlevels.
#
# All scripts for runlevel changes are in /etc/init.d/.
#
# This file may be modified by SuSEconfig unless CHECK_INITTAB
# in /etc/sysconfig/suseconfig is set to "no"
#
# The default runlevel is defined here
id:5:initdefault:
# First script to be executed, if not booting in emergency (-b) mode
si::bootwait:/etc/init.d/boot
# /etc/init.d/rc takes care of runlevel handling
#
# runlevel 0 is System halt (Do not use this for initdefault!)
# runlevel 1 is Single user mode
# runlevel 2 is Local multiuser without remote network (e.g. NFS)
# runlevel 3 is Full multiuser with network
# runlevel 4 is Not used
# runlevel 5 is Full multiuser with network and xdm
# runlevel 6 is System reboot (Do not use this for initdefault!)
#
l0:0:wait:/etc/init.d/rc 0
l1:1:wait:/etc/init.d/rc 1
l2:2:wait:/etc/init.d/rc 2
l3:3:wait:/etc/init.d/rc 3
#l4:4:wait:/etc/init.d/rc 4
l5:5:wait:/etc/init.d/rc 5
l6:6:wait:/etc/init.d/rc 6
# what to do in single-user mode
ls:S:wait:/etc/init.d/rc S
~~:S:respawn:/sbin/sulogin
# what to do when CTRL-ALT-DEL is pressed
ca::ctrlaltdel:/sbin/shutdown -r -t 4 now
# special keyboard request (Alt-UpArrow)
# look into the kbd-0.90 docs for this
kb::kbrequest:/bin/echo "Keyboard Request -- edit /etc/inittab to let
this work."
# what to do when power fails/returns
pf::powerwait:/etc/init.d/powerfail start
pn::powerfailnow:/etc/init.d/powerfail now
#pn::powerfail:/etc/init.d/powerfail now
po::powerokwait:/etc/init.d/powerfail stop
# for ARGO UPS
sh:12345:powerfail:/sbin/shutdown -h now THE POWER IS FAILING
# getty-programs for the normal runlevels
# <id>:<runlevels>:<action>:<process>
# The "id" field MUST be the same as the last
# characters of the device (after "tty").
1:2345:respawn:/sbin/mingetty --noclear tty1
2:2345:respawn:/sbin/mingetty tty2
3:2345:respawn:/sbin/mingetty tty3
4:2345:respawn:/sbin/mingetty tty4
5:2345:respawn:/sbin/mingetty tty5
6:2345:respawn:/sbin/mingetty tty6
co:2345:respawn:/sbin/agetty -h -t 60 ttyS0 9600 vt102
#
#S0:12345:respawn:/sbin/agetty -L 9600 ttyS0 vt102
#
# Note: Do not use tty7 in runlevel 3, this virtual line
# is occupied by the programm xdm.
#
# This is for the package xdmsc; after installing and
# and configuration you should remove the comment character
# from the following line:
#7:3:respawn:+/etc/init.d/rx tty7
# modem getty.
# mo:235:respawn:/usr/sbin/mgetty -s 38400 modem
# fax getty (hylafax)
# mo:35:respawn:/usr/lib/fax/faxgetty /dev/modem
# vbox (voice box) getty
# I6:35:respawn:/usr/sbin/vboxgetty -d /dev/ttyI6
# I7:35:respawn:/usr/sbin/vboxgetty -d /dev/ttyI7
# end of /etc/inittab
Up2p::respawn:/opt/uptime2/bin/uptime2+
Up2r::respawn:/opt/uptime2/lbin/Uptime2+.Restart
Startup in Multiuser Mode
Let’s look at the inittab lines that affect startup in multiuser mode. The first noncomment line in inittab tells init the runlevel to move the system to at boot up. For example:
id:5:initdefault:
If the initdefault line is missing, the boot process pauses with a console prompt asking for the runlevel to be specified before continuing. The inittdefault line typically specifies runlevel 3 or 5.
The second non-comment line in inittab is probably the system initialization script or boot script. This script sets up the console, mounts filesystems, sets kernel parameters, and so on. In Red Hat 9.0, the line is:
si::sysinit:/etc/rc.d/rc.sysinit
For SUSE 9.0, it is:
si::bootwait:/etc/init.d/boot
The Red Hat boot script, /etc/rc.d/rc.sysinit, is a top-down script compared to SUSE’s /etc/init.d/boot script. The SUSE script executes the scripts in /etc/init.d/boot.d/ to set up most system needs. You can get an idea of what gets done by looking at a listing of the boot.d directory. The boot.d directory consists of symbolic links to scripts in /etc/init.d.
#ll /etc/init.d/boot.d
total 9
lrwxrwxrwx 1 root root 12 Jul 6 12:19 S01boot.proc ->
../boot.proc
lrwxrwxrwx 1 root root 12 Jul 6 12:20 S01setserial ->
../setserial
lrwxrwxrwx 1 root root 10 Jul 6 12:20 S03boot.md ->
../boot.md
lrwxrwxrwx 1 root root 11 Jul 6 12:20 S04boot.lvm ->
../boot.lvm
lrwxrwxrwx 1 root root 15 Jul 6 12:20 S05boot.localfs ->
../boot.localfs
lrwxrwxrwx 1 root root 14 Jul 6 12:20 S06boot.crypto ->
../boot.crypto
lrwxrwxrwx 1 root root 19 Jul 6 12:20
S07boot.loadmodules -> ../boot.loadmodules
lrwxrwxrwx 1 root root 27 Jul 6 12:20
S07boot.restore_permissions -> ../boot.restore_permissions
lrwxrwxrwx 1 root root 12 Jul 6 12:20 S07boot.scpm ->
../boot.scpm
lrwxrwxrwx 1 root root 12 Jul 6 12:20 S07boot.swap ->
../boot.swap
lrwxrwxrwx 1 root root 13 Jul 6 12:20 S08boot.clock ->
../boot.clock
lrwxrwxrwx 1 root root 14 Jul 6 12:20 S08boot.idedma ->
../boot.idedma
lrwxrwxrwx 1 root root 16 Jul 6 12:20 S09boot.ldconfig ->
../boot.ldconfig
lrwxrwxrwx 1 root root 14 Jul 6 12:20 S10boot.isapnp ->
../boot.isapnp
lrwxrwxrwx 1 root root 16 Jul 6 12:20 S10boot.localnet ->
../boot.localnet
lrwxrwxrwx 1 root root 13 Jul 6 12:20 S10boot.sched ->
../boot.sched
lrwxrwxrwx 1 root root 16 Jul 6 12:20 S11boot.ipconfig ->
../boot.ipconfig
lrwxrwxrwx 1 root root 12 Jul 6 12:20 S11boot.klog ->
../boot.klog
If you have a SUSE distribution, you should read /etc/init.d/README, which further explains the SUSE boot strategy.
The runlevels consist of a set of processes that start at each runlevel. The processes are started by the /etc/rc.d/rc script. In SUSE, the rc.d directory is a symbolic link to /etc/init.d. The rc script is explained further in the next section.
The /etc/inittab file includes lines similar to the following to start the services for runlevels 0 through 6. Remember, the second field specifies the runlevel at which the line is executed. The following is from a Red Hat 9.0 system:
l0:0:wait:/etc/rc.d/rc 0
l1:1:wait:/etc/rc.d/rc 1
l2:2:wait:/etc/rc.d/rc 2
l3:3:wait:/etc/rc.d/rc 3
l4:4:wait:/etc/rc.d/rc 4
l5:5:wait:/etc/rc.d/rc 5
l6:6:wait:/etc/rc.d/rc 6
After the rc scripts finishes, the Linux startup is complete. The /etc/inittab file includes other lines to run getty processes, handle the powerfail condition, and so on. The lines that affect system startup and shutdown are those that run the /etc/rc.d/rc script.
The runlevel can be changed after boot up as well. The root user can move Linux to a different runlevel. The telinit command can be used to tell init to move to a new run-level. For example, the command telinit 5 tells init to move to runlevel 5. The telinit command is just a link to init:
#ls -al /sbin/telinit
lrwxrwxrwx 1 root root 4 Nov 6 2003 /sbin/telinit -> init
Looking at the previous /etc/inittab entries, we can see that the command telinit 5 causes init to execute /etc/rc.d/rc 5. The 5 argument tells /etc/rc.d(or init.d)/rc what runlevel scripts to execute.
The telinit command can also make init look for changes in /etc/inittab. The syntax is telinit q. See the telinit(8) man page for further details.
init errors
If the console shows errors such as the following, init has detected a problem while running a command from /etc/inittab.
INIT: Id "db" respawning too fast: disabled for 5 minutes
In this example, the message corresponds to the following line in /etc/inittab:
db:345:respawn:/usr/local/bin/dbmon
Remember that the respawn keyword in /etc/inittab means that init restarts any command whose process terminates. The previous message means init ran the command ten times, but the command keeps terminating, so init is giving up.
After the problem with the command is fixed, run telinit u to make init try again, or run telinit q if changes have been made to /etc/inittab. The init process logs its messages using the syslog facility,3 and by default you can find init messages in the /var/log/messages file. The following is a sample message:
Dec 30 10:40:29 sawnee init: Re-reading inittab
rc Scripts
The rc script is not a big, monolithic script that starts all the processes needed for Linux services such as sshd, syslog, xinetd, and so on. Rather, rc runs a small script in /etc/init.d for each required Linux service. Each service script both starts and stops the service. Here is an example of the cron service script:
-rwxr-xr-x 1 root root 1297 Mar 3 2005 /etc/rc.d/init.d/crond
The rc script knows which service scripts to start or stop for each runlevel by using directories populated with links to the /etc/init.d startup and shutdown service scripts. These directories could be /etc/init.d/rc#.d or /etc/rc.d/rc#.d, where # is the runlevel to execute. Runlevels are defined by the service scripts that start or stop services at that level. This example shows all the cron startup and shutdown links:
lrwxr-xr-x 1 root root 15 Feb 9 2005
/etc/rc.d/rc0.d/K60crond -> ../init.d/crond
lrwxr-xr-x 1 root root 15 Feb 9 2005
/etc/rc.d/rc1.d/K60crond -> ../init.d/crond
lrwxr-xr-x 1 root root 15 Feb 9 2005
/etc/rc.d/rc2.d/S90crond -> ../init.d/crond
lrwxr-xr-x 1 root root 15 Feb 9 2005
/etc/rc.d/rc3.d/S90crond -> ../init.d/crond
lrwxr-xr-x 1 root root 15 Feb 9 2005
/etc/rc.d/rc4.d/S90crond -> ../init.d/crond
lrwxr-xr-x 1 root root 15 Feb 9 2005
/etc/rc.d/rc5.d/S90crond -> ../init.d/crond
lrwxr-xr-x 1 root root 15 Feb 9 2005
/etc/rc.d/rc6.d/K60crond -> ../init.d/crond
The rc script (/etc/rc.d/rc or /etc/init.d/rc) links to service scripts starting with S in either /etc/init.d/rc#.d or /etc/rc.d/rc#.d. For the syntax /etc/rc.d/rc 5, all the /etc/init.d/rc5.d/S* or /etc/rc.d/rc5.d/S* service scripts are executed. The following is from a Red Hat 9.0 system4:
#ls -al /etc/rc.d
total 76
drwxr-xr-x 10 root root 4096 Dec 12 15:18 .
drwxr-xr-x 70 root root 8192 Dec 16 04:08 ..
drwxr-xr-x 2 root root 4096 Dec 12 15:52 init.d
-rwxr-xr-x 1 root root 2338 Feb 18 2003 rc
drwxr-xr-x 2 root root 4096 May 18 2004 rc0.d
drwxr-xr-x 2 root root 4096 May 18 2004 rc1.d
drwxr-xr-x 2 root root 4096 May 18 2004 rc2.d
drwxr-xr-x 2 root root 4096 Aug 20 08:53 rc3.d
drwxr-xr-x 2 root root 4096 May 18 2004 rc4.d
drwxr-xr-x 2 root root 4096 Aug 20 08:53 rc5.d
drwxr-xr-x 2 root root 4096 May 18 2004 rc6.d
-rwxr-xr-x 1 root root 220 Jul 10 2001 rc.local
-rwxr-xr-x 1 root root 23299 Feb 24 2003 rc.sysinit
The entries in rc#.d are symbolic links. The actual scripts are in /etc/init.d. These links begin with either K or S. The S links are for startup scripts, and the K links are for shutdown scripts. The numbers following the S or K are used to order the execution of the scripts. When moving to a new runlevel, the shutdown scripts are run, followed by the startup scripts. Let’s look more closely at the startup scripts in rc5.d:
# ls -al /etc/rc.d/rc5.d/S*
lrwxrwxrwx 1 root root 15 May 18 2004
/etc/rc.d/rc5.d/S05kudzu
-> ../init.d/kudzu
lrwxrwxrwx 1 root root 18 May 18 2004
/etc/rc.d/rc5.d/S08iptables ->
../init.d/iptables
lrwxrwxrwx 1 root root 17 May 18 2004
/etc/rc.d/rc5.d/S10network ->
../init.d/network
lrwxrwxrwx 1 root root 16 May 18 2004
/etc/rc.d/rc5.d/S12syslog ->
../init.d/syslog
lrwxrwxrwx 1 root root 17 May 18 2004
/etc/rc.d/rc5.d/S13portmap ->
../init.d/portmap
lrwxrwxrwx 1 root root 17 May 18 2004
/etc/rc.d/rc5.d/S14nfslock ->
../init.d/nfslock
... (rest omitted)
The script name is the same as the link name without the leading S or K and numbers.
#ls -al /etc/init.d
lrwxrwxrwx 1 root root 11 Nov 6 2003 /etc/init.d ->
rc.d/init.d
#ls /etc/rc.d/init.d
aep1000 firstboot isdn network random squid xinetd
anacron FreeWnn kdcrotate nfs rawdevices sshd ypbind
apmd functions keytable nfslock rhnsd syslog yppasswdd
atd gpm killall nscd saslauthd tux ypserv
autofs halt kudzu ntpd sendmail vncserver ypxfrd
bcm5820 httpd linuxcoe pcmcia single vsftpd
canna innd lisa portmap smb webmin
crond iptables named postgresql snmpd winbind
cups irda netfs pxe snmptrapd xfs
For Red Hat, the initlog command is called to run the individual service startup scripts and log the output using syslogd. The /etc/initlog.conf file defines local7 as the syslog facility for the messages. Looking at this /etc/syslog.conf excerpt, we can see that the boot messages are sent to /var/log/messages and boot.log:
# Log anything (except mail) of level info or higher.
# Don't log private authentication messages!
*.info;mail.none;news.none;authpriv.none;cron.none /var/log/messages
... (lines omitted)
# Save boot messages also to boot.log
local7.* /var/log/boot.log
The initlog(8) and syslogd(8) man pages have further details.
For SUSE, the blogger command sends messages to /var/log/boot.msg. See the blogger(8) man page for details.
It would be cumbersome to manage all the symbolic links needed for an rc start or stop script. Let’s look at crond as an example. It runs at runlevels 2 through 5, so it has a start script for each runlevel. It does not run at levels 0, 1, and 6, so it has kill scripts for these levels. That makes seven symbolic links for just crond.
#find /etc/rc.d -name *crond
/etc/rc.d/init.d/crond
/etc/rc.d/rc0.d/K60crond
/etc/rc.d/rc1.d/K60crond
/etc/rc.d/rc2.d/S90crond
/etc/rc.d/rc3.d/S90crond
/etc/rc.d/rc4.d/S90crond
/etc/rc.d/rc5.d/S90crond
/etc/rc.d/rc6.d/K60crond
Fortunately, the chkconfig command is provided to add and remove the links as needed. The chkconfig(8) man page lists all the options, but the most useful options are provided in Table 1-4.
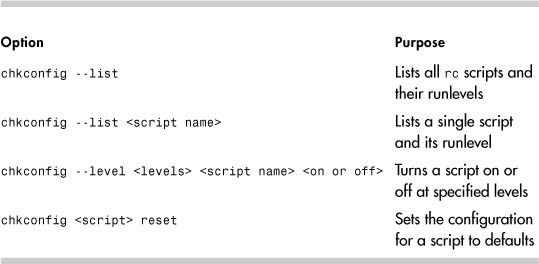
As an example, let’s manipulate crond. First we determine what the current settings are:
#chkconfig --list crond
crond 0:off 1:off 2:on 3:on 4:on 5:on 6:off
Next we turn off crond at runlevel 2:
#chkconfig --level 2 crond off
#chkconfig --list crond
crond 0:off 1:off 2:off 3:on 4:on 5:on 6:off
Now we look at the symbolic links to see whether anything changed:
#find /etc/rc.d -name *crond
/etc/rc.d/init.d/crond
/etc/rc.d/rc0.d/K60crond
/etc/rc.d/rc1.d/K60crond
/etc/rc.d/rc2.d/K60crond
/etc/rc.d/rc3.d/S90crond
/etc/rc.d/rc4.d/S90crond
/etc/rc.d/rc5.d/S90crond
/etc/rc.d/rc6.d/K60crond
We can see that rc2.d has the K60crond stop script instead of the S90crond start script. We can return the crond configuration to the default values:
#chkconfig crond reset
#chkconfig --list crond
crond 0:off 1:off 2:on 3:on 4:on 5:on 6:off
The chkconfig command uses the following line in /etc/rc.d/init.d/crond to determine the default values and link names:
# chkconfig: 2345 90 60
Linux distributions use different methods to encode the default runlevel values in startup and shutdown scripts. The previous example was from a Red Hat 9.0 crond script. A SUSE 9.0 cron script has the following:
### BEGIN INIT INFO
# Provides: cron
# Required-Start: $remote_fs $syslog $time
# X-UnitedLinux-Should-Start: sendmail postfix
# Required-Stop: $remote_fs $syslog
# Default-Start: 2 3 5
# Default-Stop: 0 1 6
# Description: Cron job service
### END INIT INFO
We must mention one more directory. The /etc/sysconfig directory contains configuration files for the rc scripts. Here is a typical listing:
ls /etc/sysconfig
apmd grub mouse redhat-config-
securitylevel
apm-scripts harddisks named redhat-config-users
authconfig hwconf netdump redhat-logviewer
autofs i18n netdump_id_dsa rhn
clock init netdump_id_dsa.pub samba
console installinfo network sendmail
desktop ip6tables-config networking squid
devlabel iptables-config network-scripts syslog
dhcpd irda ntpd tux
dhcrelay irqbalance pcmcia vncservers
firstboot keyboard prelink xinetd
gpm kudzu rawdevices yppasswdd
These configuration files contain variables for the rc scripts. The configuration files are sourced by the rc scripts from which they get their name. As we can see, /etc/sysconfig includes some directories, such as the network directory. The /etc/sysconfig files are small. The sendmail script, for example, consists of only two lines:
# cat sendmail
DAEMON=yes
QUEUE=1h
Red Hat provides the ntsysv command to manipulate startup/shutdown script configuration. It is not as powerful as chkconfig, but it is easier to use.
Linux gives us a way to control what scripts run at boot time. Sure, a system administrator can use chkconfig to configure which scripts run and which don’t, but wouldn’t it be nice to pick and choose during boot up? The Linux confirm mode provides this feature.
Confirm Mode
You can use the rc script to prompt whether each script should be run during startup. This feature is useful when one or more scripts need to be skipped for whatever reason.
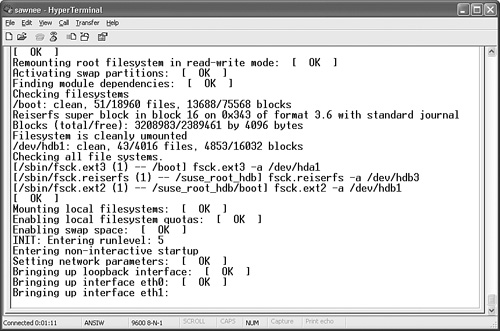
To run rc in confirm mode, add the keyword confirm to the kernel command line, just as you would add the keyword single to boot to single user mode. This can be done from the bootloader, as Figure 1-15 shows.
Figure 1-15. Booting confirm mode with LILO
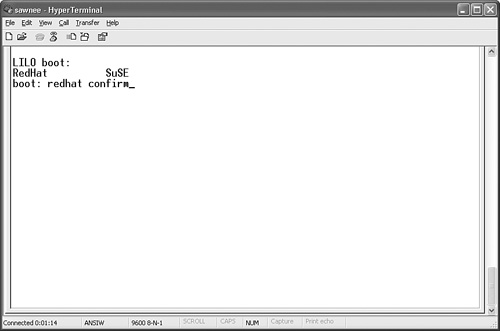
Figure 1-16 shows how the Ethernet rc script hangs if the LAN card is configured to get an IP address through DHCP but is not connected to the network. The user must sit and wait for the timeout from DHCP.
Figure 1-16. Boot hanging at eth1 configuration
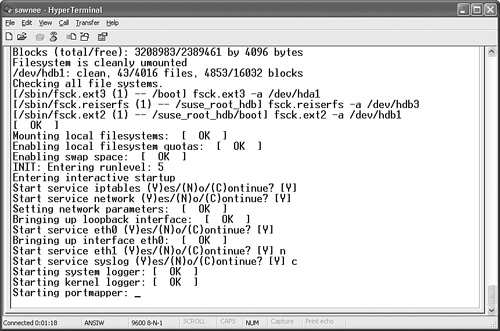
If Linux is started in confirm mode, the script can be skipped. Press y to run the script, or press n to skip it. Press c to run the script and all the following scripts. This is a nice way to skip a script and not have to change the configuration. Figure 1-17 shows how this looks.
Figure 1-17. Skipping eth1 configuration in confirm mode
Startup Problems in rc Scripts
Problems with startup scripts can be difficult to troubleshoot because many files are involved. The problem could be with the rc script, one of the scripts rc is trying to run, or any command or script rc relies on. Figure 1-18 demonstrates a typical example, in which the Linux kernel boots and then displays some errors.
Figure 1-18. Boot error from rc
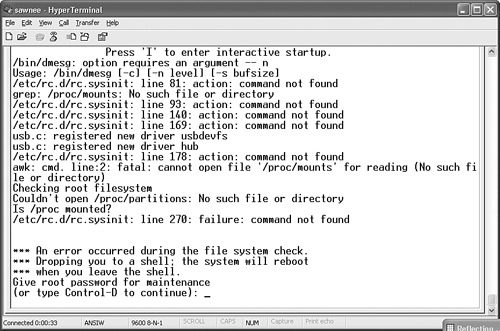
It is a good idea to stop and write down all the messages and errors before they scroll off the screen. We have a limited opportunity to fix problems with Linux in this state because / is mounted as read-only. However, we can troubleshoot and hopefully find the problem.
The following command not found errors from Figure 1-18 stand out:
/etc/rc.d/rc.sysinit: line 81: action: command not found
grep: /proc/mounts: No such file or directory
/etc/rc.d/rc.sysinit: line 93: action: command not found
/etc/rc.d/rc.sysinit: line 140: action: command not found
/etc/rc.d/rc.sysinit: line 169: action: command not found
We edit the file with vi just to check the line numbers:
*** An error occurred during the file system check.
*** Dropping you to a shell; the system will reboot
*** when you leave the shell.
Give root password for maintenance
(or type Control-D to continue):
(Repair filesystem) 1 # vi /etc/rc.d/rc.sysinit
Enter :se nu to turn on line numbers. Enter :81G to go to line 81. In Figure 1-19, you can see that the rc.sysinit script is calling the subroutine named action. The other line numbers call action as well.
Figure 1-19. Editing /etc/rc.d/rc.sysinit

We could look around to see where the action subroutine is located, but it might have been removed. Let’s verify that the startup script files are all in place and the correct size. We can use rpm, but we need to determine what package to verify. We use the rpm command to learn what delivered the rc script:
(Repair filesystem) 2 # rpm -q -f /etc/rc.d/rc
initscripts-7.14-1
Now we verify that the initscripts-7.14-1 rpm is intact:
(Repair filesystem) 3 # rpm -V initscripts-7.14-1
S.5....T c /etc/inittab
S.5....T c /etc/rc.d/init.d/functions
The output looks pretty cryptic, but the rpm(8) man page5 gives a good explanation:
The format of the output is a string of 8 characters, a possible "c"
denoting a configuration file, and then the file name. Each of the 8
characters denotes the result of a comparison of attribute(s) of the file
to the value of those attribute(s) recorded in the database. A single "."
(period) means the test passed, while a single "?" indicates the test
could not be performed (e.g. file permissions prevent reading).
Otherwise, the (mnemonically emboldened) character denotes failure of the
corresponding --verify test:
S file Size differs
M Mode differs (includes permissions and file type)
5 MD5 sum differs
D Device major/minor number mis-match
L readLink(2) path mis-match
U User ownership differs
G Group ownership differs
T mTime differs
So, the output means the size and timestamp of the inittab and functions files have changed since the files were delivered. This can be expected for inittab, but why for functions? Let’s look:
(Repair filesystem) 5 # ls -al /etc/inittab
-rw-r--r-- 1 root root 1807 Dec 17 15:52 /etc/inittab
(Repair filesystem) 6 # ls -al /etc/rc.d/init.d/functions
-rwxr-xr-x 1 root root 0 Dec 21 14:39
/etc/rc.d/init.d/functions
It looks like function was zeroed out. We need to restore this file. Because / is mounted as read-only, the box should be booted from a different source. We can use a rescue CD, rescue disk, or second boot disk. When Linux is up, we just mount / to a temporary mount point and restore the functions file. Rescue disks are explained in the next section.
Fixing Problems with the Root Filesystem
Here is a simple example demonstrating a problem with the root filesystem. The cause is a typo in /etc/fstab. The fix is easy if we can figure out how to boot Linux. Attempting to boot Linux results in the following:
Initializing USB keyboard: [ OK ]
Initializing USB mouse: [ OK ]
Checking root filesystem
LBEL=/:
The superblock could not be read or does not describe a correct ext2
filesystem. If the device is valid and it really contains an ext2
filesystem (and not swap or ufs or something else), then the superblock
is corrupt, and you might try running e2fsck with an alternate
superblock:
e2fsck -b 8193 <device>
fsck.ext3: No such file or directory while trying to open LBEL=/
[FAILED]
*** An error occurred during the file system check.
*** Dropping you to a shell; the system will reboot
*** when you leave the shell.
Give root password for maintenance
(or type Control-D to continue):
Booting from the mkbootdisk floppy gives the same result. The problem isn’t with /boot—it is with /. We need a way to get the system up to fix or restore /.
There are three common ways to boot when the Linux boot fails:
• Boot from another hard disk
• Boot from a rescue CD
• Boot from a floppy rescue disk
Booting from a Second Hard Disk
The box we have been using in the examples is a dual-boot system with Red Hat on one disk and SUSE on the other. Repairing a damaged Red Hat root filesystem is easy in this configuration. We can just boot SUSE, mount the Red Hat root filesystem to some temporary mount point, and fix the problem.
Booting from a Rescue CD
A convenient method of repairing the root filesystem is to use a bootable Linux CD. We will use the Knoppix distribution (http://www.knoppix.net/), but there are many choices, and the most popular are listed at the end of this section. A rescue disk might have been provided with your Linux distribution CDs that can serve the same purpose.
You will probably need to modify the BIOS settings to boot from the CD-ROM or DVD drive before the hard disks. After that is done, restart the computer with the Knoppix CD in the drive. After the Knoppix CD boots, log into KDE. There is no password. Open a terminal window and run df to see what is mounted. The following listing shows that no disk filesystems are mounted.
knoppix@ttyp0[knoppix]$ su - root
root@ttyp0[~]# df
Filesystem 1K-blocks Used Available Use% Mounted on
/dev/root 3471 1113 2358 33% /
/dev/scd0 716308 716308 0 100% /cdrom
/dev/cloop 1943588 1943588 0 100% /KNOPPIX
/ramdisk 95948 2020 93928 3% /ramdisk
root@ttyp0[~]#
The hard disks are not mounted, but we can see that they are in /etc/fstab. It is easy enough to mount them, as you can see here:
root@ttyp0[~]# cat /etc/fstab
/proc /proc proc defaults 0 0
/sys /sys sysfs noauto 0 0
/dev/pts /dev/pts devpts mode=0622 0 0
/dev/fd0 /mnt/auto/floppy auto user,noauto,exec,umask=000 0 /dev/cdrom
/mnt/auto/cdrom auto user,noauto,exec,ro 0 0
# Added by KNOPPIX
/dev/hda1 /mnt/hda1 ext3 noauto,users,exec 0 0
# Added by KNOPPIX
/dev/hda2 /mnt/hda2 ext3 noauto,users,exec 0 0
# Added by KNOPPIX
/dev/hda3 none swap defaults 0 0
# Added by KNOPPIX
/dev/hdb1 /mnt/hdb1 ext2 noauto,users,exec 0 0
# Added by KNOPPIX
/dev/hdb2 none swap defaults 0 0
# Added by KNOPPIX
/dev/hdb3 /mnt/hdb3 reiserfs noauto,users,exec 0 0
root@ttyp0[~]# mount /mnt/hda2
root@ttyp0[~]#
We can see in the following listing that a typo is keeping our Linux box from booting. The fstab has a typo: LBEL=/should be LABEL=/ instead.
root@ttyp0[~]# cd /mnt/hda2
root@ttyp0[hda2]# ls
bin etc lib opt quota.group suse_root_hdb usr
boot fd lost+found original quota.user swapfile var
cdrom home misc proc root tftpboot web
dev initrd mnt prod_serv sbin tmp
root@ttyp0[hda2]# cat etc/fstab
LBEL=/ / ext3 defaults LABEL=/boot /boot ext3 defaults none /dev/pts
devpts gid=5,mode=none /proc proc defaults none /dev/shm tmpfs defaults
/dev/hda3 swap swap defaults /dev/cdrom /mnt/cdrom udf,iso9660
noauto,ro 0 0
/dev/fd0 /mnt/floppy auto noauto,owner,/swapfile none swap pri=2
/dev/hdb3 /suse_root_hdb reiserfs defaults /dev/hdb1
/suse_root_hdb/boot ext2 defaults root@ttyp0[hda2]#
Now just fix fstab, unmount the repaired root filesystem, and reboot from the hard disk. The following shows the corrected fstab.
root@ttyp0[hda2]# cat etc/fstab
LABEL=/ / ext3 defaults LABEL=/boot /boot ext3 defaults none /dev/pts
devpts gid=5,mode=none /proc proc defaults none /dev/shm tmpfs defaults
/dev/hda3 swap swap defaults /dev/cdrom /mnt/cdrom udf,iso9660
noauto,ro 0 0
/dev/fd0 /mnt/floppy auto noauto,owner,/swapfile none swap pri=2
/dev/hdb3 /suse_root_hdb reiserfs defaults /dev/hdb1
/suse_root_hdb/boot ext2 defaults root@ttyp0[hda2]# cd
root@ttyp0[~]# umount /mnt/hda2
root@ttyp0[~]#
Note
Many different “Linux on a CD” distributions are available. Here is a list of some of the most popular:
• Knoppix (http://www.knoppix.net/)
• LNX-BBC (http://lnxbbc.org/)
• SystemRescueCd (http://www.sysresccd.org/)
• Timo’s Rescue CD Set (http://rescuecd.sourceforge.net/)
• SuperRescue (http://freshmeat.net/projects/superrescue)
We don’t endorse any particular rescue CD distribution, and we list several so that you can evaluate them and choose the best method for your situation.
Reset Lost Root Password Using a Knoppix CD
If the root password is lost, there is no way to log in at multiuser mode. Red Hat doesn’t require a password in single user mode, though, which makes it easy to reset the password. Just reboot to single user mode and run passwd. But what about distributions such as SUSE that require a password in single user mode? It is just a bit more complicated to resolve in this case.
The solution is to boot from the Knoppix CD or whatever rescue disk you use. When the box is booted, mount the SUSE root filesystem to some temporary mount point such as /mnt/hdb3. If you are using Knoppix, be sure to change the mount option to defaults in /etc/fstab first, or else device file access won’t work. When the filesystem is mounted, just run chroot /mnt/hdb3 and passwd as root to reset the SUSE password. The chroot command is used to start a new shell with an effective root directory of the root partition on the problem disk. In other words, after running chroot /mnt/hdb3, the command ls/ shows the files and directories from the /mnt/hdb3 directory. See the chroot(1) man page for further details.
Reinstall GRUB Using Knoppix CD
The process to reinstall GRUB when booted from Knoppix is very similar to resetting the SUSE root password. We again use chroot. In this example, GRUB is written to the MBR of /dev/hda. First, we change fstab to mount the boot partition under /boot and change the options to defaults for both /dev/hda1 and /dev/hda2. /dev/hda1 is /boot, and /dev/hda2 is /. /dev/hda3 is swap, so we leave it alone. The next listing shows the original fstab that Knoppix gives us:
knoppix@ttyp1[knoppix]$ su - root
root@ttyp1[~]# cat /etc/fstab
/proc /proc proc defaults 0 0
/sys /sys sysfs noauto 0 0
/dev/pts /dev/pts devpts mode=0622 0 0
/dev/fd0 /mnt/auto/floppy auto user,noauto,exec,umask=000 0 /dev/cdrom
/mnt/auto/cdrom auto user,noauto,exec,ro 0 0
# Added by KNOPPIX
/dev/hda1 /mnt/hda1 ext3 noauto,users,exec 0 0
# Added by KNOPPIX
/dev/hda2 /mnt/hda2 ext3 noauto,users,exec 0 0
# Added by KNOPPIX
/dev/hda3 none swap defaults 0 0
# Added by KNOPPIX
/dev/hdb1 /mnt/hdb1 ext2 noauto,users,exec 0 0
# Added by KNOPPIX
/dev/hdb2 none swap defaults 0 0
# Added by KNOPPIX
/dev/hdb3 /mnt/hdb3 reiserfs noauto,users,exec 0 0
root@ttyp1[~]#
The following listing shows fstab after we change the /dev/hda1 and /dev/hda2 lines:
root@ttyp1[~]# cat /etc/fstab
/proc /proc proc defaults 0 0
/sys /sys sysfs noauto 0 0
/dev/pts /dev/pts devpts mode=0622 0 0
/dev/fd0 /mnt/auto/floppy auto user,noauto,exec,umask=000 0 /dev/cdrom
/mnt/auto/cdrom auto user,noauto,exec,ro 0 0
# Added by KNOPPIX
/dev/hda1 /mnt/hda2/boot ext3 defaults 0 0
# Added by KNOPPIX
/dev/hda2 /mnt/hda2 ext3 defaults 0 0
# Added by KNOPPIX
/dev/hda3 none swap defaults 0 0
# Added by KNOPPIX
/dev/hdb1 /mnt/hdb1 ext2 noauto,users,exec 0 0
# Added by KNOPPIX
/dev/hdb2 none swap defaults 0 0
# Added by KNOPPIX
/dev/hdb3 /mnt
Now we mount the disk filesystems so that we can reinstall GRUB:
mount /dev/hda2
mount /dev/hda1
Next, we run chroot /mnt/hda2 to make /mnt/hda2 the effective / for the following GRUB work. The commands in the following listing are the same as the previous GRUB reinstallation example.
grub> root (hd0,0)
grub> find /boot/grub/stage1
grub> setup (hd0)
>>
grub>
root (hd0,0)
Filesystem type is ext2fs, partition type 0x83
grub>
find /boot/grub/stage1
(hd1,0)
grub>
setup (hd0)
Checking if "/boot/grub/stage1" exists... no
Checking if "/grub/stage1" exists... yes
Checking if "/grub/stage2" exists... yes
Checking if "/grub/e2fs_stage1_5" exists... yes
Running "embed /grub/e2fs_stage1_5 (hd0)"... 16 sectors are embedded.
succeeded
Running "install /grub/stage1 (hd0) (hd0)1+16 p (hd0,0)/grub/stage2
b.conf"... succeeded
Done.
grub>
After this is done, we can just quit the GRUB shell and exit the chroot shell. We then unmount /dev/hda1 and /dev/hda2 and reboot.
Booting from a Floppy Rescue Disk
A 3.5-inch floppy disk doesn’t have room for a full Linux system. However, you can make a bootable rescue disk that includes critical utilities needed to recover a system. We recommend using Knoppix, SystemRescueCd, or some other CD-based solution because they are full Linux distributions and have all the commands and utilities you are used to. If a CD-ROM is not available on the Linux server, then a rescue floppy is a good solution.
Check tomsrtbt (http://www.toms.net/rb/) for a good floppy disk distribution. Tom Fawcett has an excellent article explaining how to build a rescue disk on the Linux Documentation Project Web site at http://www.tldp.org/HOWTO/Bootdisk-HOWTO/.
Whatever method you decide to use, be sure to verify that it will boot all your Linux boxes before you need it to resolve a problem.
Summary
The intent of this chapter is to give the reader a good understanding of the Linux boot process. If you know how the startup and shutdown processes work, you probably have a good idea of how to troubleshoot problems. The examples are intended to demonstrate the skills needed to resolve common problems.
Hopefully, you now feel more confident booting from a rescue CD, repairing MBR problems, and fixing other problems.
Endnotes
1 Refer to initrd(4) for more information about the initial ram disk.
2 I was trying to limit the bootloader discussion to just GRUB and LILO, but you can see I failed. The mkbootdisk floppy uses SYSLINUX as its bootloader. More information on SYSLINUX (floppy bootloader) and ISOLINUX (CD bootloader) is available at http://syslinux.zytor.com/.
3 Look at the syslog.conf(5) man page to understand syslog routing. init uses the daemon facility.
4 The crond file listing was created on a Red Hat 3.0ES system with find /etc/rc.d -name *crond -exec ls -al {} ;
5 RPM man page taken from a Red Hat 9.0 system.