
Chapter 3
Exploring the Main Window and Tracks Area
In This Chapter
![]() Navigating the windows
Navigating the windows
![]() Playing and controlling the project
Playing and controlling the project
![]() Exploring the tools and controls
Exploring the tools and controls
![]() Saving time and speeding up your workflow
Saving time and speeding up your workflow
Logic Pro X has a simple single-window design that helps you be more productive and puts everything you need only a click away. You can do most of what you need to do right in the main window. But you can also open windows separately and push windows to different displays. The program is as flexible as it is simple.
In this chapter, you discover how to navigate the Logic Pro interface. You also learn some timesaving tricks and smart ways to use key commands to accomplish the bulk of your work. Navigating Logic Pro X with speed and purpose will put your music out in the world and build your project catalog. You’ll be zipping around Logic Pro in no time.
Navigating Logic Pro
To get the most out of Logic Pro X, you should know the name and purpose of each area of the main window. Plus, if you ever need to contact the folks in product support, you'll be able to communicate the problem with precision.
Getting comfortable in the main window
The main window, shown in Figure 3-1, was called the arrange window in earlier versions of Logic Pro. The main window title makes more sense because you can use it to do a lot more than just arrange. The name also stresses the importance of this Logic Pro key element. As the highly effective Stephen Covey once said, “The main thing is to keep the main thing the main thing.”
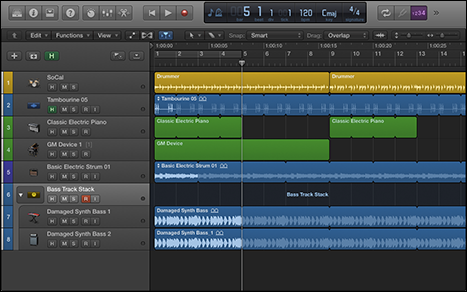
Figure 3-1: The Logic Pro X main window.
The main window includes the tracks area and the control bar. It’s highly customizable and gives you all the tools you need to begin making music. To display the main window, choose View on the main menu bar.
Working in the tracks area
The tracks area, shown in Figure 3-2, contains your project's tracks of audio and MIDI regions. When you create a project, Logic Pro asks you what type of track you would like to create. The tracks you create are added to the vertical track list to the left of the tracks area. To create more tracks, click the new tracks (plus sign) icon at the top of the track list or choose Tracks⇒New Tracks. I cover the track list in more detail later in this chapter.
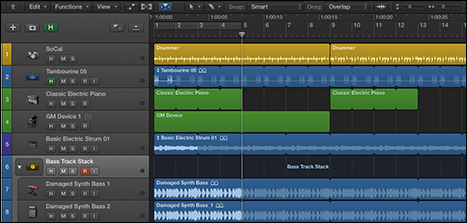
Figure 3-2: The tracks area in the main window.
 Download a Logic Pro X project template with several tracks and regions so you can follow along with the examples in this chapter. Visit http://logicstudiotraining.com/lpxfordummies.
The toolbar above the tracks area, shown in Figure 3-3, contains several menus to help you work.
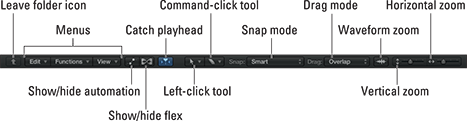
Figure 3-3: The tracks area toolbar.
Here's an overview of what’s available in the menus:
- The Edit menu gives you several functions that you can apply to your regions, including basic functions such as copy and paste and region-specific functions such as splitting, joining, and repeating. The options in this menu are almost identical to the options in the Edit submenu in the main application menu, so you have two places to execute commands. This feature is useful when you don’t have the main window open and are working in an editor in a separate window. For details on editing audio and MIDI, see Chapters 14 and 15.
- The Functions menu gives you even more actions to take on your regions, such as naming and coloring your tracks and regions, MIDI quantizing (snapping your MIDI events more precisely to the time grid) and transforming, and removing silence from audio regions. When you want to do something to a region, check out the Functions and Edit menus first.
- The View menu gives you more viewing options and useful tweaks to the tracks area. If Advanced Editing is selected in the Advanced Preferences pane (see Chapter 1), you have a Link option to control the relationship between open windows. Selecting the secondary ruler is useful when you want to view your project ruler in clock time as well as in bars and beats. The marquee ruler gives you a visual indicator of selections you’ve made with the marquee tool. You can get rid of the grid in the tracks area if you're working in free time or if it gets in the way visually. The Scroll in Play option continually scrolls the tracks area as you play.
I turn off the Scroll in Play option because I like my tracks area to snap when it reaches the end instead of continually scrolling. The tracks area behaves more like sheet music, where you have to turn a page when you get to the end, but Logic Pro is your personal page turner. I find it harder to follow the tracks area when it scrolls.
- To the right of the View menu are icons to display or hide automation and futuristic flex modes (more on flex editing in Chapter 14) and catch the playhead, that is, the tracks area will follow (catch) the playhead instead of remaining still.
- In the center of the toolbar are two tool menus. The left tool menu is the currently selected tool that’s visible when your cursor is in the tracks area. The right tool menu selects the
 -tool that becomes available when your cursor is in the tracks area and you press the key. Both tool menus are described in detail later in the chapter.
 - The snap function makes dragging regions easier. You can choose the snap mode from the drop-down menu to the right of the tool menus. Smart mode is usually all you need until you’re trying to do something specific. At the top of the drop-down menu, you can choose a finer snap value if you need to move a region more precisely. If you snap a region to a relative value and the region doesn’t start exactly on the beat, it will move relative to its current position. That’s the default value and usually what you want, until you need to move something more precisely. To make use of snap modes, select Snap to Grid in the Edit menu.
- To the right of the snap modes is your drag mode drop-down list. The different drag modes allow you to overlap, not overlap, crossfade, or shuffle regions in a track. Overlap mode preserves the region borders of the selected region when you drag it on top of another region. No Overlap shortens the right boundary of the region on the left. X-Fade creates a crossfade the length of the overlapped area.
The shuffle modes move the regions in the direction of the particular shuffle mode selection; in addition, resizing a region resizes all the regions, and deleting a region moves the regions by the length of the deleted region. Shuffle is a complicated function that is used mostly in audio situations such as editing voice-overs or audio interviews and not in musical settings. Only one audio region can be played at a time, so any part of a region that’s hidden won’t be heard.
- Finally, on the far right of the toolbar are a zoom button that zooms your audio waveforms and sliders that control the vertical and horizontal track zoom.
Controlling the control bar
The control bar, which is shown in Figure 3-4, is located at the top of the main window. It contains view icons that show and hide windows, transport controls for playback and recording, an LCD display area for viewing important information about your project, and icons for different behavior modes and specific functions.
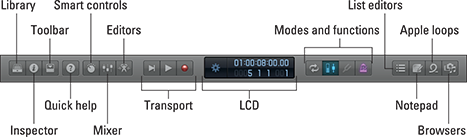
Figure 3-4: The control bar.
You can customize the control bar by Control-clicking an empty area and choosing the Customize Control Bar option. On my 13-inch MacBook Air, I can’t see all the default control bar items, so I always customize it to show only what I need.
After you customize the control bar the way you like it, save it as a template so you can recall it later. You can also import your customized control bar from another project by importing the project’s screensets. You’ll learn more about screensets later in this chapter.
When you become comfortable using key commands to navigate Logic Pro, you may never need to click the control bar. But it still provides a good heads-up display, indicating whether certain functions are engaged.
The leftmost group of view icons displays the library, inspector, and toolbar. To the right of the view icons are the Quick Help icon and the editor icons. Here’s a brief description of what these icons allow you to do:
- The library is where you load and save settings for recall later. It’s like having a modular studio where you can save and load entire mixer setups, guitar amp settings, or even groups of software instruments. The library is one of the most powerful new features in Logic Pro X, and you find out about it throughout the book. The key command to open the Library is Y.
- The inspector icon opens a dynamic editing window for the object or objects currently selected in the tracks area. The inspector is more like three inspectors in one. It inspects the selected track, the channel strip where you adjust the track’s sound, and the selected region or regions. The key command to open the inspector is I.
- The toolbar icon puts a customizable row of functions along the bottom of your control bar. You can customize the toolbar by Control-clicking it and choosing Customize Toolbar. When you're new to Logic Pro, displaying this toolbar is helpful. When you've memorized the key commands or need more screen real estate, however, you might want to hide the toolbar. You can do so by pressing Control-Option--T.
- The quick help icon is another good tool for new Logic Pro users. Click this icon when the inspector is displayed, and you'll see details for whatever your cursor is hovering over. If the inspector isn’t displayed, you’ll see a floating window with the same details. The quick help icon doesn't have a key command, but you can create one for it. Details on creating key commands are provided later in the chapter.
- The smart controls icon opens an editor that's new in Logic Pro X. The smart controls are displayed in the main window below the tracks area. The content of the smart controls editor depends on the selected track. Smart controls decide which parameters you need the most, and they do an almost perfect job. The key command to open the smart controls is B.
- The mixer icon opens the pristine-sounding or dirty-sounding mixer, depending on how you decide to mix it. The mixer is so versatile and great that it gets plenty of attention throughout this book, including an entire chapter on mixing (Chapter 16). Like the smart controls, the mixer appears at the bottom of the tracks area. The key command to open the mixer is X.
- The editors icon displays the group of editors associated with the selected region type. The editors open at the bottom of the tracks area; which editors you see depends on whether you have an audio, a MIDI, or a drummer region selected. All editors are covered in detail in Chapters 14 and 15. The key command to open the editors is E.
- The transport is a collection of icons that provide basic controls for playing, recording, pausing, stopping, forwarding, rewinding, and generally navigating your project. You can customize the control bar to contain your choice of 17 transport icons.
Because all these functions are easily performed with key commands, I display only the most important controls on my transport. I always display the stop, play, and record icons because when you click and hold down on them, you see additional options that you often need to adjust throughout your work.
- The LCD display indicates the current location of the playhead. You can see your project in beats, time, or a customized display. To change the display mode, click the left section of the display and make a selection. A useful feature of the custom display options is to open a giant beats or time display in a separate floating window for viewing from afar.
You can enter data directly into the LCD display by double-clicking or click-dragging (for tempo and location). You edit other key project parameters, such as key and time signatures, by clicking the display and manually entering the data.
During hard-drive- and processor-intensive work, such as recording and mixing, I like to show the load meters in the display so I know how far I’m pushing my computer. - To the right of the LCD display are several mode and function icons. You can customize the control bar so that is displays your most important modes and functions.
A few mode icons, such as cycle mode, are useful to have available, even if you know the corresponding key command, because their pressed state lets you know quickly whether the mode is enabled. And some icons, such as the tuner, don’t have corresponding key commands so it’s handy to have them on the control bar.
- On the far right of the control bar is another group of view icons. The list editors icon opens a window on the right side of the tracks area with four tabs: Event, Marker, Tempo, and Signature. Each tab gives you editing access to the smallest details of your project data. The Event tab updates its display depending on what you have selected. The Marker, Tempo, and Signature tabs show events that affect your project globally. The key command to open the list editors window is D.
- The notepad icon opens a window on the right side of the tracks area with two tabs of notes: Project and Track. I keep copious notes throughout my project, so I open these tabs a lot. The Project notes tab is a great place to write song lyrics. You could use the Track notes tab as a change log, so you don’t forget what you’ve tried out or how you’ve edited your track. The key command to open the notepad is Option--P.
- The Apple loops icon opens a loop browser in a window on the right side of the tracks area. You can filter your loops by using the descriptive icons or you can search for them directly in the search field. Selecting a loop automatically auditions it. When you find one you like, drag it to the bottom of the tracks area, where you see the Drag Apple Loops Here text. The key command to open the Apple loop browser is O.
- The browser icon opens a window on the right side of the tracks area with three tabs: Project, Media, and All Files. The project browser shows you all the audio in your project. The media browser shows you all the media on your computer that is indexed by iTunes, GarageBand, and Logic Pro, as well as the movies in your User Movies folder. The all files browser works similarly to Finder; you can navigate to any location on your computer to import media. The key command to open the browser is F.
- The master volume slider is a new feature in Logic Pro X and might be familiar to GarageBand users. Because GarageBand doesn’t have a mixer, the master volume slider is the main way to turn your project volume up or down. In Logic Pro X, a master fader in the mixer serves the same function as the master volume slider on the control bar, so the slider isn’t necessary.
As you can see, the control bar gives you lots of, well, control. Even though most of these modes and functions are available as key commands, having them in your line of sight can help your workflow. For starters, you can click them. But more than that, they make great visual reminders of what you can do with Logic Pro. And if you’re up to the challenge, you can use them to help you memorize their key commands.
Polishing in the editors area
The control bar editor icons and corresponding key commands aren’t the only ways to open the various editors. Double-click an audio, a MIDI, or a drummer region and the corresponding editor will open at the bottom of the tracks area. An audio region defaults to the audio track editor. A MIDI region defaults to the piano roll editor, shown in Figure 3-5. A drummer region defaults to the drummer editor.
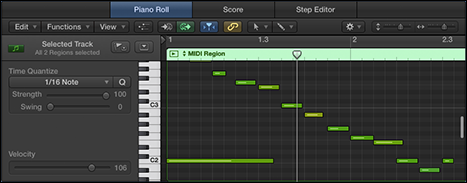
Figure 3-5: The editors area.
In the audio and MIDI editor windows, you’ll see tabs for additional editors. The MIDI editor displays tabs for the score and step editors in addition to the piano roll editor. The audio editor shows a tab for the audio file editor in addition to the audio track editor.
Just like the tracks area, the editors area has a toolbar with edit, functions, and view menus; icons; tool menus; and snap and zoom settings. (You find out what the editors can do in Chapters 14 and 15.) When you learn how to navigate the tracks area, you’ll have a pretty easy time navigating the editors.
Investigating the inspector
The inspector, shown in Figure 3-6, is an important tool, and you'll quickly memorize its key command, I. (When you’ve memorized the key command, consider deleting the inspector icon on the control bar to free up space.) The inspector can take up a lot of space in the main window, but it’s integral to editing your tracks and shaping your sound.
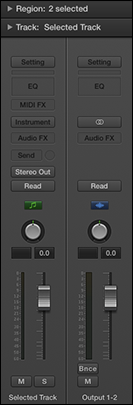
Figure 3-6: The inspector.
At the bottom of the inspector are two channel strips. The strip on the left corresponds to the currently selected track. The strip on the right is dynamic and is discussed further in Chapter 16. Above the channel strips are two panes that you can open and close:
- The track inspector pane gives you details about the entire track. You can change the track icon here, which I love to do. You discover what the track inspector can do in Chapter 4.
- The region inspector shows you details about the currently selected region or regions. The details in both the region and track inspector panes depend on what kind of track or region is selected.
Understanding the difference between the track and region inspector panes will save you from a lot of confusion as you work. You discover more about tracks and regions in Chapter 4.
Taking Inventory of Your Track List
Every track you create is added to the track list and given a track header, as shown in Figure 3-7. You can reorder tracks by dragging the track headers to new locations in the list. To select more than one track at a time, ![]() -click the track headers. You can delete tracks by choosing Track⇒Delete Track or by Control-clicking the track header and choosing Delete Track. You can also navigate your track list by using the up and down arrow keys.
-click the track headers. You can delete tracks by choosing Track⇒Delete Track or by Control-clicking the track header and choosing Delete Track. You can also navigate your track list by using the up and down arrow keys.

Figure 3-7: A track header.
Make headway with track headers
Track headers are customizable and resizable. Choose Track⇒Configure Track Header (or press Option-T) to display the Track Header Configuration dialog shown in Figure 3-8. Select the additional items you want to see in your track headers and click Done. You can also Control-click any track header to pull up the Track Header Configuration dialog. You can resize the track header vertically or horizontally by placing your cursor at the top, bottom, or right edge of the track header and dragging when your cursor changes to the resize pointer.
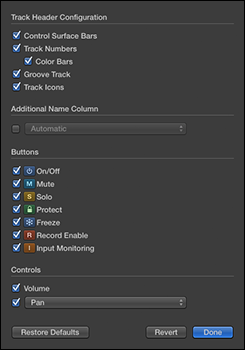
Figure 3-8: Track header configuration dialog.
By default, all the buttons and controls aren’t shown on the track headers. Here’s a brief description of the track header configuration options:
- Control Surface Bars: Select this option to add on the far left of the track header a thin bar that indicates whether the track is being controlled by a control surface. A control surface, such as your iPad, is a hardware device that allows you to control a digital audio workstation such as Logic Pro. Many MIDI controllers can also be used as control surfaces, which allow you to use hardware to control the onscreen faders, knobs, buttons, and displays. To read an in-depth manual on control surfaces, choose Help⇒Logic Pro Control Surfaces Support.
- Track Numbers: Select the Track Numbers option to display the track number on the left of the track header. Selecting this check box also gives you the option to select the Color Bars check box, which colorizes the track numbers area and visually organizes your tracks. You find out more about track colors in the next section.
- Groove Track: You can set one track in your project as the groove track and select other tracks to follow the timing of the groove track. When a groove track is selected, a star will appear to the right of the track number and all other tracks will have check boxes that you can select to make a track follow the groove track. For the details on groove tracks, see Chapter 13.
- Track Icons: If you Control-click the track icon in the track header, you can choose a new icon from the icon pop-up menu. Track icons are useful visual indicators and look cool, too.
- Additional Name Column: Add a name column to the right of the track name. You can also customize what the column displays by using the drop-down menu in the track header configuration dialog.
- On/Off: Use the on/off icon to save processing power. To turn off tracks, you must select Show Advanced Tools in the Advanced Preferences pane (see Chapter 1). When a track is turned off, it is silenced.
- Mute/Solo: The mute icon silences the track. You can mute all tracks by pressing while you click the mute icon. The solo icon mutes every track except the soloed track. You can mute or solo multiple tracks at once by clicking and holding down on the icon and dragging your cursor up or down the track list.
- Protect: This icon prevents changes to the track. With the protect icon enabled, you won’t be able to record or edit the track. Protecting a track is useful when you want to make sure it remains exactly as it is, without accidental changes.
- Freeze: When you freeze a track, you reduce processing power on the track by temporarily turning the track and all its audio effects into an audio file. This feature is useful for software instruments and audio tracks with lots of plug-in effects that require a lot of processing power. With freeze enabled, all plug-ins (including software instruments) are temporarily deactivated and the track is turned into an audio file that includes all effects.
- Record Enable: Click the record enable icon to enable your track for recording.
- Input Monitoring: This icon allows you to monitor audio tracks that aren’t enabled for recording. Use this icon whenever you need to set audio levels for recording or to practice a part you plan to record.
- Volume/Pan: If you’re used to working in GarageBand, having your volume and pan control in the track header might help you get accustomed to Logic Pro. I’m usually in need of more workspace in the tracks area, so I don’t display these. Plus, I find the mixer controls better suited for the job. But when I’m on a bigger computer screen, I like to fill my track headers. The volume slider does double-duty as a level meter. You can change the pan control to an effects send control. You learn more about send effects in Chapter 16.
You can quickly rename a track in the track header by pressing Shift-Return and typing the new name. You can get through the entire track list by pressing Tab between each new name.
Make it pretty with track colors
Track colors not only make your tracks pretty but also help you identify tracks and groups of tracks quickly. In the track header configuration dialog (refer to Figure 3-8), you can display the color bars to aid visual recognition. When you create new regions on a track, they are also colorized in the same color. You can even change the color of regions independently of the track color. However, selecting a track automatically selects all the regions on the track, so if you colorize a track while all the regions are selected, those regions will also change color.
To change a track color, Control-click a track and choose Assign Track Color. You’ll be shown a beautiful palette of 72 color swatches that you can use to colorize your selected tracks and regions. By default, MIDI tracks are colorized green and audio tracks are blue. I always group my tracks by color. Drums get their own color, lead vocals get their own color, background vocals get a different color — you get the idea. Group your groups with color.
Zooming Tracks
You’ll probably need to zoom in and out of tracks a lot, especially when you’re editing. Fortunately, you can zoom tracks in several ways. The first trick is to turn on Auto Track Zoom by pressing Control-Z or by choosing View⇒Auto Track Zoom from the tracks area toolbar. With Auto Track Zoom on, as in Figure 3-9, the currently selected track will automatically zoom horizontally. You see not only more of the track contents but also a quick indicator of which track is selected and has focus. The key command makes it easy to toggle between the two zoom states.
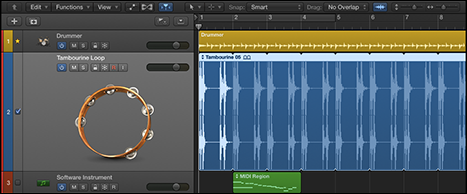
Figure 3-9: Auto track zoom on a selected track.
At the top right of the tracks area toolbar are two zoom sliders, vertical to the left and horizontal to the right. Drag the sliders to adjust the zoom level. You can also use key commands to zoom; I suggest that you memorize them because they’re so easy to use. To zoom in on all your tracks vertically, press ![]() -down arrow; to zoom out, press
-down arrow; to zoom out, press ![]() -up arrow. Likewise, to zoom in horizontally, press
-up arrow. Likewise, to zoom in horizontally, press ![]() -right arrow; to zoom out, press
-right arrow; to zoom out, press ![]() -left arrow.
-left arrow.
If you want to zoom in on a specific area of your tracks, you can use the zoom tool. It’s always available when your cursor is in the tracks area: Simply press Control-Option while dragging over the area you want to zoom. Your cursor will temporarily turn into the zoom tool, and the area you select will automatically zoom when you release the cursor. To get back to the previous level of zoom, press Control-Option while clicking anywhere in the tracks area.
You can recall up to three levels of zoom by using the zoom tool. This means you can zoom in on a large portion of your project, zoom in on a smaller section, zoom in on a single part of a region, and then recall each one in sequence just by pressing Control-Option and clicking the tracks area.
Another useful key command to memorize is Z, which toggles the Zoom to Fit Selection or All Contents command. If a region is not selected, this zoom command zooms out to fit all the content in the tracks area. The tracks and regions are smaller and you can view all your content. If you have any regions selected, the same command will zoom in on those regions.
One more zoom to consider is the Waveform Vertical Zoom. Press ![]() -minus (-) or
-minus (-) or ![]() -plus (+) to zoom only your audio waveforms. This zoom feature makes your audio waveforms larger in the regions without making the regions themselves bigger. I use this feature a lot for audio editing and voice-over work when waveforms aren’t tall because they’re not recorded at high volumes. If you forget the key command, use the waveform vertical zoom icon to the left of the zoom sliders in the tracks area toolbar (refer to Figure 3-9).
-plus (+) to zoom only your audio waveforms. This zoom feature makes your audio waveforms larger in the regions without making the regions themselves bigger. I use this feature a lot for audio editing and voice-over work when waveforms aren’t tall because they’re not recorded at high volumes. If you forget the key command, use the waveform vertical zoom icon to the left of the zoom sliders in the tracks area toolbar (refer to Figure 3-9).
The default state of zoom should be to see the entire project. You learned how to zoom out to see your entire project by pressing Z with no regions selected. From that position, you can easily see where you want to focus and get there quickly by Option-Command-dragging over the area. When you’re finished, zoom back out and decide what to do next. This method of zooming creates an efficient workflow.
You can zoom in and out of your project in many other ways, as you discover later in the chapter when you read about creating your own key commands.
Your Logic Pro Toolbox
Tools imply work. But Logic Pro is about having fun. So think of your toolbox as a fun box. The toolbar in the tracks area has several tools you can play with.
Another important key command is T. This key command opens the tools menu, as shown in Figure 3-10. In several windows, including the tracks area and most of the editors, pressing T opens the tools menu, and you can choose a tool with your cursor or with the keyboard shortcuts listed on the right. Note that the keyboard shortcut for the default pointer tool is also T, giving you an efficient workflow in which you can press T twice to get back to the pointer quickly.
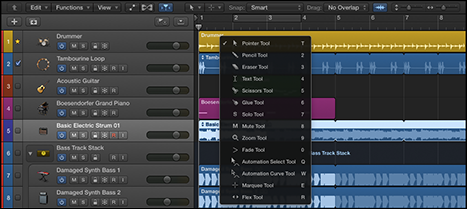
Figure 3-10: The tool menu in the tracks area.
Here’s what’s on the tool menu:
- Pointer: The pointer is your default tool for selecting and moving things. Using the pointer tool, you can copy items by Option-dragging them. Grabbing the corners and edges of regions can temporarily cause the pointer to take a descriptive shape as an indicator of additional pointer functions. Place your cursor over the upper half of the right side of a region to turn the cursor into the loop tool. With the loop tool active, dragging the region corner to the right loops the region. Place your cursor over the lower half of the region’s right side to change the length of the region as you drag the corner. You’ll get the hang of the pointer quickly because it will be your most-used tool.
- Pencil: The pencil tool is similar to the pointer tool, in that it can also loop, drag, alter length, and even select regions and other events. What makes the pencil unique is that it creates regions when you click in empty track areas. Note that if the project hasn’t been saved and you click an empty area with the pencil tool, you'll be asked about opening an audio file.
- Eraser: The eraser tool deletes regions and events from the tracks area. If multiple regions or events are selected and you click one of them with the eraser tool, all selected items will be deleted. This tool doesn’t get a lot of use because pressing Delete has the same effect. However, if you are going to delete several items in a row, clicking with the eraser tool is faster than selecting each item one by one and pressing Delete after each. And if you’re trying out for the Logic Pro Editing Olympics, every keystroke counts.
- Text: With the text tool selected, you can rename regions and other events.
- Scissors: Use the scissors when you want to split items. The scissors tool has a special Option-click behavior that can split a region into portions of equal length. You can also click-drag the scissors tool over a region to find the right place to make your split.
- Glue: The glue tool joins selected items. You can also click-drag over items to select them before joining them.
- Solo: Use the solo tool when you want to listen to only a single region. With the solo tool, click and hold down on a region to hear it. You can also drag the solo tool through the region to listen to whatever the tool touches, a process known as scrubbing.
- Mute: The mute tool mutes or unmutes the items and other selected items it touches. You can select multiple items and mute or unmute them all at once or simply click any region to mute or unmute it.
The mute tool is a useful arranging tool because you can quickly hear how sections of music will sound without the muted part. Using the mute tool on a region is often better than deleting the region if you're not sure you want to commit to the edit.
- Zoom: You learned how to use the zoom tool previously in this chapter by Control-Option-dragging in the tracks area. You can also choose it as a tool from the tool menu, which you rarely need to do except when you forget the key command, which isn’t likely since you’ll be using it so much. Another trick with the zoom tool: If your cursor is over an empty part of the tracks area, you only have to press Option to make your cursor the zoom tool.
- Fade: With the fade tool, you can fade in and fade out the volume of your audio regions by dragging over the start or end of the region, respectively. You may need to zoom in horizontally to see the fade that’s applied to the region. You can edit the length of the fade by dragging the start or end point with the fade tool. You can also adjust the curve of the fade by dragging up or down within the start and end points.
- Automation Select: I discuss automation in detail in Chapter 17. When automation is active, the automation select tool allows you to select automation data for editing. Show Advanced Tools in the Advanced Preferences pane must be selected to enable automation tools.
- Automation Curve: You can bend an automation curve by dragging it with the automation curve tool. (You find out more about automation in Chapter 17.)
- Marquee: Use the marquee tool to select and edit regions and parts of regions. You drag the marquee tool over the objects you want to select or edit. After you’ve made a selection with the marquee tool, clicking Play on your transport will start your project at the beginning of your selection and playback will stop at the end of the selection. The marquee selection can also be used for punch recording, which you learn about in Chapter 6. The marquee tool is flexible, and you’ll use it a lot throughout this book.
- Flex: The flex tool is going to blow your mind when you learn more about it in Chapter 14. With the flex tool selected, you can grab an audio region’s waveform to manipulate it and change its rhythm. The flex tool will save you from throwing away recordings that contain mistakes because you can fix them. It’s like having a time machine.
You have two tools available at all times. The first tool, chosen by the left tool menu on the menu bar, is the tool that’s currently available. The second tool, chosen by the right tool menu, is available by pressing ![]() . You can select any tool to be your
. You can select any tool to be your ![]() -click tool. If you’re slicing a lot of regions, make the scissors your
-click tool. If you’re slicing a lot of regions, make the scissors your ![]() -click tool. Different workflows require different tools, and the
-click tool. Different workflows require different tools, and the ![]() -click tool will help you accomplish your work quickly.
-click tool will help you accomplish your work quickly.
Keeping It Simple with Smart Controls
Smart controls are your personal Logic Pro genius bar. Smart controls know what you’re trying to achieve and give you the best tools for the job. They don’t give you every available parameter — only the most important ones.
Smart controls are dynamic. The controls you’re given depend on the selected track and the software instrument or plug-in effects on that track. For example, if you have a compressor and EQ plug-in on a track, the smart controls will give you a combination of the most important controls of each plug-in. If a software instrument track is selected, the smart controls will also include parameters that affect the sound of the instrument.
Last but not least, smart controls look cool and make you want to play with them.
Opening smart controls
![]() Click the smart controls icon in the control bar or press the key command B to open the smart controls at the bottom of the tracks area, as shown in Figure 3-11. I memorized the smart controls key command by remembering the word best, as in best controls. You can also choose View⇒Show Smart Controls. To open smart controls in a new window, choose Window⇒Open Smart Controls or press
Click the smart controls icon in the control bar or press the key command B to open the smart controls at the bottom of the tracks area, as shown in Figure 3-11. I memorized the smart controls key command by remembering the word best, as in best controls. You can also choose View⇒Show Smart Controls. To open smart controls in a new window, choose Window⇒Open Smart Controls or press ![]() -3.
-3.
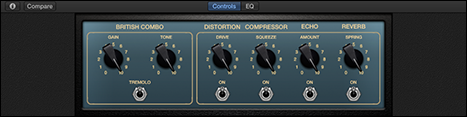
Figure 3-11: The smart controls.
At the top of the smart controls is a menu bar. In the center of the menu bar are two buttons to quickly switch between the track’s smart controls and dedicated channel EQ. If no EQ is inserted on the track and you press the EQ button, a plus sign icon in the center of the control area will allow you to insert an EQ into the track’s channel strip instantly.
![]() If the selected track is a software instrument track, an arpeggiator icon appears on the right side of the menu bar, as shown in the margin. An arpeggiator turns the chords you play into arpeggios, or one note played after another as opposed to simultaneously.
If the selected track is a software instrument track, an arpeggiator icon appears on the right side of the menu bar, as shown in the margin. An arpeggiator turns the chords you play into arpeggios, or one note played after another as opposed to simultaneously.
Click the icon to turn on the arpeggiator and a pop-up menu will appear so you can choose a preset or adjust the settings. The arpeggiator is a popular synth effect across many genres. Many of The Who’s greatest hits feature vintage synth arpeggiators and the effect is common in pop and dance music. (The arpeggiator and other MIDI effects are covered in more detail in Chapter 16.)
 To enable the smart controls icons and features described in this chapter, Show Advanced Tools must be selected in the Advanced Preferences pane. Choose Logic Pro X⇒Preferences⇒Advanced Tools and select the Show Advanced Tools option.
![]() On the left side of the smart controls menu bar is the smart controls inspector icon (shown in the margin) and a Compare button. The icon opens the inspector on the left side of the Smart Controls window, as shown in Figure 3-12. The Compare button compares the edited smart controls with the saved version.
On the left side of the smart controls menu bar is the smart controls inspector icon (shown in the margin) and a Compare button. The icon opens the inspector on the left side of the Smart Controls window, as shown in Figure 3-12. The Compare button compares the edited smart controls with the saved version.
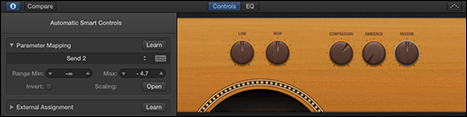
Figure 3-12: The smart controls inspector.
Editing smart control layouts
Smart controls automatically give you quick control over the most important parameters, so you won't need to edit them often. If you want to control a parameter that’s not included in the automatic smart control layout, you can edit the sound directly in either the software instrument interface or the effects plug-ins inserted in the track. (You find out how to adjust the plug-ins directly in Chapter 16.)
Think of smart controls as shortcuts to the sound parameters that you use most often. For example, if your track contains a software instrument, such as an electric piano, the smart controls will give you the knobs that are frequently needed to adjust the sound of an electric piano. If you were to also add an effect to the track, the smart controls will readjust based on the new setup. Smart controls will continue to adjust as you add or remove effects to a track — that’s why they’re smart.
But what if you want to manually customize the smart controls for a particular purpose? Fortunately, smart controls are as flexible as they are intelligent. They also have a menu of gorgeous layouts designed to emulate the look and feel of gear you may be familiar with, such as classic guitar amps and instruments.
To change the smart controls layout, follow these steps:
- Click the inspector icon.
The smart controls inspector opens to the left of the screen controls. At the top of the inspector is the name of the current layout (refer to Figure 3-12). The default layout is Automatic Smart Controls.
- Click the name of the current layout at the top of the inspector.
A pop-up menu appears.
- Make a selection from the menu of layouts.
The smart controls are updated.
Smart control layouts are predefined. You can’t add knobs, buttons, or other controls to the layout, though you can map the relationship between the controls and your track’s parameters, as you discover next.
Manually mapping smart controls
When you open the smart controls and choose Automatic Smart Controls as the layout, all the screen controls are mapped to the track parameters automatically. If the controls aren’t mapped to the parameters you want or some of the controls remain unmapped, you can both manually and automatically map the smart controls.
To map smart controls automatically:
- Open the smart controls inspector by clicking the inspector icon in the smart controls menu bar.
- Open the Parameter Mapping area by clicking the disclosure triangle (refer to Figure 3-12).
- Click the Parameter Mapping pop-up menu and make a selection as follows:
- Choose Map All Controls when you want to completely reset the controls and have them automatically mapped. Automatically mapping your controls is a great starting place and usually gives you control over the parameters you need.
- Choose Map All Unmapped Controls when you want to map only the controls that are currently labeled Unmapped.
You can manually map smart controls in two ways. The first way is to map controls by using the Learn button:
- Open the smart controls inspector.
- In the layout, select the control that you want to map to a parameter.
Depending on the current layout, your controls could include knobs, faders, switches, buttons, and other interfaces. You should select the controller type that’s similar to the parameter you want to control. For example, a switch or button will control a parameter that has an on/off state, and a knob will control a parameter that has a range.
- Click the Learn button next to the Parameter Mapping menu in the inspector.
The Learn button flashes orange to indicate that learn mode is active.
- Click the plug-in or channel strip parameter you want to control.
For example, you might click the volume slider on the track. (Channel strip parameters and plug-ins are described in Chapter 16.)
- Click the Learn button again to finish mapping controls.
The selected control now adjusts your track volume.
The first method is great if you know which parameters you want to adjust. The second way allows you to map controls by browsing the Parameter Mapping pop-up menu.
- Open the smart controls inspector.
- Select the control in the layout you want to map to a parameter.
 Click the parameter mapping disclosure triangle (see the margin) to open the mapping area, and then click the parameter name (or click Unmapped if the control is unmapped).
A pop-up menu appears.
- Choose the parameter you want to control.
You aren’t limited to mapping a control to a single parameter. You can add additional parameters to the control by clicking the parameter name in the inspector and choosing Add Mapping. In addition to adding mappings, you can copy and delete mappings from the same pop-up menu.
Editing smart control parameters
After you’ve mapped a control to parameters, you can adjust how the control modifies the parameters. For example, you might want a volume knob to never go all the way down and all the way up. You might want the control to modify a specific range. Open the Parameter Mapping area in the inspector by clicking the disclosure triangle, and you’ll see values that you can edit below the parameter name:
- Range Min: This value sets the minimum range of the parameter.
- Max: This value sets the maximum range of the parameter.
- Invert: This check box switches the minimum and maximum values.
- Scaling: Click the Open button to open a graph to adjust the minimum and maximum range values, as shown in Figure 3-13.
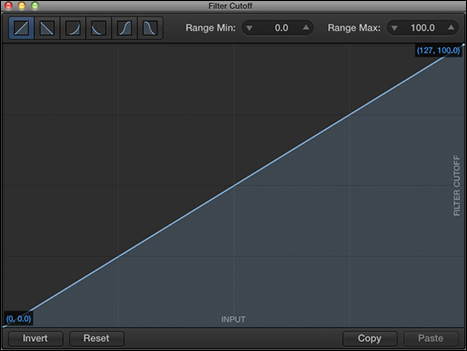
Figure 3-13: The scaling graph window.
If you have more than one parameter mapped, you can change the order of the parameters by dragging the left side of the parameter name up or down the list.
Don’t forget to use the Compare button, which lets you audition changes before fully committing to them.
Controlling the controls with your controller
A major benefit of smart controls is how much time they save you. Instead of having to open plug-ins and instrument interfaces and find the parameters you need to change, smart controls give you the most used controls in a simple and beautiful interface.
As Steve Jobs would say in every keynote, “But wait, there’s more.” Your MIDI controller can control all smart controls. The setup is super fast:
- Click the inspector icon to display the smart controls inspector.
- In the layout, click the control that you want to control.
- Click the external assignment disclosure triangle to display the assignment name field.
- Click the Learn button.
- Move the control on your MIDI device that you want to pair with the selected control on the layout.
As long as the Learn button is enabled, you can continue to select controls in your smart controls layout and move controls on your MIDI device to pair the hardware and software.
- When you're finished, click the Learn button.
You’ve just paired your MIDI controller with your smart controls and saved yourself time. You’re beginning to love Logic Pro X For Dummies, aren’t you? And we’re just getting started.
Navigating with Key Commands
The absolute fastest way to navigate Logic Pro is with key commands. I’ve talked about key commands quite a bit and don’t intend to stop. I sometimes talk about key commands on intimate dates and important holiday gatherings. I find them to be festive and captivating. And even if my date doesn’t agree that key commands are great conversation starters, I’m sure you will.
Learn any new key commands lately? Open the Key Commands window, shown in Figure 3-14, by pressing Option-K or by choosing Logic Pro X⇒Key Commands⇒Edit. Your cursor is automatically placed in the search field. Type the name of the command you’re looking for, even if you have to guess at the keywords, and your search results will be displayed in the key commands list. If you press Tab, your cursor will move to the key commands list and pressing any key combination will instantly take you to the associated command.
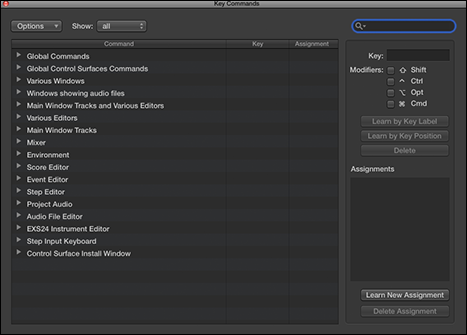
Figure 3-14: The Key Commands window.
The key command to open the key commands is Option-K. If you can’t remember which modifier key to use, it doesn’t hurt to try all the modifier keys until you get it right. Anything you do to your project you can undo.
From the Key Commands window, you can create your own key commands:
- Search or browse for the command.
- Select the command and then click the Learn by Key Label button.
If you have a keyboard with a numeric keypad and you want to distinguish between number keys on the alphanumeric keyboard or numeric keyboard, press the Learn by Key Position button instead. A full-size keyboard is a great tool for music production. The additional keypad can store a lot of key commands.
- Press the key and modifier key or keys.
If the key command is already in use, an alert will ask you to cancel the operation or replace the key command.
- Click the Learn by Key Label button again to finish.
What’s the next best thing to being able to assign thought commands? How about assigning commands to your MIDI controller? Simply follow these steps:
- Search or Browse for the command.
- Click the Learn New Assignment button.
- Press a button on your MIDI controller.
- Click the Learn New Assignment button again to finish.
To delete a key command, select the command and click the Delete button. To delete a controller assignment, select the command and click the Delete Assignment button.
At the top of the Key Commands window is an Options drop-down menu with the following options:
- Presets: Choose a key command preset for another language and, in some instances, other presets installed on your computer.
- Import Key Commands/Export Key Commands: If you have customized key commands that you use regularly and have to work on a different computer, you can simply import your key commands from this menu. Be a good guest and back up the owner’s key commands first.
- Copy Key Commands to Clipboard: This menu item is useful if you want to print your key commands for reference, all 30 or so pages of them.
- Expand All/Collapse All: So many key commands are available that it’s necessary to group them into categories. Being able to expand and collapse the key command menus will help you browse all your choices.
- Scroll to Selection: If you have a key command selected at the bottom of the list but you’ve travelled to the top of the list looking for another key command, you can quickly jump to your selection using this command.
- Initialize all Key Commands: This item resets all your key commands to their original state, erasing all key command modifications you may have made. Fortunately, the original set of key commands is a great place to start.
To the right of the Options menu is an additional drop-down menu to show all, used, or unused key commands. Some functions are available only by using a key command. If you open the Key Commands window once a session and learn a new key command, it will be a valuable session.
Saving Workspaces with Screensets
As you’ve discovered so far, Logic Pro X has lots of windows, inspectors, icons, and interfaces. You could probably imagine having two or three 30-inch displays with everything open all at once. So what do you do when you get your screen just the way you like it? You create a screenset, a snapshot of your current screen layout.
I love screensets. Whenever I move windows around and get them the way I like them for a particular job, I save it as a screenset. If I need to do a different job with a different focus, I create a new screenset. I give you some ideas about how you can use screensets later, but first let me show you exactly what screensets are and how they help you make more music.
You’re always using a screenset. The numbered menu to the right of the Window menu shows you what screenset is currently selected. Screensets store window size and placement, your control bar customization, your zoom level, and much more. You can import another project’s screensets by using the import project settings (see Chapter 2). You can assign screensets to all the number keys except 0, which makes them easy to navigate. You can also store double-digit screensets. Press Control for only the first digit of double-digit screensets (but you still can’t use 0).
To create a screensets, do one of the following:
- Press any number key from 1–9. If a screenset doesn’t already exist, one is created. To create screensets higher than 9, press Control with the first digit.
- Click the Screenset menu (the number in the main menu to the right of Window) and choose Duplicate to make a copy of your current screenset. Name your screenset in the dialog that appears and press OK.
After you have a screenset exactly how you like it, you can lock it from the Screenset menu. You can also delete and rename screensets from the Screenset menu.
Screensets are easy to recall because all you have to do is use your number keys. Most projects don’t need more than 9 screensets, but it’s nice to know you can have as many as you want in case you need them for a specific workflow.
Following are some ideas for using screensets:
- Open the score in a separate window from the main window to reference the music notation while you record or edit.
- Open the Mixer and Floating Transport windows when you’re focusing on mixing.
- Audio and MIDI editing might need windows to be positioned just right for a good workflow.
- Software instruments and their interfaces can get their own screenset for quick sound editing or playing.
- Open a main window with no inspectors or editors so you can see your full arrangement quickly. Don’t forget the Z key command, which zooms everything to fit in the main window.
- If you work on a laptop and a desktop computer like I do, you can create a set of screensets optimized for the display size and save them as a template for either starting projects or importing the screensets into current projects.
Here’s how I use screensets. I reserve screenset number 9 for project notes and number 8 for track notes. Both screensets have the Notes window open and set to the correct tab so I can quickly jot down ideas and references and keep a change log. Screenset number 1 is reserved as an ad hoc workspace where I can set up windows for specific workflows and then duplicate the screenset to its own name and number. Whenever I get the windows just right for what I’m about to do, I duplicate it as its own screenset and give it a descriptive name.
You’ve learned why Logic Pro X is a music producer’s powerhouse and timesaver. It’s capable not only of sounding great but also of bringing out the great in you.