Building Your WCM Site
Now that we’ve gone through a long list of the functionality that WCM brings to the table in MOSS, how do you build a site that takes advantage of these publishing capabilities? As mentioned in the first chapter, the key to any project is to put together a good blueprint for the solution you are about to build.
Planning Your WCM Site
If you polled most of your site users and ask them to list a few things that they want to do to improve your Website, one of the top answers would likely be “make it easier to find things.” The good news is that there’s hope! Whether you are starting with a new MOSS site or you already have an existing one, it’s never too late to organize your content and make your site more usable.
There is a catch phrase that often gets used when talking about Web sites: “Content is king.” Although extremely overused, it’s absolutely true. The content that is contained across your site is the most important part of your site. Providing access to content in as few clicks as possible is always the goal for most Web sites. The first step in the process is to create a taxonomy.
Imagine you are on your way home from work and have to stop at an unfamiliar home improvement store to pick up some nails. Although you’ve never visited the store, chances are you can easily find what you’re looking for because all home improvement stores are well organized into aisles and sections that each contains similar items. Now imagine going to that same store but instead of well-organized aisles, it just contains random piles of items. The amount of effort to find the specific nails you’re looking for is significantly larger. Most likely, you have to ask a salesperson who might need to talk to a coworker to determine which pile contained the nails. This situation is no different from how a Web site works, and an effective taxonomy makes a dramatic difference in how easily users can find what they are looking for.
Taxonomy is the practice and science of classification. If you think back to your high school biology class you might remember the scientific classification of organisms: domain, kingdom, phylum, class, and so on. In Web site terms, a taxonomy involves creating an organized structure for your content, which would be something like Document, Human Resources, Policy, 2007, Time Off Request. For users to most easily find information, a taxonomy should be created that leads users down a familiar path to find the content they are seeking. Every situation is going to be different, and there isn’t a one-size-fits-all taxonomy that will work in all cases. Some common examples of taxonomies include
Business units or organizational chart
Subject (such as Yellow Pages, supermarket aisles)
Functional or role based
When creating a taxonomy, you need to ask the following important questions:
Who will be the primary audience of the site, and how will they use the site? For example, imagine you were a government agency with many departments that each had specific names. The general public visiting the site might know what they are looking for but might not know the specific name of the department. Although it might make perfect sense to someone who works for this government agency to find something, if the primary consumers of the content can’t find what they are looking for, then the taxonomy is not effective.
What different ways can users navigate the site? Each user is going to look at different aspects of the site. Some users will use the navigation, some will look for links throughout the body of the pages, and others will simply search and go straight to what they are looking for. All of these methods can be used together to make content easier to find.
Will the sites have unique permissions? As you build your taxonomy, make note of the permissions for each of the sites, and make note of the different types of roles that need to be accommodated. A common scenario might be that all users can read content on all sites, and users can only edit content from their respective department sites. With publishing sites, it’s also important to make note of who is responsible for approving content. Managing permissions on even small sites can quickly become complicated, and creating a plan that aligns with your taxonomy can save headaches in the future.
Is there a need to roll up any information? Each department in your company maintains different types of content, but there’s often the need for information to be rolled up from one site to another site. The structure of the sites can impact how easily content can be rolled up using the OOB tools such as the CQWP.
Who is the site owner? Sites should have owners. Period. As taxonomies are being created, it’s easy to start adding sites that sound like they have value. Ultimately, someone needs to be designated as the owner to maintain the content on the site; otherwise, the site will be an orphan. If the site has true business value, there should be no problem finding an owner.
A good blueprint for your taxonomy might sound like additional work, and initially it will be, but in the long run, it will lead to a more usable experience for users of the site. An added benefit is that it will speed the implantation of the site and reduce long-term support needs.
Site Collection Boundaries
After the taxonomy has been created, the next step in the process is to map it to actual SharePoint sites within your site structure. This topic is covered in more detail in Chapter 2, “Creating Corporate Portal Sites,” but it bears repeating that the logical boundary for security, the OOB Web Parts, and navigation is the site collection. This means that if the taxonomy that was designed requires more than a single site collection, the strategy for navigation or rolling up content needs to be carefully considered. These situations can be addressed through planning, custom development, or third-party tools.
Creating the Publishing Site Collection
Everything should now be in place to begin building out sites in SharePoint. Each SharePoint site using publishing is different, but they all start the same way: with the creation of a site collection. This example walks you through the steps of creating a site collection using the Publishing Portal template.

| This example assumes that you’ve already created a Web application that can be used for the Publishing Portal. If you haven’t created a Web application or want to create a new one, go to http://technet.microsoft.com/en-us/library/cc287954.aspx for more information. |
1. | Open Central Administration. |
2. | Go to the Application Management tab, and click on Create site collection under the SharePoint Site Management heading. |
3. | Note the Web Application selector in the upper-right corner of the screen. Make sure to select the correct Web application where you want to create the new site collection. |
4. | Fill out the details for the site collection, making sure to select the Publishing Portal template from under the Publishing tab (Figure 5.11). |
5. | Click OK. It might take a few minutes as the site creates. A lot more is happening behind the scenes than when the typical collaboration site is created. |

After following these steps, a message appears confirming that a Top Level Site has been successfully created. To view the site, click on the link provided at the bottom of the screen, and the site opens in a new window.
Enabling Publishing on a Site Collection Based on a Collaboration Template
You don’t have to choose one of the publishing site collection templates to take advantage of the publishing functionality. Because publishing is enabled by activating a feature, you can manually enable publishing to any SharePoint site.
Although any MOSS site can be enabled to use the publishing functionality, it’s best to start with one of the two publishing templates if your project will be taking advantage of the WCM functionality.
The technique of enabling publishing on collaboration sites is most effectively used when a site collection is made using one of the publishing templates, and collaboration sites are used as subsites. One of the unfortunate downsides of the publishing functionality is that because of the complexity involved, sites can no longer be saved as templates and easily reused. To get around this, if subsites are created as collaboration sites, they can be saved as templates and then used to create new sites that can have the publishing functionality enabled after the fact. This is effective in situations where you might need to create a large number of sites that will be nearly identical except for the content, such as project sites, product sites, or department sites.
1. | |
2. | Click on Site Actions > Site Settings. |
3. | Under the Site Collection Administration heading, (if you don’t see this, then you will need to ask your administrator for assistance) select Site collection features. |
4. | The Site Collection Features screen is where you’ll find all of the features that are scoped to enable functionality at the site collection level. Take a look at the other features available on this screen for future reference, but for the purposes of this exercise, we are only focusing on the Office SharePoint Server Publishing Infrastructure feature. Click the Activate button. This feature enables the foundation needed for publishing but does not activate it at the site level. |
5. | Click on Site Actions > Site Settings page. |
6. | Under the Site Administration heading, click on Site features. |
7. | Click the Activate button for the Office SharePoint Server Publishing feature. |
Although the site still looks the same, the publishing functionality is now available on your collaboration site. To verify, you can click on the Site Actions button and should now have several new options, including Create Page and Manage Content and Structure.
Creating a Page
With the site collection created, it’s now time to start entering some content. For this example, you’ll be using the Press Releases site that was created as part of the Publishing Portal template.
1. | In your newly created publishing site, click on the Press Releases subsite. |
2. | Click on Site Actions > Create Page. |
3. | Fill in the Page details:
|
4. | Click Create. |
5. | |
6. | After all of the content has been entered, click the Submit for Approval button in the toolbar. |
7. | The Start Parallel Approval screen opens. Take note of the available options on this screen, but for the purposes of this demo, click the Start button at the bottom. |
8. | The WCM is fun press release opens. You can see at the top of the screen that the version is listed as Draft (0.1), and the current Status is “Waiting for approval.” If you are logged in using the account that was specified as the site collection administrator, you should also see the Approve and Reject buttons in the toolbar. Click the Approve button. |
9. | The Approve/Reject screen for the specific workflow opens. You may optionally include comments. Click the Approve button. |
After the page has been approved, you are taken back to the WCM is fun page, which has now been published. Notice that the new page now shows up in the drop-down list from the top navigation as well as being listed as a link in the left navigation.

| When entering content into pages prior to a production release for a SharePoint site, a common technique for quickly loading content is to simply cut and paste from an existing Web site or Office Word document. Although the formatting might be slightly off, the majority of the content should come over intact. Reformatting as necessary in most cases will require significantly less time than re-creating the content from scratch. For users comfortable with editing HTML, there is a source mode that gives even greater control of what is displayed. |
Changing the Page Layout and Publish Schedule
Users commonly create content and then later wish they had picked a different layout. Perhaps they chose to create the content using the Article Page with Image on Left layout and realized that the image would look better on the right. This common situation is easily fixed. Adjusting the page publishing schedule is another change often made to pages after they’ve been created. Follow these steps to change a page layout and adjust the publishing schedule:
1. | Place the WCM is fun page into edit mode by clicking Site Actions > Edit Page. | ||
2. | |||
3. | In the Schedule settings, change the radio button for Start Date and End Date to On the following date, and select a time frame in the near future so that you can review the page during this time. | ||
4. | Scroll down to the Page Layout section. Click on the drop-down list, and select Article page with image on right (Figure 5.12).
| ||
5. | Click OK. |


The page appears in edit mode with the new layout. The page just needs to be published before all users will be able to see the content with the new layout. That is all there is to it! If simply changing the layout doesn’t meet the needs of your users, you can create custom layouts that can be used in the same way. Creating custom layouts is discussed in Chapter 6.
Don’t forget to review the page before, during, and after the time frame you set for when the page is scheduled to publish. You’ll notice that after the page passes the specified end date and time, the page will revert to draft mode and will no longer show as published content to users.
Manually Enabling Content Scheduling
Content scheduling is enabled by default when a site collection is created based on the Publishing Portal template. However, any site with publishing enabled can use the content scheduling features.
Follow these steps to manually enable content scheduling on a publishing site:
1. | Go to Site Actions > Site Settings > Modify Pages Library Settings. |
2. | Click on Versioning settings under the General settings heading. |
3. | In the Content Approval section, set Require content approval for submitted items to Yes. |
4. | In the Document Version History section, select Create major and minor (draft) versions (Figure 5.13). |
5. | Click OK. You should be redirected to the Pages library settings page. |
6. | Click on Manage item scheduling. |
7. | Place a check in the box to Enable scheduling of items in this list. |
8. | Click OK. |

Allowing Other Site Templates to Be Used in the Publishing Portal
The Publishing Portal site template by default only allows sites to be created using the Publishing Site with Workflow template. There are many scenarios in which you might want to use one of the many other templates to create a subsite. Follow these steps to allow sites to be created using the other templates:
1. | Go to the root site for your site collection. |
2. | Click on Site Actions > Site Settings > Modify all site settings. |
3. | Under the Look and Feel heading, click on Page layouts and site templates. |
4. | In the Subsite Templates section, the Subsites can only use the following site templates radio button should already be selected. The left box displays all available templates that are not being used. The right box shows the templates that are allowed. Select the Team Site (All) template, and click the Add button to move it into the list of allowed templates (Figure 5.14). |
5. | Click OK. |
6. | After you have specified that the Team Site template can be used, go to the top-level site, and create a new subsite using the Team Site template called “Team.” |
7. | After the new site has been created, the first thing to notice is that it doesn’t use the same master page as the top-level site. To fix this, go to the top-level site, and click Site Actions > Site Settings > Modify All Site Settings. |
8. | Under the Look and Feel heading, click on the Master page link. |
9. | Because the new subsite is a collaboration site, it’s using the master page defined by the System Master page. Change the System Master page to BlueBand.master. |
10. | |
11. | Click OK. |

If you click on the newly created Team site now, it should be using the same master page as the rest of the site (Figure 5.15). This technique can be used to allow other types of sites such as blogs or Wiki sites in the Publishing Portal.


| Because collaboration sites do not have publishing enabled by default, you can create a custom template preloaded with content that can be used to build out sites very quickly. After the sites have been created, the publishing feature can be enabled on the site. |
Using the Content Query Web Part to Roll Up Content
The ability to create sites using a collaboration template provides a lot of flexibility but to take full advantage of the WCM capabilities, such as creating pages using page layouts and content roll up, the publishing feature needs to be enabled. This example shows you how to enable the publishing feature on the Team site that was created in the previous example and add the CQWP to roll up content from the Press Releases site.
1. | Open the Team site. | ||
2. | Enable the publishing feature by going to Site Actions > Site Settings. | ||
3. | Under the Site Administration tab, click on Site features. | ||
4. | |||
5. | Go back to the main page for the Team site. | ||
6. | Select Site Actions > Edit Page. | ||
7. | Click on the Add a Web Part button at the top of the Left Web Part zone. | ||
8. | The Add a Web Part screen opens. Scroll down to All Web Parts. In the Default section, select the Content Query Web Part check box. | ||
9. | Click Add. | ||
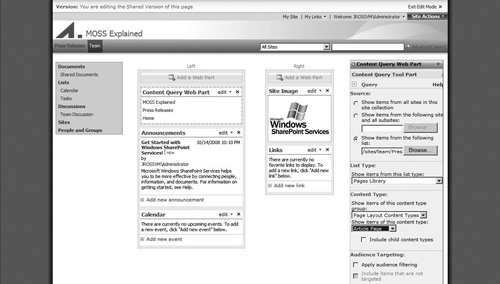
10. | The Content Query Web Part is now added to the page, which is still displayed in edit mode. Now, you’ll make some changes to the Web Part to roll up specific content from another site. In the upper-right corner of the Web Part, click on the Edit drop-down list and then select Modify Shared Web Part. | ||
11. | The Edit menu for the Web Part opens. Click on the plus sign next to the Query to expand that section. | ||
12. | From the Source section, choose the Show items from the following list radio button, and then click the Browse button. | ||
13. | Select the Pages library under the Press Releases site (Figure 5.16). Figure 5.16. Set the CQWP to only show the Pages library from the Press Releases site.
| ||
14. | |||
15. | Expand the Appearance section of the Web Part options menu. | ||
16. | |||
17. | Click OK. | ||
18. | In the upper-right corner, click Exit Edit Mode. After the CQWP has been configured, it should look similar to Figure 5.18.
|