Search Examples

Now that you have a general idea of how MOSS search works, let’s put it together into a few examples. In this section, we’ll combine several search techniques to build powerful business solutions that require no code.

Limit Search To File Server

In this example, you’ll build a solution that allows users to search content that currently exists on the file server. In this business scenario, currently all archived business documents are being stored on the file server. These documents are moved to the file server and remain there until they can be deleted per the corporate document management strategy. On occasion, users need to reference these documents, and they want to search through these documents from the corporate search center.

To provide the functionality requested by the users, you’ll implement the following search techniques.

  • Create a content source for the file server content.

  • Create a custom search scope restricted to the file server content.

  • Add a custom tab to the search center where the Web Parts will be restricted to the new custom search scope.

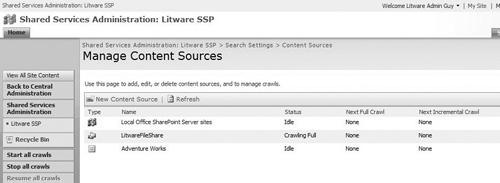
Exercise: Create a New Content Source

In this exercise, you’ll create a content source for the data currently stored on the file server. This allows users to search the file server data from the SharePoint search center. To get started, you’ll need to access the SSP from the Central Admin site.

1.
From the server, open the Central Admin page.

2.
Select the Shared Service Provider link from the navigation at the left to open the SSP Administration site.

The SSP is configured when the server is first installed. If you don’t have a link in the left navigation for an SSP, you’ll first need to configure it before completing this exercise.


3.
From the SSP Administration page, look for the Search section, and select Search settings to display the Search Administration site.

4.
Select Content Sources and Crawl Schedules to see a list of all the content sources configured for the server.

5.
Select Create New Content Source. Use the values in Table 8.1 to configure the content source. After you select OK, the content source begins a full crawl (see Figure 8.4).

Table 8.1. Values for New Content Source
PropertyValue
NameLitwareFileShare
Content Source TypeFile shares
Start AddressesFile://litwareserver/LitwareFileShare
Crawl SettingsThe folder and all subfolders of each start address
Crawl SchedulesNone
Start Full CrawlYes

Figure 8.4. Manage Content Sources screen during full crawl.


The values given in the table are for example purposes only and aren’t configured to crawl based on a schedule. When creating content sources, it’s important to configure the crawl schedule based on your organization’s needs and performance requirements.


6.
After the full crawl has completed, you can view the crawl logs to see any errors that occurred during the crawl. To access the crawl log, select View Crawl Log from the File Server drop-down list. This content source is now ready to be included in search scopes.

Exercise: Create a New Scope

Now that a new content source has been created, you can create a new search scope that allows users to limit their search to only content defined by the search scope. In this example, you’ll be creating a global search scope that can be used on any site collection in the farm.

1.
From the server, open the Central Admin page.

2.
Select the Shared Service Provider link from the left navigation.

3.
On the administration page for the SSP, look for the Search section, and select Search settings.

4.
On the Search Settings page, scroll down to the Search Scopes section. From this screen, you’ll see a summary of the existing search scopes and the time for the next scheduled update (see Figure 8.5).

Figure 8.5. Search scopes on the Search Settings page.


5.
Select View scopes to see a more detailed list of search scopes. On the View Scopes page, select the option to create a new scope. Figure 8.6 shows the Create Scope page.

Figure 8.6. Create search scope.


6.
Enter the Title and Description. Ensure that the “Use the default Search Results Page” is selected for that Target results page, and click OK. You are redirected to the Search Scopes page where your new scope is listed. You’ll also notice that your scope currently has no rules associated with it.

7.
Click Add Rules to specify the criteria for the scope. For this example, select Content Source as the Scope Rule Type, and select the Content Source created in the previous example. For the Behavior, select to Include ... any item unless it’s excluded by another rule as shown in Figure 8.7.

Figure 8.7. Scope configuration.


8.
Click OK. The Search Scopes page opens, and a message is displayed next to the scope that says the new scope will be updated with the next scheduled update (see Figure 8.8).

Figure 8.8. Search Scopes list before.


The search scopes are updated based on the scheduled process. If you want to update the scopes immediately, you can select to Start Update Now from the Search Settings page.


9.
After the search update process has completed, the scope is listed in the scopes list with the number of items in the scope being displayed (see Figure 8.9).

Figure 8.9. Search Scopes list after.


Exercise: Adding a Tab to the Search Center

The Search Center with Tabs template allows you to customize the tabs to meet your needs. This example shows how to use the template to create a new tab to search a specific scope. This allows users to search only in one scope when they select that tab.

1.
From the top-level site in your site collection, select Site Actions > Create Site.

2.
Give the site a title and URL name.

3.
On the Enterprise tab, select the Search Center with Tabs template, and click Create. After the site has been created, it is shown in the browser.

4.
For this example, you need to create two new pages—one for entering the search criteria and one for the search results. From the Search Center site, select Site Actions > Create Page. For the first page, select the Search Page as the page layout, and for the second page, select the Search Page Results for the layout.

For this example, you’ll create all of the necessary pages before you configure and publish the different search pages.


5.
From the Search Center home page, select Site Actions > Edit Page.

6.
Select the Add New Tab option, and enter in the information for the new tab. For this example, call the tab “File Server” as shown in Figure 8.10.

Figure 8.10. Search page tab configuration.


When entering the page, use the format of file name without the URL, for example, fileserver.aspx.


7.
When you select OK on the tab configuration, you are redirected to the Search Center page. Select the File Server tab, and then select Site Actions > Edit Page.

8.
Click on the Edit button in the upper-right corner of the Search Box Web Part, and select Modify Shared Web Part.

9.
Under the Miscellaneous Settings section, set the Target search results page URL to the results page created in step 2, and click Apply. Figure 8.11 shows the configurations for this example.

Figure 8.11. Search box configuration.


10.
Enter a search term into the search box, and press Enter. Verify that the page you configured in step 7 is the page that opens.

11.
From the Search Results Page, select Site Actions > Edit Page.

12.
Select the Add New Tab option, and enter in the information for the new tab. For this example, call the tab “File Server Results” as shown in Figure 8.12.

Figure 8.12. Search results page tab configuration.


13.
Verify that you’re on the File Server Results page, and click Site Actions > Edit Page.

14.
Click Edit, and then click Modify Shared Web Part from the Search Core Results Web Part.

15.
Under the Miscellaneous Settings section, set the Scope to the File Server, and click Apply. Figure 8.13 shows the configurations.

Figure 8.13. Search Core Results configuration.


For this step, you’re using the search scope that you created earlier in the chapter in the Create Search Scope exercise. Be sure to configure your Web Part to point to an existing scope.


16.
Publish the page or save as draft. Your search results are now only displaying results from the File Server scope. You can see in the URLs listed in the example that they are all located on the file server (see Figure 8.14).

Figure 8.14. Search results limited to File Server scope.


The Search Center template is a publishing site that uses page layouts. Before the page layouts can be viewed by everyone, they must first be published. Keep this in mind as you’re building your new tabs. You’ll only want to publish the pages when you’re ready for everyone to access the pages. In our examples, you’ll notice we did not publish the pages.


..................Content has been hidden....................

You can't read the all page of ebook, please click here login for view all page.
Reset
3.21.93.44