
Web Content Management for MOSS
MOSS provides several different types of site templates. You can see the full list by opening Central Administration, going to the Application Management tab, and clicking on Create site collection. There are a few options for creating site templates, but the options for creating a site with WCM functionality are under the Publishing tab (Figure 5.2).


| The term “publishing” is used throughout the SharePoint menus to refer to the WCM functionality. |
Collaboration Portal. Typically used for intranet sites, the Collaboration Portal includes a home page, a News site, a Site Directory, a Document Center, and a Search Center with Tabs.
Publishing Portal. Typically used for extranet or Internet sites, the Publishing Portal includes a home page, a sample press releases subsite, and a Search Center. Because many sites using this template will have anonymous users, additional functionality is enabled with the Publishing Portal to address these issues. For example, content scheduling, two-stage workflows, and the Lockdown feature security enhancement are enabled automatically. The Lockdown feature prevents anonymous users from being able to see things that you probably don’t want users to see in a public site, such as the items in lists and document libraries.
Publishing Functionality
The publishing functionality in the site collection templates is made possible by a SharePoint feature. Although the term “feature” might cause you to think about long lists of available functionality, it actually refers to something specific. Basically, features are the mechanisms that enable much of the functionality in SharePoint. For example, when you choose Publishing Portal as your template, behind the scenes, that template is enabling a number of features to provide the functionality that defines the Publishing Portal. Features can be used to create site columns and content types, safely add Web Parts, deliver custom code or design elements such as master pages or page layouts, add new templates or just about any other custom functionality you can think of. Features are largely a developer topic, but it’s important for you to have a functional understanding of what they can do.

| For more in-depth information about features, visit http://sharepoint.microsoft.com/blogs/mike/Lists/Posts/Post.aspx?ID=7. |
When a user chooses to create a site using one of the publishing site collection templates or if the publishing feature is activated manually, a number of changes are being made behind the scenes to add to and support the WCM functionality. As mentioned previously, two publishing site collection templates are available OOB. The examples in this chapter focus on the Publishing Portal template because it uses more of the publishing functionality.
The next sections highlight many of these changes to SharePoint that are created when the publishing feature is enabled.

| The Collaboration Portal can still take advantage of any functionality used by the Publishing Portal that is not enabled by default, but it must be enabled manually. |
Document Libraries
Collaboration sites are more geared toward document management, but publishing sites add the ability to manage Web pages. One of the most significant changes when publishing is enabled is that several document libraries are created to accommodate the specialized content required to support Web pages (Figure 5.3).

For example, the Pages library is a specialized document library that stores all of the Web pages for a publishing site. Each site where publishing has been enabled contains a document library called Pages. When a publishing site is first created, it only contains one file called default.aspx, which is used as the home page for a site collection created from a publishing template. All new pages created are stored in the Pages library.
Anatomy of a Publishing Site
When you look at a SharePoint site for the first time, you might not realize all the different pieces that are working together to create the page that renders in your Web browser. Every page in a publishing site is actually the combination of a master page and a page layout (Figure 5.4).


| All SharePoint sites have a master page gallery. Although there is no interface to get to it in a collaboration site, you could manually type in the following URL: http://<mySharePointSite>/_catalogs/masterpage/Forms/AllItems.aspx. Try creating a collaboration site without publishing, and take a look at the contents of the master page gallery before and after publishing is enabled to get an idea of all the additional master pages and page layouts that are created. |
Master Pages
Master pages are actually an ASP.NET 2.0 concept that SharePoint uses to define the outer shell of every page. Branding elements, navigation, and other SharePoint-specific controls are defined in the master page. Every SharePoint page must use at least one master page at all times. Publishing sites not only add a number of new master pages but also provide an interface to easily select a different master page. To change a master page, follow these steps:
1. | Go to Site Actions > Site Settings > Modify All Site Settings. |
2. | Select Master page from under the Look and Feel heading. |
3. | From the Site Master Page Settings screen, you can change master pages. Select OrangeSingleLevel.master, and click OK at the bottom of the screen. If you go back to the home page, you’ll see how dramatically different a site can look by simply changing the master page (Figure 5.5). |

Page Layouts
Page layouts can be thought of as templates for Web pages. In Chapter 3, “Lists, Document Libraries, and Content Types,” we covered content types—a page layout is essentially a template for how to render the content entered into a list using a specific content type. A good illustration of this is the Article page layouts that MOSS provides by default when publishing is enabled. A user first selects which page layout to use and then enters the content. This results in a new page being created in the Pages library, which renders the content based on the selected page layout. Because the content entered into the fields is simply data, by changing to a different layout based on the same content type, a user can alter the way the content is displayed on the page.
Page layouts contain three different ways to display content to users:
Field controls. A field control displays content that is stored in a field for each page that uses the page layout. This is similar to what happens when you enter data into a list. The page layout displays the content entered into the fields in a structured way. In WCM sites, field controls are the most common way to store content.
Web Part zones. Web Part zones are areas on the page layout where authors and editors can place Web Parts after a page has been created.
Web Parts. Placed on a page in Web Part zones, the OOB Web Parts provide flexible options for displaying content. Web Parts give authors the ability to add functionality to the page from displaying and querying content to data interaction such as filters.
Content authors can add content to the page using any of these methods. There is no OOB way to restrict an author from adding content via a specific method. For example, if a user has the ability to edit a page, then the user can add Web Parts to the page in addition to filling in field controls.
Creating custom page layouts is discussed in Chapter 6.

| The question often comes up about whether to use field controls or Web Parts to store content. Entering content directly into a Web Part seems to be much easier than going through the trouble of creating a custom content type and custom page layout right? The short answer is yes, entering content directly into a Web Part is the faster and easier option for entering content. But, there’s a big downside that is often overlooked until it’s too late: content entered into field controls is versioned, whereas content entered into a Web Part is not. Web Part zones store the information about Web Part placement and metadata in a separate Web Part store and not in the fields on the page. Although changes to Web Parts require approval just like other elements on the page they will not be versioned. Rolling back to a previous version of the page will not affect the Web Parts. This is a common gotcha that happens all too often. As a rule of thumb, content should be placed in field controls, and Web Parts should be used to add functionality. |
Page Editing Toolbar (PET)
One of the most obvious changes authors will notice when using a publishing site is the Page Editing Toolbar (PET). The PET provides authors with a set of menus for managing the page. From editing and approving pages to workflows and page settings, the PET is a useful tool for authors (Figure 5.6).

Page Status Bar. Located at the top of the PET, the Page Status Bar shows information about page version, status, and publish date.
Page Editing Menu. The Page Editing Menu includes menus for the various actions that can be taken for a page, including check in/out, delete, starting workflows, rolling back to previous versions, check spelling, changing the page layout, and changing the publishing schedule.
Quick Access buttons. These buttons provide quick access to the most common actions such as Edit Page, Check In to Share Draft, Submit for Approval, and Approve and Reject.
Navigation
A key component of any WCM system is a configurable navigation, and publishing within MOSS is no exception. The navigation can be viewed and modified by going to Site Actions > Site Settings > Modify all site settings, and selecting Navigation under the Look and Feel heading. The publishing navigation is broken into two separate providers: global navigation and current navigation. By default, the global navigation appears at the top of the page and is intended to appear “globally” across all sites so users have a consistent point of reference when browsing sites. The current navigation shows at the left side of most of the OOB templates and is intended to provide links relative to the current site that is being viewed.
OOB navigation is built dynamically as sites and pages are created, however, you can manually modify the navigation. From the navigation menu, a user can specify whether to show subsites or pages, reorder the navigation, and add or remove items from the navigation. Headings and links can be added so that the navigation can be customized to meet specific needs and provide links to content outside of SharePoint (Figure 5.7). Items in the navigation can also be used with audience targeting to help provide a more intuitive user experience. Audience targeting is covered in more detail in Chapter 7, “User Profiles, My Sites, and Audience Targeting.”
Figure 5.7. Navigation can be manually updated with links and headings.

The navigation also works in conjunction with user permissions to add an extra layer of security. If users don’t have access to sites or pages, then the navigation won’t show those elements; this is referred to as security trimming. This functionality doesn’t work if the navigation is manually built, however.
Although the navigation can be customized, there are a few limitations. The biggest limitation is that when manually creating navigation items, you can only create one level of headings with one level of links below it. If the navigation is allowed to build dynamically, however, there is no practical limit. This is by no means a show-stopper, but it’s a valid consideration as you plan your MOSS implementation.
While we are on the topic of planning and navigation limitations, the navigation can only dynamically display items from within the site collection. If your implementation requires multiple site collections, there is no OOB way to create a single navigation that can span all of your site collections. For many implementations, this can pose a challenge. There are many ways to solve this problem, but the most commonly used solution is to create a site collection at the root URL of your site to provide navigation for the rest of your sites. For example, if your URL is http://mossexplained, the site collection that lives at that URL would act as the entry point for all users to the site. That site would then provide a navigation structure that would drive users in an intuitive manner to your other site collections.
Another limitation is that the navigation has many options for advanced configuration, but the user interface only provides the ability to change a few items. Customizing the navigation more than what is available through the menu in site settings is outside the scope of this book, but for more information visit
http://blogs.msdn.com/ecm/archive/2007/02/10/moss-navigation-deep-dive-part-1.aspx
http://blogs.msdn.com/ecm/archive/2007/02/16/moss-navigation-deep-dive-part-2.aspx
Manage Content and Structure
Manage Content and Structure is one of the links you’ll see under the Site Actions menu of a publishing site. It was mentioned in the previous section that the navigation in your publishing site will be dynamically generated based on the site collections hierarchy. If you change the structure of the sites, that change is reflected in the navigation. It’s no surprise then that the Manage Content and Structure page allows you to manage the content and structure of your site collection. This page allows you to make bulk content changes, such as copy, move, delete, check out, check in, reject, approve, publish, or unpublish.
With any WCM site, the amount of content will continue to grow over time, and keeping track of it all can be challenging. Manage Content and Structure also has a number of reports that users can choose from to help keep content organized (Figure 5.8).
Figure 5.8. Reports available from Manage Content and Structure.
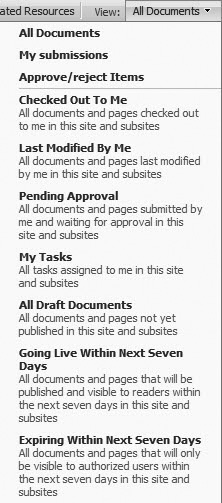
The Manage Content and Structure page also has an option to show related content. After you select a piece of content, all of the related resources are displayed that are called by a given item. A resource is anything used by the page, including page layouts, images, cascading style sheets (CSS), or links to or from the page. This is very useful if you need to update a specific resource and want to determine all of the places where that resource is used. For example, if you wanted to identify all of the pieces of content in your site collection that used a particular layout, you could go to the master page gallery and select the layout to see all of the pages in a single place.
Site structure and settings can also be managed from this page. Sites can be moved or deleted from this menu. The menu also provides access to create new subsites and lists as well as to delete, copy, or move sites. Other site settings and permissions can also be changed from the menu (Figure 5.9).
Figure 5.9. Options for modifying sites from Manage Content and Structure.

WCM Web Parts
One of the most frequent challenges of content-centric sites is how to create an organized information architecture that meets the needs of your environment. After that structure is in place, users from across the organization will begin to enter content, and often there is a need to display content in other places than where it was originally created; in other words, you’ll need to roll content up. For example, think of a typical company site with many different departments. In this scenario, each department would have its own site. Each department would maintain its own unique content, but there would still be some content that was relatively standard such as a press release that the business wants to roll up to a main page to give all of the users a consolidated look at what is happening across the organization. In a typical HTML site, this would require maintaining content in two places or some type of custom-developed solution. MOSS provides two Web Parts for publishing sites that help to roll up content: Table of Contents and Content Query.
The Table of Contents Web Part automatically generates a site map that points to different parts of your site collection. After the Web Part has been added to the page, it can be configured to show links up to three levels deep and use several different options for displaying the content.
The Content Query Web Part (CQWP) is a flexible tool to allow users to pull content from across lists and sites. Being able to specify queries to return specific types of information is a common situation, and the CQWP has several options for building those queries. The query options include specifying the source of the content (entire site collection, specific site and subsites, or a specific list), list type, and content type, or to include custom filters based on the values of site columns. The results of the query can be sorted or grouped. The CQWP uses the site permissions to only show content that the authenticated user has access to. The CQWP can also be enabled to provide a Really Simple Syndication (RSS) feed of the results.
Additionally, the results of the CQWP are displayed using XSLT, which can be modified if the default look and feel does not match your requirements.

| For more information on customizing the CQWP results, visit http://blogs.msdn.com/ecm/archive/2006/10/25/configuring-and-customizing-the-content-query-webpart.aspx. |
The Summary Links Web Part is also available in a publishing site. It provides an easy way to build links to content within the site collection as well as to outside content. These links can be managed and grouped as needed. Some layouts include the summary links as a field control.
Often users require multiple ways to find the content they are looking for, and these Web Parts provide users with another path to the information they are seeking.
Workflows
When a site is created using the Publishing Portal site template, a new workflow is added to the Pages library that requires all pages to go through an approval process before the page is published. This workflow, called the Parallel Approvers work-flow, means that after a page has been created, the content author must submit the page for approval. After the page has been submitted for approval, a few things happen. First, a task is created and assigned to all members of the Approvers group in the SharePoint site. The members of that group are notified by e-mail that they have content to review and are provided with a link to the content. If the page is approved, the version increments to the next whole number, and the document is published for all users to see.
This is called a Parallel Approval workflow because it is possible to specify approvers or groups of approvers who can all be notified to review the page at the same time. Conversely, Serial Approval means that if there were four approvers, the first person needs to approve before the second and so on down the line. If any of those approvers reject the document, the workflow stops.
The easiest way to view the workflow settings on the Pages library is to click Site Actions > Site Settings > Modify Pages Library Settings, and click on Workflow settings under the Permissions and Management heading. You should see the Parallel Approval workflow that was automatically created and can click on it to review the settings.
There are several options for what can be modified, including the start criteria and type of workflow (parallel or serial) as shown in Figure 5.10. The criteria for what determines approval can also be changed; for example, if there were five approvers in a group, you might only require three of them to approve the document for it to be published. You can specify the people or groups who can approve or reject. This provides a large amount of flexibility in how the workflow can be structured.
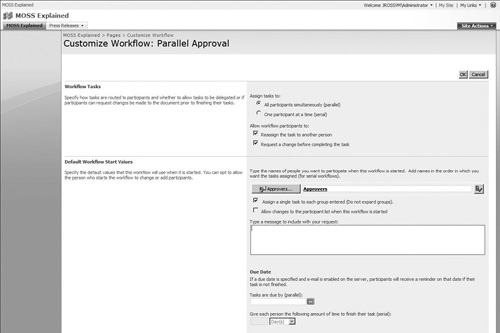

| Specifying the approvers is useful, but it’s important to be aware that every item listed in the Approvers field is treated as a separate approver. For example, if you had two groups listed and an individual person in the Approvers field, an approval would be required from someone from each of the groups and from the individual person for the document to be considered approved. As a general rule, only groups should be listed in the Approvers field. |
Publishing Permissions
When the publishing feature has been activated on the SharePoint site, either by a template or manually, it adds a few permission levels above what is available with a WSS site. These additional permission levels support the functionality enabled by the publishing feature by allowing additional control. The following permission levels are added when publishing is enabled:
Approve. This permission level is the same as Contribute but adds the capability to manage the approval status of content.
Manage Hierarchy. This permission level allows users the ability to manage the navigation as well as create and edit subsites.
Restricted Read. This permission level is similar to the Read permission level; however, it doesn’t allow a user to review previous versions of items. Additionally, users with this permission level cannot view user information on the site.
Publishing Groups
In addition to the permission levels, several SharePoint groups are created when the publishing functionality is enabled. Some map directly to the publishing permission levels such as Approvers, Hierarchy Managers, and Restricted Readers groups. Three other groups are created by the publishing feature that allow for greater control of content:
Designers. This SharePoint group is for users who will have rights to customize the site and create custom master pages and page layouts. This group is given the Design and Limited Access permission levels.
Quick Deploy Users. This SharePoint group is used in conjunction with content deployment. For more information on content deployment, go to http://blogs.msdn.com/sharepoint/archive/2006/05/02/588140.aspx and http://technet.microsoft.com/en-us/library/cc263428.aspx.
Style Resource Readers. This SharePoint group provides Read permissions to the site collection’s master page gallery as well as Restricted Read permission to the Style library.
Search
MOSS ships with a search functionality that is greatly improved over the previous version of SharePoint. Although this is inherently not a feature of WCM, it’s mentioned because, unlike the other templates, the publishing templates add the MOSS search functionality automatically when they are provisioned. Search is covered in more detail in Chapter 8, “Configuring and Extending Search.”
Benefits for Public-Facing Sites
In previous versions of SharePoint, creating public-facing sites was possible, but there were several challenges that had to be overcome. The most obvious challenge was branding. As previously mentioned, MOSS has many more options for branding, and now sites can be created so that the average user can’t distinguish which technology was used. The Publishing Portal site template has been designed to address some other underlying challenges faced by public-facing sites such as security and performance.
Most public-facing Web sites have a larger number of consumers than authors. Although it’s important for the readers to see the information, they should only be able to view the specific content on the site and not other places such as lists and document libraries that are not part of the published content. The good news is that the Publishing Portal site template automatically enables the special SharePoint Lockdown feature, which adjusts the security so that anonymous users no longer have access to see the lists and document libraries.

| The Lockdown feature is enabled by default on sites created with the Publishing Portal, but it can be manually enabled on any publishing site. For more information, visit http://blogs.msdn.com/ecm/archive/2007/05/12/anonymous-users-forms-pages-and-the-lockdown-feature.aspx. |
The other major challenge for public-facing sites with the previous version of SharePoint was performance. Many Internet sites get tens of thousands of users every day, and they are able to create high-performing Web sites by distributing the user load across several servers and utilizing server caching for content. MOSS is much better suited for public-facing sites and able to take advantage of the same techniques used by traditional Web sites. Additional servers can easily be added to distribute load. Also, sites with publishing enabled can control the caching settings from the Site Settings menu.

| For more information on the caching options and other techniques for performance tuning your WCM site, visit http://msdn.microsoft.com/en-us/library/bb727371.aspx. |