
SharePoint Branding Basics
The topic of SharePoint branding is as deep and nuanced as any other topic within the product. This chapter focuses on branding concepts and changes that can easily be made to customize the UI as it relates to the information worker (IW), but it will only scratch the surface of what is possible. Advanced SharePoint branding discussions require a deep understanding of HTML, CSS, and even .NET, which are all far outside the scope of this book. However, you can apply basic SharePoint branding techniques to create an attractive and usable UI even if you don’t have access to a SharePoint branding guru.
Themes
The concept of a theme isn’t new; other technologies use the term “skin” to describe the ability to change the look without moving the position of any of the objects. In other words, if you think of SharePoint as a house, changing the theme would be the same as changing the color of the paint on the house. The doors and windows are all in the same place, but the house looks different because of the paint job.
To see the 18 available themes, go to Site Actions > Modify All Site Settings, and then click on the Site theme link in the Look and feel section. Clicking on the different options shows a preview at the left of what the theme will look like when applied. Choose a theme, and click the Apply button. You are taken back to the Site Settings page and should notice immediately that the theme has been applied. If you go back to the main page for the site, you’ll see that the theme has been applied there as well. As with the house example, the walls have been painted, but the structure remains the same. Major objects like the search box, navigation, and Site Actions button are all in the same place. This is essentially what themes do; they change the look and feel of the site by changing colors, fonts, and so on. Certain elements, such as the site icon and link for the recycle bin, can be hidden with custom themes.
Many organizations begin the branding process by selecting a theme that looks close to the colors used by their company and then adding their company logo. The logo in SharePoint can be modified by going to Site Actions > Site Settings > Modify all site settings, and clicking on the Title, description, and icon link in the Look and feel section. To change the logo, you upload an image to a document library and enter the link to the logo in the URL field in the Logo URL and description field. After you’ve chosen the logo, you click OK, and you should see the new logo you’ve applied.
When considering whether themes are right for branding your SharePoint implementation, there are a few things to remember. First, there aren’t many options. The out-of-the-box (OOB) themes don’t match every company’s color palette, and the options for neutral colored themes are limited. Secondly, themes are applied on a site-by-site basis. If there were 20 sites in your SharePoint implementation, each site would have to have the theme applied one by one. However, you can save a site as a template with a specific theme selected when publishing isn’t enabled. Saving sites as templates and then enabling the publishing feature is described in Chapter 5.
How Themes Work
At the core, a theme is a collection of CSS and images that is used to alter the appearance of the site. These files are stored on the file system of the SharePoint server and can be referenced by sites through the Site Settings options. Figure 6.1 shows the Theme folder for one of the OOB themes—the Classic theme. You’ll notice that the theme folder contains two CSS files, several images, and one INF file.

The two CSS files are used to store the style elements associated with the theme. There is a standard theme.css, and then an additional MOSSExtensions.css that is used to style MOSS-only elements of the site. The image files stored in this folder will be the ones referenced by the two style sheets. The INF file contains information about the theme, most notably the title.

| CSS is a markup language most commonly used to add styling elements to HTML Web pages. To learn more about CSS and how it’s used, see W3C - Cascading Style Sheets (http://www.w3.org/Style/CSS/). |
Creating a Custom SharePoint Theme
If none of the OOB themes fit your needs, you can create a custom theme. The processes of creating a custom theme usually begins with copying an existing theme, renaming it, and configuring it to be included in the theme selection page in site settings. Working with all of the style elements included in themes can be a little tricky, so this task is best suited for someone with strong experience with Web design and CSS.
For more information on developing a custom theme for SharePoint, refer to the MSDN article “How to: Customize Themes” (http://msdn.microsoft.com/en-us/library/aa979310.aspx).

| Making changes to any of the OOB themes should be avoided because these changes could cause issues as service packs or patches are released. A better approach is to copy the desired theme and make your updates to that copy. This allows you to achieve the same end results without putting your environment at risk during future system upgrades. |
Master Pages
The previous section discussed how themes can be used to change the way SharePoint looks by “painting the walls.” Continuing with the house comparison, master pages allow for structural changes; in other words, you could move the garage to the other side of the house, or add or remove windows. If you want to make substantial changes to your SharePoint design, then master pages are the way to go.
The master pages concept was introduced with ASP.NET 2.0. Essentially, a master page is the shell for a SharePoint site that defines the major elements of the page such as the CSS, navigation, footer, and layouts of most areas of the site. It’s the glue that holds everything together because every page must use a master page. Even if you use a theme for your branding, a master page must be applied.
With most SharePoint implementations, you’ll see three different master pages:
Site master page. This master page is used by all publishing pages. More specifically, this master page is applied to any thing in the Pages library for a site.
System master page. This master page is applied to all forms and view pages in the site. Additionally, this is the master page applied to any pages that were not created in the Pages library. For example, a Team site would use this master page.
Application master page. This master page is applied to pages that have _layouts in the URL. These are usually pages that were installed by SharePoint, such as pages to upload documents, and so on. There is no interface to change this master page, but themes do affect the way this master page looks.

| If you need to brand the application master page, it’s strongly recommended that you not modify it because it’s a system file. If you do need to change the look and feel, themes are the safest way to apply styling. |
Similar to themes, master pages can be applied on a per site basis. But unlike themes, you can force all subsites to inherit the master page of a given site. This makes it easy to quickly apply the same UI for all sites. For more information about changing master pages, refer to Chapter 5.
Master pages are stored in the Master Page Gallery, which lives at the top-level site of each site collection. If your SharePoint architecture uses more than one site collection, the master page itself must be selected separately for each site collection. To help make this process easier, you can enlist the help of a developer to create a feature that can be deployed using a solution. For more information about features and solutions see:
http://msdn.microsoft.com/en-us/library/aa543214.aspx
http://sharepoint.microsoft.com/blogs/mike/Lists/Posts/Post.aspx?ID=7
Common Master Page Customizations
Two common requests for customizing the SharePoint UI are to add a banner to the top of all the pages and to increase the default number of levels of navigation that can be dynamically shown. Both of these changes can be easily made with SharePoint Designer (SPD).
Modifying the Default Number of Flyouts Displayed in the Global Navigation
This example walks through the process of customizing a site collection created using the Collaboration Portal with default.master selected. These steps can be used for any of the OOB master pages, but some of the line numbers referenced might be slightly different.
1. | Start by opening the site you’ll be modifying in your browser. From the top-level site, create a subsite by clicking Site Actions > Create Site. For this example, a subsite called Level 1 was created using the Team Site template. | ||
2. | After the first site has been created, another site needs to be created under the Level 1 site. Because publishing isn’t enabled, the steps to create the new site are slightly different. Click Site Actions > Create, which opens the Create screen for sites without publishing enabled. In the right column, click Sites and Workspaces. The new SharePoint site page opens. Call the new site Level 2, enter a URL, select the Team Site template, and click the Create button. | ||
3. | To demonstrate this example, one more site must be created under the Level 2 site. From the Level 2 site, repeat step 2, except this time the new site should be called Level 3. | ||
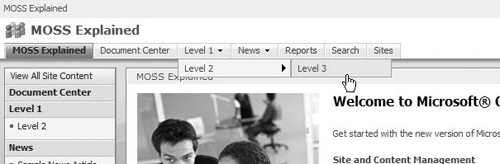
4. | When all of the sites have been created, go back to the top-level site. You might notice that no drop-down menus are showing up under the Level 1 item in the navigation. This is because of the bottom-up approach SharePoint takes with navigation. Child sites dictate whether subsites or pages will be rolled up to the sites above them. To enable subsites to show in the navigation, go to the Level 1 site and select Site Actions > Site Settings. Click Navigation in the Look and feel section. Place a check in the box next to Show subsites, and click the OK button. | ||
5. | Repeat the previous step for the Level 2 site. | ||
6. | Now when you view the navigation from the top-level site, you should notice that Level 1 is shown with a single level drop-down menu that shows Level 2 (see Figure 6.2). However, Level 3 isn’t being displayed despite changing the settings to specify that it should roll up. Figure 6.2. Default navigation behavior.
| ||
7. | |||
8. | After SPD has loaded, open the site by clicking File > Open Site, and then specify the URL for the site you’ve been using for this example. You might be prompted to enter your username and password. | ||
9. | The virtual file system for the site should be displayed. To select the master page, open the _catalogs folder. | ||
10. | Click on the masterpage folder to open the Master Page Gallery. | ||
11. | In the Master Page Gallery, you’ll notice the file default.master, which is the master page that is being used for our example. Do not modify any of the OOB master pages. Right-click on default.master, and select Copy. Then right-click again in the same directory, and select Paste to paste a copy of default.master called default_copy(1).master at the bottom of the document library. Right-click on default_copy(1).master, and select Rename. Change the name of the file to Custom.master. | ||
12. | After the file has been renamed, double-click on the file to open it up. You’ll be asked if you want to check the file out. Click Yes. | ||
13. | After Custom.master has been opened, switch to code mode if it isn’t already selected. | ||
14. | Modifying the number of levels displayed by the navigation requires that a specific line be changed in the master page, which can be tough to find. The easy way to locate the line is to use the find function. From the Taskbar at the top, select Edit > Find. Type the term “dynamic” and click the Find Next button. | ||
15. | The first result should be the MaximumDynamicDisplayLevels option in the SharePoint:AspMenu tag (see Figure 6.3). The default value for this option is 1. Change the value to 3, and save the file. You’ll be prompted that saving your changes will customize the page. Click Yes. Figure 6.3. Changing the master page to increase the number of dynamic navigation levels.
| ||
16. | The file saves and remains opened in code view. To use the newly created master page, it must first be published. To do this, click on the Web Site tab, right-click on Custom.master, and click Check In. The Check In window opens. Select the Publish a major version option, and click OK (see Figure 6.4). An alert pops up asking if you want to modify the document’s approval status. Click Yes.
| ||
17. | The Master Page Gallery opens in the My submissions view as shown in Figure 6.5. The new master page is listed at the top in Approval Status: Pending. Hover with your mouse near the name of the file, click on the drop-down menu, and select Approve/reject. | ||
18. | |||
19. | |||
20. | From the Master Page settings page, change both site master page and system master page to use Custom.master, and choose Reset all subsites to inherit the master in each section. It’s necessary to change both of the master pages to use Custom.master because the subsites we created don’t have publishing enabled and therefore use the System.master. | ||
21. | Click OK. | ||
22. | If you browse back to the top-level site, you should notice that the Level 3 site is now displayed as a flyout (see Figure 6.6). |


Add a Banner to the Master Page
Often the first question asked about customizing the UI is how to add a banner to the site. You can specify a new logo through Site Settings, but many companies are looking to take one more step.
This example shows you how to modify the custom master page created in the previous example to add a banner to the top of the page.
1. | Before changing the master page to use a custom banner, you need to create a custom banner to use. The image must be about 125 pixels high and span the entire width of the browser. If you aren’t sure how wide to make the image, pick a very wide width. The CSS will trim off the excess width at smaller resolutions. To create the image, use any image-editing utility, such as Microsoft Paint. Your own corporate logo can also be used. |
2. | After the logo has been created, it must be uploaded to SharePoint. Choose Site Actions > View All Site Content. Then click on the Style Library, and open the Images folder. |
3. | Click on the Upload button in the toolbar, and select the banner image file. For this example, we’re using a file called mossexplained_banner.jpg. After you’ve selected the file, click OK. |
4. | Now that the banner image file has been uploaded, open Custom.master in SPD. |
5. | Make sure you’re viewing the page in code mode. The CSS for the new banner needs to be added inside the head content. Add the following code immediately before the </HEAD>: <style type="text/css">
ms-main { background: white url('/Style
Library/Images/mossexplained_banner.jpg') no-repeat scroll left top
!important; }
.ms-globalbreadcrumb, .ms-globalTitleArea, .ms-bannerContainer {
background: transparent none !important; }
.ms-globalTitleArea { height: 75px; }
td.ms-titleimagearea img, .ms-sitetitle h1.ms-sitetitle { display:
none; }
td.ms-globalbreadcrumb { border:0px transparent none !important; }
</style> |
6. | |
7. |
Now when you browse back to the top-level site and others, you should notice the banner at the top of the site as shown in Figure 6.7. You may notice as you browse through the site that some pages don’t have the custom banner. Most of these pages use the application master and need to be changed with a custom theme for a completely branded solution.

For many companies, changing the banner and choosing a theme that most closely matches the company colors is all that is required to create a branded solution. For companies requiring a more in-depth solution, this example provided a look under the hood of a master page. For more complex branding solutions, it’s often necessary to create a custom master page. For more information on creating a custom master page see http://msdn.microsoft.com/en-us/library/bb727372.aspx.
Themes Versus Master Pages
There’s no clear answer as to whether themes or master pages are the better option for customizing a SharePoint site. If one of the OOB themes is close to your desired color palette, then a theme might be the way to go. However, if you need to move the elements of the page around, for instance, move the Site Actions button to the left side of the page, then you have to use a master page. If you’re still on the fence about what option would work the best, go with a master page. Realistically, you might need to use both a theme and a master page to get the desired results. Public-facing sites are often able to get around needing a custom theme, but internal collaboration sites use all of the master pages, including the application master page. Although it’s technically possible to modify the application master page, we strongly recommend that themes be used to change the look of pages using the application master page.
Content Pages
What is a page in SharePoint? The term page has been tossed around throughout this chapter, and the concept of a Web page isn’t new. But to SharePoint, a page is something very specific. When a request is made to a SharePoint server, the response that is served up to the user is the combination of a master page and a content page. This is true for pages in collaboration sites, including WSS. This concept was covered in Chapter 5 in the “Anatomy of a Publishing Site” section, but the concept is covered in more detail here as it relates to branding.
Page Layouts
When the publishing feature is enabled in a MOSS site, one of the most significant changes is the creation of the Pages Library. This is a specialized document library created to store all Web pages for a given site. Because a document library is basically a list with a file associated with it, in this case, the file is the Web page itself. The page layout can be thought of as the template for the Web page content similar to how you might have a Word template for another document library. And just like other templates in SharePoint, the page layout is directly related to a specific content type. Content types are discussed in more detail in Chapter 3, “Lists, Document Libraries, and Content Types.”
When a request is made to a MOSS publishing site, the response is the combination of a master page and content entered into an associated page layout. One of the biggest benefits to the page layout is that it truly does act like a template, and the content rendering on the page can be altered simply by picking a different page layout. For example, if you create a page using the OOB page layout called Article Left, you can fill in some fields with data, including an image positioned on the left side of the page. After the page is created, if you decide that you should have chosen the layout with the image on the right, then you can easily make the change by switching layouts.

| Layouts can only be changed between other layouts using the same content types. Technically, you can force a page to use a layout using a different content type but we strongly recommend that you avoid this practice. |
Content can be entered into a page layout either through a field control or a Web Part. Field controls are similar in concept to site columns in a list except in this case the data is getting entered into the Web page being created and served up to the user through the selected page layout. Information entered into field controls is saved to the content database and therefore versioned.
Web Parts provide the ability to add functionality to the page. It could be as simple as displaying a list or performing a dynamic query. Another common use for Web Parts is to capture and display information to the user similar to how field controls work. However, information stored in Web Parts isn’t versioned. This topic is covered in more detail in Chapter 5.
Creating a Custom Page Layout
Page layouts provide much more flexibility than entering content into a list. It allows users to enter content into site columns and add Web Parts to the page.
Another option is to extend one of the OOB content types to more tightly control how content is targeted. This example extends the Article Page content type to add another field that allows us to specify the type of content contained in the article.
Many organizations have content that is created in a central spot and needs to be displayed in an organized manner on other sites. Using the Content Query Web Part (CQWP) in conjunction with a page layout based on a custom content type can help to address this issue. The first step in the process is to create a new content type from the level site you’ve been using for the other examples in this chapter. But before you do that, you need to create a new site column:
1. | |
2. | Click on Site columns in the Look and feel section. |
3. | Click the Create button on the toolbar. |
4. | This column helps determine what department an article was created for. Enter the following information for the new site column:
|
5. | Under Type each choice on a separate line, specify the following values: HR, Marketing, IT (each of the values should be on a separate line). |
6. | For the Default value option, remove the value so that the field for Default value is blank as shown in Figure 6.8. |
7. | All of the other values not specified can use the default values. After all the information has been entered, click OK. |

Now that you’ve created the site column, you need to create the new content type.
1. | Click Site Actions > Modify All Site Settings, and then click on Site content types under the Galleries section. |
2. | Click the Create button on the toolbar. |
3. | Enter the following values for the new content type:
|
4. | |
5. | After the content type has been created, the details for the Custom Article Page content type will open. To add the site column you created, click Add from existing site columns from the Columns section near the bottom of the page. |
6. | Select the group called MOSS Explained from the drop-down box, which displays the custom site column that was created. Click on the column, click the Add button to specify the column to add to the content type, and then click OK. |
7. | Open SPD, and open the site where you created the new content type. |
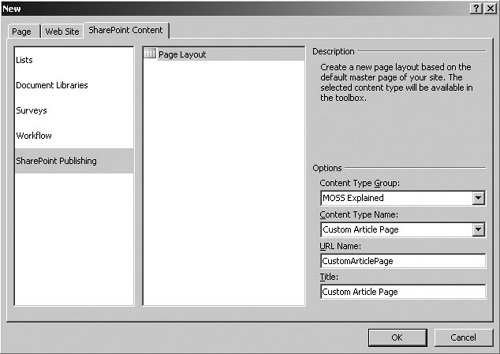
8. | To create the new page layout, from the SPD toolbar, select File > New > SharePoint Content as shown in Figure 6.10. Figure 6.10. Create a new page layout from SPD.
|
9. | Select SharePoint Publishing from the panel on the left side of the New window as shown in Figure 6.11. Under the Options section at the right, select the following information:
|
10. | Click OK. The new page layout opens. Make sure to switch to code mode if it isn’t already displayed. |


Creating a page layout completely from scratch involves advanced knowledge of HTML and CSS. For this example, we’ll use the ArticleLeft layout as the basis for the rest of the example.
1. | Click on the Web Site tab of the New dialog box, and open the ArticleLeft.aspx layout. When you’re prompted to check out the file, select Yes. |
2. | While viewing ArticleLeft.aspx, choose Edit > Select All to highlight all of the code. |
3. | Choose Edit > Copy. |
4. | Click on the tab for CustomArticlePage.aspx, and from the top, select Edit > Select All. |
5. | Then to add the code from ArticleLeft.aspx to CustomArticlePage.aspx, select Edit > Paste. |
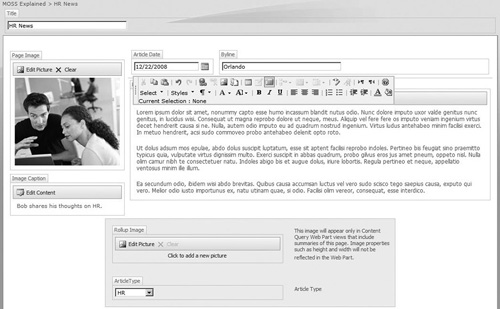
6. | Scroll to the bottom of the code, and you’ll see a tag called PublishingWebControls:editmodepanel. The code in this section is only displayed when the page is in edit mode. The column we’re adding is only used to target the content, and we don’t want it to show up in read mode, so the Edit Mode Panel is a good place to put it (see Figure 6.12). Add the following code after the final </tr> but before the </table>: <tr> <td> <SharePointWebControls:DropDownChoiceField FieldName="ArticleType" runat="server"></SharePointWebControls:DropDownChoiceField> </td> <td width="200"> <asp:Label text="Article Type" runat="server" /> </td> </tr> |
7. | After the code has been added, save the page layout. |
8. |

Now that the page layout has been created, the last step is to create some content.
1. | |
2. | |
3. | After the page has been created, it opens in edit mode. Fill out the site columns with whatever content you prefer, making sure to set the Article Type to HR (see Figure 6.14). Click Publish. |
4. | |
5. | Now that there’s some content to play with, go back to the home page and place the page into edit mode by clicking Site Actions > Edit Page. |
6. | Add two CQWPs to the Top Zone on the page by clicking on the Add a Web Part button and selecting the Content Query Web Part from the list. Repeat this step to add the second one. |
7. | |
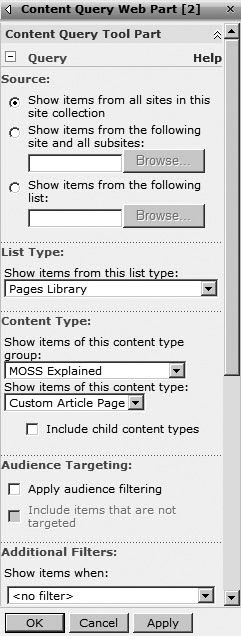
8. | Expand the Query section, and specify under Content Type to show items from the content type group MOSS Explained and only show the items with the content type Custom Article Page (see Figure 6.15). Click OK. Figure 6.15. Show all items using Custom Article Page.
|
9. | Modify the second CQWP in the same way as in the previous step, but before clicking OK, scroll down to the Additional Filters section. Set the filter to the following criteria as shown in Figure 6.16: Show items when:
Figure 6.16. Show all items using Custom Article Page with Article Type of HR.
|
10. | After the filter has been created, click OK. Click Publish at the top of the page to save your changes. |


When the page reloads you’ll notice that all of the pages created with the Custom Article page layout are displayed in the first CQWP, but the second one only displays items created with the page layout where the ArticleType is set to HR (see Figure 6.17).
Figure 6.17. Use custom page layouts and CQWP to target content.

The goal of this exercise was to demonstrate how you can create page layouts that can then be targeted through Web Parts such as the CQWP. As you continue to enter content with the Article Type HR, it will automatically show up in the Web Part.
In a real-world scenario, this configuration might be used to make this page layout available for all content authors. They would simply create the content from their site and specify the Article Type. Once approved, it would automatically be displayed in the configured CQWPs.
The CQWP can be customized using XSL to display more columns or to provide a different look and feel. For more information on customizing the CQWP with XSL see http://msdn.microsoft.com/en-us/library/bb447557.aspx and http://msdn.microsoft.com/en-us/library/ms497457.aspx.
Customized Versus Uncustomized Files
The topic of customized and uncustomized files was first introduced in Chapter 4, but it most specifically relates to the types of the files covered in this chapter. Using SPD to modify the UI in your SharePoint site is often the starting point for both information workers and seasoned designers, but in either case, it’s not without risk. Although a very powerful tool, changes made with SPD—specifically changes to design elements—can cause problems in your environment. These potential problems are discussed in the following sections. Something as small as opening a file and saving it without making any changes can prove to be problematic. As a responsible information worker, it’s important to understand the power you wield.
Uncustomized Files
When a new site is created in SharePoint, it’s created using all uncustomized files. This means that when a user requests a page from SharePoint, the server looks to the content database for the file but only finds a pointer to the file on the file system of the SharePoint server, which then renders to the user (see Figure 6.18). For example, if you create a publishing portal, it uses BlueBand.master for its master page. Every other site using BlueBand.master sees the same file located on the server. If you were to go to the server and modify that file, every site referencing that file would get updated with the changes. You should never modify any of the OOB files, and what was just described was simply an example. But this example describes the power of uncustomized files: modify a single file to update many pages. In a typical implementation with many sites, this type of scenario allows for quickly making drastic changes across all sites at one time.


| Some may be familiar with the term “ghosted,” which was used in the previous version of SharePoint. Although this term is no longer officially used, it’s still referenced in some of the code your developers may encounter. |
Customized Files
A customized file is any file that is modified through the SharePoint UI or by using SPD. When this happens, a modified version of the file is saved to the content database. In this scenario, when a user requests a page, the server looks to the content database and sees the file that it then renders to the user (see Figure 6.19).

Fundamentally there isn’t anything wrong with using customized files, but it can cause problems if users aren’t aware of what they’re doing. Imagine there are five sites in a company’s SharePoint site that all use the same master page. Then one day, someone simply opens up the master page on one of the sites and saves it without making any changes. This customizes the file. Although the site and all pages that use the master page will still render just fine, if someone were to attempt to change the file on the server in an effort to update all sites using the master page, the result would be that all sites would be updated with the change except for the one with the customized master page. This is a very simplistic example, but in an environment with many users, customized files can begin popping up all over the place. This not only can cause an inconvenience if you’re trying to make mass changes by updating one file, but it can also be an issue when you try to upgrade to the next version of SharePoint.
Customizations to SharePoint 2003 were often made with FrontPage, which caused the equivalent of customized files. The problem was that there was no easy way to uncustomize a file. When MOSS was released, companies began to run into problems during their migration from SharePoint 2003. It wasn’t until they began the upgrade process that they realized the full extent of what can happen if customized files aren’t controlled.
Fortunately, MOSS provides a way to uncustomize a file, which solves one of the major issues, but great care is still required when making changes to the UI with SPD. Imagine if everyone was given a chainsaw. In the right hands, a skilled person would be able to do many useful things or maybe even turn a piece of wood into art. But in untrained hands, people could hurt themselves or others or cause significant damage. SPD is no different.
That comparison isn’t meant to scare anyone, but rather to underscore the point that SPD isn’t a tool that should be provided to all users as part of the standard set of software on their computer. There are a few things that can be done to ensure that SPD is used responsibly in your environment:
User training. Knowledge is power, and this is especially true for those who will be using SPD. Users should be trained on what SPD can do, what they are allowed to modify with SPD, and the right way to make those modifications.
Governance. As part of the planning process, it should be decided what parts of the UI can be modified with SPD, by whom, and what types of changes are allowed. This chapter specifically focuses on branding topics, but effective governance of SPD includes all areas that can be modified. In addition to the plan, it’s also a good idea to determine how that plan would be enforced.
Security. Users must have the appropriate permissions to access SharePoint using SPD. There are several levels of permissions that control what users can do using SPD. Users can be added to the designer group, which grants them the necessary permissions to view and edit with SPD. If using the designer group grants too much power, you can create groups with custom permission levels to address various types of users.
SPD is a powerful tool for customizing the UI for your SharePoint site. But as with any powerful tool, great care should be applied when using it. Many companies learned about customized files the hard way with SharePoint 2003 when they tried to upgrade to MOSS. With proper training and a strong governance plan, SPD can be an effective way to create a more attractive and functional SharePoint site.