
In This Chapter
Using Photo Booth to take photos
Capturing video with iMovie
Working with the Apple Remote
Using Front Row
Many Apple switchers and first-time owners quickly notice the unusual feature that accompanies the latest MacBooks: a tiny square lens and LED light at the top of the laptop's screen. That square is the lens of your MacBook's built-in iSight camera, which allows video chatting in iChat or a quick, fun series of photos or video clips via Snow Leopard's Photo Booth and iMovie applications. (Some third-party applications can use your MacBook's camera for things like reading bar codes.) Heck, you can even take your user account photo with your iSight camera (in the System Preferences window)!
Ah, but there's more. You can also buy an Apple Remote, which appears to be a stick of chewing gum with buttons (or an old-style iPod Shuffle). You can use an Apple Remote to control your MacBook from the comfort of your lounge chair or breakfast nook via Snow Leopard's Front Row software (as well as other third-party applications with Apple Remote support). What's that you say? Your last computer didn't have a remote control? You've never used a computer video camera? Well then, good reader, you've come to the right place!
In this chapter, I show you how to use your MacBook's remote to dazzle your friends and family with all sorts of digital media; then, I demonstrate how easy it is to produce photos and video with your iSight camera. Sassy!
Does your MacBook have that tiny lens at the top of the screen? Then you're in business with your built-in iSight camera ...pat yourself on the back and do the Technology dance.
Figure 5-1 illustrates a typical MacBook iSight camera. With iChat, you can videoconference in style, and you'll find everything you need to join the ranks of the iChat elite in Book VI, Chapter 3. Photo Booth allows you to snap digital pictures just as you did in the old automatic photo booth at your local arcade, but Photo Book comes complete with visual effects to add pizzazz and punch to your photos.
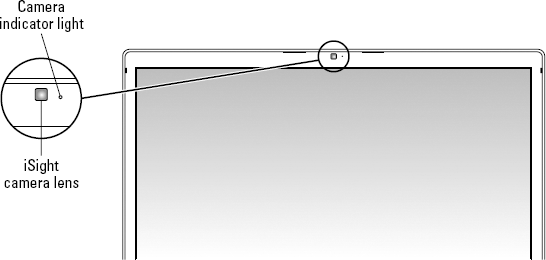
The iSight camera's indicator light glows green whenever you're taking a snapshot or recording video ...which, when you think about it, is A Good Thing (especially if you prefer chatting at home in Leisure Mode).
Tip
Need to quickly get a picture of yourself for use on your Web page? Or perhaps your iChat icon needs an update to show off your new haircut. Photo Booth can capture images at 640 × 480 resolution and 32-bit color — and although today's digital cameras produce a much higher-quality photo, you can't beat the built-in convenience of Photo Booth for that quick snapshot! To snap an image in Photo Booth, follow these steps:
Launch Photo Booth from the Applications folder.
Figure 5-2 illustrates the application window that appears. (Ignore the rather silly gentleman who wandered into the frame. I doubt he'll be in your Photo Booth window!)
(Optional) Click the Effects button to choose an effect you'd like to apply to your image.
Photo Booth displays a screen of thumbnail preview images so that you can see how each effect changes the photo. You can produce some of the simple effects you may be familiar with from Photoshop, such as a black-and-white image or a fancy color-pencil filter, but Photo Booth can also deliver some mind-blowing distortion effects, and even an Andy Warhol–style pop-art image!
Tip
To return the display to normal without choosing an effect, click the Normal thumbnail, which appears in the center. (Paul Lynde's spot, for those of you old enough to remember "Hollywood Squares.")
Of course, you can always launch your favorite image editor afterward to use a filter or effect on a photo — for example, the effects available in iPhoto. Photo Booth can apply these effects automatically as soon as you take the picture.
(Optional) Click a thumbnail to select the desired effect.
When you choose an effect, Photo Booth automatically closes the Effects display.
Click the Camera button.

You'll notice that the image appears in the filmstrip at the bottom of the window. Photo Booth keeps a copy of all the images you take in the filmstrip so that you can use them later. After you click a photo in the filmstrip, a series of buttons appears, including
Sending the photo in an e-mail message
Saving the photo directly to iPhoto
Using the image as your Snow Leopard user account icon
Using the image as your iChat Buddy icon
Tip
To delete an image from the Photo Booth filmstrip, click the offending photo and then click the X button that appears underneath.
"Mark, am I limited to capturing still images with my MacBook's camera?" Oh, pshaw on limitations ...you're a MacBook owner, after all! You can also use your iSight camera to snag video clips (complete with audio) in iMovie.
Tip
You don't need an expensive digital camcorder to produce video clips for use in iMovie! Your MacBook's camera can capture those clips for you — think of the party possibilities! (And the opportunity for practical jokes. But then again, you're not that kind of person, now are you?) To capture video directly from your iSight camera into iMovie, follow these steps:
Launch iMovie from the Dock or from the Applications folder.
Click the Open Camera Import Window button to switch to Import Video mode.
The button is located at the far left of the toolbar running down the center of the iMovie window, and it sports a camera icon.
Click the Camera pop-up menu at the bottom of the Import window and click Built-in iSight.
When you're ready to start recording video, click the Capture button.
iMovie displays a sheet allowing you to select the location for the movie clip (including the approximate amount of time you can record). You can also choose to add the video to an existing iMovie Event or a brand-new Event. To help keep things steady in your clip, click the Analyze for Stabilization after Import check box to enable it — but note that the stabilization process significantly adds to the time it takes for iMovie to save your clip to disk. (Also, the stabilization data that's created during this step isn't actually applied to the video until the clip is added to a project, so your clip may still look shaky in the Event browser.)
When you're ready to start recording video, click the Capture button.
iMovie automatically displays the incoming video in the monitor window while it's recorded. (As you might expect, the goofy behavior on the part of the distinguished cast usually starts at about this moment.)
Click the Stop button to stop recording.
After you've ended the recording, iMovie creates the video clip and adds it to your Clips pane.
I go into much more detail on iMovie in Chapter 4 of Book IV, but that's the gist of recording video clips.
Okay, you've seen some neat stuff so far, but things get really cool about now! With Apple's Front Row software, you can turn your MacBook into a multimedia presentation center that can show off all your digital media to your adoring public (and friends and family to boot). In fact, with the Apple Remote, you don't even have to leave the comfort of the couch to start the show.
The Front Row application performs four different functions:
Watching DVD movies with DVD Player: If you already loaded a DVD into your optical drive, you can watch it. (Sorry, your MacBook doesn't load the DVD for you. I guess some things have to remain manually driven for a few years yet.)
Viewing photos and slideshows: Front Row calls upon iPhoto so that you can see your albums, film rolls, and slideshows.
Displaying TV shows, movies, videos, and movie trailers: You can choose most types of video you download from the iTunes Music Store or save to your Movies folder. If your laptop has a high-speed broadband connection to the Internet, you can also watch movie trailers straight from the Apple Web site.
Coaxing your favorite music and podcasts from your iTunes library: Find your songs and playlists available from Front Row.
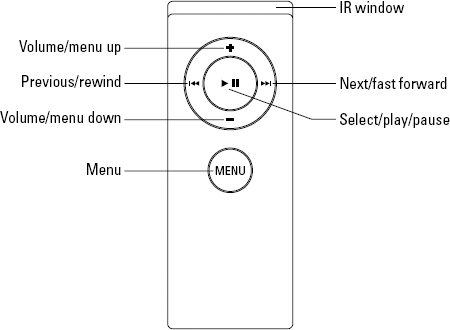
All this is accomplished with the awesome infrared Apple remote you see in Figure 5-3. It's as simple to use as an iPod Shuffle!
Tip
To launch the application, press the Menu button on the remote. As long as your MacBook is on, Front Row runs automatically. To put your laptop to sleep after a night of fun, press and hold the Select/play/pause button.
Table 5-1 includes the important functions of the Apple remote in Front Row.
Table 5.1. Using the Apple Remote in Front Row
Action | Purpose |
|---|---|
Menu | Press to launch Front Row or to return to the previous menu. |
Volume/menu down | Press to navigate down through menu options or to lower the volume while media is playing. |
Volume/menu up | Press to navigate up through menu options or to raise the volume while media is playing. |
Select/play/pause | Press to select a menu item, or play or pause media from within iTunes, DVD Player, QuickTime, or iPhoto. |
Next/fast forward | Press to skip to the next song or DVD chapter or hold down to fast-forward through a song. |
Previous/rewind | Press to skip to the previous song or DVD chapter, or hold down to rewind a song. |
You can also go the mundane route and use keyboard shortcuts to control Front Row. (But it's nowhere near as cool.) Table 5-2 explains the keyboard shortcuts.
Table 5.2. Using the Keyboard in Front Row
Action | Keyboard Equivalent |
|---|---|
Menu | |
Volume/menu down | Down arrow |
Volume/menu up | Up arrow |
Select/play/pause | Space or Return |
Next/fast forward | Right arrow |
Previous/rewind | Left arrow |
Note
Your Apple remote is supported by only a handful of applications at the time of this writing — for example, you can't use it as a presentation aide in PowerPoint or as a playback controller in GarageBand. However, Apple may continue to add functionality to the Apple remote in the future, so check the Apple remote section of Snow Leopard's online help system to keep tabs on what's happening!