
In This Chapter
Introducing the iWeb window
Planning your site
Adding a new site and pages
Editing pages
Setting site and page attributes with the Inspector
Publishing sites to the Internet
I keep telling everyone who'll listen: The Web is simple. Or at least it should be.
Kids in preschool these days know how to use a browser. Millions of people contribute to FaceBook pages, help to create the dynamic reference wonder that is Wikipedia, and correspond effortlessly through Web-based e-mail. Yet there's one untamed wilderness that many MacBook owners haven't explored — or even set foot in! That's the jungle of HTML, the language used to create Web pages. Today's advanced HTML is complex, and it's not particularly fun, either. Have you thrown up your hands and declared, "I guess I'll never get my own Web site on the Internet?"
Forget your Web site envy, fellow Mac enthusiast! With iWeb, Apple has provided a guide through that untamed wilderness ...and suddenly it's as easy and fun to create a Web site as it is to make a movie or write a song with your MacBook. In this chapter, you discover how to design a site, import your own photos, and add all sorts of different pages.
Soon, you'll proudly hold your head up high and declare to the world, "I am a Webmaster!"
All of iWeb's major features and controls fit into a single window, naturally, just as it does in iPhoto and iMovie. (I agree with the Apple software designers: Multiple windows equals confusing.) Figure 7-1 illustrates the iWeb window, complete with a Web site in progress. The stuff to keep your eye on includes:
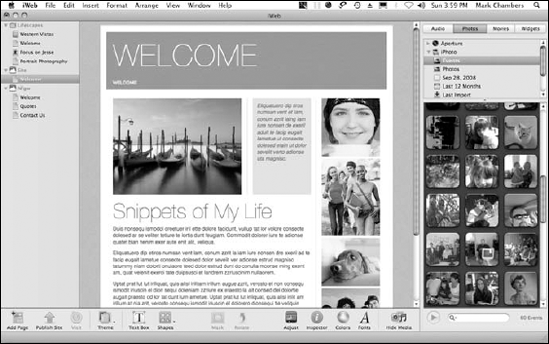
Toolbar: Located at the bottom of the window, the iWeb toolbar keeps all your major controls one or two clicks away.
The iWeb toolbar contains different buttons, depending on the chore you're handling at the moment. Figure 7-1 shows the set of toolbar buttons that you see when you're editing a page.
Layout: You need elbow room to build a Web page, so the Layout section of the iWeb interface dominates the window. You create and edit your pages in the Layout display and then use it to preview and test-drive your finished site.
Site Organizer: The strip to the left of the layout display is the Site Organizer, which allows you to organize your Web sites, add new pages to a site, and select an existing page for editing.
Before we get down to business, it's overview time. You essentially follow three phases to put your new site on the Web:
Decide which pages you need.
Create a new site and build those pages.
Publish your site to your MobileMe account (or to a Web server using FTP).
I go over each of these phases in order. (They taught me that in college ...along with the history of the Aztecs and the wonders of FIFO accounting.)
Every properly designed Web site has a purpose: to inform, to entertain, or to provide downloads or contact information. The pages you add to your site should all reflect that common purpose.
iWeb can produce the following types of pages for your site:
Welcome: This is the default first page that iWeb adds to a site you create. The Welcome page familiarizes your visitor with the idea behind your site, and perhaps offers a snippet of the latest developments on the site in a "What's New" paragraph.
About Me: This page provides a biography of you or another person, listing things like your age, favorite songs, and favorite foods. (After all, that's important stuff.) Links are provided to your photo album pages and other Web sites you want to share.
Photos: Oh, this is good stuff here — iWeb makes it easy to add one of those cool online photo galleries for your snapshots, complete with a Web slideshow! You can add Events and albums from iPhoto, too.
My Albums: You can organize all your Photos and Movie pages on a single My Albums page. Visitors click a thumbnail to jump to the corresponding Photos page or Movies page — it's a visual index done the right way.
Movie: Got a QuickTime movie you've created with iMovie to share with others? This is the page that presents it to your adoring fans.
Blog: Adding a Blog (or personal Web journal) page is a somewhat different beast: iWeb keeps track of each addition you make in an entry list so that you can quickly add or delete entries without requiring tons of scrolling, cutting, and pasting. A Blog page also includes an archive so that deleted entries aren't lost forever.
Podcast: Consider a podcast as an audio (or audio/visual) blog — it's designed to be downloaded to a visitor's iPod or computer for later enjoyment. As does the Blog page, a Podcast page has an entry list and an archive list attached to it.
Blank: Yep, an old-fashioned blank page, ready for you to fill with whatever you like.
Before you even launch iWeb, jot down on a piece of paper (or put in a Sticky) these important points:
What message do I want to communicate to visitors?
What tone will I use — funny, informal, or businesslike?
What stuff do I want to offer: photos, movies, or podcasts?
Now you have the starting point for your site and you know what you want to include ...so let's get down with the Web!
When you open iWeb for the first time, the application creates a new site for you, and you can rename and modify this default site to your heart's content. In fact, for many of us, one site is all we ever create — but iWeb can easily handle multiple Web sites, keeping them separate in the Site Organizer.
If there's at least one existing site in your Site Organizer, iWeb automatically displays the last site you were working on. Therefore, if you want to create an entirely new site, you have to perform a little manual labor. Here are a number of different ways to add a site:
Choose File

Press

Control-click (or right-click) in the Site Organizer and click New Site.
iWeb leaps into action and displays the template sheet you see in Figure 7-2. Scroll through the template themes in the list at the left of the sheet until you find one that matches the tone you decided on in the previous section. (Informal, formal, or silly, iWeb has templates that match every mood!) Click a template on the left, and the application automatically updates the page type thumbnails on the right.

When you choose a template, iWeb automatically provides your pages with a common background, color scheme, and fonts so that your finished Web site has a common theme throughout.
After you find the right look and feel, click the desired template in the scrolling list at the left, click the Welcome page thumbnail, and then click the Choose button. iWeb creates a new site heading in the Site Organizer, complete with the default Welcome page. Figure 7-1, shown previously, illustrates the Welcome page from a new site I created with the Main Event template.
Time to add the pages you plan for your site! For example, I've decided to add Photo and About Me pages to the new site I've created. In the following section, I discuss how to edit these pages to personalize them ...but for now, I just want you to add the pages.
If you have multiple sites in your Site Organizer list, click the top-level heading for the desired site to select it. You can add pages by
Clicking the Add Page button on the toolbar at the bottom of the iWeb window
Choosing File
Pressing
Control-clicking or right-clicking the site header in the Site Organizer and clicking New Page
Tip
Want to start with an existing page as a basis for a new page? Right-click that page entry in the Site Organizer and choose Duplicate. iWeb creates a new page with exactly the same contents and adds it to the site.
Pages are listed under the main site heading in outline format, making it easy to expand or collapse a site by clicking the familiar rotating triangle icon next to the site heading. (Apple calls these disclosure triangles. Wowzers!)
Deleting a page — or a whole site, for that matter — is easy in iWeb. Right-click the offending page or site heading in the Site Organizer and choose Delete Page/Delete Site. Note that iWeb doesn't prompt you for confirmation here, so these aren't commands to toy with.
If you have your site framework complete, you can actually put your site on the Internet as is! Of course, the photos would all be of good-looking strangers, and most of the text would read like Pig Latin nonsense. (Come to think of it, I've been on some real sites that aren't much better. Go figure.)
I think we both agree, however, that you want to personalize your pages with your own information. To begin editing a page, click it in the Site Organizer.
First, update the text with your own information by following these steps:
Click the text you want to replace.
As do most desktop publishing applications, iWeb uses boxes to enclose text. When you click the text, the box appears, with handles that you can drag to resize the box.
Begin typing your text.
iWeb replaces the existing template text with the text you type, using the text formatting taken from the template. Don't forget that you can paste text from the Clipboard by pressing
Tip
Mistakes are passé in iWeb. To undo your last action, you can always press the familiar
Highlight and format your new text as necessary.
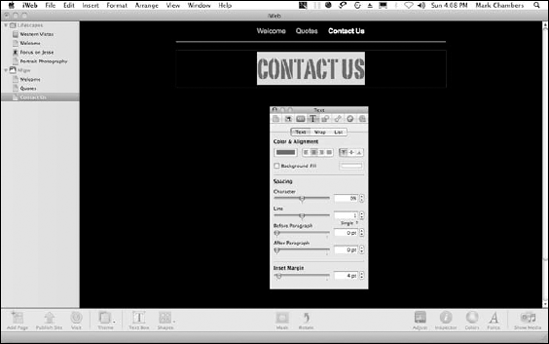
To make changes easier, click the Inspector button in the iWeb toolbar. The window you see in Figure 7-3 appears, allowing you to change text color, alignment, and spacing with aplomb. (You find more about the Inspector later.) You can click the Colors or Fonts buttons on the iWeb toolbar to display a Color Picker or Font Panel for the selected text.
Click outside the text box after you're satisfied with the text.
Because you're likely modifying everything on the template pages from the title to the last box on the page, repeat Steps 1–4 for each section of text you want to change.
If your page includes photographs that you want to change, follow these steps:
Click the image you want to replace.
As it does with a block of text, iWeb displays a box around the image, complete with resizing handles.
Drag an image to the image box from a Finder window.
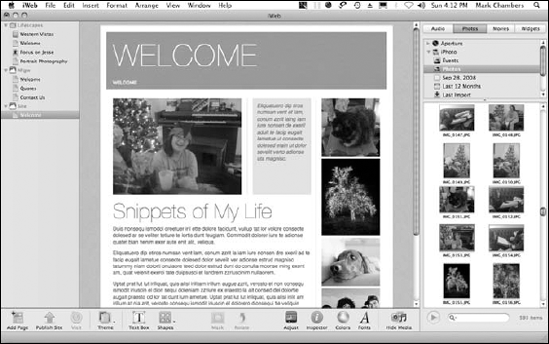
Alternatively, you can click the Show Media button in the toolbar, which displays the Media Browser you see in Figure 7-4. From this window, you can click the Photos tab to choose an image from your iPhoto library.
Tip
You can hide the Media Browser to make more room for your page layout. Just click the Hide Media button in the toolbar.
Adjust your new image if necessary.
Click the Adjust button, and iWeb displays a cool, semi-opaque dialog that allows you to tweak image settings, such as tint, brightness, and sharpness (see Figure 7-5). Click Enhance to allow iWeb to choose the settings it considers best for the image or click Reset Image to restore the photo to its original appearance. When you're satisfied with the image, click the Close button on the dialog to return to the image box.
Click outside the image box (usually the page background) after you're satisfied with the photo.

Again, lather/rinse/repeat for each image you want to change on your page.
iWeb also makes it easy to add new items to a page. The list of extras includes
Audio: You can add a song (complete with volume control, Play/Pause button, and progress slider) to your page! Either drag an audio file from a Finder window to your page, or click the Audio tab in the Media Browser to select a song from your iTunes or GarageBand collections. You can drag any image to the player that appears. (How about a photo of your daughter instead of album art?)
Photos: To add a new image box to your page, drag a photo from a Finder window to the iWeb layout section. Or, click the Photos tab in the Media Browser to choose an image from your iPhoto library, or throw caution to the wind and drag an entire Event or an album to your new page! iWeb takes care of all the details.
Movies: Yep, you guessed it: You can drag a movie clip from a Finder window to your page, or click the Movies tab in the Media Browser to choose a movie from iMovie or your Movies folder.
Text: Choose Insert
Shapes: Click the Shape button in the toolbar to display the pop-up menu and then click the desired shape. (Don't forget to resize it as you desire with the box handles.)
Widgets: Click this tab in the Media Browser to insert a widget (a Web applet) to your page. For example, HTML Snippet allows you to type HTML code directly into place on the page, or paste HTML code that you've copied from another Web site. You can also insert interactive Google Adsense advertisements or a Google Map. To populate the page with a MobileMe Gallery, choose the MobileMe Gallery widget and select a Gallery you've created using the iPhoto MobileMe Gallery feature. (For the complete scoop on iPhoto, cruise over to Chapter 3 in this minibook.) Other widgets include a countdown timer and YouTube videos.
Tip
You can move a widget anywhere on a page by dragging it, and it can be resized just as a text box can.
Links: If you're editing text and you want to insert a Web link, choose Insert
Tip
iWeb can automatically detect e-mail and Web addresses that you type in a text box, so you don't have to use the Links menu. To enable this feature, choose iWeb
Button: Your Web page can include buttons that allow your visitors to e-mail you or display the number of hits (visits) your page has received. Choose Insert
Tip
With these tools, you can use the Blank page template to create your own new pages. Personally, I prefer to use the professionally designed templates offered by Apple as starting points, removing whatever I don't need and adding new content.
Most Web designers would strongly recommend that you use a common theme for all the pages within a site (to lend continuity). Of course, you can also stick your tongue out at those very same Web designers and select a different theme for every page! To select a different theme for a page, open the page in iWeb and click the Theme button in the toolbar; then click the desired thumbnail from the pop-up menu. Nothing's lost but the old look of the page, so feel free to experiment to your heart's content.
Earlier, you used the Inspector to change text formatting attributes — but this star performer can do much more than just that! To modify page characteristics, click the page in the Site Organizer, display the Inspector, and click the Page Inspector button, which carries a document icon. These settings allow you to change the name of a page; you can also elect to include or exclude this page from the site menu, or to drop the site menu from this page.
If your site contains a Blog or Podcast page, you can click the RSS button to provide an automated RSS (RDF Site Summary) feed to your visitors. (For more information on RSS and how it works in Safari, see Chapter 5 of Book VI.)
After you finish with a new site — or you're satisfied with the edits you make to existing pages — it's time to get your masterpiece on the Web! Even the best Web site design is worth next to nil if it isn't available on the Internet, and in this last section, I demonstrate how to publish your Web site to your MobileMe account or to a separate server maintained by a third party (perhaps your ISP, your company, or Dave down the street).
As I mention in the "Don't forget your site properties!" sidebar, you specify where your iWeb site will be published from the Site Publishing Settings screen. Click the site name in the Site Organizer to display the Publish To pop-up menu (Figure 7-6). iWeb offers the following publishing options:
Publish to MobileMe: Your site is hosted by Apple as part of your MobileMe subscription. The application takes care of everything, uploading any changed pages or media.
Publish to FTP Server: This publishing option provides you with a completely different collection of settings on the Site Publishing Settings screen. You'll need to furnish iWeb with your Web server's FTP settings (which should be furnished to you by the host) and your site's address (or URL).
Publish to a Local Folder: The final publishing option creates a folder on your hard drive that contains all the files to display your Web site. This is the option to choose if you're not a MobileMe subscriber and you don't use a third-party hosting service. You can add these files directly to your home or business Web server. Once again, you must supply the site URL as it will appear on the Internet after you copy or upload the site files to the server.

After you've set the type of publishing the site will use, it's time to take care of business! Click the site to select it in the Site Organizer and then click the Publish Site button on the toolbar. The application takes care of everything else, automatically uploading all pages and media (if you choose MobileMe or FTP publishing) or saving them on your hard drive (if you chose the Local Folder option).
Tip
In a hurry? You can elect to publish just the changes necessary to update your site: Instead of clicking the Publish Site button on the toolbar, click the File menu and choose Publish Site Changes.