
Picking your own background
Adding and selecting a screen saver
Choosing menu colors and highlights
Keeping track of things with Stickies
Customizing the Dock and using Dashboard
Cleaning and sorting the Mac OS X Desktop
"Tweak! Tweak!" It's not the cry of some exotic bird — that's the call of the wild MacBook Power User. Power users like to tweak their Mac OS X Desktops just so, with that menu color, this background, and those applications in the Dock. Noncomputer types just can't understand the importance of the proper arrangement of your virtual workplace: When things are familiar and customized to your needs, you're more productive, and things get done faster. In fact, if you've set up multiple users on your computer under Mac OS X, the Big X automatically keeps track of each user's Desktop and restores it when that person logs in. (For example, when you use the MacBook, you get that background photo of Suzanne Sommers from the '70s whereas your daughter gets Avril Lavigne.)
In this chapter, I show you what you can do to produce a Desktop that's uniquely your own, including tweaks that you can make to the background and your Desktop icons. I also show you how to use Desktop Stickies instead of a forest of paper slips covering your monitor.
With your Mac OS X Desktop clad in the proper harmonious colors — yes, that can be your favorite photo of Elvis himself — and your new Dock icons ready for action, you're indeed prepared for whatever lies ahead in your computing world!
You might be asking, "Mark, do I really need a custom background?" That depends completely on your personal tastes, but I've yet to meet a computer owner who didn't change his or her background when presented with the opportunity. Favorite backgrounds usually include
Humorous cartoons and photos that can bring a smile to your face (even during the worst workday)
Scenic beauty
Photos of family and friends (or the latest Hollywood heartthrob)
The company logo (not sure it does much for morale, but it does impress the boss)
If you do decide to spruce up your background, you have three choices: You can select one of the default Mac OS X background images, choose a solid color, or specify your own image. All three backgrounds are chosen from the Desktop & Screen Saver pane, located within System Preferences (as illustrated in Figure 2-1).

To choose a background from one of the collections provided by Apple, click one of these groups from the list at the left:
Desktop Pictures: These default backgrounds range from simple patterns to somewhat strange and ethereal flux shapes. (You have to see them to understand what I mean.)
Nature: These backgrounds feature scenic beauty, such as blades of grass, sand dunes, snowy hills ...that sort of thing.
Plants: Close-up backgrounds of plant life — I especially recommend the autumn leaves.
Black & White: Several truly stunning black-and-white backgrounds that look especially good on a widescreen display. These are my favorite images provided by Apple.
Abstract: These backgrounds have even weirder twisting shapes in flux, this time with bright contrasting colors. Good for a psychiatrist's office.
Solid Colors: This is for those who desire a soothing solid shade. More on this in the following section.
Pictures Folder: This displays the images saved in the active user's Pictures folder.
Choose Folder: You can open a folder containing images and display them instead. (I discuss this in more detail in a page or two.)
If you see something you like, click the thumbnail, and Mac OS X displays it in the well and automatically refreshes your background so that you can see what it looks like. (By the way, in the Apple universe, a well is a sunken square area that displays an image or color swatch — in this case, the background image that you select.)
Tip
Notice your iPhoto albums in the list? That's no accident — Snow Leopard automatically offers your iPhoto Photo Library so that you can choose images from your iPhoto collection!
Mac OS X automatically manipulates how the background appears on your Desktop. If an image conforms to your screen resolution, fine — otherwise, click the pop-up menu next to the well and you can choose to
Tile the background. This repeats the image to cover the Desktop. (This is usually done with pattern images to produce a smooth, creamy, seamless look.)
Fill the screen. This can be used with a solid color to get uniform coverage. The original aspect ratio of the image is preserved, so it's not stretched.
Stretch the background to fit the Desktop. If your Desktop image is smaller than the Desktop acreage, this works, but be warned — if you try to stretch too small an image over too large a Desktop, the pixilated result can be pretty frightening. (Think of enlarging an old Kodak Instamatic negative to a 16 × 20 poster. Dots, dots, dots.) The original aspect ratio of the image isn't preserved, so you might end up with results that look like the funhouse mirrors at a carnival.
Center the image on the Desktop. This is my favorite solution for Desktop images that are smaller than your resolution.
Note that this pop-up menu appears only if the Desktop picture that you select isn't one of the standard Apple images. All the pictures in the Apple Desktop Pictures, Nature, Abstract, and Solid Colors categories are scaled automatically to the size of your screen.
Tip
To change your Desktop background automatically on a regular basis, select the Change Picture check box and then choose the delay period from the corresponding pop-up menu. To display the images in random order, select the Random Order check box; otherwise, Mac OS X displays them in the order that they appear in the folder. You can also select a translucent Finder menu bar, which (almost) blends in with your background. If you prefer a solid-color, matter-of-fact workman's menu bar, click the Translucent Menu Bar check box to deselect it.
As I mention earlier, for those who want their favorite color without the distraction of an image, you can choose from a selection of solid colors. You can choose from these colors the same way that you'd pick a default Mac OS X background image (as I describe in the preceding section).
Finally, you can drag your own image into the well from a Finder window to add your own work of art. To view thumbnails of an entire folder, click the Pictures Folder (to display the contents of your personal Pictures folder) or click the Add button (bearing the plus sign) to specify any folder on your system. Click the desired thumbnail to embellish your Desktop.
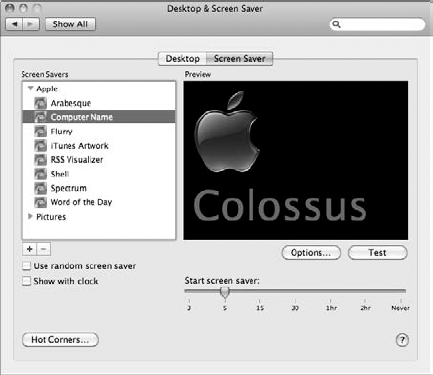
Screen savers are another popular item. Because I cover the Screen Saver preferences in Chapter 3 of this minibook, I simply illustrate here how to choose one. Open System Preferences and click the Desktop & Screen Saver icon; then click the Screen Saver tab to display the settings that you see in Figure 2-2.
Tip
To add a third-party screen saver module so that everyone can use it on a multiuser system, copy it into the Screen Savers folder within the top-level Library folder. To selfishly keep that saver all to yourself, copy it into your user account's Screen Savers folder (which is located within the Library folder in your Home folder).
Click one of the entries in the Screen Savers column to display a thumbnail of the effect. Selecting the Use Random Screen Saver check box runs through 'em all, naturally. You can also test the appearance of the saver module by clicking the Test button; the screen saver runs until you move the mouse or press a key.
To keep tabs on the current time, click the Show with Clock check box to select it. Snow Leopard adds a clock display to any screen saver.
Many screen savers allow you to monkey with their settings. If the Options button is enabled (not grayed out), click it to see how you can change the effects.
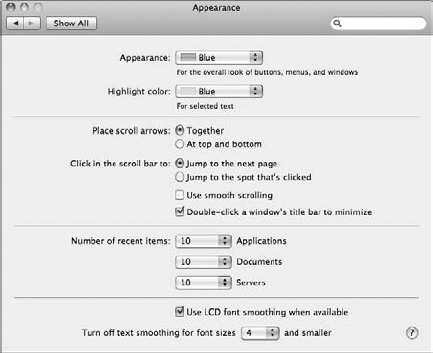
I can't understand it, but some people just don't appreciate menus with purple highlights! (You can tell a Louisiana State University graduate a mile away.) To specify your own colors for buttons, menus, and windows, follow these steps:
Open System Preferences and click the Appearance icon to display the settings, as shown in Figure 2-3
Click the Appearance pop-up menu and choose the main color choice for your buttons and menus.
Click the Highlight Color pop-up menu and pick the highlight color that appears when you select text in an application or select an item from a list.
Press

Stickies are interesting little beasts — I don't know their genus or phyla, but they're certainly handy to have around. To be technical for a moment, a Sticky is actually nothing more than a special type of application window, but these windows remain on your Desktop as long as the Stickies application is running.
I use Stickies for anything that a real-world sticky note can handle, including
Reminders that you don't want to misplace
Snippets of text that you want to temporarily store while your MacBook is turned off (without launching a behemoth like Word or digging for TextEdit)
Boilerplate (repeated and standard) text that you're constantly including in your documents, such as your address
A quick note that includes someone's e-mail address or phone number
Today's Dilbert cartoon from
www.dilbert.com
A Sticky can contain data pasted from the Clipboard, or you can simply type directly into the Stickies application window. Sticky windows can include graphics and different fonts and colors. You can even locate specific text from somewhere in your vast collection of Stickies by using the Find command within the Stickies application. Just press
Tip
In Book II, I discuss the Mac OS X Services menu. You can make a Sticky note from the Services menu in many applications as well.
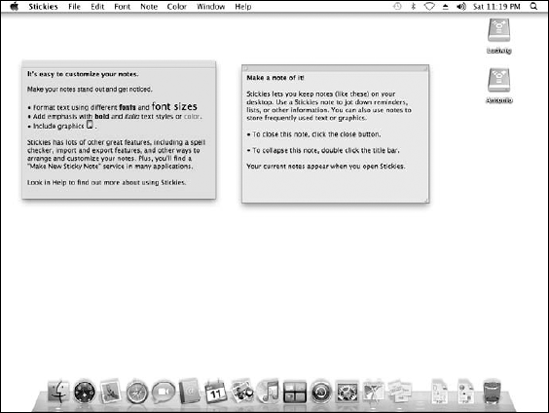
Follow these steps to stick your way to success:
Open your Applications folder and run the Stickies application to display the new window that you see in Figure 2-4
The text cursor is already idling in the new window.
Type text in the window or press
Tip
You can also import the contents of an existing file into a Sticky. Just click File and then choose Import Text to display a standard Open dialog.
(Optional) Add text formatting, change text font, and change font color from the Font menu.
From the Note menu, you can also choose to make the Sticky translucent. (No pressing reason; they just look cool.)
To change the Sticky color, click the Color menu and choose the appropriate hue.
Resize and drag the Sticky window to the desired location.
Press
Tip
To automatically run the Stickies application each time you log on, open the Accounts settings in System Preferences and click your account in the list. Click the Login Items button and add Stickies to the list by clicking the plus button.
To delete a Sticky, simply click the Close button at the upper-left corner of the Sticky window. Or click the Sticky to make it the active note and then click Close. Stickies displays a dialog to confirm that you want to close the note; click Save to save the contents in a file or click the Don't Save button to close the note and discard its contents.
To close the Stickies application completely, click any note and press
In terms of importance, the Dock — the launch pad for applications and documents that appears on your Desktop — ranks right up there with the command center of a modern nuclear submarine. As such, it had better be easy to customize, and naturally, Mac OS X doesn't let you down.
Why be satisfied with just the icons that Apple places in the Dock? You can add your own applications, files, and folders to the Dock as well.
Adding applications: You can add any application to your Dock by simply dragging its icon into the area to the left side of the Dock (that's to the left side of the vertical dotted line that's visible in the Dock). You'll know when you're in the proper territory because the existing Dock icons obligingly move aside to make a space for it.
Warning
Attempting to place an application directly on the right side of the Dock sends it to the Trash (if the Trash icon is highlighted when you release the button), so beware. Note, however, that you can drop an application icon inside a Stack or a folder that already exists at the right side of the Dock.
Tip
Snow Leopard adds a new Exposé feature to the Dock: With Exposé active, click the Dock icon for any open application, and Exposé displays all the application's windows, allowing you to change to another window. Just click the Exposé window you want to work with...Convenience is King in Cupertino!
Adding individual files and volumes: Individual files and volume icons can be added to the Dock by dragging the icon into the area to the right side of the Dock. (Attempting to place these to the left of the side of the Dock opens an application with the contents, which usually doesn't work.) Again, the existing Dock icons will move aside to create a space when you're in the right area.
To open the Dock item you've added in a Finder window, right-click the icon to display a Dock menu, where you can open documents, run applications, and have other assorted fun, depending on the item you choose.
Adding several files or a folder: Snow Leopard uses a feature called Stacks, which I discuss in a few paragraphs, to handle multiple files or add an entire folder to the Dock.
Adding Web sites: You can drag any URL from Safari directly into the area at the right of the Dock. Clicking that icon automatically opens your browser and displays that page. (Safari gets the treatment in Book VI, Chapter 5.) Now that, my friends, is genuine sassy!
To remove an icon from the Dock, just click and drag it off the Dock. You get a rather silly (but somehow, strangely satisfying) animated cloud of debris, and the icon is no more. Note, however, that the original application, folder, or volume is not deleted — just the Dock icon itself is permanently excused. If you like, you can delete almost any of the default icons that Mac OS X installs in the Dock; only the Finder and Trash icons must remain in the Dock.
To set up a Dock icon as a Login Item — without the hassle of opening the Accounts pane in System Preferences — just click a Dock icon and hold the mouse button down until the pop-up menu appears. Then select the Open at Login menu item.
Tip
If you can't delete items from the Dock, you're using a managed account — your account is configured with Parental Controls turned on, and your administrator has deselected the Can Modify the Dock check box in your account. In order to delete Dock items, you'll need an admin-level user to log in; then visit the Accounts pane in System Preferences and select the check box again. For more information on user accounts, see Chapter 5 of this minibook.
I know, it's a horrible play on words, but my editors are doing me a favor.
Snow Leopard offers Stacks, which are groups of items (documents, applications, and folders) that you want to place in the Dock for convenience — perhaps the files needed for a project you're working on, or your favorite game applications. For example, I have a Stack named Wiley on my Dock that holds all the project files I need for the book I'm currently writing.
To create a Stack, just select and drag the items you want to include to the right side of the Dock. As always, the Dock opens a spot on the right side of the Dock to indicate you're in the zone.
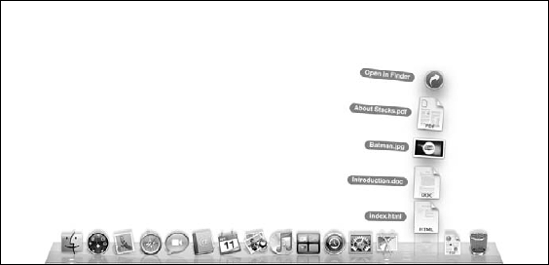
To display the items in a Stack, just click it:
If the Stack holds relatively few items, they're displayed in a really cool-looking arc that Apple calls a fan (as shown in Figure 2-5), and you can click the item you want to open or launch.
If the Stack is stuffed full of many items, the Stack opens in a grid display, allowing you to scroll through the contents (and even open subfolders inside the Stack) to find what you need.
You can remove a Stack from the Dock by Control-clicking or right-clicking the Stack icon. To do so, choose Remove from Dock from the menu that appears. Alternatively, just drag that sucker right off the Dock.
Tip
If you add a folder full of items, the Stack is named after the folder; otherwise, Snow Leopard does the best job it can in figuring out what to name the Stack. (Although Apple makes a righteous attempt, I usually end up renaming the Stack. Right-click the Stack icon, or hold down Control while clicking the icon, and you'll see the Rename Stack menu item appear.)
Apple provides two Stacks already set up for you. One, the Download folder, situated next to the Trash, is the default location for any new files that you download using Safari or receive in your e-mail. Snow Leopard bounces the Download Stack icon to indicate that you've received a new item. Next to the Download Stack is the Documents Stack, which conveniently displays the contents of your Documents folder.
You can change the size of the Dock from the Dock settings in System Preferences — I explain this in more detail in Book III, Chapter 3 — but here's a simpler way to resize the Dock, right from the Desktop.
Move your cursor over the vertical dotted line that separates the left side of the Dock from the right side; the cursor turns into a funky line with arrows pointing up and down. This is your cue to click and drag while moving your finger up and down on the trackpad, which expands and shrinks the Dock, respectively.
You can also right-click when the funky line cursor is visible to display a menu of Dock preferences. This allows you to change your Dock preferences without the hassle of opening System Preferences and displaying the Dock settings.
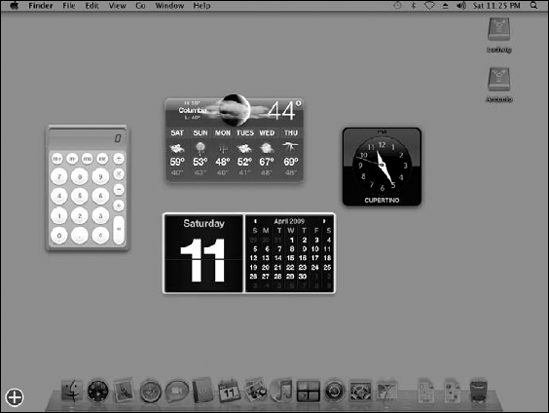
One of Snow Leopard's most popular features is Dashboard, which you can use to hold widgets and display them with the press of a button. (Okay, I know that sounds a little wacky, but bear with me.) Widgets are small applications — dubbed applets — that typically provide only one function. For example, Dashboard comes complete with a calculator, a clock, a weather display, and a quick-and-simple calendar. You can display and use these widgets at any time by pressing the Dashboard key; by default, that's F4 on current MacBook keyboards, but you can modify the key on the Exposé & Spaces pane within System Preferences. Snow Leopard also includes a thoughtful Dashboard icon in the Dock, which you can click to display your widgets. (Geez, that sounds kind of racy. Best not to pursue it.)
Figure 2-6 illustrates Dashboard in action. Press the Dashboard key, and the widgets appear, ready for you to use. You can add widgets to or delete them from your Dashboard by clicking the Add button (which bears a plus sign, naturally) at the lower-left corner of the Dashboard screen. When you click the Add button, a scrolling menu strip appears at the bottom of the Dashboard display, and you can drag new widgets directly onto your Dashboard from this menu. It's also easy to rearrange the widgets that are already populating Dashboard by dragging them to the desired spot. Press the Dashboard key again to return to your Snow Leopard Desktop.
Most widgets have an option button that allows you to change things, such as borders, ZIP Codes, display columns, and the like; look for a tiny circle with a lowercase letter i. Click this information icon and you can tweak whatever options are available for that widget.
To remove a widget, just click the Add button to display the menu strip, and you'll notice a tiny X button appears next to each widget on your Dashboard. Click the X button next to the widget you want to remove, and it vanishes from the display. You can add it back again at any time from the strip.
Tip
While you're adding or deleting widgets, you can also click Manage Widgets, which displays a dialog where you can sort your widgets in a list by name or date added, disable any widget, and delete a widget (click the red minus icon next to the offending widget in the list). Click the More Widgets button to jump directly to the widget download area on the Apple Web site.
If you need to use a widget for only a second or two, press the Dashboard key and hold it. When you release the key, you're back to your Desktop.
Apple offers additional widgets that you can download on the Mac OS X download site (www.apple.com/macosx). Third-party software developers also provide both freeware and shareware widgets.
Tip
You can also modify the Dashboard key by turning it into a key sequence, which is a good thing if you're already using an application that thrives on F4. Visit the Exposé & Spaces pane in System Preferences, and use the Shift, Control, Option, and
Oh, did I mention that Snow Leopard allows you to create your own Dashboard widgets? That's right, this feature is sure to be a winner amongst the In Crowd. Follow these steps to create a new WebClip Dashboard widget from your favorite Web site:
Run Safari and navigate to the site you want to view as a widget.
Click File

Select the portion of the page you want to include in your widget and click Add.
Many Web pages use frames to organize and separate sections of a page, so this step allows you to choose the frame with the desired content.
Drag the handles at the edges of the selection border to resize your widget frame to the right size and then click Add.
Bam! Snow Leopard displays your new WebClip widget within Dashboard.
A WebClip widget can include text, graphics, and links, which Dashboard updates every time you display your widgets. Think about that for a second: Dynamic displays, such as weather maps, cartoons, even the Free Music Download image from the iTunes Store, are all good sources of WebClip widgets! (That last one is a real timesaver.)
If you click a link in a WebClip widget, Dashboard loads the full Web page in Safari, so you can even use WebClips for surfing chores with sites you visit often.
Consider the layout of the Desktop itself. You can set the options for icon placement from the Finder View menu. Just as you can with the options for Finder windows that I cover in Chapter 1 of this minibook, you can clean up and arrange your Desktop by name, date, size, or kind.
The View Options for the Desktop are different in two ways from the View Options for a Finder window in icon view (which I discuss in Chapter 1 of this minibook):
You choose a background for the Finder from System Preferences.
There's no Always Open check box. Your Desktop always opens in Icon view!