
In This Chapter
Finding out how Internet sharing works
Choosing between hardware and software Internet sharing
Connecting your Macs to a cable/DSL router
Adding wireless support to a shared Internet connection
Although I discuss lots of fun stuff that you can do with your network in previous chapters, this has to be my favorite: sharing a single Internet connection between all the computers on your network. If you have more than one computer, I'm sure that you've had to deal with the dilemma that pops up whenever more than one person wants or needs to access the Internet at the same time.
Luckily, because small home and office local area networks (LANs) use our old friend TCP/IP for network communications, connecting an entire network to the Internet isn't as troublesome a task as you might think. In this chapter, I talk about different hardware and software options for sharing your MacBook's Internet connection as well as how to include your wireless devices.
Sharing a single Internet connection among all your computers can be a boon simply because of the reduced chances of random acts of violence. (Internet deprivation can be an ugly thing, you know.) Although I won't claim that Internet sharing will save lives, it can indeed save you from headaches and arguments when more than one person wants to use the Internet at one time.
Tip
Throughout this chapter, I talk a lot about cable modems and Asynchronous Digital Subscriber Line (ADSL) modems. Both of these are high-speed Internet connections — and both are relatively inexpensive — that are offered by your local cable company and your local phone company, respectively. The phone company offers different kinds of digital subscriber line (DSL) connections, the most common of which is ADSL. However, because different kinds of DSL connections exist, in this chapter I refer to them all generically as DSL.
To share your Internet connection, you need a few things, so here's a brief checklist:
An Internet connection: Typically, this is a cable or DSL modem connection, but older versions of the AirPort Base Station can use a dial-up Internet connection that's accessed via a standard v.90/v.92 analog telephone modem. (Note that recent models of the AirPort Extreme Base Station do not have the capability to use analog dial-up connections.)
A LAN: You need a standard LAN (which is connected with cables) or a wireless LAN. (Heck, you can even have a hybrid that has both wired and wireless access.) See Book VII, Chapter 1 for more information about setting up a LAN; see Book VII, Chapter 3 for more on setting up a Wireless LAN (WLAN).
An Internet-sharing device: I use the word device because the method that you use to share your Internet connection could be through software that you run on one of your computers or hardware that is stand-alone, depending on how you connect to the Internet and what best fits your needs.
When you have these three things ready to go, you can share your Internet connection. However, you need to know some background information to help you choose the right components and get everything up and running.
You must determine one thing before you start your Internet sharing quest: the set of network Internet Protocol (IP) addresses that you'll use. If you used Book VII, Chapter 1 to set up and configure your LAN, you might recall that I suggest a specific range of IP addresses to use on your LAN. In case you missed out on Chapter 1 of this minibook, I briefly cover this important topic here so that you can share your Internet connection smoothly. (Forgive me if I wax technical, but 'tis only for the moment.)
When talking about IP addresses, the ruling body that tracks IP addresses and where they're used has broken all IP addresses into two parts:
Public IP addresses: Public IP addresses are used to communicate on the Internet, and only one device in the entire world can use a given public IP address at any given time.
Private IP addresses: Private addresses, on the other hand, are supposed to be used only on networks (such as your home LAN) and do not connect directly to the Internet. Lots of people can use the same private address because their networks never go public; that is, they never directly access the Internet, so their IP addresses never conflict.
Typically, you'll use private addresses in the form of 192.168.x.x on your LAN; however, AirPort Extreme routers use private addresses in the form of 10.0.x.x by default. See Book VII, Chapter 1 for an overview of IP addresses and how they work.
You might be wondering to yourself thusly: "If I use private IP addresses on my LAN at home or in the office and I have to use a public IP address to communicate on the Internet, how can my private IP addresses on my LAN communicate with public IP addresses on the Internet?" That is an excellent question, and the answer is Network Address Translation (or NAT, for short).
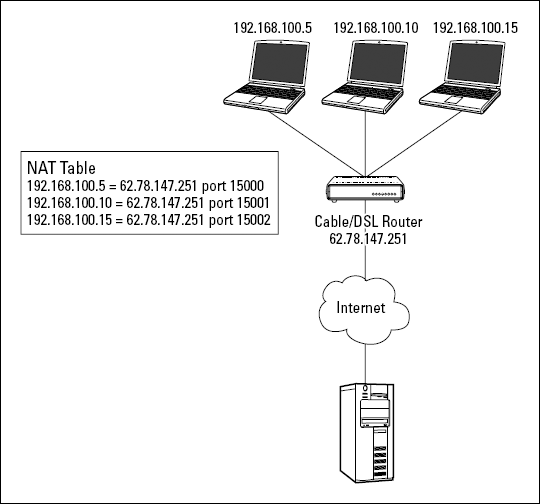
NAT acts as a gatekeeper between your private IP addresses on your LAN and the public IP addresses on the Internet. When you connect to the Internet, your Internet service provider (ISP) gives you one — and usually only one — public IP address that can be used on the Internet. Instead of one of your computers using that public IP address and depriving all the other computers on the LAN, the hardware or software that you use to share the Internet will take control of that public IP address. Then, when any computer on your LAN tries to communicate on the Internet, your NAT software/hardware intercepts your communications and readdresses the traffic so that it appears to be coming from your allotted public IP address. (Think of a funnel that collects water from several different sources and then directs all the water into a single stream.)
When the Web site, File Transfer Protocol (FTP) server, or whatever strange Internet intelligence you're using on the Internet replies, it replies to your NAT device. The NAT device remembers which private IP address it should go to on the LAN and sends the information to that computer. See NAT at work in Figure 4-1.
After you have an Internet connection and your LAN is set up, you need something to make this NAT thing work. You have two different options to take care of NAT for your shared Internet connection: hardware or software. (Go figure.) Each has pros and cons, so take a look at each option individually.
Tip
If you read Chapter 3 of this minibook, you know that Snow Leopard has AirPort software built in. So, since you have AirPort Extreme wireless hardware built-in on your MacBook and you're using Snow Leopard, you can have your MacBook act like an AirPort Extreme Base Station for all the wireless computers on your network, which in turn can use a software NAT.
Probably the most popular way to share an Internet connection is to buy a hardware device that connects to your Internet connection, which then connects to your LAN. These devices are referred to as cable/DSL routers. The main downside to a hardware Internet connection-sharing device is that it costs more than a software solution.
Cable/DSL routers are nice because they're easy to set up and configure. Too, you can leave them on, which means constant Internet access for those on your LAN. You don't have to worry about turning on another computer to connect to the Internet as you do with a software solution. Sounds like a good spot for a Mark's Maxim:
Note
Hardware routers are the best choice for sharing your Internet connection, so if you can afford one, you should get one!
Apple's AirPort Extreme Base Station is not only a Wireless Access Point (WAP) for your network, as I discuss in Chapter 3 of this minibook, but also acts as an Internet connection-sharing device. (AirPort Express can't share an Internet connection.) Some older flavors of AirPort Base Station even have a built-in v.90 modem for sharing a single 56 Kbps connection using a dialup account! A base station typically has several Ethernet connections for sharing a high-speed Internet connection, including a dedicated port to connect to a cable/DSL router and two or four ports to connect to other computers on the LAN.
If you think that a cable/DSL router or an AirPort Extreme Base Station could be the karma pathway for you to achieve your goal of sharing your Internet connection, here are some things to consider when deciding which device to buy for your LAN:
Do you need a switch? Most cable/DSL routers have a small 3-, 4-, or 5-port switch built in. See Chapter 1 of this minibook to discover more about switches. This multiport capability is nice because the same cable/DSL router that shares your Internet connection is also the centerpiece of your LAN where all your connections meet, thus saving you from having to buy a switch on top of the cost of the cable/DSL router.
Some cable/DSL routers, however, have only a single Ethernet connection to connect to your LAN. So keep in mind that if you choose a device with a single LAN connection, you must supply your own switch that would then connect the cable/DSL router to the rest of your LAN.
Got modem? If your only Internet connection is through a dial-up modem account, look for a built-in analog telephone modem on your cable/DSL router. You must have this feature if you want to use a hardware device to share your Internet connection. (Again, older versions of the AirPort Base Station are great for this because the modem is built in, but you'll have to do some shopping on eBay.) Even if you have cable/DSL service, some ISPs also include a dial-up account with your broadband access. With such a bountiful selection of connections, you can plug in your cable or DSL service to the cable/DSL router as well as use the dial-up account as a back-up in case your main service has problems.
Want a printer with that? Some cable/DSL routers also have a port for connecting a printer — a great feature to have because it allows you to leave the printer connected and turned on so that anyone on the network can print to it anytime. (This is much better than connecting the printer to a computer and sharing it because then the computer doing the sharing must always be on in order to make the printer available.) Mac OS X can send a print job to a printer by using Bonjour or TCP/IP, so just make sure that your printer is compatible with TCP/IP printing, also called LPR (Line Printer Remote).
As I mention earlier, your MacBook can act like an AirPort/AirPort Extreme Base Station, providing both wireless Ethernet connectivity for other computers on the LAN and a shared Internet connection.
Snow Leopard also has built-in software that allows a single computer on your network to share its Internet connection with others on the LAN. To share your Internet connection, follow these quick steps:
Click the System Preferences icon in the Dock.
Click the Sharing icon.
Click the Internet Sharing entry in the list on the left side of the pane.
This brings up the settings, as shown in Figure 4-2.
Click the Share Your Connection From pop-up menu and choose Ethernet.
Select the Ethernet check box (in the To Computers Using list) to enable it.
When you do, you're issued a warning that enabling this could affect your ISP or violate your agreement with your ISP. In my experiences, this step has never caused any networking problems. However, if you have any doubts, contact your ISP and verify this.
Click OK in the warning dialog to continue.
You go back to the Sharing dialog, where you'll notice that the Internet Sharing check box is conveniently ready for you to select it — feel free to click it now.
If you're using a dial-up modem to access the Internet, you need to also make sure that the computer that has the modem also has an Ethernet or wireless LAN connection. Unfortunately, MacBook models don't have a built-in modem, but if you buy an external USB modem from Apple (or a third-party vendor), you can still use this feature.

If you're using a cable or DSL modem for your Internet connection, the Mac that you want to run the sharing software on should have two Ethernet connections: one to connect to the cable/DSL modem and one to connect to the rest of the LAN.
The main disadvantage to using a software solution for Internet connection sharing is that the computer that connects to the Internet must be turned on and ready to go all the time so that others on the network can get to the Internet. And although the sharing software operates in the background on the machine it's running on, it still chews up some of the Mac's processing power and memory, so it could slow down other applications that you're running on that computer.
After you decide whether to use a software or hardware solution, it's time to get your hands dirty: All the pieces of the puzzle must be set up and connected. In this section, I tell you how to connect things for either the software or hardware method of sharing the Internet connection.
When you use the software method to share your Internet connection, one of the computers on your network has both the connection to the Internet and a connection to the LAN. Figure 4-3 shows a typical setup for software Internet sharing, whether you're using a dial-up modem account or a cable/DSL modem for your Internet connection.
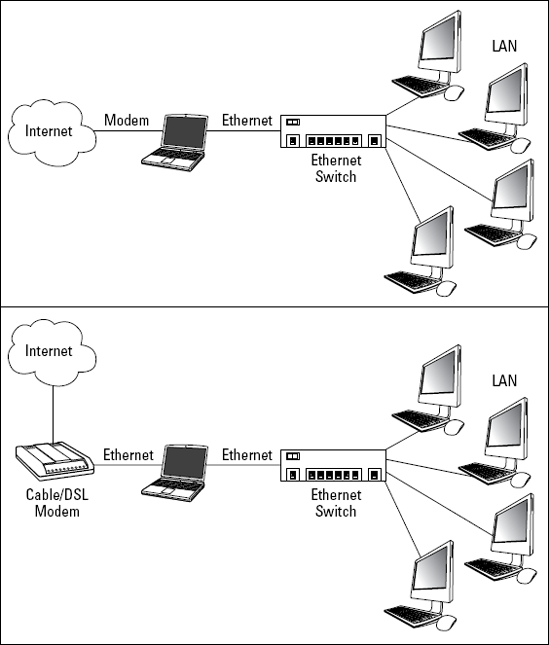
Keep in mind, though, that when using a cable/DSL modem for your Internet connection, the computer running the sharing software must have two Ethernet connections.
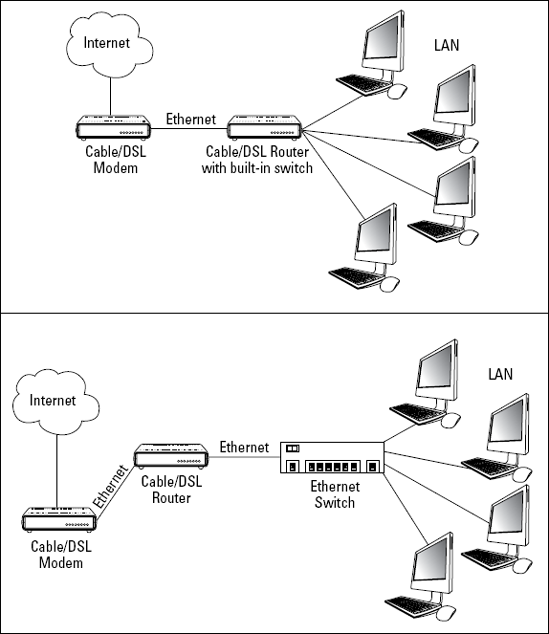
Not only does using a dedicated piece of hardware free one of the Macs on your network from the onerous job of hosting the shared connection, but it also keeps you from having to have more than one Ethernet connection on a single computer if you're using a cable/DSL modem for your Internet access. Figure 4-4 shows how you would connect your devices for hardware Internet sharing by using either a cable/DSL router with a built-in Ethernet switch or a cable/DSL router with a stand-alone Ethernet switch, as you would need to use AirPort or AirPort Extreme.
If you choose to buy a cable/DSL router that has a built-in Ethernet switch, you can simply connect all your computers on the LAN to the built-in switch. However, if you buy a cable/DSL router that has only a single LAN connection, as with older versions of the AirPort Base Station, you must connect that single LAN connection to an external hub or switch in order to get all the computers on the same network.
Note
We're talking wired Ethernet here — of course, wireless connections don't require a port on your router or base station. (More on this in the next section.)
Tip
Regardless of whether you use the hardware or software method to share your Internet connection, all the computers on your LAN — except the one that's doing the sharing, if you're using software sharing — should be configured to obtain its IP address automatically through our old friend, Dynamic Host Configuration Protocol (DHCP). (See Chapter 1 of this minibook for details on how to do this in Snow Leopard.) Although it's not a requirement that you set up your other devices with DHCP, it's recommended unless you understand the IP addressing scheme required by your cable/DSL router and you're willing to set up the addresses manually. You need to follow the instructions that come with the cable/DSL router or software that you purchase for detailed information on how to configure that.
You might have noticed that I mention wireless here and there in this chapter. This section covers in a bit more detail how you can add wireless capabilities to your shared Internet party. To discover more about how wireless networks work and how to set up one, see Book VII, Chapter 3.
Basically, you can encounter a couple of situations when trying to add wireless capabilities into the mix. Either you already have an Internet connection-sharing mechanism in place (either hardware or software), or you don't yet have your Internet connection shared.
If you already have a cable/DSL router or if you're using software Internet sharing, like that built into Snow Leopard, you can simply buy a WAP (short for Wireless Access Point) and connect it to your LAN. Adding a WAP enables anyone using wireless Ethernet access to your network and thus to your shared Internet connection.
There are many WAPs that you can buy to add wireless to your network. AirPort Extreme is a good example; however, because AirPort Extreme also can do Internet sharing, make sure that you don't enable Internet sharing through software on your MacBook! (In this case, you don't want or need this feature because it can conflict with your cable/DSL router operation.)
If you don't have a cable/DSL router or an AirPort Extreme Base Station for Internet sharing, you have a few options. Each option has an upside and a downside.
One option is to get an AirPort Extreme Base Station, which provides both wireless access for AirPort-enabled wireless computers and Internet sharing for the entire network. Because today's AirPort Extreme Base Stations also feature three built-in Ethernet ports for wired connections, you won't need an additional switch to connect up to three Macs using Ethernet cables.
The other option is to buy a combination cable/DSL router, which has a built-in WAP. Most cable/DSL routers — including the ones that have wireless built in — also have multiple Ethernet ports on them, so connecting computers by using wired Ethernet can be done without buying an external switch.
The final option is that you can use the AirPort software built into Snow Leopard to turn your MacBook into an Airport/AirPort Extreme Base Station, as I discuss earlier. This is a great, low-cost way to add wireless and Internet sharing to your network, but remember that the software will still eat up processor time and memory. For more on wireless networking, read Chapter 3 of this minibook.