
In This Chapter
Choosing a view mode
Modifying the toolbar
Searching for files from the toolbar
Searching for files with the Find command
Changing view options
Changing Finder preferences
The Finder is the heart of Mac OS X — and we all know how heart surgeons like to tinker, don't we? (Ouch. Start again.)
The Finder is the heart of Mac OS X, and as you might expect, it's highly configurable. You can customize the Finder to present icons, or you can peruse folders with a column view that can pack much more information on-screen at one time. Some folks prefer the default Finder toolbar, and others like to customize it with the applications and features that they use most often.
Decisions like these can help you transform Snow Leopard into Your Personal Operating System — and every Mac OS X power user worth the title will take the time to apply these changes because an operating system that presents visual information the way that you want to see it is easier and more efficient to use.
No need for a hammer or saw — when you're building the Finder of your dreams, the only tool that you need is your finger!
The default appearance of a window in Mac OS X uses the familiar large-format icons that have been a hallmark of the Macintosh operating system since Day One — but there's no reason you have to use them. (In fact, most Mac OS X power users I know consider the icon view mode rather inefficient and slow.) Besides the icon view, as shown in Figure 1-1, Mac OS X offers three other window view modes: list, column, and flow.
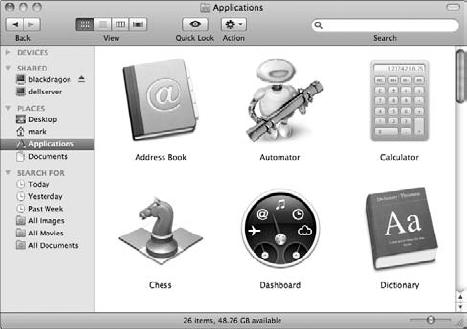
Mac OS X old-timers will thrill to the slider control at the bottom-right corner of Finder windows in icon view mode. Why? Drag this control to the right to expand the size of the icons within the window, and drag the control to the left to reduce the icon size! (This is A Big Thing for those who prefer icon view — and it makes quite a difference for those with less-than-perfect eyesight.)
List view: List view displays the folders on the volume in a hierarchical fashion. To display the contents of a folder, you can either click the right-facing small triangle next to the folder name — it rotates downward to indicate that you've expanded the folder — or you can double-click the folder icon to display the contents in a Finder window. To collapse the contents of the folder, click the small triangle again; it rotates back to face the right. Figure 1-2 illustrates the same Finder window in list view.
Tip
You can resize a column by dragging the right edge of the column heading.
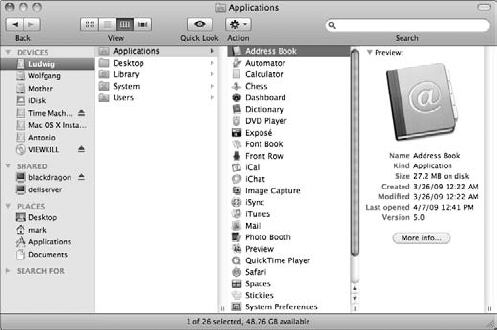
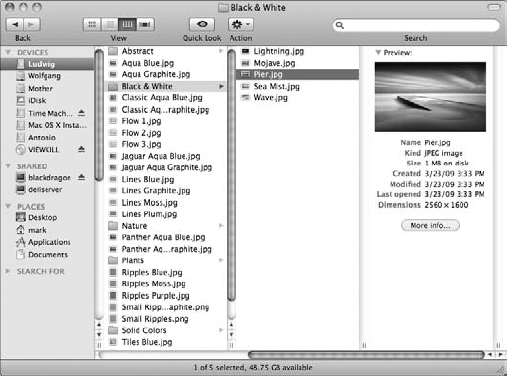
Column view: Figure 1-3 shows the same window in column view, in which the volumes on your Mac OS X system are displayed on the left. Each column on the right represents a lower level of subfolders. Click the volume in the Devices list and then click the desired folder in the first column on the right to display its contents, and so forth. (Personally, this is my favorite view — thanks, Apple! It's efficient and fast as all get-out.) When you drill deeper, the columns shift automatically to the left. When you click an item (instead of a folder), the Finder displays a preview and a quick summary of the selected item in the rightmost column.
Each column has its own scroll bar (for those really, really big folders), and you can drag the column handle at the bottom of the separators to resize the column width to the left. When you hold down Option and drag a column handle, all the columns are adjusted at once.
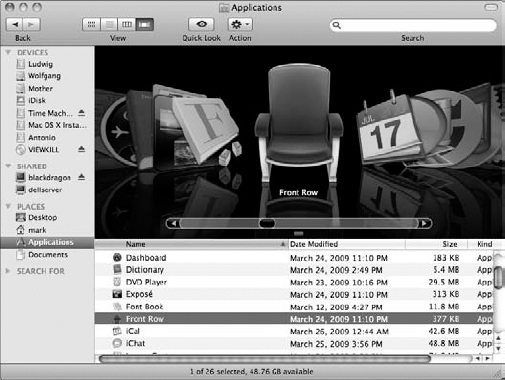
Flow view: When a new software feature or function turns out to be incredibly popular, a developer tries to use it wherever possible — hence the Flow view shown in Figure 1-4, which Apple took directly from the Cover Flow view that proved so successful in iTunes (as well as on the iPhone and iPod touch). Flow view still displays the sidebar, but each document or item is showcased in a preview pane (and with an accurate thumbnail, if possible). You can resize the preview pane by dragging the three-line handle on the bottom edge of the pane. The remainder of the Finder window in Flow view works very similarly to list view, complete with the rotating triangles. However, if you like, you can click the scroll buttons or drag the scroll bar under the preview pane to move through the contents of your drive in a very classy visual display!

Tip
Another of my pet peeves is cluttered disks. If you're continually having problems locating files and folders, ask yourself, "Self, do I need to organize? Am I — gasp — cluttered?" If your answer is yes, take an hour and organize your files logically into new folders. (Remember, I'm talking your documents and such — not your applications, which are usually where they need to be — in your Applications folder.) Often, documents that you create end up as stragglers, usually located in the root folder of your hard drive, which sooner or later ends up looking like a biker bar after Ladies' Night. (The same can be said of many Mac OS X Desktops, too.) By keeping your root folder and Desktop clean and saving your files in organized folders, you waste less time searching for files and more time actually using them.
To switch between the four modes, click one of the four view mode buttons on the Finder window toolbar (the current view is highlighted) or click the View menu and choose As Icons, As List, As Columns, or As Cover Flow. Mac OS X places a helpful check mark next to the current view mode. (Keyboard lovers can hold down
You can work your customization magic on the Finder toolbar as well! In this section, I show you how to customize that strip of icons across the top of the Finder window that's affectionately called the toolbar. Or, if you like, you'll discover how to dismiss it entirely to gain additional real estate for the contents of your Finder window.
You can toggle the display of the toolbar in an active Finder window in one of three ways:
By clicking the toolbar button located at the upper-right corner of the Finder window
By pressing

By choosing View from the Finder menu and then choosing Hide (or Show) Toolbar
Hiding the toolbar also hides the Sidebar, which many MacBook owners dislike — me included.
The status bar at the bottom of the Finder window displays a number of helpful informational-type tidbits about the window's contents. Depending on what you've opened, the status bar can include
Statistics: See the number of items in the window and the amount of free space remaining on the volume.
A write-protect icon: This icon looks like a pencil with a line running through it, as shown in Figure 1-5. This indicates that you don't have write permissions for the contents of the window — or the volume where the contents reside. (Note that this doesn't necessarily mean that folders at a lower level are write-protected as well.) You'll typically see this icon when you're viewing the contents of a CD or DVD, where everything is write-protected.
The current automatic icon view setting: For windows in icon view, the status bar can display either a grid icon (indicating that the icons are set to snap-to-grid) or four tiny icons (indicating that the icons are displayed in a sorted order). You'll discover more about these settings in the section "Configuring the View Options," later in this chapter.

Tip
To toggle the display of the status bar, choose View from the Finder menu and then choose Show/Hide Status Bar.
The default icons on the toolbar include
Back and Forward: As with a Web browser, clicking the Back button moves you to the previous window's contents. If you use the Back button, the Forward button appears. Click this to return to the contents that you had before clicking the Back button.
View: Click this control to toggle between the four view modes (icon, list, column, or flow).
Quick Look: Click this control to display a window with the contents of the selected file or document without launching the corresponding application. Quick Look works with all sorts of images, video, and documents, allowing you to efficiently peruse files on your system without the hassle of constantly launching and quitting applications. Quick Look works in any Finder window view mode, too. To activate Quick Look for a selected file from the keyboard, press the spacebar.
While Quick Look is active, a number of format-specific buttons appear at the bottom of the Quick Look window. For example, displaying an image file in Quick Look adds a button that can automatically import the image into iPhoto. These buttons vary with the format or type of document, but you'll always see a full-screen/exit full-screen button that toggles the Quick Look window between full-screen and regular size.
Tip
Pssst. Selecting a folder and pressing the spacebar displays a summary of its size and last modification date. Pass it on.
Action: Click this pop-up menu to display context-sensitive commands for the selected items. In plain English, you'll see the commands that you'd see if you held down Control and clicked the selection.
Search: Okay, I know it's not technically an icon, but the Search box is a member of the default toolbar family nonetheless. You can search for a file or folder using this box. More on this in the section "Searching for Files from the Toolbar," later in this chapter.
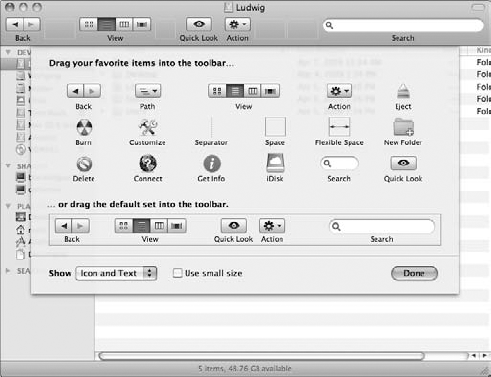
But, as one of my favorite bumper stickers so invitingly asks, "Why be normal?" Adding or deleting items from the toolbar is a great way to customize Mac OS X. Follow these steps:
From the active Finder window menu, choose View

Along with controls such as Back, Forward, and View, you find a number of system functions, such as Eject and Burn.
To add items to the toolbar, drag them from the Customize Toolbar dialog up to the toolbar at the top of the window.
To add an item between existing buttons, drop it between the buttons, and they obligingly move aside. If you get exuberant about your toolbar and you add more icons than it can hold, a double-right arrow appears at the right side of the toolbar. A click of the arrow displays a pop-up menu with the icons that won't fit.
In fact, the Customize Toolbar dialog isn't necessary for some toolbar modifications: You can also drag files, folders, and disk volumes directly from the Desktop or other Finder windows and add them to your toolbar at any time. To remove a file, folder, or disk volume from the toolbar, hold down Control and click (or right-click) the icon on the toolbar; then click Remove Item from the shortcut menu — it vanishes like a CEO's ethics.
You can also hold down
To remove an item from the toolbar, drag it off to the center of the window, amongst the other icons.
Naturally, you can swap item positions. Just click an item, drag it to its new spot, and then lift your finger from the trackpad.
To choose the default toolbar configuration or to start over, drag the default bar at the bottom of the window to the toolbar at the top.
This is the toolbar equivalent of tapping your ruby slippers together three times and repeating, "There's no place like home."
To toggle between displaying the icons with accompanying text (the default), the icon only, or a text button only, click the Show pop-up menu at the bottom of the Customize Toolbar dialog.
After you arrange your toolbar as you like, click the Done button.
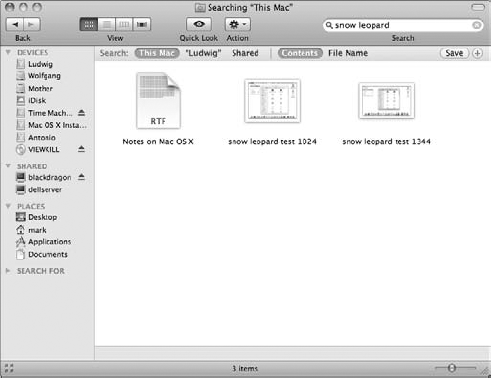
Need to find a file fast? The default toolbar has just what you need: the Search field, which offers the ability to perform a Spotlight search for a string of text within your files (including both filenames and contents). To locate a file with the Search field, follow these steps:
Click in the Search box on the toolbar and type the text that you want to find.
It's the text box on the right with the magnifying glass. (The folks at Apple are really, really into Sherlock Holmes ...as am I!) If you need to clear the field and start over, click the circular X button, which appears only when text is in the Search field.
Hey, who needs to press Return? The Finder immediately displays the files with names (or contents) that include the text, as shown in Figure 1-7.
To display the location of a file, click it once. To launch it, double-click the entry.
Files can also be moved or copied from the Search results list with the standard drag and Option+drag methods.
To perform a new search, click the circular X button and type new text in the Search field.
Note
To return to your original location in the Finder window, click the Back button on the toolbar.
Although the Search box on the toolbar is all you usually need to find most files and folders, sometimes you need a little more flexibility and power to locate what you need on your system. To do so, add the Find controls, which you can use to create custom searches with more complex criteria. To locate a file by using the Find controls, follow these steps:
With the Finder active, display the Find controls by pressing
Mac OS X displays the controls that you see in Figure 1-8.
Click the buttons at the top of the list to specify where you want to search.
You can choose Computer (your entire system, including network volumes), a local volume, or your Home folder.
To search for a specific filename, click the first pop-up menu in a row and choose Name; then type all or part of the filename in the Contains box.
Snow Leopard automatically begins searching as soon as you type at least one character.
After you locate the file or folder that you need, click the entry name to reveal the location of the matching file or folder. You can also double-click it to launch (or display) it.
If you want to search for a text string within the document itself, click the first pop-up menu in a row, choose Contents, and then type the string to match in the box.
Note
The text must appear just as you've typed it, so it's always a good idea to restrict what you're searching for to a minimum of words that you're fairly sure will cause a match. (Content searching is not case sensitive, though.) Content searching works only when you've generated an index, which I explain later in this section.
To include additional search criteria lines, click the button with the plus sign next to the last criterion line.
You can limit your results based on all sorts of rules, including the date that the file or folder was last modified, when it was created, the file type, the size, the extension, or whether the file or folder is marked visible or hidden (such as a system file).
Tip
You can also remove a search criterion line by clicking the button with the minus sign.
To save the search criteria that you selected, click Save.
This creates a Smart Folder, which (you're gonna love this) Snow Leopard automatically updates (in real time) to contain whatever items match the criteria you've saved! You can specify the location for your Smart Folder, and you can choose to add it to your Finder Sidebar for the ultimate convenience. Sweet.
When you're done canvassing your computer, click the Back button in the Find dialog to return to the Finder.

As I discuss at the beginning of the chapter, you have a lot of control over how Mac OS X presents files and folders in the Finder. In this section, I cover how you can make further adjustments to the view from your windows. (Pardon me for the ghastly cliché posing as a pun.)
First, allow me to provide a little detail on housekeeping in the Big X. After a few hours of work, a Finder window in icon mode can look something like a teenager's room: stuff strewn all over the place, as I demonstrate with my Applications folder in Figure 1-9. To restore order to your Desktop, right-click (by tapping two fingers on the trackpad) in any open area of the active window and then choose Clean Up. This command leaves the icons in approximately the same position but snaps them to an invisible grid so that they're aligned, as shown in Figure 1-10.


After things are in alignment, work with the icon view options. (Naturally, you'll want the active Finder window in icon view first, so choose View
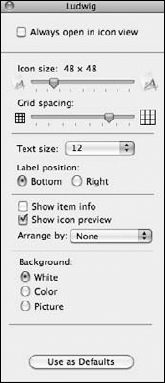
Of course, Mac OS X remembers the changes that you make within the View Options dialog, no matter which view mode you're configuring. Now, the changes that you can make from this dialog include
Always Open in Icon View: When you select this check box, each Finder window that you open automatically uses icon view. (If deselected, the new window uses the last view mode you used.)
Resizing your icons: Click and drag the Icon Size slider to shrink or expand the icons within the window. The icon size is displayed in pixels above the slider. (Remember, however, that Snow Leopard offers an icon resizing slider at the lower-right corner of any Finder window that's currently using icon view mode; it's much easier and more convenient just to drag the slider to expand or reduce the size of icons in a window.)
Specifying grid spacing: Click and drag the Grid Spacing slider to shrink or expand the size of the grid used to align icons within the window. The larger the grid, the more white space between icons.
Resizing icon label text: Click the up and down arrows to the right of the Text Size pop-up menu to choose the font size (in points) for icon labels.
Moving icon label text: Select either the Bottom (default) or the Right radio button to choose between displaying the text under your Desktop icons or to the right of the icons.
Show Item Info: With this check box selected, Mac OS X displays the number of items within each folder in the window. Many filenames also display helpful information (such as the dimensions of a photo).
Show Icon Preview: If you select this check box, the Finder displays icons for image files using a miniature of the actual picture. (A cool feature for those with digital cameras; however, this does take extra processing time because Mac OS X has to load each image file and shrink it down to create the icon.)
Arranging icons: From this pop-up menu, you can automatically align icons to a grid within the window, just as if you had used the Clean Up menu command. You can also sort the display of icons in a window by choosing one of the following criteria from its pop-up menu: by name, date modified, date created, size, item type, or the icon label you've assigned.
Choosing a background: To select a background for the window, select one of three radio buttons here:
White: This is the default.
Color: Click a color choice from the color block that appears if you make this selection.
Picture: Select this radio button and then click the Select button to display a standard Open dialog. Navigate to the location where the desired image is stored, click it once to select it, and then click Open.
Use as Defaults: When you first open the View Options dialog, the changes you're making apply only to the Finder window that opens when you open the selected item — in other words, the item that appears in the window's title bar, such as a folder or drive.
For example, any changes made to the settings in Figure 1-11 will affect only my Applications folder because it was the active Finder window when I pressed
However, you can decide to apply the changes that you make to all Finder windows that you view in your current mode. Click the Use as Defaults button to make a global change.
After all your changes are made and you're ready to return to work, click the dialog's Close button to save your settings.
If you're viewing the active window in list view, choose View

As in icon view, changes you make in this dialog normally apply only to this window, but you can click Use as Defaults to assign these settings to all windows that you view in list mode. The other list view settings include
Always Open in List View: Select this check box and Snow Leopard will open all Finder windows in list view. (If deselected, new windows use the last view mode you used.)
Resizing your icons: You can choose from two sizes of icons.
Resizing icon label text: Click the up and down arrows to the right of the Text Size pop-up menu to choose the font size (in points) for icon labels.
Show Columns: Select the check boxes under this heading to display additional columns in list view, including the date that the item was modified, the creation date, the size, the item type, the version (supplied by most applications), the label color, and any comments you've added in the Info dialog for that item. (In my personal opinion, the more columns you add, the more unwieldy the Finder gets, so I advise disabling the display of columns that you won't use.)
Use Relative Dates: Select this check box to display modification dates and creation dates with relative terms, such as Today or Yesterday. If this freaks you out, deselect this check box to force all dates to act like adults.
Calculate All Sizes: Select this check box to have Mac OS X display the actual sizes of folders, including all the files and subfolders they contain. (Handy for figuring out where all your disk space went, no?) Note: Using this option takes processing time, so I recommend that you avoid using it unless you really need to see the size.
Show Icon Preview: Select this check box to display preview icons for image files. (Again, this takes extra processing time, and the image preview icons are pretty doggone small in list view, so this feature may be of limited value to you.)
To save your settings, click the dialog's Close button.
To make changes to view options in column view mode, choose View
Note
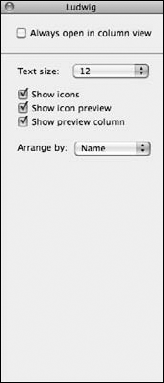
You have only five column view options, and any changes that you make to this dialog are always reflected in every column view:
Always Open in Column View: If this check box is selected, all Finder windows open in column view. (If deselected, new windows use the last view mode you used.)
Resizing icon label text: Click the Text Size pop-up menu to choose the font size (in points) for icon labels.
Show Icons: Select this check box to display icons in the columns. If this option is deselected, the icons don't appear and you'll gain a little space.
Show icon preview: Click this check box to select it, and Snow Leopard displays preview icons for image files — taking a little extra time to perform this service, naturally. (As you find out in the next bullet, column mode can be set to automatically display a preview thumbnail in the last column when you click an image or video file, and even some documents to boot ... Therefore, the usefulness of tiny icon previews in column mode may be limited for you.)
Show Preview Column: If this check box is selected, clicking a file in column mode displays a thumbnail (reduced image) and preview information in the right-most column, as shown in Figure 1-14.
Tip
If you store a slew of smaller QuickTime movies and digital images on your drive, the Preview column is great. (You can even play a QuickTime movie from the Preview column.) Of course, longer movies and larger photos take more time to load!
Arranging icons: Click this pop-up menu to specify the sort criteria for the item names displayed in each column, using name, date modified, date created, size, item type, or the icon label.
Click the dialog's Close button to save your settings and return to the Finder.
Finally, you can change a number of settings to customize the Finder itself. From the Finder menu, click Finder and choose the Preferences menu item to display the Finder Preferences dialog that you see in Figure 1-15.

In the General section, the preference settings include
Displaying Icons on the Desktop: Select these check boxes to display your hard disks, removable volumes (including CDs, DVDs, and iPods), and connected network servers.
New Finder Windows Open: Click the pop-up menu to specify the spot where a new Finder window should open. By default, a new window displays the contents of your Home folder.
Always Open Folders in a New Window: When this check box is selected, double-clicking a folder will open it in a new Finder window, as did earlier versions of Mac OS. (If deselected, the contents of the folder appear in the same Finder window, which makes it easier to focus on just the folder you need at the moment.)
Spring-Loaded Folders and Windows: It sounds a little wacky, but using this feature can definitely speed up file copying! If this check box is selected, you can drag an item on top of a folder — without releasing the trackpad — and after a preset time (controlled by the Delay slider), a spring-loaded window appears to show you the folder's contents. At that point, you can either lift your finger from the trackpad to drop the file inside the folder (upon which the window disappears), or you can drag the icon on top of another subfolder to spring it forth and drill even deeper.
The Labels preference pane is a simple one — just click next to each label color to type your own text for that label. (I've gotta recommend red for deadlines and green for contracts ...call me sentimental.)
Tip
From the Sidebar preferences pane, you can choose which default items should appear in the Finder window Sidebar column. Your choices include locations (such as your Home and Applications folders), network servers, removable media, the Desktop itself, and — naturally — your hard drives. To add a default item to the Sidebar column, click the corresponding check box to select it, or deselect the check box to banish that item forthwith.
The Advanced preference settings include
Show All File Extensions: If this check box is selected, the Finder displays the file extensions at the end of filenames. This comes in handy for some applications, where everything from a document to a preference file to the application itself all share the same icon. However, I find extensions distasteful and leave things set with the default of extensions off.
Show Warning before Changing an Extension: Also on by default, this setting forces Snow Leopard to display a confirmation dialog before allowing you to change the extension on a filename. Why? Well, changing an extension usually results in a "broken" file association, so the file's corresponding application may not launch automatically any longer when you double-click the item. Double-clicking a Word document, for example, might not launch Word automatically as it used to do. If you show file extensions and you often change them, click this check box to disable the warning.
Show Warning before Emptying the Trash: By default, this check box is selected, and Mac OS X displays a confirmation dialog before allowing you to — in the words of Mac OS X patrons around the world — toss the Bit Bucket. If you're interested in speed and trust your judgment (and your trackpad finger), you can disable this setting.
Empty Trash Securely: If you'd prefer to use the more secure method of emptying your Trash — where deleted items are far harder for anyone to recover — select this check box.
When Performing a Search: Click this pop-up menu to specify whether the text you enter in the Finder window Search box should match everything on your Mac or be limited to the current folder only. Choose Use the Previous Search Scope to use the scope setting you used during your last search.
After you make the desired changes to the Finder Preferences, click the dialog's Close button to save your settings and return to the Finder.