Working with Windows
The Mac OS uses windows to let you look at an item's contents, whether that item is a folder, a volume, or even a file. Windows frame the contents of a folder or file, and controls nestled in that frame let you manipulate a window by changing its size, closing it, or moving its contents around to view whatever you like.
Anatomy of a Window in Mac OS 9 and Earlier
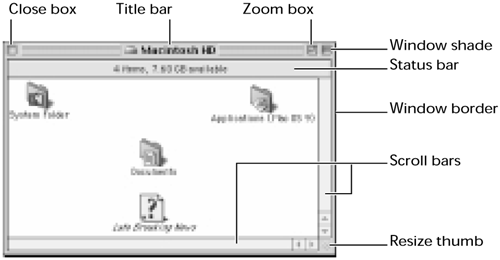
Although the Mac OS 9 window has been around in various forms for a long time, it hasn't changed a lot over the years. You'll find certain elements in every Finder window you open (Figure 1.18):
Figure 1.18. Mac OS 9 Finder windows offer a view on what's inside hard drives, folders, and files. Each window has several controls.

Close box.
This small box in the top-left corner closes the window when clicked.
Title bar.
This broad horizontal border along the top provides a solid handle with which you can drag the window around. The text in the title bar reflects the name of the folder or volume you're looking at. A small icon to the left of the text shows whether the window represents a volume, a folder, the Trash, or a Desktop Printer. The small icon acts as a proxy icon—that is, if you drag the little icon in the title bar to a new place, you'll also move the item connected to that window.
Zoom box.
This icon on the right side of the title bar, which looks like a box within a box, lets you quickly resize a window. Click it once, and the window resizes so it's big enough to show all of its contents, if possible. Click it again, and the window resumes its previous size. This behavior can be a bit confusing at first. If the window is too small to show everything, it will grow larger when you click the zoom box; if the window is larger than it needs to be to show everything, it will shrink when you click the zoom box.
Window shade.
The rightmost box—the one with the horizontal bar through it—is the window-shade control, and clicking it will roll up the window so only the title bar is visible (known as minimizing a window). Click it again, and the window unrolls to its original size.
Status bar.
This line of text below the title bar tells you at a glance how many items are in a given folder or volume and how much space is left on the hard drive that contains the window.
Scroll bars.
Every window has two of these—one horizontal scroll bar and one vertical. You can use these to move the contents of a window around if it's not big enough to show all of the contents at once. (If all of a window's contents are visible, the corresponding scroll bar will be gray and inactive.) Each scroll bar has four elements: two Scroll arrows, the scroll-bar thumb, and the gray bar in which the scroll-bar thumb sits.
Resize thumb.
This square with three diagonal lines in the lower-right corner resizes the window when dragged.
Window border.
You can also use the thin gray border around the left, right, and bottom of a window to drag a window to a new location—just as you would do with the title bar.
 | Because programs have their own window resources, a given program's windows might be missing some—or all—of these features. In a few extreme cases (in most MP3 player programs, for instance), windows may not look like windows at all. They can look like sculptures, rocks—almost anything. |
Pop-up WindowsYou can view Mac OS 8 and 9 windows in two ways—as the standard windows we all know and love and as pop-up windows, which show up as tabs along the bottom of the screen. Pop-up windows aren't really all that different from regular windows, except that they're attached to the bottom of the screen. When you drag a window's title bar to the bottom of the Desktop, its outline will change shape—instead of a square window hanging off the bottom of the screen, it converts to a pop-up window, which has a tab at the top instead of a menu bar. When you release the mouse button after this transformation, the window 's title bar snaps to the lower edge of the screen, showing nothing but the window's title and icon on a tab at the bottom of the desktop. Click the tab (or drag an item onto the tab), and the window pops up into view, showing its contents (Figure 1.19). Click the tab again (or move something out of the window), and the window snaps shut, showing just its tab once more. If you'd rather have your old standard window back, drag the window's tab up and away from the bottom of the screen. Figure 1.19. Pop-up windows attach themselves to the bottom of the screen, and instead of title bars, they have tabs. Clicking a pop-up window's tab makes it jump up, revealing its contents.
You can make just about any Finder window (including a Desktop Printer window) into a pop-up window by dragging it to the proper location. You can also use the View menu to change a regular window into a pop-up window and vice versa: In the View menu, select As Window or As Pop-up Window. |
Anatomy of a Window in Mac OS X
 | The user interface for Mac OS X—called Aqua—does introduce some new features to the Macintosh window (or at least they look new). Instead of the tried-and-true square boxes that Mac OS 9 and earlier provides to handle basic window operations, Mac OS X windows have candylike round widgets (Figure 1.20). Here's a look: |
Figure 1.20. Mac OS X's sleek, rounded windows contain even more controls than their Mac OS 9 counterparts.

Close button.
The red button in the upper-left corner is the close box. Click it to close the window.
Minimize button.
The yellow button shrinks the window and moves it to the Dock at the lower edge of the screen, using an impressive effect that looks like a genie coming out of (or going into) a bottle. This is called the Genie Effect, as you might have guessed.
Zoom button.
The green Mac OS X zoom button works like the Mac OS 9 and earlier zoom box. It's a quick way to resize a window to the smallest possible size at which you can still see all of its contents. Click the zoom button a second time, and the window returns to its original size.
Title bar.
The Mac OS X title bar shows the name of the currently open item. You can move the window by dragging its title bar—in Mac OS X, you can't drag a window by grabbing the side or bottom borders.
Toolbar.
The toolbar is full of buttons that give you quick access to various folders and commands. It is customizable—you can change what buttons appear there. See the “Mac OS X Window Toolbar” sidebar below for more information.
Toolbar toggle button.
This button toggles the window's toolbar on and off.
Scroll bars.
Mac OS X scroll bars work just like their counterparts in Mac OS 9 and earlier except they're now three-dimensional and colorful. These scroll bars can move a window's contents if it's not big enough to show everything. Each scroll bar has four elements: two scroll arrows, the scroll-bar thumb, and the gray bar in which the scroll-bar thumb sits.
Resize thumb.
Mac OS X windows also have a resize thumb in the lower-right corner that you can use to change the size of a window.
 | Don't count on Mac OS X window button colors to be the same on every Mac—learn their positions as well. Apple has also introduced a Graphite color scheme that turns all of the widgets gray. They always appear in the same places, though. |
Floating Windows and Palettes
Not all Macintosh windows look and act like standard windows. There is a class of Mac window called a floating window (sometimes referred to as a palette). Floating windows often resemble regular windows (with a menu bar, close box, zoom box, and window-shade controls for Mac OS 9 and earlier, and close, minimize, and maximize buttons in Mac OS X), except that all of their elements are smaller (Figure 1.21).
Figure 1.21. Whether they allow quick access to formatting controls (left) or display a list of all the programs you can quit (right), floating windows maintain a position above all others because of their importance.

Floating windows float above all other windows (hence the name). That means you can't cover up floating windows with other windows from the same application—floating windows always end up on top. Floating windows are typically filled with buttons, text boxes, pop-up menus, and other controls—they constitute a tool palette (hence the other name). (Not all floating windows are control palettes; some display chat text or a string of news headlines.) These windows float above other windows so the controls they contain are always accessible.
Opening and Closing Windows
Opening a window is a piece of cake—just double-click any icon other than a document or application icon, and a window will open, showing you what's inside the item. Closing a window is just as easy—click the window's close button (or press ![]() ), and the window will close.
), and the window will close.
 | If you hold down the Option key while closing a window, all the open windows close. This little tidbit works in both Mac OS 9 and earlier and Mac OS X. |
Moving and Resizing Windows
To move a window, drag it by its title bar to its new location and then release the mouse button. In Mac OS 9 and earlier, a rectangular outline will represent the window as you drag it. This is a holdover from many years ago when the Mac just didn't have the processing horsepower to draw the window as it moved (and redraw all the areas behind the window erased by its passing). Dragging an outline saves graphics power. In Mac OS X (and with very fast modern computers), there's no need to conserve power like that. The window moves along with the mouse pointer when dragged—no outline necessary.
 |
Windows can be layered on top of each other so that one window partly or totally covers another window. If you want to move a window that's behind another window without disturbing this stacking order, hold down
|
To resize a window, drag the resize thumb in the bottom-right corner of the window. In Mac OS 9, a dotted outline will form, showing the size of the window as it will be when you release the mouse button; in Mac OS X, the window itself resizes as you drag the thumb. The reasons for this are the same as the reasons for the old outline mode of dragging a window—faster computers and modern operating systems have made it possible to do live resizing.
Minimizing Windows in Mac OS 9 and Earlier
In Mac OS 9 you can minimize windows (or make them take up less screen real estate) by clicking the window-shade control in the upper-right corner. Clicking this item causes the window to roll up so that only its title bar is visible. This trick is incredibly useful if you need to move a window out of the way but don't want to close it or move it offscreen entirely. To unroll a minimized window, click the window-shade widget again, and the window will return to normal.
 | The Appearance control panel in Mac OS 9 has an option that allows double-clicking a window's title bar to trigger the window-shade effect. |
Minimizing Windows in Mac OS X
 | In Mac OS X you can also move windows quickly out of the way, but you do so differently than in Mac OS 9 and earlier. In Mac OS X, clicking the minimize button (the yellow button on the left side of the title bar) makes the window shrink down to squeeze itself in the Dock. Once the window has assumed its place in the documents and folders area of the Dock, it stays there until you click it again, at which time it resumes its former position. The plus side to this new minimization method is that it clears up a cluttered screen quickly. The minus side is that you can't manipulate the windows when they're minimized. |
Apple has put a lot of effort into minimizing windows, and it works so well with high-powered machines that QuickTime movies will continue to play even while you're squeezing them down into a Dock-size square.
 |
If you want to see the Genie Effect in slow motion, hold down
|
Zooming Windows
The zoom box lets you quickly resize a window so you can see all of its contents without having to scroll. A second click returns the window to its original size and shape. This can get a bit confusing. Most of the time, clicking a zoom box in a window that's too small will make it get bigger so you can see what's inside. However, if you click a zoom box in a window that's already larger than is necessary to display all of its contents, it will actually shrink to the minimum size required. So clicking a zoom box can make a window grow or shrink, depending on its state when you click it.
 |
If you want to enlarge a window so that it takes up almost the entire screen, hold down
|
Scrolling Windows
Unless a window has relatively few items in it, you'll probably have to scroll it to see all of its items. Scrolling moves the window's contents up, down, left, or right, depending on which scroll controls you click. Each window has two scroll bars, a vertical one and a horizontal one. The vertical scroll bar scrolls the contents up and down, and the horizontal one scrolls the window right and left. A window's contents have to be too large for viewing in a given direction (horizontally or vertically) to make that scroll bar active.
You have three ways to scroll a window's contents (Figure 1.22). Clicking a scroll-bar arrow scrolls the window in that direction just a little bit, and pressing a scroll arrow makes the window's contents scroll by at a moderate clip until you release the mouse button. Clicking the gray bar between the scroll arrow and the scroll-bar thumb makes the window's contents move faster than clicking, and pressing that area (clicking and holding) makes the window's contents fly by at breakneck speed. Dragging the scroll-bar thumb along the scroll bar makes the contents scroll by as fast or as slowly as you drag the thumb; this is called live scrolling.
Figure 1.22. Scroll bars are made up of three parts: the scroll arrows, the scroll bar thumb, and the space between the arrows and the thumb. Clicking in any of these areas will result in scrolling.

Mac OS X uses a proportional scroll-bar thumb to indicate how much of a window's contents you're viewing. The larger the scroll-bar thumb, the more of the window's contents you can see. Mac OS 9 and earlier can use proportional scroll-bar thumbs, but you have to set that option in the Appearance control panel.
 |
You can also “grab” a window's contents in Mac OS 9 and earlier by holding down
|
Window Views
Windows let you look at things in several ways. By default, you see a window's contents as a series of icons you can place just about anywhere. But that's not the only way you can look at a window's contents—it's like a Zen painting that way. You can view a window in icon, small icon, list, or button mode, and Mac OS X also has its own special browser view mode. Each mode has its advantages in particular situations, but you can use any mode you like at any time.
Icon view.
This is the default view that made the Macintosh famous—a series of squarish pictures that represent actual files, programs, and folders. In Mac OS 9 and earlier, these icons are 32 by 32 pixels; in Mac OS X, they're much larger, a maximum of 128 by 128 pixels (Figure 1.23).
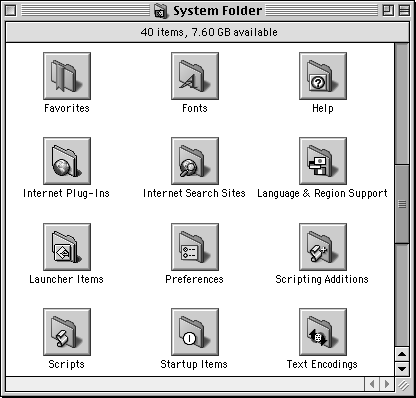
Figure 1.23. Icon view is best used when a folder only contains a few items—otherwise you might get confused or lose files in a sea of icons.

List view.
List view puts a window's contents into a vertical list using small icons (Figure 1.24). This view shows lots of information, such as the sizes and the last modification dates of items, in columns, and you can sort the lists by clicking a column. You can also resize columns in a list view by dragging the edge of each column. Folders appear in the list view with a small triangle (called a disclosure triangle) next to them. If you click a folder's triangle, it reveals that folder's contents in the same list without opening a new window. In Mac OS 9 and earlier, a window in list view has a button in the upper-right corner resembling a small pyramid of horizontal lines. When clicked, this button reverses the window's sort order so that, for example, a list sorted by filename will read from Z to A. Clicking it again sets things right. You can achieve the same effect by clicking the column name in Mac OS X. This flips the window's sort order and also flips a little triangle in the column name to let you know that the sort order has changed.
Figure 1.24. If you have more than a few items in a folder, consider using the list view, which provides built-in organizational tools.

Button view (in Mac OS 9 and earlier only).
The button view looks a lot like the icon view, except that the icons sit on a slightly larger gray square (Figure 1.25). Buttons take just a single click to open, so if you want to select a button, you'll have to draw a box around it with the pointer.
Figure 1.25. For times when you want to access items with a single click, the button view (unique to Mac OS 8 and Mac OS 9) is the way to go.

Browser view (in Mac OS X only).
 | Mac OS X introduces the browser view, which actually has its roots in another operating system, NextStep. In the browser view, the window is divided into a series of columns that show the file path (the series of nested folders) leading to the selected item (Figure 1.26). The column series starts with the hard drive on the left and works its way through the folders you click, expanding toward the right to show you the selected item's contents. One really cool thing about the browser view is that you're never more than a couple of clicks away from any folder on your hard drive, and you don't have to keep more than one window open at a time. A second, even cooler thing is that you get a preview of selected files (such as text documents, pictures, or even movies) right in the browser view. |
Figure 1.26. The browser view is unique to Mac OS X. It lets you view your entire hard drive's folder structure in a single window. When you select a file, it gives you a preview of that file. It will even play back QuickTime movies.

 | You can change the size of icons in the icon view in both Mac OS 9 and earlier and in Mac OS X. In Mac OS 9 and earlier, choose View Options from the View menu. This brings up a window where you can select small or large icons. (It also lets you customize many other aspects of the window display.) In Mac OS X, choose Show View Options from the View menu. This also brings up a view-customization window in which you can change the size of a window's icons using a slider control. |
To change views in Mac OS 9 and earlier, just choose the kind of view you want to use from the View menu; to change Mac OS X views, you can either click the icons in the window's toolbar or select the type of view you want from the View menu.
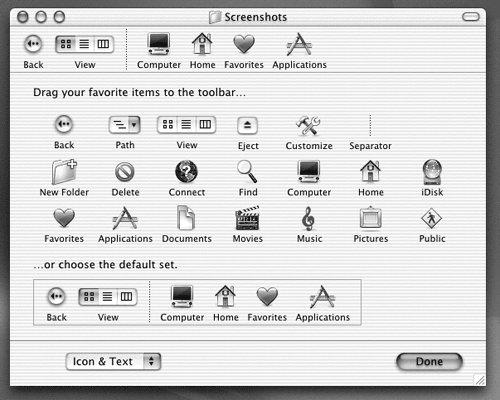
The Mac OS X Window ToolbarEvery window in Mac OS X has a set of buttons held in a toolbar along the top of the window. By default, the toolbar contains a couple of controls (a back button and three buttons that switch between icon, list, and browser views) and four buttons that “jump” a window to a new location—the Computer folder, the Home folder, the Favorites folder, or the Application folder. Clicking one of the jump buttons instantly moves the window to the new location, just as if you'd opened a window in that location. The buttons along the top of the window don't have to be visible. If you want to get rid of them, click the oblong toggle button on the right side of the window's title bar. If you don't like the arrangement of buttons in your windows, you can change which buttons appear there by choosing Customize Toolbar from the View menu. This makes the window larger and temporarily changes its contents to show all of the possible buttons you can drag on and off the toolbar. You can choose from 20 possible buttons and also select whether just buttons, just their names, or both buttons and names appear in the toolbar by selecting one of these options from a pop-up menu (Figure 1.27). Figure 1.27. By dragging buttons from the special customization area into a Finder window, you can create a button bar to meet your needs.
Once you've made all the changes you like to the toolbar, click the Done button at the bottom to return the window to the working state (so you can't accidentally change the buttons)—along with its shiny new toolbar. If you don't like the toolbar changes you've made, you can use the default button set at the bottom of the customization window to return things to their original state. |


