

COLOR
COLOR WITH 123D SCULPT AND MESHMIXER
TIP: TO GET MULTICOLORED PARTS


A NEW APPROACH TO COLOR
Laureline Galliot is one of the few designers to have experimented with modeling and virtual coloring whilst creating everyday objects. With her Contour & Masse project, she presents a modeling method which uses aggregated solids on which she applies colors and textures from her personal palette rather than exploiting lines and extruded surfaces, as is the norm in product design. With her extensive painting experience, Laureline Galliot has used digital sculpting tools intended for animation, to paint, model, and intuitively modify her objects.Combined with color 3D printing techniques such as “Binder jetting” 3D Systems (Z Corp) and SDL paper from Mcor IRIS, Laureline Galliot’s creative processes have brought to life objects as colorful as they are original. This new approach to object creation gives new freedom to the use of color in product design.
Spotted the Villa Noailles in 2013, her project won the prestigious prize from the Var General Council.
Inspired by Laureline Galliot’s creative process, the following exercises demonstrate how to use free software for coloring and modeling shapes for 3D printing.
Again, there is a multitude of professional software packages that enable you to color, texture, and “map” visible file surfaces and to send them for 3D multicolor printing.
Here, we decided to use the same two free tools that helped us to sculpt in the previous exercise. This tutorial will teach you how to use the color functions in 123D Sculpt and Meshmixer.

Contour de masse, Mask
By: Laureline Galliot
3D printed on: Mcor Iris
Source: Laureline Galliot
© Laureline Galliot
Contour de masse, Thea pot
By: Laureline Galliot
3D printed on: ZPrinter 650
Source: Laureline Galliot
© Laureline Galliot
Designing the tea pot
By: Laureline Galliot
3D modeled on: ZBrush
Source: Laureline Galliot
© Laureline Galliot
COLOR WITH 123D SCULPT AND MESHMIXER
COLOR WITH 123D SCULPT (IPAD)
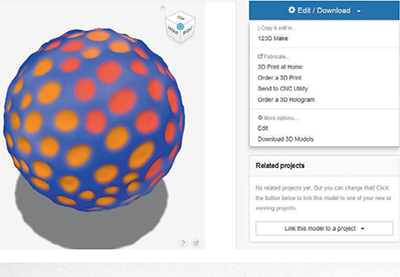
Import a generic sphere into the application from the ‘Geometry’ library. Using the digging tool, third from the top, drill small holes on the surface of the sphere, as if you were trying to make a golf ball. Reduce the tool’s size and strength to 50%. To save time, you can use the symmetry function so that your movements are mimicked on the opposite side of the sphere.


When your ball is finished, select the “Brush” tool. The second to last icon in the left hand column.
Choose a background color for your sphere. Use the circle as your brush shape, then allocate its thickness and maximum size before applying color over the whole surface. Still using the “Paintbrush” tool, change the tip to the blurred circle, choose a complementary or contrasting color, and use that for the base of the sculpture. Reduce the size of the brush to 20%, then fill each cavity with color, alternating the color tone now and then.


In 123D Sculpt, you can also apply images and textures on an object’s surface using the “Mapping” tool (at the end of the right hand column). Visuals like eyes, faces, skin and materials are there by default, but you can also import your own images from the iPad’s camera or photo album.

To apply the selected texture, frame the picture on your object and then slide your finger on the screen to where you want to apply it. You can also adjust the opacity. When you are satisfied, save and then share your sculpture on your 123D account from the gallery, and then retrieve it on your PC. The ZIP file will contain your OBJ model along with the MTL file and the associated PNG mapping.
All that remains is to print it on a color 3D printer!

COLOR WITH MESHMIXER
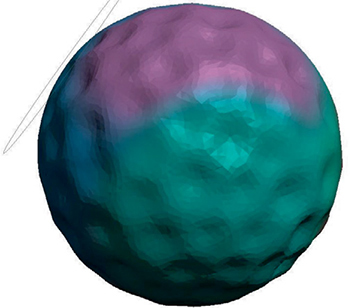
Import a sphere in Meshmixer using “File, Import Sphere”.

In the “Sculpt” tool, use the “Brush” called “Drag” pushing it onto the sphere’s surface to reproduce the crevasse effect that we made using 123D Sculpt. Set the “Strength” to 30 and the “Size” to 50. Make use of this step to explore the effects of the different brushes on the sphere.

Before moving on to the color, make sure the “Mesh Color Mode” is enabled by pressing the space key and selecting the sphere painted blue.
In the “Sculpt” tool, select the “Paint Vertex” brush.

For your “Stencil”, select the last one on the right, depicted by an indefinite circle. Note that you can create your own shape by importing an image using the + icon.

In “Falloff” select “Bubble”, the fourth icon.

Feel free to switch from one mode to an other to discover the effect of each tool.
Paint the entire surface of your sphere, choosing a color and a large brush size to create a background. The color of the shader will not affect the hue of the file once exported.

Change the color and decrease the size of your tool so that it matches the diameter of the cavities you produced.
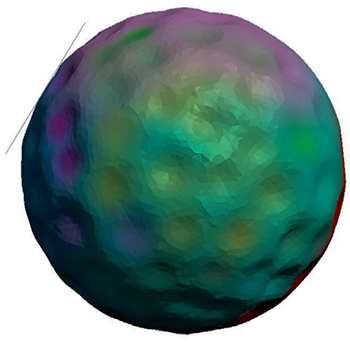
By changing your brush to “Smooth Color”, in the surface mode, you can attenuate the transition between colors and even combine them. You can choose the size of your model before you export your sculpture to avoid unpleasant surprises at the time of production. Go to “Analysis » Units” and enter the dimensions that you want. By default, the sphere is 25 mm in diameter. To save a color file of your sculpture on your computer, go to File » Export » OBJ Format With Per-Vertex Color. Unlike 123D Sculpt, the OBJ file will not be associated with an external MTL file, because all the color informations are already embeded in the Per-Vertex OBJ. If you want to have a separate texture file, export with a standard OBJ format.

It is possible to change the filament during your print, either by monitoring your part and pausing the process to reload, or by configuring the machine, if a z pause option is available. Some slicing software, like Cura and Simplify 3D, also offer the possibility to set multiple Z pauses directly in the 3D printing code. You can change the filament color as many times as you want and create multicolor pieces with a single extruder. While you’re at it, try also to change the type of material while extruding. Go from PLA to NinjaFlex to wood filament and see what happen. You might discover a new composite material.

Nylon filament can be bought in certain stores: its advantage, outside strength and flexibility, is that it can be colored with textile dyes. This kind of dye comes as powder and needs to be mixed in hot water. Follow the instructions provided with it, as if you were working with textile. Make sure your dye is nylon compatible. Immersing your object in a container filled with diluted dye will color it in about an hour. You can also dye the filament directly using different colors on the same spool to create hue transition on your 3D printed objects...

