

FINISH
POST-TREATMENT OF 3D PRINTED OBJECTS

PERSONALIZE
3D printing has been a geeks and nerds world for a long time. It’s only recently that it’s become available to artists, stylists and individuals. In order to pay homage to the science fiction side of digital fabrication, the young designer Thomas Thibault has created a telescopic and adjustable Light Saber. Taking the form of a ribbed cylinder, the handle of the toy weapon can be personalized by sliding and screwing different accessories onto it, such as a button, a screen, rings, or even a belt clip. This technique allows anyone to make a unique toy without having to go through the modeling process. However, the main interest of this extremely simple design is the ability to modify it by designing your own accessories while giving them the desired finish (color, texture...). The most impressive element of the saber is definitely the telescopic “laser” that is printed all at once, already assembled. It goes from 15 cm when closed to 86 cm when expanded. This project is a good example of a fun use of 3D printers, especially targeted to individuals. It’s also an approach that provides the personalization of objects as an alternative to the creation of multiple “models” with fixed characteristics.
You can download the files for making the Light Saber at the following address:
www.thingiverse.com/thing:572485

Light Saber parts
By: Thomas Thibault
3D printed on: Replicator 2
Source: le FabShop
© Thomas Thibault
Assembled Light Sabers
By: Thomas Thibault
3D printed on: Replicator 2
Source: le FabShop
© ThomasThibault
Light Saber FabShop
By: Thomas Thibault
Source: le FabShop
© Tatiana Reinhard
POST-TREATMENT OF 3D PRINTED OBJECTS
POST-PROCESSING METHODS
There are many ways to finish your pieces: here is a non-exhaustive list of examples of “post-print” techniques ... It’s up to you to invent and discover others according to your needs and desires.
SANDING
The “layer by layer” appearance of 3d-printed objects can be off-putting for certain projects: sanding is very tedious and can turn out to be impossible in certain inaccessible areas of your pieces. Most times we use it for cleaning support traces left on 3D printed pieces, or for fixing points that are a little broken down. Begin with large-grain paper (P80) then gradually switch to a finer grain (240-400). Be careful, each plastic reacts differently, and colors such as “black” may whiten when sanded. Use a Dremel as needed for more effectiveness.

SMOOTHING WITH ACETONE
This works better with ABS plastic: the material dissolves on contact with the solvent. There are several ways to proceed; some people begin by sanding their piece and passing a paintbrush dipped in acetone over the surface: the dust from the sanding dissolves, filling cavities and smoothing the grooves in the printed layers. This method can be also very practical for gluing pieces together. You cover the two walls with acetone, then place them against each other at the moment when they begin to dissolve. They will bond that way permanently. A simple but dangerous method consists of dipping the object in a bath of liquid acetone during 1 to 10 seconds and letting it dry. The most effective way is also the most complex; it consists of heating the solvent to use its vapors: be careful, they are toxic, so this maneuver should be done in a well-ventilated area, with all of the necessary precautions. You need a glass container equipped with a lid. Add a small amount of acetone: a few tablespoons or more depending on the size of your piece. With the help of a hot plate, heat the container to around 60°C. Then insert your piece into the inside, on a base where it can be easily removed and where it will not be in contact with the liquid (think of a handle/rod which will hold the part in the air and help you to retrieve your piece without having to touch the acetone and the bottom of your jar). Wait from 1 to 10 minutes depending on the desired smoothness: if you leave it too long, you risk ending up with a piece that’s completely melted rather than smooth... It is therefore necessary to keep an eye on the progress of the operation. It can be repeated as many time as needed. With the help of the rod attached to the base of your piece, retrieve the piece from the acetone chamber and let dry 1 hour before handling it: you can then remove the base and any burrs with the help of a cutter. The use of safety glasses and gloves is highly recommended. This trick also works with cold acetone, but more time is needed for the smoothing to take action.


The smooth effect is sometimes impressive and provides a finish that resembles pieces produced by injection molding. However, you will naturally lose something in precision and detail.
PAINTING
Pieces made from PLA and ABS are best painted using spray paint. The best results are achieved on pieces sanded with a fine grain.
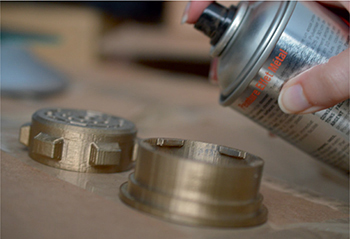
After sanding, rinse your piece: your surface is now ready to accept a layer of primer or paint. You can then cover the areas of the object that you want to protect from any additional layer. Depending on your needs, work with aerosol or acrylic paint: the painting techniques are the same as for model building, all you have to do is have patience while improving your painting skills.
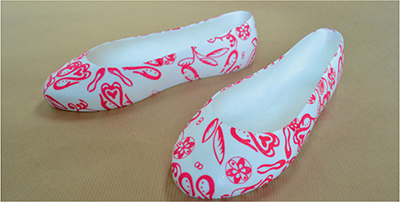
HYDROCOATING
Little-known but effective, hydrocoating is a process of transferring patterns onto 3D objects mostly used in industry (helmets, car interiors...). The technique can be used on all plastics. Here’s a video tutorial of how it’s done: http://www.instructables.com/id/Custom-hydrographic-design-for-3D-printing/

You will need hydrographic film (choose your pattern, there are dozens of choices on the Internet), as well as a kit containing cans of primer and activator. Cover the areas of your object that you want to leave intact with painter’s tape. Then, in a ventilated room or outside, making sure to wear a mask, vaporize the primer, keeping a distance of 30 cm between the can and the object to avoid splattering. Delicately place your film, cut beforehand to the dimensions of the bowl, on the surface of the water: wait 40 to 60 seconds for the film to expand. Then vaporize the activator (always wearing your mask) and carefully immerse the object while wearing gloves. Don’t hesitate to create handles for your object with tape so your fingers don’t hide the object being coated. When the object is in the water, use a stick to remove undesirable film residues from the surface of the water before carefully taking out the object. Once it is dry, remove the tape and varnish to your taste.

There are hundreads of other ways to work on your pieces after printing: drills, laser etching, friction welding, heat deformation... Some people even inflate PLA parts after dipping them in hot water. Feel free to invent your own method!
Photo credit for “acetone” example by Éric Simon - ES Concept.