


3D SCAN
THE PREREQUISITES FOR THE OBJECT TO BE DIGITIZED
PREPARING THE SUBJECT FOR 3D SCANNING
TIP: DIGITIZING MULTIPLE TIMES
USING SKANECT TO CREATE A MINIATURE BUST
USING 123D CATCH TO CREATE A 3D SCAN

SOUVENIR OR MEGALOMANIA ?
3D scanners have been used in industry for decades for reverse engineering, that is to study the geometry and wear of existing objects. They are used in architecture and urban planning to improve cities and to preserve our cultural heritage. Scientists themselves use this technology to create a virtual archive of valuable objects and to make reproductions to be used when studying certain artifacts. In medicine, 3D scans enable lives to be saved and increase quality by creating custom prostheses and even implants.
What will consumers use them for? For now, there is a one word answer: “selfies”. These self-portraits (or “egoportraits”) have been invading modern-day social networks since 2004 and now they come in 3D. With mobile photogrammetry applications, such as 123D Catch, you can make a three-dimensional scan anywhere, anytime. The 3D selfie will become even easier when infrared LED scan techniques are directly integrated with our handheld devices. Google is already on the ball with its Tango project, a telephone that creates point clouds of spaces in real time. In 2013 Apple bought the company PrimeSense, the originator of the technology in the first generation Kinect for Xboxes and holder of multiple patents on the use of infrared LEDs.
3D photo booths are also fashionable around the world. The Japanese company PARTYLab was one of the first to make this concept popular through the Omote 3D Sashin Kan project. This publicity stunt, sponsored by the 3D iJet printers, had an immediate response from international media. The idea was used by Coca-Cola in Israel and Asda, the English branch of Walmart, for promotional purposes. The figure on the left hand page was created in France by the 3D photographer Dominique Lentengre using a 3D Artec EVA scanner.

Place de la République
Scan: Trimble
By: Grégory Lepère
Source: le FabShop
© le FabShop
Mini-me
Scan: Artec EVA
By: Comexx
3D printed on: ZPrinter 650
Source: Comexx
© le FabShop
Pink and blue miniatures
Scan: Asus Xtion with Skanect
By: Samuel N. Bernier
Source: le FabShop
© Samuel N. Bernier
SCANNING AN OBJECT
WHY 3D SCANNING?
There are 3D scanners in all price ranges with a corresponding quality range; in general, the more you spend, the more faithful the reproduction. However, no single scanner has the solution to every problem. Before you invest time and money in scanning, you need to be able to determine whether an object should be digitized with 3D scanning or manually modeled with the help of precise measurements. Here are some cases where the use of a 3D scanner is justified.
HANDMADE ITEMS
Some shapes are just a headache to model. They might be too organic to be measured manually, or have a surface texture that is too random. Handmade objects are ideal subjects for 3D scanning. Are you a sculptor? Digitize your creations to create a virtual portfolio. That way you will have a digital record of your work.

SCALE
It is possible to digitize virtually any dimension of object from entire buildings to microscopic ones (with the appropriate tools). A 3D file can change scale infinitely, which lets you reproduce the digital subject in any desired size. Changing an object’s scale has never been so easy, but be careful, you may lose details once the file you produced is reduced and 3D printed.

CUSTOMIZATION
3D scanning is used in medicine and in fashion to take the exact measurements of a subject in order to create a custom accessory. For example, prostheses for people with one leg can be made from a scan of the intact opposite leg. The US army is also studying the use of 3D scanning to design armor adapted to the soldiers anatomical differences.

PRECISION
In industry, high-accuracy 3D scanners allow verification of the wear and deformation on the manufactured components. The 3D scanner is therefore more of a tool for testing quality than a modeling tool.

REALISM
3D scanning preserves a level of realism that is difficult to obtain with 3D modeling. Even the movement of fabric, the posture of a person, or the expression on a face. Moreover, big movies with animation and special effects, such as Avatar or The Lord of the Rings, use techniques similar to 3D scanning to give digital characters more realism.

FRAGILE OR PRECIOUS ITEMS
3D scanners are used in archeology and conservation to produce replicas of priceless artifacts. This can be used to create hands-on exhibits without risk of damage to the original, or to share with schools around the world to produce their own copies for use in the classroom.

THE PREREQUISITES FOR THE OBJECT TO BE DIGITIZED
OPACITY
In order to be able to digitize an object in 3D, the object must be able to reflect light. Some transparent materials, such as glass, simply cannot be digitized in their natural state. In order to be able to calculate the sides of an object with a certain translucence, we use a “mattifying” agent, often in the form of powder or a liquid in the form of an aerosol. The treatment consists of covering the object with a fine opaque layer that you can remove with water or compressed air. A more drastic strategy consists of completely repainting the object.

MATTE
The same problem with reading digitized surfaces also applies to objects that are too shiny or reflective. A mirrored surface, polished metal or crystal can’t be digitized because of its shiny surface. The reflections and refractions of of the light confuse the reading of the geometry and prevent the calculation of a coherent volume. In order to counteract this problem, using a mattifying agent is also suggested. Of course, bright objects, such as a light bulb or a white surface exposed to direct sunlight pose the same problem of scrambling the data.

THICKNESS
Digitizing a flower is not impossible, but it’s still somewhat complex. When the volume to be scanned is extremely thin, the scanner can have difficulty determining the front side from the back side. For this reason, it risks canceling the geometry or superimposing the polygons. This is particularly true for medium and low-resolution scanners such as the Sense from 3D Systems. The problem with thickness also applies to opacity.

STABLE AND STATIC
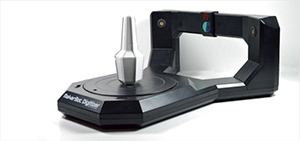
The object and its environment have to be stable for the entire duration of the scan. Likewise, an exterior element that goes into the digitization area interferes with the meshing of the 3D file. The majority of 3D scanners calculate the geometry on the inside of a virtual box. For the MakerBot Digitizer, this volume is a cylinder that is 20 cm in diameter by 20 cm high. For the Xtion scanner, this virtual area is an adjustable cube that can go from 30 cm to 500 cm per side. All geometry collected outside this border will be automatically ignored.

LIGHT-COLORED ITEMS
With the use of infrared LED scanners, very dark-colored objects are problematic since they absorb the light emitted rather than reflect it. In this case, the use of a mattifying agent or talc is a solution. Dry shampoo is also frequently used.

TEXTURED ITEMS
In the case of a color or photogrammetric scan, the textures can serve as a point of reference, so they are useful. With applications such as 123D Catch, it is also suggested that you add markers before you scan something with different symbols to make it easier to calculate data collected from volumes that are too even in shape or in color. These “markers” are often made from numbered Post-it notes or pieces of painter’s tape.

ORGANIC
A digitized cube will never be more precise than it is in a 3D modeling software, and this also applies to a screw, a door hinge, or drawer slides. An object whose surfaces are measurable and even can, of course, be digitized with the help of a 3D scanner, however, if it can be modeled simply, modeling remains the best solution. Volumes with complex curves are ideal subjects since they are more difficult to measure by hand.

PREPARING THE SUBJECT FOR 3D SCANNING
Begin by covering any transparent or shiny object (glasses, silver jewelry, piercings...). Use dry shampoo, available in any pharmacy, to cover surfaces that are too shiny or too dark. Stabilize your subject. If the subject is a person whose bust you would like to scan, ask him or her to sit down. If it’s an object that is unstable, use adhesive putty or adhesive tape to hold it in place. Some people use a rotary table so they can pivot the subject while keeping the scanning tool in place. If you are trying to digitize a live animal... well, let’s hope that it’s well-trained.


The range of 3D scanners is limited. You sometimes have to resort to tricks to reproduce the largest and most complex objects. Some 3D scanning software programs, such as MakerWare for Digitizer, directly integrate a “Multiscan” option, which allows you to digitize the same item several times by swiveling on different axes between each scan.

If you use solutions such as Skanect, you will have to bypass the problem by saving several “paths” that you then recombine with the help of the “Reconstruct” tool. You can also simply save multiple STL files that you then merge manually using Meshmixer.


USING SKANECT TO CREATE A MINIATURE BUST
For this exercise, you should get your hands on a Microsoft Kinect 1 sensor or an Xtion Pro by Asus, two accessories that use PrimeSense technology. If you have a Sense, iSense, or Structure sensor, the procedure will be similar, but the software interface will be different.

Download and install the free version of Skanect, or buy a pro license for $129 from:

Plug your device into the USB 2 port of your computer. Make sure that all of the drivers have been installed before beginning.
After having prepared your subject, create a perimeter of 1.5 m around it and make sure that there is no direct light source that can scramble the 3D scanner’s sensors. With the Skanect software, go into “Prepare » New”. Choose the standard stage called “Object.” By default, it uses a virtual box that is 0.6 m on each side, which is perfect for our subject. Keep “Aspect Ratio” in normal mode. The “Height x 2” mode corresponds to a vertical box, very useful for digitizing people from head to toe.
Press “Start” to begin.

Orient your infrared scanner towards the subject. It should appear in the box that is displayed on the screen. Adjust your distance in such a way that the head and shoulders of the person you are digitizing are entirely in this box. Help yourself by pivoting the cube on the screen.

When everything is in place, click on the black circle on the red background at the top left. A countdown will begin. This can be set with the help of the cursor to the left of the black circle.

Your subject should be displayed in green and red on the screen. The green surfaces correspond to the geometry calculated, the red ones to areas out of range. Carefully pivot around the subject or rotate the item itself. Don’t forget to scan the top of the head and under the chin.

If you lose your place along the way, try to superimpose the gray image with what is displayed at the bottom of the screen. If that doesn’t work, cancel the operation and click on the circle to begin again from the start.


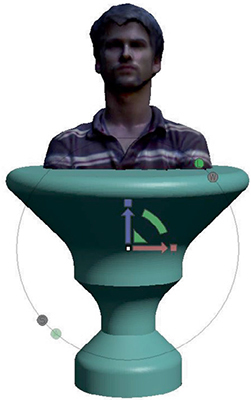
When you have finished, click on the red square at the top right. After several seconds of calculating, the 3D volume will be shown in white.
Go directly to the “Process” tab. There you will find automatic repair tools, but we won’t be using them. Meshmixer lets you repair everything just as well, but with more control over the results. You can still position and cut the undesirable areas of the file with the help of the “Move and Crop” tool.
Make sure that your subject’s chin is pointed slightly up, which will allow it to be made without support material.

If your Kinect or Xtion is equipped with a webcam, you can retrieve the colors by clicking on the “Colorize” option.

In the “Share” tab, choose “Export Model.” You will have the choice between several formats and units of measurement In format, choose OBJ. In “Colors,” choose UV Texture to get an MTL file. In number of faces, export with the maximum unless you want to create a faceted effect. If you are using the free version of Skanect, you will only be able to export a limited number of surfaces. Use millimeters as the unit of measurement in “Scale” mode. That way you will get a color 3D file at original scale that can be used with multiple 3D printing machines.

Now open the file in Meshmixer and launch an automatic repair procedure with the “Inspector” assistant (See the exercise on page 43).

Make sure that the base of the object is very flat and closed. If not, use the “Plane Cut” tool. Your bust is ready to be printed in 3D, but first add a base to it.
In 123D Design, create a base by using the sketching tools and the “Revolve” function, then export an STL file that you imported to the scan open in Meshmixer by choosing “Append.” Don’t worry about the size of the base, we’ll adjust it in Meshmixer.

In the “Edit” tool, use the “Transform” function to adjust the size, depth and position of the base. Make sure that it makes contact with the bust. In the “Object Browser” window, select the two volumes to make the boolean options appear. Choose “Boolean Union” to fuse the volumes. Export the result in STL Binary format. If the sculpture is not personal enough for you, return to 123D Design and add a name to the base by using the “Text” tool. Then begin the previous procedure again.

Import the STL file into the slicing software of your 3D printer. The object should appear at its original scale, therefore much bigger than your print volume. Give it a scale of 1:10, which should reduce it to 60mm in height.

Start the print with maximum resolution. If you would like, you can create a mold of the model afterwards for the color in plaster or metal. The same file could also be used for digital milling in high quality materials such marble or wood, if you are into this kind of decoration.

USING 123D CATCH TO CREATE A 3D SCAN
Begin by installing the 123D Catch application on your Apple or Android mobile device. A PC compatible version also exists, but it requires the use of a digital camera and behaves different than the mobile version described here. You have to log into your 123D account to use all of the application’s features.

Choose a textured subject that is non-transparent and stable. We have decided to digitize a stuffed toy tiger. Its stripes are ideal for serving as a reference for the photogrammetric process.

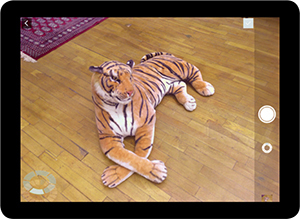
The texture of the surface on which the object is placed can also help to obtain a precise model. Here, the wooden slats and the Persian rug below have contributed to the success of the scan. Take photos of the object from all possible angles. A mark on the lower left helps you determine the necessary number of pictures. 25 photos should be enough for a usable model. When you have finished taking photos, touch the check-mark on the top left of the application. Validate the rest of the photos by pressing “Submit” at the top right. The calculation begins, and could take several minutes or several hours. It depends on the speed of your Internet connection and the traffic on the server. Memento, an even more powerful photogrammetry tool by Autodesk, allows you to get an even better results by analyzing more high resolution pictures at the same time, which can take more than a day. See memento.autodesk.com


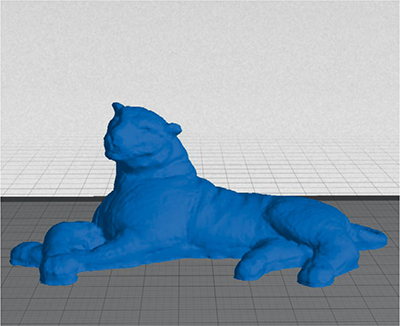
You will receive a message when the 3D reconstruction is finished. You can then visualize your virtual object and verify if the digitization has gone well. In the case of the tiger, only a hole under the chin poses a problem, but we can repair it later with Meshmixer.

Connect to your 123D account on your computer to recover the 3D file from your “Models” library then open it in Meshmixer. Using the “Select” tool, select all of the undesirable space surrounding your subject. The area should appear in orange. Press the X key on your keyboard to make it disappear. Then, go into the “Analysis” tool and pass the volume to the automatic inspector to seal all of the holes. Make sure that the bottom of your object is very flat using the “Plane Cut function”, then export a file in STL Binary format. Export an OBJ instead if you want to produce it in multiple colors on an Mcor Iris or a Projet 660 by 3D Systems. Find the result of this tiger 3D scan here: www.thingiverse.com/thing:440462

Import the cleaned file to your 3D printer’s software, then adjust it to the desired scale. The level of detail obtained is not enough to create a large-format object, unless you sufficiently rework the file with software programs such as ZBrush, or Mudbox. We printed our little tiger without raft or support and with an infill density of 10%. Photogrammetric scanning is a great tool, especially when it is combined with our mobile devices. It lets you generate digital copies of both large objects and small ones with unequaled color precision. However, a good dose of patience and training is necessary to obtain high-quality results, but the answer often lies in the choice of subject and environment.
