
Doug Stowe
Spoon-Carving Knife
Make a blade to make useful things for the kitchen.
IN RECENT GENERATIONS, WE’VE LOST
many basic skills. Today, making a simple knife to work wood is beyond the capacity of most people in the Western world. Sad, but true. And yet it’s fun, and offers a sense of tactile satisfaction. The use of this knife is therapeutic, leading to feelings of accomplishment.
And knives are tools. Sadly, most have come to regard knives as weapons, forgetting the simple pleasures of whittling on a stick or making something useful for the kitchen.
Making a Simple Spoon Knife
You can’t buy anything as effective as this knife in a store, so you’ll need to make your own. It’s designed for carving the bowl shape at the working end of a spoon. With this knife and a sloyd (whittling) knife, you can carve anything you want. In fact, you can remake yourself into a craftsman. It just takes a little carving. But, I’ll remind you that you won't find everything you need in this article. It takes practice to actually get good at something. Your first efforts may not result in what you see here, but things are made more meaningful and useful by the effort we’ve invested in them.
1. Grind the blade.
Use a grinder to shape the steel blank and begin forming the knife edge (Figure A, following page). For a right-handed knife, hold the steel from the right side of the wheel. For a left-handed knife, work from the other side.

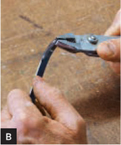
2. Bend the blade to shape.
Use pliers to bend the end of the sharpened steel blank (Figure B). The degree of curvature in the blade determines how deep you can go into the bowl end of the spoon. Study the spoons in your kitchen to determine the level of curvature you’ll want. The blade should be curved slightly more than is required to conform to the spoon shape.
MATERIALS
Steel blank, approximately ![]() "×½"×5" for blade
"×½"×5" for blade
Wood stock, walnut: ⅜"×1"×18" and ![]() "×1"×18"
"×1"×18"
Brass rod, ![]() " diameter, a few inches long You’ll cut it down to 2 pins 4" long.
" diameter, a few inches long You’ll cut it down to 2 pins 4" long.
Epoxy glue
Sandpaper, 600 grit, extra fine
Danish oil, ½ pint
TOOLS
Grinder
Pliers
Drill press (preferred) or electric drill
Propane torch
Oven
Cookie sheet, metal
Clamps
Sander
Hacksaw
Dowel
![]() CAUTION: It’s important to use a fence on the drill press. If the drill were to catch and the blade to spin accidentally, you could be cut.
CAUTION: It’s important to use a fence on the drill press. If the drill were to catch and the blade to spin accidentally, you could be cut.
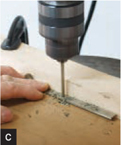
3. Drill holes for the pins.
Use a 3/16"-diameter drill bit in the drill press to make holes for the brass pins that will secure the handle (Figure C).
4. Heat treat the blade.
Use a propane torch to heat the end of the knife blank to cherry red (Figure D). This is best done in the dark. You’ll see the steel turn a variety of colors as it heats up. When it’s cherry red, quench it quickly in oil. This hardens the steel so the knife will hold an edge, but it also makes the steel brittle, requiring the next step.

5. Temper the steel.
Preheat the oven to 425° and place the metal cookie sheet inside. When the oven has reached temperature, put the heat-treated knife blade on the cookie sheet for 20 minutes. Then remove it and allow it to cool to room temperature.
6. Make scale stock.
Rip wood stock as shown in Figure E to form the 2 “scales” that make up the handle of the knife. A ripping cut in one scale, only partially through, provides a secure housing for the knife blank on 3 sides as shown.
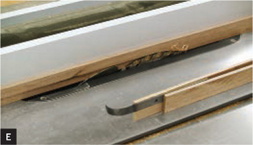
Cut the scales to length to fit the blade.
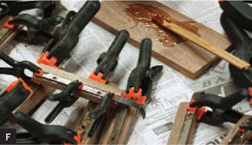
7. Glue scales on both sides.
Use epoxy to glue the knife blank into the grooved scale (Figure F, following page). Then use the drill press to finish the holes through the scale.
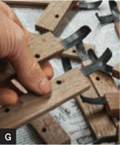
Glue on the other scale using epoxy, and then drill to finish the holes through to both sides. Whether you’re making a left- or right-handed knife, yours should look like one these (Figure G).
8. Shape the handle and install the brass pin.
Use a sander to shape the edges of your knife to be comfortable in your hand (Figure H). Of course another carving knife could be used for this! But either way, this is a job that requires skill and attention.

Cut ![]() brass rod into 2 pins ⅞" long and glue them in the holes using epoxy glue.
brass rod into 2 pins ⅞" long and glue them in the holes using epoxy glue.
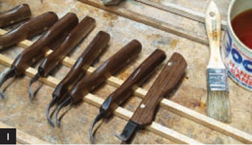
9. Finish and sharpen.
After sanding (and sanding and sanding) apply a hand-rubbed Danish oil finish to the knife to protect the wood and bring out its beauty (Figure I).
Use a dowel wrapped in 600-grit extra-fine sandpaper to sharpen the cutting edge (Figure J). Use a flat sheet or sharpening stone to hone the backside of the blade.

10. Carve a spoon.
Now you’re ready to carve a spoon. You’ll also need a sloyd knife or other type of whittling knife as shown in Figure K.

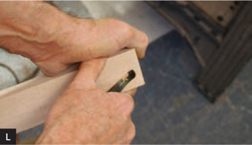
You’ll find that green wood works best for carving spoons. So cut a stick, use an axe to split it in two, and then begin carving (Figure L). The spoon in Figure K is made of bass-wood. Many other woods will work as well.
Also, if you can make a spoon knife, there is no reason you couldn’t make a sloyd knife as well. The technology is the same except that traditional sloyd knives, like this one from Mora, Sweden (Figure K), are made with many laminations of steel — a technique hard to duplicate outside the blacksmith shop. ![]()
Doug Stowe lives in Arkansas’ Ozark Mountains, where he makes, teaches making, and writes about both. He’s working on his seventh woodworking book and is best known for box making.
Sam Murphy
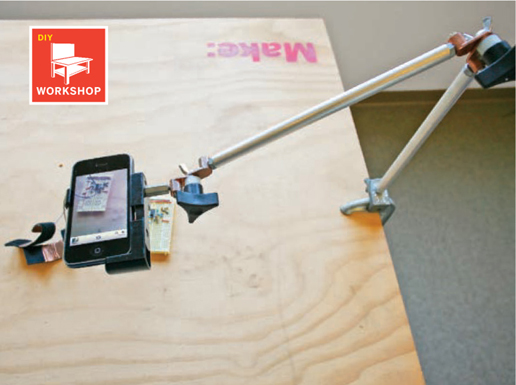
$30 Gobo Arm: Mobile Document Camera Stand
Go hands-free for the price of a clamp.
IF YOU’RE FAMILIAR WITH TABLETOP
product photography and video, you know what a pain it can be to shoot overhead shots while working on your subject. Tripods just get in the way.
The usual remedy is a document camera, the modern equivalent of the overhead projector. These cameras let you display close-up shots with an LCD projector or external monitor, and they cost between $500 and $1,500. They’re well suited to capturing images of document-sized objects, but come on, a grand for a glorified webcam?
We’ve all got streaming video on our smart-phones now, so couldn’t we just use that instead? The problem is, how to hold it over the project without a tripod to bump into.
Hollywood grips solve this problem with what is known as a gobo arm, a lightweight mount that lets you position your smartphone (webcam, etc.) down where the action is without getting in the way. Commercial units run $100–$150, not including the $30 clamp you attach it to. But for the price of one of those fancy clamps, you can piece together your own Mobile Document Camera Stand using easily sourced parts.
It’s easy. If you can make cuts with a hacksaw, you can build this project. There’s also plenty of room for improvement. For example, I recently upgraded the lock washers to the “curved disc spring” type, and they work great.
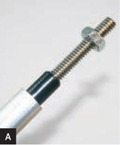
1. Cut rod and tube, and assemble.
Cut two 11½" lengths and one 1¾" length of threaded rod. Cut two 10" lengths of aluminum round tube. Clean up the ends with a file.
Insert the threaded rod into the aluminum round tube, and use hex nuts to hold in place. Optionally, you can use nylon spacers or 8" strips of electrical tape wound around the threaded rod toward each end to position the tube. You should have enough rod left at each end to fit into the terminal lug.
Attach a single terminal lug to one end of the first threaded rod, and tighten with a slotted screwdriver. Attach terminal lugs to both ends of the second threaded rod, and tighten. Then thread the coupling nut onto the 1¾" threaded rod. Attach the remaining terminal lug to the end and tighten (Figure A).
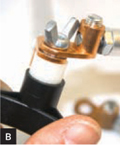
2. Assemble the friction joints.
For the first friction joint, insert a nylon spacer onto the clamping knob shank. Insert the end of the terminal lug over the nylon spacer, keeping the locking screw facing away from the tip of the shank. Insert a lock washer over the terminal lug.
Now, insert the end of the terminal lug of the second threaded rod over the lock washer, keeping the locking screw facing toward the tip of the shank. Hold it together with a ¼"-20 wing nut (Figure B).
Repeat for the second friction joint, to attach the 1¾" threaded rod assembly to the other terminal lug of the second 11½" threaded rod assembly.
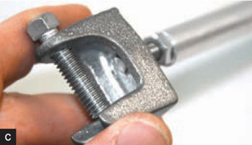
3. Finish.
Thread the beam clamp onto the remaining end of the first threaded rod assembly and attach it to the C-clamp (Figure C). Make sure a little extra of the threaded rod sticks through the bottom of the beam clamp. You’ll want this overhang to wedge the C-clamp into so that the beam clamp aligns straight.
Adam Flaherty
Attach the generic smartphone tripod adapter to the ¼"-20 end of the 1¾" threaded rod assembly. Use the coupling nut to adjust for a snug fit.
MATERIALS AND TOOLS
See makeprojects.com/v/27 for recommended suppliers, prices, and other sourcing information.
Threaded rods, ¼"-20, 12" long (3)
Setscrew terminal lugs, ¼", straight tongue, copper (4)
Spacer, ½" OD, .252" ID, ½", nylon (2)
Wing nuts, ¼"-20 (2)
Aluminum tubing, ½" OD, 0.4" ID, 10" length (2)
Clamping knob, threaded stud, 3-arm, ¼"-20, plastic (2)
Lock washer, ¼", curved disc spring (2)
Coupling nut, ¼"-20
Beam clamp, ¼"-20
C-clamp
Smartphone camera adapter, generic Check eBay or theglif.com (for the fancy iPhone 4 model).
File for cleaning up cut rod
Screwdriver, slotted
Hacksaw
Now you’re ready to photograph your project for sharing at makeprojects.com, or even stream live video from your workbench. ![]()
Adam Flaherty is a contributing writer for makezine.com. He edited MAKE’s iPhone Hacks book (O’Reilly), and has tech-reviewed other O’Reilly titles including Linux Unwired and Netbooks: The Missing Manual. He has dabbled in industries including alcohol, tobacco, firearms, and the declining automotive industry.