
11
General Electronics
When you first get into electronics and start putting together kits, those kits usually come with a components checklist, and each step in the build process is designed to be checked off as you progress through the project instructions. You are always highly encouraged to inventory all of the parts in the kit before you start and to mark off each step once completed. This is a great habit to retain. A lot of the perceived complexity of electronics work is thanks to lots of tiny little parts to keep track of, and dozens (and dozens) of solder points to lay down onto a tiny and over-populated printed circuit board (PCB). By just being careful, methodical, and organized, you alleviate a lot of the problem. Taking the time to set up a PCB project, inventorying and sorting the parts into temporary parts containers, reading through all of the instructions, and blocking out the build in your head will all pay off in the end. Let’s take a look at some other tips for working with PCBs, electronic components, and general electronics.
 Sorting Parts on a Sticky Mat
Sean Ragan offers this great tip. If you are doing a teardown, or working on an electronics project with a lot of small parts, consider getting a dashboard sticky mat. You can get them online for around US$10. They will keep all of your parts in place and well organized until you are ready to use or sort them. [SMR]
Cutting PCB Fiberglass
If you need to physically cut fiberglass (FR4) circuit boards, avoid using saws or rotary tools. The fiberglass is very hard on your tools and produces hazardous dust. A shear is the right tool for the job. Heavy-duty tin snips or bolt cutters can be used with relative ease and precision. [WO]
Use Magnification
For successful PCB work, especially troubleshooting soldering issues like cold joins and solder bridges, you will need some form of magnification. Always have a glass, jeweler’s loupe, or magnifying visor on hand to inspect your work as you go. You can also get full-spectrum fluorescent swing-arm lights that have a magnifying lens on them for fairly cheap. These can be helpful, especially if you’re new to soldering and really need to see what you are doing.

Get a Component Lead Tool
Component lead-bending tools, often branded by a supplier and given away as swag, are a great little addition to your electronics toolbox. Along with pre-planning and organizing, having the discipline to keep your circuits neat, tidy, and tight to the board will pay off in the end. Precisely bending component leads to the proper lead width can help in that process. The bending tool in this picture belongs to Steven Roberts, aka The High-Tech Nomad. I love how you can see that it is a well-used tool.

Our pals at Evil Mad Scientist Labs (evilmadscientist.com) sell a bending tool for resistors. One side of it is designed for ¼W resistors (sizes 0.4″–1.5″), the other for ½W resistors (sizes 0.5″–1.5″). It works for 1/8W resistors as well. This is one of those tools that is likely to get a, “How have I lived without this?” response after you’ve had a chance to use it.
Use a Pair of Tweezers
Get yourself a pair of electronics tweezers. Even if you’re not mainly working with surface-mount components, which are tiny enough to require such tweezers, adding through-hole components to the board is much easier with tweezers than trying to get parts in place with your fat and meaty end-effectors.

Always Give Your Boards a Bath
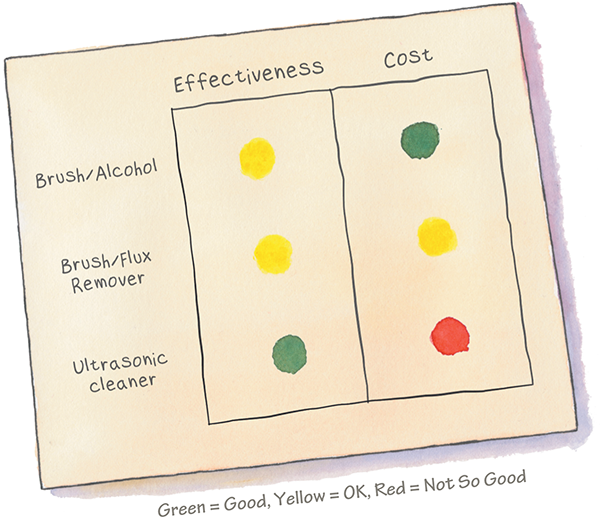
When you first get into electronics, it seems counterintuitive to expose your circuits to cleaning solutions, but cleaning your PCBs should always be part of your circuit-building regimen. And you want to clean the board before and after you populate it. Make: contributor Ross Hershberger writes, “Cleanliness is next to solderliness. Freshly scrubbed copper takes solder with less heat and wets more thoroughly, so always scrub or otherwise de-oxidize your boards before soldering. I use isopropyl alcohol and a fine abrasive like a Scotch Brite. You can also use a pen eraser followed by alcohol. For bad corrosion, use a glass fiber ‘pen.’ Steel wool may leave fibers that can cause shorts.” [RH]
Using Black Hot Glue as a Light Sealant
Hot glue sticks comes in a number of colors, and at least one of those colors has a practical use. Black glue sticks can be used in electronics to act as a light sealant. In some electronics projects, you might want to seal up or block light-emitting components so that you don’t get photonic noise or crosstalk. Black hot glue is just the ticket. [BK]