
18
Sewing
Alongside soldering, sewing is one of the skills I frequently tell makers and DIYers of all stripes that they should learn. The basic techniques of sewing can come in handy for all manner of issues in project execution, as well as for maintenance and repair. As with soldering, many people are intimidated by sewing, but they shouldn’t be. Learning how to thread a needle, the basics of operating a sewing machine, and a few basic stitches and what they are used for can arm you with a very useful and fundamental life skill. Here are a few tips to help you along in this effort.
 Thread a Needle the Easy Way
Here’s a very clever method of threading a needle. Basically, you place the thread across the palm of your hand, place the eye of the needle perpendicular to the thread, press the needle into the thread, and wiggle it back and forth across the thread until a loop of thread gets worked through the eye. Pull on that loop and you are done. It’s useful (if you don’t have a needle threader handy), and it feels kind of like a magic trick at the same time.
Use Pins Wisely
If you’re sewing slippery fabric, or if you’re sewing together two or more pieces of fabric that don’t lie flat on top of one another—for example, if you’re sewing a gathered piece to a non-gathered piece—then using lots of pins will help you get a neat result. Sometimes, however, lots of pins can have the opposite effect. If you use too many pins, they will keep the pieces from lying flat against each other. So, for basic assembly, use the fewest pins you need to hold the pieces in place. A related tip is to pin perpendicular to the edge with the pin heads sticking out so they don’t distort the fabric. [TW2]
 Darning a Hole
The following instructions on how to mend holes in fabric are taken from Make Do and Mend, a booklet that was issued by the British government during WWII. A screen capture of the page has been a viral favorite on the web whenever the subject of darning clothes comes up. What would “Mrs. Sew and Sew,” the credited author of the publication, have thought if she knew that her instructions would be whizzing around the globe in a vast and largely invisible electronic network nearly 80 years later?
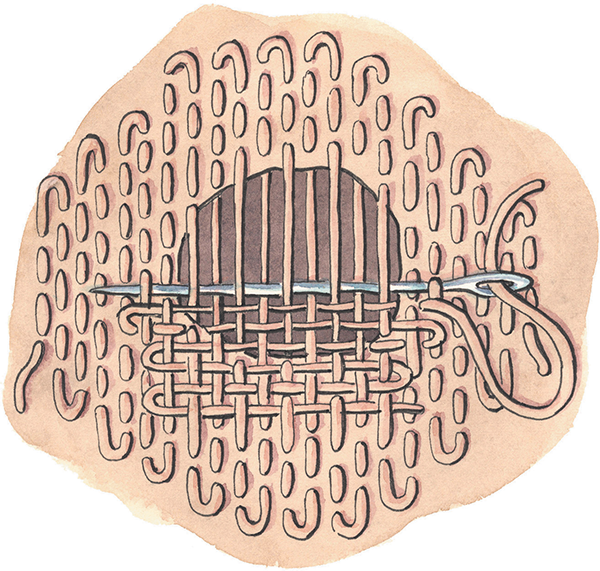
First, clear the loops of fluff and broken ends of threads from knitted garments or clip away ragged edges from machine-knit fabrics. Always use a darning ball under large holes.

- Make the darn in the shape of the hole.
- Darn up and down the hole first—work on the wrong side.
- Choose mending thread as fine as the material of the garment.
- Begin a good distance away from the hole in order to reinforce the thin parts around the hole.
- Space the rows of darning the width of a strand of mending thread apart.
- Pick up the backs of the loops only, unless the material is very fine.
- Leave loops at the ends of the row and darn so that stitches alternate with spaces between stitches in the previous rows.
- Pick up the edge of the hole in one row, and then go over the edge of the hole in the next row. If you have cleared the edges of the hole, you will find this will be easy and will make a neater mend on the right side of the garment.
- Continue the darn over the thin place beyond the hole.
- Only darn beyond the hole about two stitches.
- Leave loops at the ends of each row and only pick up the darning stitches on the needle.
- Pick up the alternate strands of mending in the first row.
- In alternate rows, pick up the strands of mending you passed over in the previous row.
Don’t Forget to Change Your Needle
It’s easy to forget to change the needle on your sewing machine. A dull needle is not your friend or a friend to the fabric it is attempting to cut through. Sewing machine needles should only be used for six to eight hours of machine time before you replace them. And if you’re hand-sewing and getting a lot of resistance from the fabric as you stitch, consider getting a new needle to see if that helps.
Draw the Stitching Line onto Your Fabric
This might sound like cheating, but if you are preparing to sew a corner, or perhaps an even more complex shape such as a scalloped edge, try drawing the stitching line onto the wrong side of the fabric (or interfacing) to help you see exactly where you need to pivot or turn your stitching. Use a chalk pencil or washable pen so that the mark comes out afterward! [TW2]

Make a No-Slip Fabric Grip
Are you trying to machine-sew a two particularly rambunctious piece of fabric together? Make: contributor Andrew Lewis offers this great tip. “Spray both sides of a piece of tissue paper with temporary fabric adhesive. This will help stop stretchy or slippery fabrics from moving while you sew them together. The needle cuts through the paper as it stitches, so you can just rip the paper away when you’re done.” [AL]