which look just like regular servos but can rotate
all the way around. Make sure you are using the
right kind of servomotor (and the right MakeCode
blocks) for your robot!
CONNECTING SERVOS TO MICRO:BIT
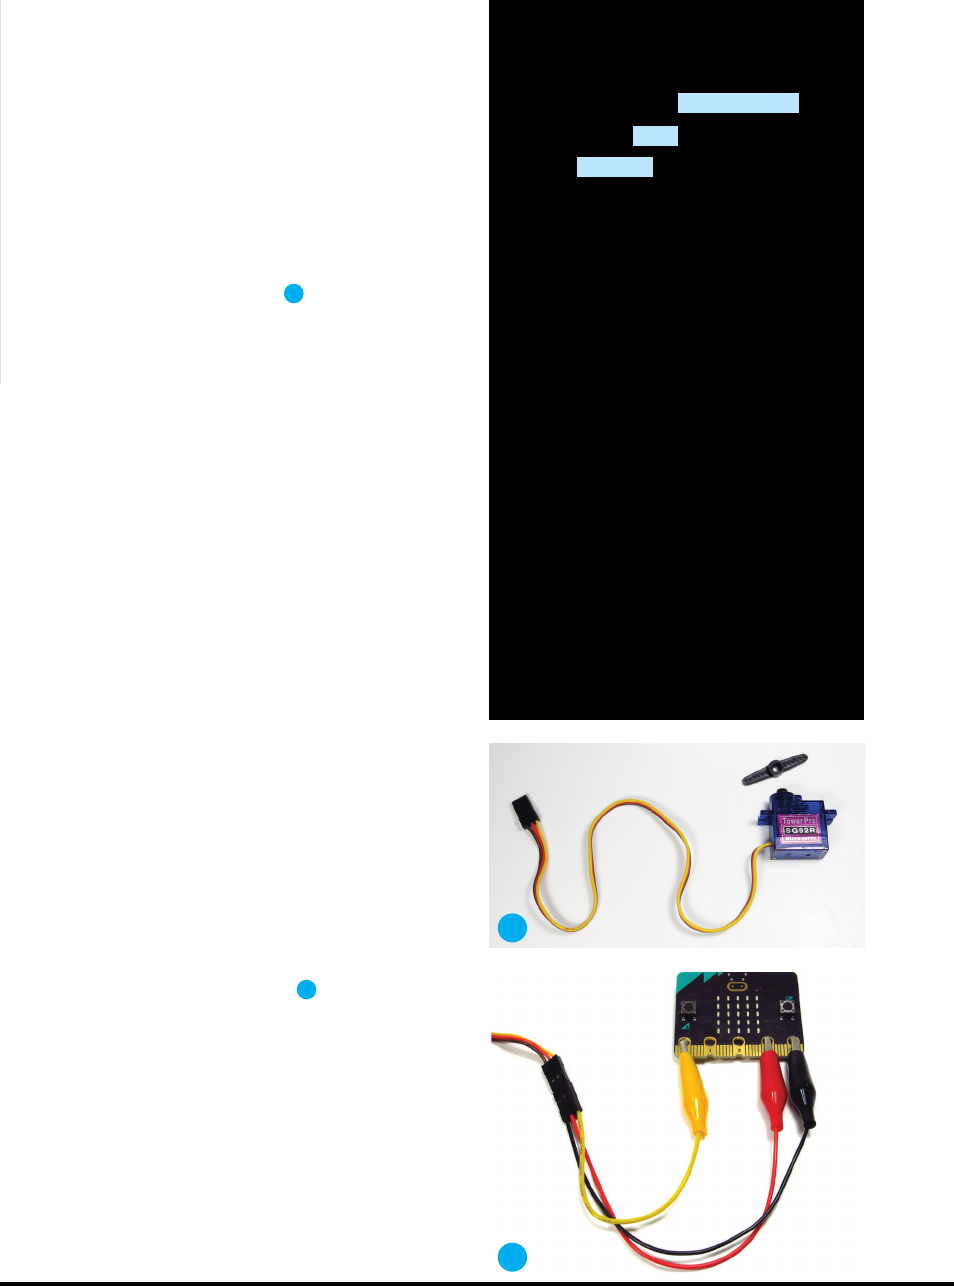
To connect a servo to a board like micro:bit, you
use its cable. The cable is made up of three wires
in different colors (Figure
A
):
• Orange or red is power. It draws electricity
from the micro:bit (or other source, such as a
separate battery pack) to make the motor run.
• Brown or black is ground. It completes the
circuit by bringing it back to the micro:bit.
• Yellow or white is signal. It carries the
programming instructions from the micro:bit
to the servo.
A connector at the end lets you plug wires into
the servo cable. For the projects in this book, it’s
handy to use a connecting jumper wire of the style
known as alligator-clip-to-male-header-pin. On
one end, it has a pin that can plug into the servo
cable. On the other end, it has an alligator clip
that can clamp onto the edge connector rings on
the micro:bit. (To open the alligator clip, squeeze
on its “head” and the “jaws” will open up. Let go,
and they snap closed. The “teeth” will usually give
you a good grip on the part you are connecting to.)
It’s very important to connect the wires from
the servo to the correct pin on the micro:bit!
You should also get used to attaching them in
the correct order. This will avoid damage to the
servo or the micro:bit. If possible, use alligator
clip wires that more-or-less match the colors of
the servo cable wires. If not, attach little labels to
each wire with tape to keep them straight. Here is
how to attach them (Figure
B
):
• First: Brown or black (ground) connects to
the GND pin on the micro:bit.
• Second: Yellow or white (signal) gets
connected to one of the micro:bit’s three
programmable pins, labeled as 0, 1, and 2.
For the projects in my book, you’ll connect the
servo to Pin 0.
• Third: Orange or red (power) goes to the 3V
pin. The name stands for “3 volts,” which is
the amount of power the micro:bit can send
to another device.
TIME REQUIRED:
30–60 Minutes
DIFFICULTY:
Easy
COST:
$30–$40
MATERIALS
» micro:bit V2 microcontroller V1 will also work,
but won’t include sound.
» USB micro-B data cable that fits your
computer
» Micro servo, 9g (positional, not continuous)
with servo horns that snap onto the shaft, and a
cable with a plug that takes male jumper wires
» Jumper wires, alligator clip to male header
pin, in different colors (3) to match the servo
wires, preferably red, black or brown, and yellow
or orange
» Optional:
• Extra-long USB data cable (3 feet or more)
so your bot can move around while connected
to the computer for power and updating the
program
• Additional male-to-female jumper wires for
longer distance remote control
• Battery pack for the micro:bit
• The punch-out cardboard battery pack
holder that comes with some micro:bits is
handy for holding the board and batteries
together; print and cut out your own from
the micro:bit site (microbit.org/get-started/
user-guide/battery-pack-holder).
• You can also get a larger pack that holds two
AA batteries and has an on/off switch.
89
make.co
A
B
M81_088-91_SimpRobots2_F1.indd 89M81_088-91_SimpRobots2_F1.indd 89 4/12/22 12:23 PM4/12/22 12:23 PM
..................Content has been hidden....................
You can't read the all page of ebook, please click here login for view all page.
