
ALONG WITH THE JOY that technology brings to prosumers comes the price tag of confusion. Technology is complex by nature, and although you may know a great deal about each of the three major components of music videos—the music, the video, and the Internet—it is doubtful that you know everything. Even the geekiest of techies does not know everything (although many would like you to think so).
So, starting with the basics, you have to determine what kind of camcorder you will use and what kind of video you will create (HD or standard definition). Assuming you have a computer, you will need to know what editing software to use, and if you don’t have a computer, you are standing at the end of the line with thousands of people ahead of you. (However, it’s not too late to get a new computer—ever!)
From here, you can acquire whatever complement of tools you feel is necessary, as long as you have the budget for it. For example, you can make a music video with only a camcorder. But you can make a much more impressive video if you have a lighting kit.
Once you have a lighting kit, it makes sense to have extra batteries. While you’re at it, you might occasionally need your own power in the form of a generator. If you have all of that, you will discover the need for reflectors, light meters, extra bulbs, and the list goes on. So, although using just a camcorder will work, you really have to evaluate—in advance—how sophisticated you want to get. This applies not only to lighting, but also to virtually every aspect of the video-making process: tripods for your camcorder, steadicams, multiple lenses, filters, and so on.
Fortunately, as I discuss later, the cost of the post-production process, especially editing, has come way down due to the advent of sophisticated computer editing programs such as Final Cut Pro, Final Cut Express, Adobe Premiere, Avid Express, and many other brands. This is a relatively new phenomenon, because it wasn’t very long ago that these types of nonlinear editing systems were nonexistent. The power of nonlinear editing debuted in early products from Adobe and Avid, and some of the first visual effects were part of the Video Toaster software that ran on the Commodore Amiga computer. Amazing things have been produced with these systems, but by today’s standards, those products seem very primitive. The power of professional post-production studios has come down to the home—even to a laptop computer—courtesy of software from companies such as Apple.
First, say goodbye to the analog camcorder and the VHS tape. I’m sure you appreciate all that they’ve done for you, but there is no better definition of old school than a fifteen-pound camcorder that shoots low-resolution video that plays on a format no one has any more. Enough said.
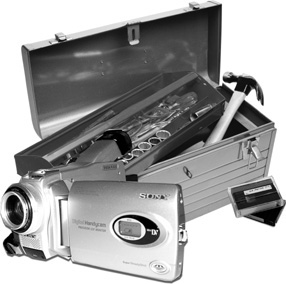
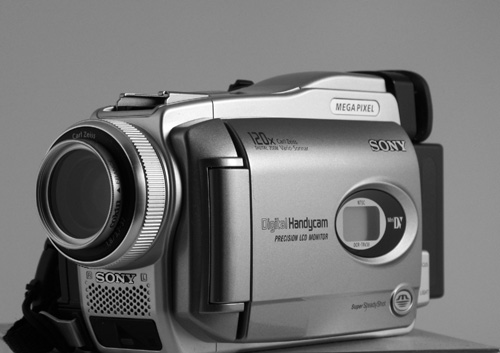
You need to work with a digital camcorder. This category has a lot of formats to choose from—and no one type fits all. At the end of the twentieth century—around 1998 or 1999—the MiniDV format took over. MiniDV cameras use, not surprisingly, MiniDV tape (see Figure 5.1). The tape is not used at all like analog tape was with VHS systems. The DV tape is recording data—essentially, ones and zeros—of the information from the digital camera. MiniDV can produce near-broadcast–quality video. MiniDV is also the most dominant format today, although there is the “threat” that another format may eventually take over.
A more recent format uses a tapeless means of recording data. This may be a hard drive, a CD, a DVD, a memory stick, or some other removable device. Of these, the hard drive seems to be the most popular and may wind up leading the pack. The upside to using MiniDV, however, is that you automatically have a backup tape or archive of your project, once you’ve transferred the video to your hard drive and put the DV tape in a safe place. Using a hard drive camcorder requires that you offload your shots onto your computer so that you can reuse the drive for more shooting. So, without going through the intentional process of backing up the footage you just offloaded to your computer, you don’t have a backup copy.
This may be one of the reasons that MiniDV is still widely used and that hard drive systems haven’t taken over. Beyond that, it is always a risky business to offer consumers a myriad of choices (Alvin Toffler coined the term “overchoice” for this phenomenon) and hope that the market will decide which format will win out. In any case, if you already have a digital camcorder in any of these mentioned formats, you should do fine (just remember to archive your footage if it’s not a MiniDV format). If you haven’t purchased a digital camcorder yet, make sure you think about the format you want before you get to the store.
Standard definition (SD) is the format we were all used to up to just a few years ago. When you look at a high definition (HD or HiDef) television (whether it be plasma, LCD, or any other type), you are looking at a screen aspect ratio of 16:9. It is more rectangular (widescreen) in appearance, as opposed to the square-looking standard definition aspect ratio of 4:3 (see Figure 5.2 for a comparison).
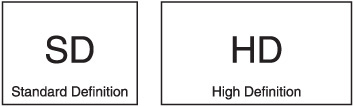
Figure 5.2. HD has not only higher resolution than SD, but also it has a widescreen (16:9) aspect ratio.
High definition also has a higher resolution—it looks crisp, clear, clean—with deeper, richer colors and more depth. This is terrific for viewing video on large screen television sets. But that is the crux of the following question: Where and how will your video be used? If it is ultimately going to be shown on a large screen, the HD could be the way to go. After all, most new cameras are HD, and the format is rapidly taking over in home television setups.
But if you are really targeting the Internet as your venue, HD might be overkill. The downside of HD is that its large file size requirements demand large storage devices, even with the compression that is necessary to further reduce the file size. Furthermore, even the standard definition digital files from your camcorder will have to be compressed in order to be small enough for Internet viewing.
All things considered, the SD format could be considered plenty enough resolution for web viewing. If you are planning other venues or showings on large screens, you might consider HD, which can serve that purpose as well as be compressed for use on the Internet.
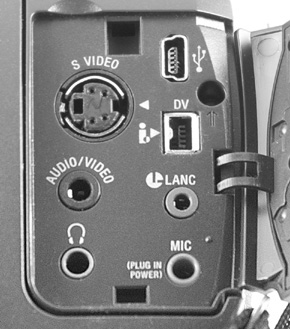
Whatever format you choose, here are some other necessities for your digital camcorder. The inputs and outputs labeled A through E can be seen in Figure 5.3.
Digital audio, digital video, and the Internet—all are centered on the computer. Without that particular part of the equation, there is no discussion about making music videos and posting them on the Internet—not in terms of present-day production processes, that is. So, the computer is not only necessary, it is really the “brains” of the production (besides your own brain, that is).
There is not enough room here to discuss the ongoing controversy of Macs versus PCs as to which computer platform is better. Even if there were room, the debate would never be conclusive. Both platforms have powerful processors and both have software available for music and video production, not to mention film and video production.
In the creative community, there does seem to be a propensity for the Mac platform, and if you are in the market for a computer, it deserves careful consideration. If, on the other hand, you already have a PC, there is no reason it can’t be the center of your production studio. The whole controversy is “solved” in Figure 5.4.

The basic rule is this: The more computing power you can get for your audio and video projects, the better. Developments in this area are taking place so fast that it’s hard to say what the “latest, greatest” hardware might be by the time you read this. At the time of this writing, however, most audio and video professionals and semi-professionals are using PCs with clock speeds in the 2.8 to 3.0 GHz range. This is also the day of the multi-core processor, with four or eight cores being commonplace in editing suites. Your project can be completed on a computer with less horsepower, but more powerful machines will contribute to overall productivity—the time it takes to process things, as well as the overall stability of your software. Get the best that you can afford and remember—something more powerful is always around the corner anyway, so there’s no need to wait.
Digital media, both audio and video, require a large amount of storage space. If you’re creating a new song for your project, you’ll need a lot of space for your audio files. You will be needing storage for your master video files. But that’s just the beginning. Each of these types of files will require multiple revisions, edits, versions, and so on. In addition, you will need compressed versions of these versions, and at that, you’ll likely be experimenting with different compression methods to get the best results possible.
These things used to be measured in terms of megabytes, but with the heavy requirements of audio and video, you need to think in terms of gigabytes. The computers themselves have speed measurements in gigahertz and require RAM in terms of gigabytes. So you need to make sure you have the horsepower and storage necessary to create and manage multimedia files.
Without compression, an hour of raw, uncompressed video may consume as much as 100GB of disk space. Just one hour of MiniDV footage will occupy about 13GB of hard disk space. Using compression will certainly require less, but remember that you need to have storage accommodations for all of the iterations previously mentioned.
Once you finish your production, much of it can be archived onto DVD, which can hold about 4.7GB of disc space. However, do not attempt to use DVD in place of a hard drive during the production process. The speed and access times of hard drives are necessary for full motion playback of video files.
Each computer environment is unique. Some things will differ depending on the location of the workstation. If you are set up in a commercial building or office, you may have more flexibility because of additional space. But even in a home studio environment, there are specific elements that are necessities and others that border on luxuries.
A dual-monitor system used to be a luxury, but today it is more commonplace because the prices for LCD monitors have come way down. Other necessities, such as a FireWire interface, will vary according to price yet they perform the same essential function. And cables, no matter how small your workstation is, are never too plentiful.
Dual-monitor systems are fast becoming the norm, not only in video production suites, but also in audio production setups. With the vast array of tools and process-specific screens involved in production, two monitors are almost a necessity. The word almost is key here, because although it would be ideal to have two monitors at your disposal, it’s very possible to create incredible work using only one monitor. As with other tools, budget will often dictate what you will have in your arsenal.
If you have a two-monitor setup, you may opt to have your main working environment on one monitor and other supporting windows on the other. Or you may choose to have all of your software windows on one and all of your files on the other. The flexibility of having two monitors creates a variety of possibilities that are up to your particular preference.
In audio and video production suites, you will rarely find monitors less than 20 inches in size. So if you’re going to get a monitor (or monitors) for the first time, opt for larger screens if your budget allows for it. You will never regret that choice. Figure 5.5 shows an Apple Cinema Display that measures 23 inches diagonally.

Aside from the standard requirements for cables that interconnect computers with keyboards, mice, monitors, printers, and speakers, there is the matter of the connections between your computer and audio peripherals, as well as the connections between your computer and video peripherals.
The most common type of connection for this purpose is known as FireWire. (FireWire is also known by another name, 1394.) A FireWire connection can be made directly between your computer and a digital video camera, assuming that both devices have a FireWire port (most of them do). A FireWire port can be added to your computer if it doesn’t already have one. The connection between your computer and audio devices is a bit more complex and requires a FireWire interface, not simply a cable. Figure 5.6 shows a PreSonus FireWire interface that can accommodate both audio and video connections.
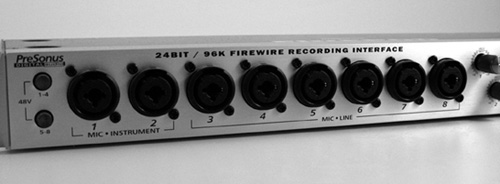
FireWire is the most common means of transferring data from your camera to the computer. FireWire interfaces usually have more than one port, so there should be no problem setting up your interface to handle all the tasks you need.
There’s an old saying: “You can never have enough ______.” You can fill in just about any word in the blank space, but in this case, you will fill in the blank with the word “cables.” No matter how many cables you have, you’re just one short of the exact cable you need. This is where redundancy—having duplicate cables—as well as excess—having more cables than you think you’ll need—come into play.
The following list includes some cables you’ll want to have around:
FireWire
USB
Audio I/O
This is just the tip of the iceberg. When you’re out on a shoot, make sure you have a collection of cables (possibly in a dedicated camera bag) that includes the following additions to the ones in the preceding list:
If you are planning to have a computer on location, make a list of all the computer cables you’ll need and, if possible, buy duplicates of each one.
Finally, you’ll need adapters in addition to the cables mentioned previously, such as:
XLR to ¼ inch (female to male, male to female)
RCA to ¼ inch (female to male, male to female)
Mini-plug to ¼ inch (female to male, male to female)
The list goes on, but you get the idea. Your guideline for this process is another old saying: “Hope for the best, but prepare for the worst.” You don’t want a little cable or adaptor to hold up your production, especially when other people are on the set, waiting for you.
In the olden days—which I calculate as eight or nine years ago—the tools available for audio and video production were primarily in the form of hardware. Recording studios, whether on a commercial street or in an empty bedroom—housed wall-to-wall black boxes of audio, MIDI, and outboard effects gear. Consoles were as big as refrigerators, although they were incapable of keeping one’s beer cold. Computers may or may not have been present, but they certainly weren’t used the way they are today.
Just as the Mac and PC present two points of view on what hardware to use, many competing companies present the same battle when it comes to which software to use. The software can mean your main sequencer (for your DAW), or it can mean samples—your sound libraries. The bottom line is that there are tons of great software packages to choose from.
On the Mac side, the two main contenders are Apple’s Logic Pro 9 and MOTU’s Digital Performer 7. I say “main contenders” because they are the most widely used, but are by no means the only choices you have for Mac DAW software. The cool thing about both of these packages is that they interface very easily with Apple’s Final Cut software.
The line-up of DAW software is extensive and is presented in the following table in no particular order (so that I can’t be accused of having favorites—even though I do).
Software Title | Manufacturer | Platform |
|---|---|---|
Logic Pro/Logic Studio | Apple | Mac |
Digital Performer | MOTU (Mark of the Unicorn) | Mac |
Sonar 8 | Cakewalk | Windows |
Cubase 4 | Steinberg | Mac/Windows |
Live 7 | Ableton | Mac/Windows |
Acid Pro 7 | Sony | Windows |
Producer 8 | FL Studio | Windows |
Tracktion 3 | Mackie | Windows |
Nuendo | Steinberg | Mac/Windows |
There are two main categories of plug-ins: software or virtual instruments, and audio processing plug-ins. The list of these plug-ins is so huge that they can fill up an entire catalog (and, it so happens, they do fill up entire catalogs). If you’ve ever seen the catalog from Sweetwater Sound, you know what I mean.
When you evaluate plug-ins, you have to consider platform compatibility (does it work with your computer and its CPU chip?) and software compatibility (does it work with your host sequencer or DAW?). The list of software instruments includes everything from orchestral instruments to hip-hop loops to ethnic vocals. Audio processing can include limiters, compressors, reverbs, and mastering and noise-reducing software.
Your task is to figure out which ones you need and to make sure they work with your particular system. Because of the tremendous amount, diversity, and technical issues associated with plug-ins, I will not go into any more detail here. Utilize the web and your network of musician friends to determine the must-haves if you don’t already have the already-haves in your arsenal. And of course, you can always use Google to search for the types of plug-ins you want and narrow the search to your particular platform (computer).
There are many software packages for video production and editing, but as in the rest of this book, I’m focusing on what might be more suitable for a typical music video production.
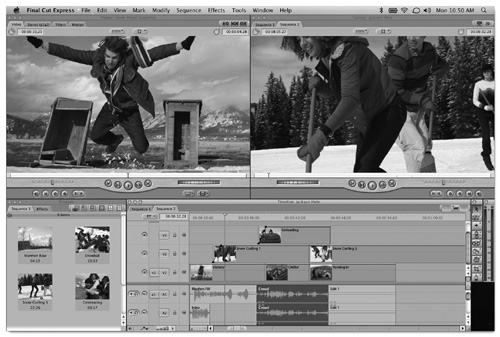
The main packages in use today are Final Cut (Pro and Express versions), Adobe Premiere, and Avid Express. Avid has an extensive product line-up, and most of it is likely too expensive for what you’re trying to achieve. Adobe Premiere has been around for a long time but is not as widely used as both versions of Apple’s Final Cut software. Apple also makes iMovie, but it is likely not a good choice for your purposes. Many recent “improvements” in iMovie have also eliminated certain necessities. For example, in the most recent (as of this writing) version, 8.0, the capability of manually adjusting audio levels is not there. I can’t understand the reasoning behind this, but having this capability is an absolute necessity when you are balancing music, voice, and effects tracks. iMovie is more powerful than one might imagine, and I’m sure somebody, somewhere, has created a decent music video using it. But I would recommend nothing less than Final Cut Express (shown in Figure 5.7) for any serious video work—and if you can afford it, Final Cut Pro.
For a comprehensive look at the latest video software, you might try Googling “video editing software.” You will not only get links to specific software solutions, but also reviews and comparisons of multiple video-editing products as well.
Video editing is known as a nonlinear process, because with random access disk drives, you can locate and edit at any point in the program and not disturb the rest of the sequence. In the “old days,” before nonlinear software, tape machines (linear) were used along with a variety of devices—switchers, TBCs (time-based correctors), mixers, and others—in order to achieve what you can do today with a laptop computer.
Most video-editing software programs have a basic architecture that includes a preview window, a program window, a bin for audio and video files, and a timeline. The timeline is where you place—or sequence—your clips in the order that you want. You can usually trim or fine-edit these clips right on the timeline. You may also be able to add effects, such as transitions, fades, or wipes—from one scene to another.
The timeline provides at least one stereo audio track, but usually you’ll have the capability to accommodate several tracks of audio and even multiple tracks of video. Additional video tracks are used for video effects such as superimposing titles, video overlays, and so on. Multiple audio tracks will accommodate your stereo music track along with any other sound effects you may want to lay in.
You get into the nitty-gritty details of using audio and video software as it relates to making music videos in Chapter 9, “Post-Production”.