
IF, BY NOW, YOU HAVE SELECTED the song you are going to use for your music video and you have it “in the can” (that’s Hollywood talk for “it is complete and ready to go”), then the next thing you’re going to be tempted to do is start shooting. Don’t do that—not yet, anyway.
As I mention in Chapter 7, “Shooting Options,” a major consideration before you do anything is determining what type of music video you’re going to produce. It may be a recording of the song during a live concert or performance. It may be a story-driven song that is expressed with lots of visuals, real or abstract. Your choice will affect what type of preparation is needed. A live recording may require less formal preparation (although it still requires some planning and preparation nonetheless). I encourage you to read the following sections on preparation regardless of the type of video you are planning to create. A lot of this information is applicable to music videos that are primarily a live shoot of a performance or event.
There is a natural excitement inherent in the desire to shoot a music video. Ideas are spinning in your head. You can visualize some of the scenes so vividly that it almost feels like they’ve been shot already. You can even imagine sitting down with a group of friends and showing it to them after it’s been posted on the web. How far away can stardom be, at this point of the game?
Well, stardom could be extremely far away if you don’t take advantage of Step 1—Preparation.
Here’s a homework assignment. Go rent or buy Close Encounters of the Third Kind by director Steven Spielberg. Do this whether or not you’ve already seen the film. Watch it from beginning to end and ask yourself these questions:
Is every shot precisely framed as if it were a composition of a professional photograph or painting?
How did Spielberg orchestrate those incredible camera moves? How can a camera even move that way?
Are the lead characters, from the suburban couple to the little boy who gets abducted to the Neary children, expertly cast? Are they totally, inescapably perfectly cast?
Is the music scored well throughout? Is it just a coincidence that the music, which is key to communicating with the aliens, is woven throughout the score in a variety of interesting variations—some subtle and some pronounced?
If you are getting the drift here, then you know that none of this could have happened without extensive preparation and pre-planning. These elements do not happen by accident. This is not to say that you won’t sometimes end up with footage that was not planned but is nevertheless excellent. Those types of accidents do happen.
Although you are not making a full-length motion picture, many of the principles are the same. That’s why, in addition to watching lots of music videos, you can get a very good education by watching films and reading books and magazines on filmmaking. However, when you watch movies for your own educational purposes, the trick is to not get hooked into the story (that is, movie) thereby losing track of your analytical thinking process.
One difference between a full-length motion picture and a music video has to do with the script. The lyrics of the song already provide a great deal of the script. Lyrics are a basic roadmap for what scenes will be acted out in the video, at least from a conceptual standpoint. Lyrics are, however, not the whole enchilada. You may know conceptually what you want to show, but that doesn’t provide you with any of the detail—hence, the need for scripts, storyboards, director’s notes, and so on.
A variety of software programs are on the market that help you lay out a script. Some of them are overkill for the purpose of a music video, and some may prove useful. Some examples of screenwriting software include Final Draft, Movie Magic, Five Sprockets, Hollywood Screenwriter, and more. A simpler version of screenwriting software can be found in Movie Outline 3, but even at that, this program probably has a ton of features that you would never use in a music video script.
At the very least, you can create a simple script based on the old style audio/visual or slideshow presentations, which might look something like Figure 8.1.
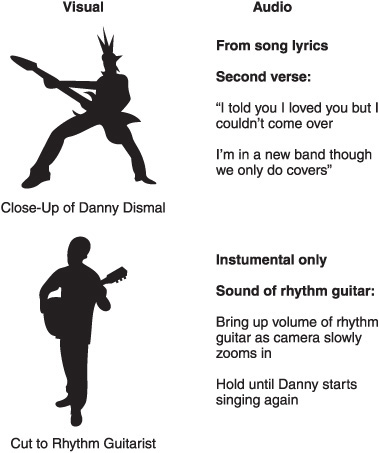
In the case of a music video, the narration is replaced by the song’s lyrics. If four lines of the lyrics were to be conveyed by one distinct scene and the next few lyrics were conveyed by another scene, each would get its own “box” and accompanying description. It’s sort of a very simplified combination of script and storyboard.
This covers the basics, but more is needed to describe scenes that are not inherent in the lyrics. For example, if the written lyric were “Our love is strong, it survives the storms,” the visual might be the vocalist singing that line in a live or taped performance. Or it might be a completely different visual of the singer holding on for dear life to the sail of a boat in the midst of a strong storm (that is, if budget allowed). The visual might be represented in a number of different ways—and it is the function of the script to say (as precisely as possible) how the visual is to be executed in the final video.
In a typical movie script, one page might be the equivalent of one minute of actual motion picture time. This varies widely and is only a general average. But a typical movie script has a completely different format consisting of the scene description, the character(s), the dialogue, the action taking place, and so on. Here is a typical format for a movie script.
FADE IN:THE SIXTH STRING OF AN ELECTRIC GUITARis plucked with force. It is apparently out of tune. Fingers twist the tuning peg. The string is plucked again, twice. DANNY (O.S.) How does that sound to you? RANDY (O.S.) Are you nuts? Can’t you hear how out-of-tune that is?TWO MENsit on a low wall outside a Hollywood club, bundled in sweaters against a cool L.A. wind, holding guitars, tuning up as best they can.SUPERIMPOSE: APRIL, 2009.
RANDY BURROWS is the big one, an athlete in a previous life, a bit of a tire around the middle. DANNY SULLIVAN is slimmer, more sophisticated, and brighter. DANNY The reason it sounds out-of-tune, Randy, is because it is! RANDY Heck no. It is not. I’ve been playing a lot longer than you, pal!Danny plays a lead guitar line. He’s not bad. But Randy shakes his head. DANNY You must be deaf.While Danny plays, Randy reaches over and gives Danny’s tuning peg a twist to the right. The string breaks and Randy smiles. DANNY Oh no you didn’t! You didn’t just break my string! RANDY Danny, I’d be doing everyone a favor by breaking all of your strings! Randy starts twisting all the tuning pegs on Danny’s guitar. They both start laughing.As the sun sets over North Hollywood, California, a neon sign lights up behind Randy and Danny — “The Palomino Club”HARD CUT TO:TELEVISION SCREEN SHOWING A ROCK CONCERTThe footage is shaky, handheld shots in black and white, with lots of horizontal lines evident. A band’s name is almost visible on the bass drum, but too blurry to read.
Script formats may be typical but they are not standardized—there will always be a few minor variations. Still, the main elements are as follows:
Stage direction
Character name
Dialogue
Parenthetical (direction to the actor just before dialogue)
Action
Other instructions, such as CUT TO, or STILL PHOTO, or BANG (sound effects)
It can be argued that a traditional move script format is overkill for a music video and that the simple slideshow format is better suited. That may be, but if you are writing for an opening segment or any other section that has a story-like feel to it, the typical film script format may be well suited to it.
If you use the traditional script format, the song lyrics can be substituted for the dialogue. If the clip you’re showing at any given time is an existing shot of the act, you can simply indicate that, as shown in this example:
15 Band clip (sync)
This is an example where nothing specific about the shot is indicated, except that it should be in sync with whatever lyric is being sung at that particular point.
The next example shows how a script might read if you have a specific shot in mind or if you use an existing shot you’ve already identified.
16 EXT GIBSON AMPHITHEATER
Hear Today, Gone Tomorrow
Wide shot of the band, featuring lead singer
Sync
In this example, the script is showing Scene 16. It is a wide shot taken at the Universal Amphitheater of the band, Hear Today, Gone Tomorrow, featuring the lead singer.
Again, the lead singer is singing the lyric and the video clip is showing this in sync. Why must this be stated? The reason is simple. You could just as easily have a shot in which the camera pans up on the lead singer who is not singing at all. As you know from studying music videos, some clips—usually short clips—are inserted without the vocalist singing, until perhaps the following shot in which she is.
A script that describes video that hasn’t been shot yet requires more detail. Here is one example of that scenario:
17 EXT GIBSON AMPHITHEATER
Hear Today, Gone Tomorrow
We see the band walking to the amphitheater, just before sunset
CAMERA: Pans left to right from band member 1 to lead singer, holds, and then finishes pan to band member 5
LYRICS:
I see the sun setting before my eyes
My tears are merging with the sky
This is just one example. Your script can always be customized to your needs as long as it is understandable to you later and to others on your team.
The script is your roadmap for your music video production. The song lyrics give you a big head start in knowing what you might do to create the video. But without preparation, from the simplest pondering of ideas to writing out detailed notes, a script cannot emerge.
The script will be with you from the time it is conceived and written to the final video master. It goes beyond the shoot and lasts into post-production. If you’ve ever seen a real script created for almost any purpose, I’m sure you’ve noticed many notes written in the margins as well as text crossed out and rewritten by hand, not to mention arrows, circles, and the occasional doodle.
The script also goes beyond your own needs and serves as a guideline for everyone else in the production—from the camera operator to the editor to the actors to the recording engineers (assuming that you’re not doing all of these jobs yourself).
A storyboard is like a visual script. Many creative people are inclined to be more visual than others. Whether they are or not, the storyboard provides the crew with the type of instruction that words can only begin to tell. If the storyboard is a good one, there will be little difference in the way it originally looks and the way the final scenes look, especially in terms of framing and composition. Sometimes on the actual set, ideas emerge that vary from the storyboard, which is fine. But generally speaking, the storyboard can be a great asset for everyone on the team. Figure 8.2 shows an example of a storyboard.
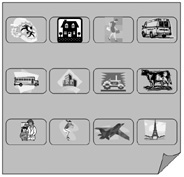
The storyboard is a natural evolution from the script. Among other things, a storyboard tells who or what is in the scene. It also indicates the camera moves and can indicate how to frame a particular scene.
Although it seems a natural fit that storyboards are used in an animation sequence, they are just as useful and necessary for live action. Storyboards can be very simple, such as stick figures, or very elaborate—sometimes looking like a finished comic book. It’s wise to base your expectations for your storyboard on what you—or someone in your crew—are capable of producing.
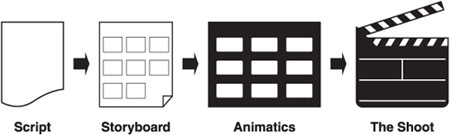
Animatics are sort of like storyboards on steroids. Animatics are storyboards that have been put to animation. The animation is usually rudimentary. In its simplest form, it might consist of a series of hand-drawn visuals that are sequenced in order of each scene. Although the drawings might be very basic, they still represent the essential part of the scene, including the desired camera angle. This presentation can be authored in any number of applications, from a simple PowerPoint presentation to one constructed in Final Cut Pro. The final output is usually in the form of a QuickTime movie, which is playable on both the PC and Mac platforms.
In addition to providing a better sense of timing than would be possible on a storyboard, an animatic can provide another distinct advantage—an audio track. Animatics audio tracks can accommodate a music temp track, which could be helpful for someone scoring a film or commercial. In the case of your music video, it will likely be the song itself. In other types of productions, there is also the possibility of including a narration track, sound effects, and so on.
A more sophisticated animatic might provide actual frames from an animation, assuming the music video contained animated sequences. It might include still shots as opposed to hand drawings. The bottom line is that an animatic can provide more of a sense of the desired outcome of an audio/visual piece. This might not be necessary in the case of your music video, depending primarily on how much you need to communicate your vision to other cast or crew members. That’s another decision to add to your seemingly endless list of decisions. Regardless, if you can use any (or all) of the tools that are available for story development, your final product may be that much better, not to mention that it could speed up your entire production process (see Figure 8.3).
If you eliminate everything that’s been discussed from the beginning of this chapter until now, you would essentially have an ad hoc approach to your production. That means no preparation, no script, and no storyboard.
You can probably guess what this author is thinking about this approach. (Hint: Not a good idea.) Even if you took the most basic of basic concepts for a music video—the live shoot— and decided not to add anything else to it, you would likely come up short in the editing room. Did you get a combination of long, medium, and close-up shots? Did you get additional footage to which you can cut away? What about the same scene from different angles? How about the sound—is it ready for high-quality playback?
As you may have already surmised, I’m one who understands rules can be broken. As such, maybe it is possible to create a music video this way and not have your audience fall asleep. After all, it is possible.
But what you may want to keep in mind is this: Today’s music video audiences are fairly sophisticated. Remember, they were brought up during or after the MTV revolution. They all might qualify for ADD prescriptions. They’ve seen some very elaborate productions and special effects that are made with industrial light and some magic thrown in.
So, if you want to make a music video ad hoc style, go right ahead. But don’t say I didn’t warn you!

If you were to watch a professional camera crew at work, you might mistakenly come to the conclusion that shooting video is easy—that there’s “nothing to it.” This happens in other professions as well. When you watch gymnasts performing in a competition or dancers dancing in a show, the quality of their performances can easily create the illusion that there’s nothing to it. That’s largely because they are so talented. There may be years or even decades of experience behind what they’re doing. As professionals approach mastery of their crafts, they appear to perform effortlessly.
The same can be said for shooting a music video. The process involves a lot more than “point-and-shoot.” How far you want to take the craft and technicalities of video making or filmmaking is up to you (assuming that you are shooting the video yourself). In this chapter, I assume that you (or your videographer) have some experience with a camera. And, as in other chapters, I will keep the focus on shooting video as it relates to the making of a music video.
Providing an in-depth explanation of shooting quality videos is beyond the scope of this book. That said, there are hundreds of good books on the market that can help you with every aspect of video production. As a matter of fact, Course PTR has a selection of books that deals extensively with digital video and filmmaking (for more resources, see Appendix A). You can also find resources on the Internet—some of them free—that can help with some of the basics on video production.
The following sections focus on issues that will be of importance to you in making a music video. If you need help with camera techniques, lighting, and other core production issues, use whatever resources you can to get up to speed before you embark on producing your music video.
This history lesson will be briefer than you might expect. Rather than discuss all of the issues related to synchronization, I’m going to focus on how it relates to you, today, in the context of a music video.
In a galaxy a long, long time ago (although it was not far, far away), filmmakers needed to sync their audio to whatever sound was being recorded. In most productions, the film recorded the picture (only) while the audio was recorded separately, usually to a tape machine such as a Nagra recorder. To ensure that the scenes began exactly at the same moment, a clapper was filmed. You’ve likely seen this before, and you can see it now in Figure 8.4. The clapper is also known as a “clapper board” and sometimes is referred to as a “slate,” which actually is the bottom part of the clapper that documents the scene, the date, the time, and so on.
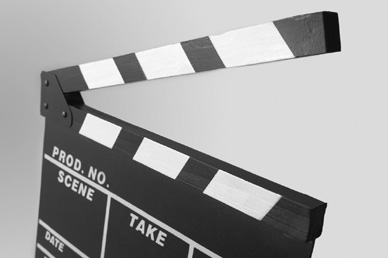
Figure 8.4. This handy little device (a clapper) ensures that sound and picture begin exactly at the same time.
There is simplicity here that pays off in big rewards later. When editing the film, the exact moment that the arm of the clapper hits the body of the clapper (the slate), a sound (of a clap, oddly enough) is heard that later tells the editor how to line up the audio with the video. A bulky old machine, first invented in the 1920s, known as a Moviola, had a motor driving a reel with the film and another driving a mag strip with the audio. The clapper was an essential tool that made certain where the sync point was when lining up the film and the audio. Directors used the clapper as a reference point. Because the film and the audio could be adjusted separately, it was possible to move one (or both) reels around on their respective motors until all of it lined up—again, using the clapper or slate as the reference or sync point. Later, as technologies developed, the clapper was replaced by electronic signals, such as a light burst on the film coupled with a tone on the audio track. Same idea, just a bit more sophisticated.
Now, how does this relate to you in these modern, sophisticated times, when audio and video are recorded together? I’m glad you asked, because you’re going to see how this “old” technology can benefit you today.
This question is posed on several different levels. Do you need to sync the video with the recording of the song when you shoot? Do you need to sync different camera footage of the same song with other footage of the song? Do you need to sync lips, musicians playing instruments, and even “wild” footage with the audio track?
The answer is all of the above. When you shoot your video, you need to have a master recording of the song on hand. When you shoot, play back the track and have the artist lip sync and, likewise, have the musicians copy all of their own moves. You would be wise to shoot one continuous take of the song from beginning to end for a reference track. That way, you’ll always know who’s doing what at any particular point in the song. It will also serve as “back-up” footage in the event that a particular part of the song that is shot doesn’t work out later. If you’re doing a multi-camera shoot, that’s even better—but still shoot a take from beginning to end to use as a reference track.
The idea of using a syncing device, such as a clapper, is simply good practice. When you are in post-production and are using lots of different pieces of video, it makes sense to know exactly where they sync up to the audio track—an audio track that is different than the audio track you recorded during the shoot. Remember, unless you are doing a live shoot in which you are recording directly into the camcorder’s audio inputs and that audio is going to serve as the master audio in the final music video, you will be using the studio recording as the master audio. However, as I discuss in other areas of this book, even a live recording is likely to have audio recorded on a separate recording device, hence the practical need for a clapper once again.
If you’ve ever heard the expression “recording wild,” it does not refer to the personalities of the crew (although in some instances it may—but that’s just a coincidence). Recording wild means recording with no clapper for the shot. Shooting wild may be done for several reasons, chief among them is to record audio snippets that can be used later, such as the ambience of a room in a particular scene. Another reason is similar, but with video being the key factor. If you’re shooting B-roll (footage to which you cut away), there is likely no clapper involved, as synchronization is not a necessity. Here you are essentially shooting wild as well, but for purposes of acquiring additional video footage.
As mentioned in Chapter 7, the most straightforward way of recording a live event is to turn on the camcorder at the beginning of a song, keep it running throughout the song until it ends, and use the audio inputs of the camcorder to record the final audio. However, there are two problems with this method. One problem is that a one-take music video tends to be boring; the other problem is that this method doesn’t provide you with the best audio quality possible.
First, I’ll explain why this method can make for a boring music video; then I’ll go into a more detailed explanation about how this approach affects audio quality.
Even if the camera is on a tripod (and it should be), a three-minute, one-shot recording of a song from beginning to end with one camera will resemble a home video more than it will a music video. The audience, just like you, is accustomed to seeing cuts—close-ups, medium shots, and establishing shots. They expect to see shots of the guitarist cutting to the lead singer cutting to the audience cutting to the drummer. They are used to seeing quick cuts, and a one-shot recording might just put them into a coma. Remember, you are already beyond the expectations of the MTV generation.
The audio quality of a camcorder is not all that bad. It records digital PCM (pulse code modulation) data and thus is a digital recorder. But the camcorder’s electronics are devoted to both audio and video, so don’t expect to get the same results that you would in a studio recording or with audio gear that has much better A/D and D/A converters, which convert signals from analog to digital and back again. Professional-grade camcorders also use high-quality connectors and cables, something that consumer-grade camcorders do not have. Additionally, many camcorders use just a single IC (integrated circuit) chip to handle the audio chores.
Consumer camcorders also use AGC, which stands for automatic gain control. This feature will average out the overall level so that it doesn’t exceed the maximum level before distortion might set in. It is essentially a compressor/limiter that controls your audio levels. This might be beneficial in some instances, but in other cases—such as those in which the main audio (like a speaker) pauses—the background audio (usually noise or ambience) suddenly jumps up in level. Better control and professional results come with using the manual audio controls, coupled with using headphones to check the audio as you are taping.
Some of these differences are minute, and some are more extreme. But remember, you are making a music video; hence, the audio quality is of utmost importance. And that is why you should avoid using the camcorder’s internal microphone for recording a live music video. You would not be getting a direct signal this way and could also pick up noise generated by the camcorder’s internal motors.
The method you use for recording the audio is ultimately up to you, but here are some choices for recording the live audio (these are illustrated in Figure 8.5):
Recording from the house mixer’s stereo outputs directly into the camcorder’s audio inputs (number 1 on the figure).
Recording the audio to a separate digital recorder, such as an iPod or iPhone or a DAT machine, while using a clapper or slate (number 2 on the figure).
Recording audio to a separate digital recorder using SMPTE timecode (number 3 on the figure).
Recording audio to a separate digital multitrack recorder along with SMPTE time-code. There are apps available for the iPod or iPhone that turn it into a 24-bit, 4-track recorder (number 4 on the figure).
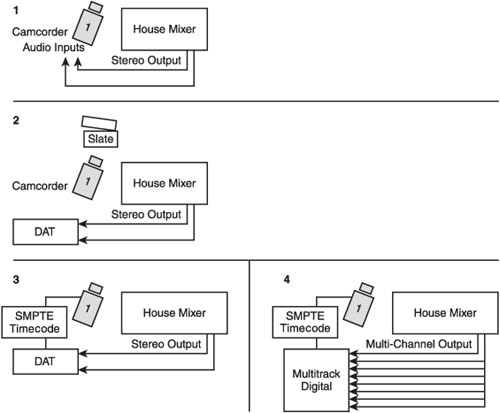
Option 1, recording from the house mixer directly into the camcorder’s audio inputs, is first discussed in Chapter 7. This option means you avoid any synchronization issues (because the audio and video are recorded together and are automatically in sync). It has the disadvantages discussed earlier in this chapter in the section “Audio Quality.”
Option 2, recording to a separate digital recorder, can offer better audio quality. This is where a clapper or slate becomes very important, so that you have an exact reference point for syncing up the audio and video tracks later. As in the other options, you ideally want to connect to the stereo output of the house mixer.
Option 3 is available in higher-end equipment in which the same timecode is recorded on both the camcorder and the separate audio recorder. Additional synchronization devices (or add-in hardware cards) are usually necessary to act as an interface between the two machines, with one machine being the “master” and the other machine being a “slave” (someone has to be in charge). Again, the stereo audio track could come directly from the house mixer.
Option 4 combines the best of all worlds. Here, you record audio separately along with SMPTE timecode. The difference in this option lies in recording the audio to a multitrack recorder instead of a stereo recorder. In this case, you have to think in terms of sub-mixes or “stems.” For example, say you have an 8-track multitrack recorder (and no, not the 8-track tape of the seventies!). You have the capability to mix to eight major groupings. An example might look like the one in the following table.
Track Number | Description |
|---|---|
1 | Drums Left |
2 | Drums Right |
3 | Bass |
4 | Lead Guitar |
5 | Rhythm Guitar |
6 | Piano |
7 | Vocals |
8 | Synthesizer (or timecode if it requires its own track) |
These particular channels can be fed from the house mixer output to your setup. The advantage of mixing to separate tracks is that it still gives you the opportunity to make adjustments to these tracks later. The adjustment can certainly imply relative levels, but also can mean equalization, compression, flanging, and other specific effects. The track listing shown in the table is just an example—you can create sub-mixes in any configuration you like. Remember, though, that if you mix to a 2-track master, you no longer have control over these individual elements.
When you watch a concert performance by a major artist, whether you’re watching it live or on a DVD presentation, try to take a closer look at the audio setup. It’s usually in the middle of the arena, halfway back or more. You will naturally see the huge mixing board. But you also may notice one or more multitrack recorders. This is because almost every major artist will record to multitrack for the opportunity to do post-production on the audio portion of the program as well as the video.
This type of recording needn’t be reserved for major artists, however. One inexpensive way to go is to buy a used Tascam D-88 or ADAT or similar digital multitrack (there are also inexpensive hard disk-based systems). These machines used to command a lot of money, but with the evolution of the DAW, the usage of these particular machines has declined greatly, and so has the price.
If you were to have a situation in which a separate company is in charge of audio for the event but you want some independent control of the tracks, you could opt to inject a mixer into your setup. This mixer could also be fed from the house mixer and placed before your digital multitrack, but you could elect to be “fed” different sub-mixes, as you would also have control over the individual levels.
As the name implies, a multi-camera shoot uses more than one camera. It may mean using two, three, four, or more cameras—but regardless of the number, the idea is to have multiple angles recorded—in sync—so that multiple shots are created simultaneously (see Figure 8.6). You could have one or more cameras shooting wild, but if you want to save money on aspirin or other pain relievers, shooting as much as possible in sync is the way to go.

Figure 8.6. An example of how multiple cameras might be positioned in a live shoot of a performance.
The multi-camera shoot originated a long time ago with situation comedies that were taped this way. As a matter of fact, if you wanted to, you could add a few pieces of gear and shoot your event as if it were a television show, saving a lot of time in your post-production editing.
If the multiple cameras are fed to a switcher—a sort of “mixer” for video sources (as opposed to just audio sources), the output of the switcher can reflect the various takes that you (as the director) are calling for. You may have seen this portrayed in a movie or on television. The director is in the control room shouting out commands such as those shown in the following table.
Each camera is previewed on its own monitor while a “program monitor” reflects the current image that is being taken—meaning, the image that is going to tape or broadcast antenna or satellite (see Figure 8.7). That’s the interesting thing about this kind of setup—it can be a situation that is a live broadcast, or it can be a scenario in which the entire feed is simply recorded for a later purpose. This situation also allows for additional editing if necessary.
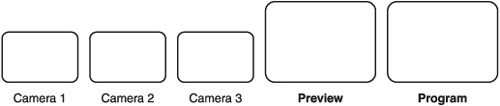
Figure 8.7. A typical setup for a live shoot includes monitors for each camera, a preview monitor (the camera that’s cued up), and a program monitor.
Meaning | |
|---|---|
“Ready one—take one” | Technical director (TD) presses a button or slider, choosing camera one on the switcher. |
“Ready two” | Cameraman two has a good shot framed and holds it there. |
“Take two” | The TD brings up camera two on the switcher. |
“Okay, three pan left and frame the vocalist in a CU” | Cameraman three pans left and lines up a shot in which the vocalist is front and center in a close-up. |
“Ready three” | Cameraman three holds his shot, and the TD gets ready to bring it up. |
“One—give me a wide shot of the stage—Take three” | The TD presses the button or slider to bring up camera three while cameraman one zooms out to get a wide shot of the stage. |
In the case of a music video, you would probably not treat it as a live broadcast as you would be locked into whatever decisions you made during the event. You could, however, use a combination of ideas in which you treat it as a live event but also ensure that each of the individual camera shots is taped. This is a great advantage of today’s camcorders. You can feed an external source (such as a switcher) but also record everything on a teeny-tiny tape or disc or hard drive. When you think of the huge, bulky television cameras of yester-year, you can see that we’ve come a long way.
Another thing to keep in mind is that if you do decide to integrate other footage later in post-production, you can still do that—even if you started out thinking that a simple live shoot of a concert or band performance is all you need. With multiple cameras and a line cut (that’s the scenario I’ve described using a switcher), you’ve saved some time in the editing room. With each camera recording its own footage, you have other creative choices that you can make later. All of this can ultimately be intercut with any ideas you have later— ideas that were not necessarily filmed at the live event.
Shooting your music video with no intention of creating a live event is almost the other extreme, at least in terms of time. In a live taping, you are making instantaneous decisions and relying on the talent—both of the performer and the crew—to be experienced enough to get things right the first time. If you’re taping solely for a post-production scenario, people very often don’t get it right the first, second, third, or fourth time (or more). That’s why a director in this situation is often heard to say, “Okay, just one more,” meaning one more take.
On the other hand, you will have many more shots to choose from, and you’ll have the ability to “sculpt” the final product to your liking in post-production. In a live shoot, you might have to settle for whatever you get. In a taping, you don’t have to settle until you’re convinced you’ve captured the best possible shot that can be made.
The reference to a director saying “Okay, just one more” can be the basis of skepticism about the film business and a suspicion of possible self-indulgence on the part of filmmakers (when there are dozens and dozens of takes), but the truth is that there’s a lot to be gained by getting “just the right take.” It can be costly and sometimes impossible to reshoot a particular scene later, for you’d have to create precisely the same conditions that you originally had. This would apply to getting the right angle on a shot of the band, but could apply even more to a scene that involves actors or band members playing a role in a particular scene. As a director, you must have an awareness that is both extremely focused yet broad enough to take all things into consideration.
For example, if you have a creative shot in which lighting plays a key role and you have a great dolly-in shot planned, you could very well find out later that the actor underperformed when saying his or her lines. Your focus might have been on the creative aspects of the scene but at the expense of having convincing dialogue. That’s why it’s a matter of having intense focus and broad awareness at the same time.
Multiple takes are common in filmmaking, and if necessary, you should not hesitate to use them in your music video production. You don’t want to wear out your talent, but at the same time, you want to ensure you’ve captured exactly what you need. And the opposite is sometimes true—that you capture precisely what you want on the first take and that it even exceeds your expectations. You could very well find that subsequent takes don’t even come close to the spontaneity or spark that the first take had. It’s your job to know which is which.
Another reason for doing multiple takes may have nothing to do with whether the shot was good or bad, but incorporates the idea of a multi-camera shoot. Unless you’re planning to employ a pyrotechnics team to create special effects, such as blowing up a building, you’re unlikely to need a multi-camera setup. With a single camera shoot, you can shoot the same scene, multiple times, from different angles. If you create a storyboard, then you already know what these different shots are going to look like. If you don’t have a storyboard, you can still use your creativity while on location to capture different camera angles for a particular scene. Nevertheless, the principles just stated for doing multiple takes for one camera angle—but ensuring you get a usable take—still apply. Thus, you need to think in terms of getting a good take for each of multiple angles.
A third example of employing multiple takes is capturing footage for the same scene but with a different bent. For example, say your music video calls for a scene in which the female lead singer lip syncs the words “I love you” as she looks straight into the eyes of the actor playing her love interest. That’s fine, but what if you discover in post-production that the scene would be more effective if she were looking straight into the camera? Right now, you’re not totally certain which shot will work best as you can argue advantages and disadvantages to both ideas. The smart director will shoot both versions (using multiple takes of each, if necessary) and thank himself when it comes time for post-production and both options are still available. The trick (even for a smart director) is knowing ahead of time that different versions of the same scene will be valuable later and being ready to shoot them when the time comes.
And finally, a fourth reason for multiple takes is capturing footage for a section of the song—for example, a verse, chorus, or bridge—that will be used a second or third time later in the song. You might argue that these are not multiple takes, but rather different scenes altogether. I believe both viewpoints are correct, but the advantage in looking at them as different takes will be a benefit in the pre-production stage—namely, planning how the same chorus could be shot in different ways (subtlety or not) to keep the interest going.
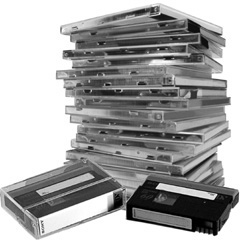
The moral to this story is you need to have lots of tape (or hard disk space, or whatever storage device your camcorder uses) to create your project. A good rule of thumb is that you’ll probably need more storage than you think you’ll ever use, so get it and bring it with you. Figure 8.8 shows both CD and tape storage media, but this photo could easily have hard disks and flash drives added to the pile.
Shooting scenes multiple times obviously has its advantages, but shooting scenes in multiple locations for the same section of a song provides additional benefits. I call it out separately here because it’s a very simple concept for a music video, and you’ve likely seen it used many times. For example, in verse one, the band might be filmed singing in the studio, but in verse two, the shot is framed exactly the same way but is taped in an outside location with a beautiful panoramic landscape in the background. Verse three might also be shot in a different location or in the same location as verse one.
This technique can be used in either a literal or abstract way. If the lyrics in verse two were somehow related to the outdoors or countryside, the location would be a literal representation of that idea. If there were no relationship at all, the use of a different location would still work. This type of artistic license was popularized a long time ago with the earliest of the MTV generation of music videos. No explanation of the scene change is necessary. The use of the scene change simply is—for the lack of a better word—cool.
Camera moves and camera angles add another method of creating diverse scenes. Some of these moves can be subtle and some much more dramatic. Having an understanding of what you can accomplish with camera moves and camera angles can help you spice up your video, and in most cases, you will not need a larger budget to create them.
The most basic method of shooting anything is the handheld shot—simply pick up the camera and let it roll. This may not be the best way to get a smooth, steady shot—but in fact, an unsteady, somewhat bumpy shot may be the effect you’re looking for. Capturing this type of footage is common in “contemporary” film and video projects, including the music video.
The next most basic thing is mounting the camera on a tripod. This provides a means to get a variety of camera angles (which I’m about to discuss) with a certain amount of precision.
Music videos with larger budgets often employ the use of cranes to add more impact to this idea. The different shots might vary dramatically in the type of camera movement that is used, with the crane adding lots of drama by doing flyovers or lifts that add a completely different perspective to the way the scene started out.
Another camera move that adds drama is the dolly shot. A dolly can be a platform or a cart on wheels that serves as the foundation for the camera and tripod. The dolly shot follows the action. For example, two characters in a movie might be having a conversation as they walk down the street, but instead of panning as they walk by, the dolly shot moves right along with them. The key to a good dolly shot is that it is very smooth, unlike a handheld shot that might also be used to follow two characters. Major motion pictures will often use a dolly that runs on two tracks that have been laid down—another way of ensuring that the shot is super smooth. You can see the dolly shot compared to the pan shot in Figure 8.9.

Figure 8.9. In a pan shot (left), the camera is stationary on a tripod, whereas a dolly shot (right) follows the action regardless of the direction the subject is moving.
There is another way to achieve smoothness without using a dolly. The Steadicam, invented in 1976, is a device that straps onto the cameraman, and by virtue of some neat technology, including gimbals and gyroscopes, the cameraman can walk through (or around or next to) an actor or object without creating any bumpiness. The Steadicam is truly steady, and like other camera equipment, can be bought or rented for a production. Having said that, I would recommend hiring a Steadicam operator if you plan to use one in your production. It requires a lot of skill and practice to master it effectively.
Your vision for your music video should dictate what you need in terms of extra camera equipment, and naturally this will be tempered by the realities of your budget. But always keep in mind that great things can be achieved by being inventive and resourceful. Dollies and cranes are great if you can afford them, but in fact you may need a grainy, bumpy filming approach for your particular project—or you may be able to come up with inventive ways of creating the effect of dollies or cranes without having to rent them.
Shots that do not necessitate sophisticated gear certainly will save you money, but this does not imply that they are insignificant in their impact. The trick is knowing what effect a certain type of shot will have on the message you are communicating.
Pan shots are horizontal moves that can be done handheld or on a tripod, although if smoothness is the desired result, a tripod is the right choice. Pan shots also follow the action, but the camera is in the same spot from the beginning to the end of the shot. The pan shot pivots from a central point and moves—say from left to right—while in the dolly shot, the camera does not stay in the same spot at all. If you are using a pan shot to film two people walking down the street, you need to provide some space in front of the characters as they walk. In a sense, the camera should lead them with this extra space. You may notice this same method employed in still photography. If the subject is a person looking slightly to the right, there is more “blank area” on the right side of the picture. You can see this illustrated in Figure 8.10. It is framed that way on purpose, and when it is not done that way, it can actually make the viewer feel somewhat uncomfortable. Knowing this rule, you can then break it to achieve the opposite effect. If you have the leading space behind the characters in a scary scene, you might be implying that the “monster” is sneaking up behind them. Make sure there’s a purpose to the way in which you frame the scene.
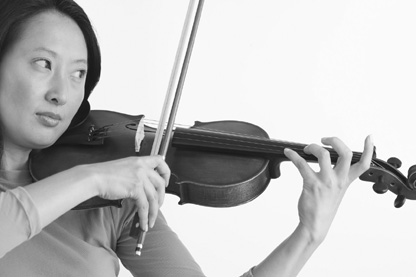
Figure 8.10. Whether in still photos or motion video, you should provide a leading space in the direction the subject is looking or moving, shown here on the right side of the image.
The tilt shot is like the pan shot except it goes in a vertical pattern, up and down. The tilt, like the pan, can also be done with a handheld camcorder or on a tripod—with the same rules regarding how smooth a shot you want to capture. Think of a tennis player serving the ball, with the camera shot following the ball as it’s lifted straight up into the air. If the scene called for capturing just that particular part of the move, you would be using a tilt shot.
The tilted angle shot (as opposed to the tilt shot) is made by tilting the camera to one side or the other at an angle, for example, at 45 degrees. This is often used to create imbalance, uncertainty, or fear. It harkens back to the days of Alfred Hitchcock and has been used many times in suspense, horror, and science fiction movies. The key is to use it when it is warranted, not just for the sake of offering up a new camera angle. If you ever watched the original episodes of The Twilight Zone, you saw it used there as well; although when used effectively, most viewers are not even aware that a tilt shot is used.
High angle shots, in which the camera points down on the subject, usually create the illusion that the subject is less important or insignificant. Low angle shots shoot upward and add importance or power to the subject. Like the other shots discussed, use high angle and low angle shots only when the scene calls for them—not just for the sake of changing the camera’s perspective.
Another effect you’ve probably seen before in music videos is not very hard to duplicate. Instead of varying the camera shot or location, you can insert a new variable into the mix— a costume change. Although a costume change makes sense when it coincides with a scene change in a motion picture or play, having the artist use a costume change simply because you’re filming the chorus section a second time in a music video does not really make sense. But that doesn’t matter. Again, it’s creative license, and it adds more variety to the video. The fact that it does not make sense has a slightly jarring effect. But no one will stop watching because of this—quite the opposite is true, as it tends to spice things up and maintain interest.
Although you will find more about them in Chapter 9, “Post-Production”, because they are sometimes related to the subject of artistic license, I will mention the match cut and jump cut here.
The match cut is an edit in which the scene that you cut to is framed like and almost identical to the scene before it. Think of a scene in which a shot of the moon is featured, dead center in the frame. The scene then dissolves or cuts to an image of a clock. The clock is precisely (or close to) the size of the moon in the previous shot. Although this is not hugely difficult to achieve from a technical perspective, it nevertheless can have a dramatic effect on the transition between these two scenes.
In a jump cut, on the other hand, the editor has no intention of trying to make the first and second scenes match. Think of unedited footage in which you are filming some action, then you stop the camera, and moments later resume shooting without changing the framing of the shot. The image “jumps” rather suddenly from the first shot to the second shot. In “days of old,” a jump cut was looked upon as poor editing. Today, it is used intentionally as an effect and is regarded as cool (when used sparingly).
Now, the reason I bring this up in the context of costume changes is that both the match cut and jump cut are often used to create instant “magical” costume changes onscreen. A match cut is more difficult to achieve, as the subject must be in exactly the same physical place, with a similar facial expression, and framed exactly the same way. If you can pull it off, however, a match cut can be very effective.
But a jump cut works very well in this situation because we know (subconsciously, at least) that a band cannot perform a complete costume change in one millisecond. Thus, the jarring effect of a jump cut fits well with a transition that is really impossible (in real life) in the first place. To the viewer, it is unlikely that any of this is being considered for even a moment; nevertheless, the viewer accepts the jump cut, when used this way, as perfectly normal.
To the larger question of why to do a costume change at all with either a match cut or jump cut, the answer is, no particular reason. But if the effect works and doesn’t seem obligatory, you might consider it. The role of the artist is to have a change of clothing for this scene. The role of the director is to stage the scene well so that the match or jump cut is relatively easy to pull off during the editing process.
Shooting B-roll has nothing to do with B-movies. B-roll is simply footage that you can cut away.
Earlier in this chapter in the section “That’s Wild,” B-roll was mentioned in the context of synchronization and the fact that you aren’t likely to need a clapper at the beginning of every scene. Now I will take another look at what B-roll footage might include.
The following scenario presents a typical example of B-roll shooting. An executive from a company is being interviewed on camera about his company’s financial success the preceding year. After 20 or 30 seconds of talking, the video cuts to an outside shot of the building as the executive continues to talk. This cut is followed by a close-up of the signage outside showing the company name and logo. Finally, the video cuts back to the executive speaking on camera.
Naturally, this was not how the sequence was shot that day. The interview took place entirely with the executive being on camera. The other footage of the building was probably shot the same day, but at a different time. It’s quite possible that the director did not know for certain whether that particular footage would be used. However, the director usually has a general idea about the kinds of shots he might use later during the editing process. He was smart—he shot some B-roll.
You should keep B-roll shooting in mind, even if it’s not specifically indicated in your script. Ideas for shooting B-roll sometimes come to mind when you’re on the scene. One of the worst feelings in the world is to be in the editing process and realize something like, “I should have taken a shot of the ocean…we were right there, and we didn’t take a wide shot of the ocean!”
If you are an experienced filmmaker, some of the following will seem very basic to you. But because this book is targeted to a wide variety of readers with different skill sets, I’m going to mention a few basic do’s and don’ts that might prove valuable and be a time saver as well.
First, because it’s a longer list, here are the don’ts.
Don’t use the camera’s titling feature. You will create the titles in post-production, where you not only have better control, but also a much more professional look to your fonts, as well as a variety of methods to display the titles.
Don’t use the camera’s special effects features. The preceding rules also apply here.
Don’t take your collection of cables, adaptors, batteries, filters, and so on to the set without organizing them carefully in a camera bag.
Don’t assume that a bad shot (as a result of such things as poor lighting, excessive camera movement, and so on) can be fixed later in post-production. Get the best possible shots you can during the live shoot.
Don’t proceed with your production if you’re using outside actors without first getting releases.
Don’t view your production as an amateur one. If you look at it that way, so will everyone else. Go to the set feeling like a pro (except, perhaps, for the oversized ego).
Now, for the Do’s.
Use a variety of checklists to ensure everything is complete. You might have one for tools to bring, another for things to do, and another checklist that is an actual shot list.
Make a shooting schedule. This is a project plan that details where and when scenes are to be shot, which resources (including the artist and/or other actors) are needed for that day, and so on.
Make a call sheet. This is for the cast and crew and is a document stating where and when scenes are to be shot, contact information for those involved, a schedule for that particular day, the location, and so on.
Use a video monitor on-site. This is for the purposes of shooting and playing back video. A video monitor that’s hooked up to the output of the camera(s) is a more reliable means of viewing footage than the two- or three-inch LCD monitor on the camera. Additionally, it provides a means for several people on the set to see the footage at one time.
Use headphones to monitor audio while shooting, and if the external monitor doesn’t have its own speakers, bring a pair of small speakers (preferably, powered speakers) to the set as well.
Have you ever been accused of being too organized? Have people said things to you like, “you’re so methodical” or “you’re so detail-oriented” or even “you’re so anal-retentive”? If so, this is your lucky day, because these qualities are a part of what is necessary to successfully create a video production. If you don’t have these qualities, you’ve got some work to do—that is, unless you can afford to hire a production assistant or script supervisor who is more organized than you are.
It is important that each scene, setup, and take in your production is logged in a log book. Some people prefer to do this during the actual shoot. However, it is also possible to do this at the end of the day or the following morning. Hollywood productions refer to this as watching the “dailies.” This gives the key personnel a chance to review footage, and it also provides an opportunity to log each of the scenes.

A log sheet can be very detailed or very simple. At the least, it should contain the tape number, information on which scene is being shot, the date, the location, the start time, the end time, and any other additional notes that describe the shots. You can make up a bunch of blank log sheets and put them in a binder, or you can search on the Internet for some ready-made log sheets—some of which are free of charge. (You might search on a topic using the keywords “log sheets film video”.)
The detail included on a log sheet is directly proportional to the complexity of your project. For example, with a multi-camera shoot, you might include A, B, or C, each letter representing a different camera. You will be very happy later in the editing room if you also included the specific setup and type of shot, such as CU for close-up, WS for wide shot, MS for medium shot, and so on. When there are multiple takes, it is important to include the take numbers—and in the description, you can denote if a particular take is good or bad. (You could indicate NG for “no good.”) For the start and ending times, you can include the timecode. If you can indicate the timecode specifically down to the frame, such as 01.29.58.06, that’s fine, but even a more general one can suffice for the initial logging during a shoot, whereas a specific timecode can be derived later when reviewing dailies.
It is a good idea to start a new page whenever you start a new tape or reel. A new reel deserves a new page and makes your job easier later when sorting through all the tapes.
You won’t have any luck keeping accurate logs if you don’t label your tapes. Just as with the log, it’s good practice to have a fresh tape correspond to a new reel.
Perhaps you are the kind of person who doesn’t label tapes because you
Don’t have time for that.
Know in your head what’s on each reel.
Can’t bother with inconsequential details.
Will figure it out later.
If this is the case, you had better start getting in the habit of tape labeling. None of these excuses will work in a professional scenario—as a matter of fact, the habit of not labeling tapes doesn’t work well with simple home movies. You will probably want to come up with some sort of system for tape labeling that works well for you. In all cases, you will want to include the date. Other codes might be M, indicating a master tape; S might stand for a source tape; C might be a compilation tape; and so on. On a specific project, such as your music video, R and a corresponding number could stand for reel number. None of this is set in stone—you can come up with a system that works for you. The only thing set in stone is that it’s a bad idea not to label tapes—that is, once again—unless you have a full-time production assistant to do these types of chores for you.
After the shoot, gather all of the source tapes and organize them by reel number (which should be easy because you are an experienced tape labeler). Keep them together in one place or, better yet, one container (such as a box) that you keep in one place.
Although it’s not an absolute necessity to enter your log sheet information into a computer, there are some benefits to doing so. If you use a program such as Microsoft Excel to keep track of the logging information, you can easily sort through your information by date, reel number, timecode, content, and so on. Most schedules are tight; therefore, it is understandable if there is no time to enter this data into a computer. But, if time allows, this method can help you out in the long run.
Keep your tapes in a cool, dry place, and out of direct sunlight. Keep them away from magnetic fields (which sometimes can be generated from a television set or speakers). Treat them with care, because they are both your source tapes and your archival tapes.
You should also lock your tapes by flipping the little switch on the top of the MiniDV cassette. There’s nothing worse than telling the boss (even if you’re the boss) that the opening shots were recorded over when you taped your sister’s baby shower, forgetting that Reel 1 was still in the camcorder.
By now, you can surmise that these basic housekeeping duties are vital for a successful production. It’s true that a production can be completed without the details being tracked and organized. However, these details can be like a box of disorganized cables—even though they’re all there, if they’re disorganized, you’ll only be adding to your own confusion unless some sort of organization and methodology are in place.
Here are some principles to keep in mind when shooting your music video:
Music videos tend to have more visual effects, extreme camera movements, jump cuts, and so on than do “normal” videos. Feel free to use such effects and techniques, but do not overuse them just because they’re cool. Use effects when they make sense.
You don’t shoot a video and then consider the role of the music. The opposite is the case (which is different than almost all other video productions). The music is the heart of the video, and the video serves the music.
A lot of your editing will involve cutting to the beat (more about this in Chapter 9). Keep the rhythm of the video aligned with that of the music. Keep this rhythm in mind when you are shooting your footage.
Be original. This is a tough one, because almost every music video is derivative in some way, copying or leveraging what’s been done in other music videos. To be truly original (while maintaining viewer interest) is not an easy task, but if you can do it, you will be the one who everyone else begins to imitate later. (Consider it a compliment.)
Have fun. Producing a music video is a lot of work, but it should be fun as well. If it isn’t fun, consider producing nature videos, aerobics videos, or infomercials. (Chances are, however, that those will be much less fun.)
With the pre-production and shoot completed, it’s time to move on Chapter 9. This really is the fun part of the process, when all the pieces begin to fall together and your vision for your music video takes shape.