
SOMETIMES THE TERMS POST-PRODUCTION and editing are used interchangeably, although in practice, editing is best viewed as a part of the overall post-production process. You can think of post-production as everything that takes place from the time shooting is completed to the creation of the final master.
Just as with other chapters in this book, this chapter is not intended to give you a complete and in-depth understanding of the editing process. The focus is on the basic parts of the editing process and especially the parts that are important when creating a music video.
If you are into creating music, and I’m going to make a huge leap and assume that you are, then you know that being a musician is part art and part science. Art is the creative part of the formula while science might be represented by technique. Many professions have this part science/part art composition. A ballet dancer, a marketing director, and a car salesman all have this mix to one degree or another.
Film and video editors are another group that has this hybrid make-up. When you take a close-up look at the editing process, you might be looking at the nits and technicalities of SMPTE timecode. (Don’t worry; you’ll read about that in a moment.) You could, in the same discussion, be focused on the topic of artistic license—how to break away from the norm, experiment, and explore unchartered creative territory. Editing is part art and part science, too.
This chapter covers SMPTE timecode and artistic license, as well as other topics that are a part of the art and science of editing. The focus is on editing music videos and the chapter includes some of the things to look for in a video editing software package.
Editing, in its most basic form, involves removing the bad shots and leaving the good ones. Sometimes this is an obvious procedure, such as those instances in which you didn’t know the camera was still running and you ended up with a shaky, out-of-focus medium shot of your feet walking along the sidewalk. That shot will be removed in its entirety, and it doesn’t take a lot of thought to come to that conclusion.
The other part of editing is more of a challenge. What you want to accomplish by editing is the sequencing of the good shots to create something that is interesting, compelling, and possibly emotionally moving—and at the very least, a series of images and sounds that tells a story.
The science—or craft—of editing involves the use of editing software, syncing with SMPTE timecode (see Figure 9.1 and the upcoming sidebar, “What Is SMPTE,” for more on time-codes), and a basic understanding of editing concepts such as rippling, inserts, trimming, overwriting, and so forth. (See more on these topics in the section “Inserting, Trimming, Rippling, and Overwriting,” later in this chapter.)
Figure 9.1. SMPTE (Society of Motion Picture and Television Engineers) timecode can be displayed in hours, minutes, seconds, frames, and samples.
The art of editing can be learned only to a point, whether by instruction or reading a book on the subject. Like other art forms, its effectiveness depends largely on the artist.
For example, go back to the bad stuff I suggested removing from a shot. Removing the bad footage is a no-brainer. But if you are left, say, with a shot of a street scene and want to cut to a close-up of one of the shops on that street, where—exactly—do you cut from one scene to the next? Removing the bad footage is not enough. There is a certain rhythm created by both the camera motion and the length of the shots that comes before and after these two scenes. The pacing of the video sequence is related to the length of the shots. The precise editing points are dictated by what is happening at a given moment in the frame.
When you start editing, you get a feel for where one shot should end and where the next one should begin. Perhaps the street shot is wide—panning from left to right and stopping at the store you’re going to cut to. The store may be a medium shot that tilts up from the doorway to the sign above the store, where it stops and holds just long enough for the viewer to absorb the store’s name (see Figure 9.2).
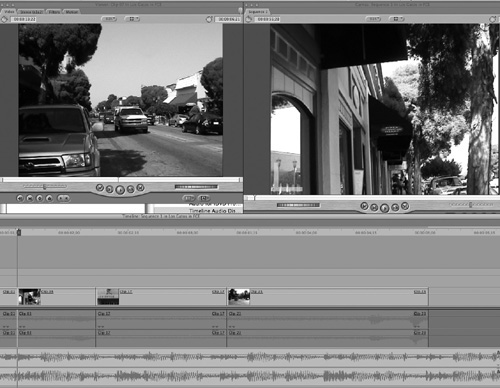
Figure 9.2. The editing process has a logical flow and a rhythm built into it. A street scene might pan and cut to a store sign, which would then cut to the inside of the store.
If some of this seems obvious to you, that’s a good thing. Hopefully, you have a natural inclination as to where to make edits that flow and create a rhythm of their own. Some of this is very intuitive and gets better with practice. Knowing this and understanding that there is an art to editing that goes beyond the basics, you need to be constantly aware as to exactly where and when you make your edit points. The final product will be the sum of those decisions.
And because I’m talking about art—especially because this discussion focuses on music videos—you want the final product to be more than a series of shots, one after the other. Remember, the medium is the message—so this is your chance to use the medium in an artful way.
The decision whether to perform the editing yourself, as opposed to hiring someone else, goes back to a discussion in Chapter 4, “Choosing Your Production Methods,” that demonstrated DIY decisions are directly related to budget. If you’re producing a video that provides for a budget to hire a professional editor, then this is something to consider. One of the advantages to using a professional, besides the fact that this editor can produce very professional-looking results, is that he sees the project with a pair of fresh eyes, much in the same way that a hired producer/engineer might bring something more to your final mix than you could (by being so close to it).
On the other hand, lower budgets can still result in professional quality as you literally learn on the job. The learning will involve both the art and science of editing. You will need to understand the editing process; that’s for certain. You will need to learn about your editing software to the extent that you can create just about anything you can envision. And, once again, to create a product that is more than the sum of its parts, you will need to be artful in your approach to editing. If you are passionate enough about doing so, there really is nothing to stop you.
The basic principles that apply to video editing apply to music videos as well. Where it differs has everything to do with the music—the music is paramount and “in charge” of everything else. Music is the driver; video is the vehicle. The following sections cover some of the basics and naturally, the topics that are specific to editing music videos.
So, for the sake of argument, say that you’ve already mastered the art and science of editing. How then is a music video different from any other type of video when it comes to the editing process?
As discussed earlier, it is the music that is driving the video. Now that you are editing, you will soon discover that it’s the beat that drives the music that drives the video.
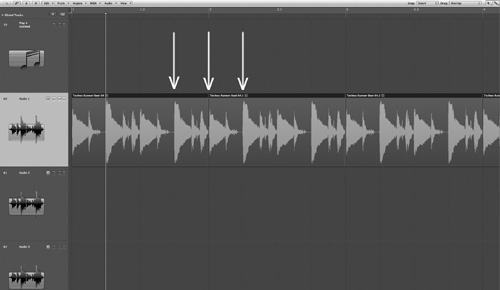
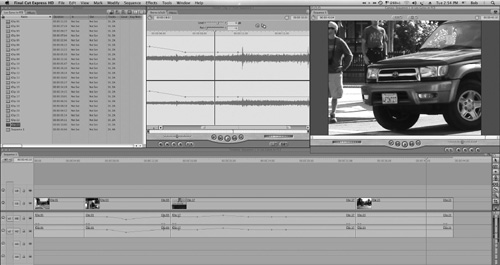
Cutting to the beat has been an editing method that goes back to the very first music videos. Consider this typical example of music: A rock piece in 4/4 time that consists of drums, bass, guitar, piano, and vocals can be edited to the kick drum. Depending on the pacing you want to achieve, the cuts may fall on every other measure, or every measure, or twice or even four times a measure (see Figures 9.3 and 9.4). Most likely, you will mix it all up and create a visual rhythm that varies within the song structure. In other words, it doesn’t require that you cut only to every measure—you can combine any number of editing points dictated by a variety of beats.

Figure 9.3. The vertical lines in this Final Cut example indicate which places in the audio’s waveform are likely possibilities for making a visual edit.
A simple example is an editing rhythm that falls on every measure, but when the song comes to a drum fill, the video cuts on each part of the tom fill, which could be eighth or sixteenth notes. Then, as the next downbeat begins, you return to the previous pacing and cutting method on each measure. I’m simplifying here so that the point is clear. In reality, you can mix it up even more to make the final edit more compelling.
A ballad might have a different rhythm altogether. The pace will be slower, just as the tempo is slower in a ballad. The cuts don’t necessarily have to land on a beat. As a matter of fact, there is no law that cuts have to land on a beat, even in the first example of a faster rock tune. You may cut this way—or you may not.
Learn the rules. Once you feel you have them down well, break a few. It’s all about you and your creativity.
Another general rule that applies to music videos is that you have much more freedom to experiment, try new ideas, and break away from some of the formal editing rules found in traditional video editing.
One example of how a rule was broken a long time ago is the jump cut. Traditional editing practices taught us never to cut from one part of a scene to another part of the scene, say, a few seconds later—while the camera angle and framing remains the same. The video seems to jump with a jarring movement that is somewhat unnatural and certainly not smooth.
Think of a situation in which an onscreen talking head is speaking and then the video cuts to a sentence that takes place a few seconds later. The person’s position, expression, and so on will not match exactly, and thus the cut seems abrupt and unnatural. This is the nature of a jump cut. The sequence shown in Figure 9.5 makes sense as a series of stills, but if the stills represented actual frames in a video sequence, they would be jump cuts. The facial expressions would change suddenly and the people in the background would be jumping around unnaturally.
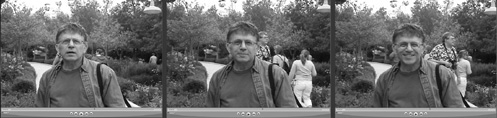
Figure 9.5. These still shots would be jump cuts if they were contiguous frames of a video sequence.
If you look at the films, television shows, and commercials of today, you will see that the jump cut is used without hesitation. It is used for effect. It is sometimes used, for lack of a better word, as a “hip” way of editing a particular scene. Although you’d hope there is some reason or meaning attached to the use of the jump cut, sometimes there is and sometimes there isn’t. But the old rule about not using a jump cut has been broken. The “wrong way” has given way to a new way. The jump cut and other unconventional edits have evolved from being considered “wrong” to being looked at as “cool.” Usually, though not always, you will find these new rules employed in videos that are more artistic in nature—such as a music video.
When you edit music videos, you have more artistic license than you have with a documentary or corporate video. But if you do try something new and different, bounce it off a couple of other people before you run with it. Objectivity can be a difficult thing when you are too close to your work for a long period of time. Artistic license can yield great results sometimes. At other times, the results might seem gratuitous, self-indulgent, or downright silly. Luckily, the digital age affords you the opportunity to experiment with new ideas with the assurance that the original digital video files are still there—safe and sound until you want to try something different or revert to an edit that is more traditional in nature.
You may have heard the saying “We’ll fix it in the mix.” Even before they had the advantages of digital recording equipment, producers and musicians often skipped the process of redoing or fixing something during recording session, figuring that they would fix it later.
This worked sometimes. Most times, it did not. “We’ll fix it in the mix” became a sort of code for “We don’t have time to deal with it now, maybe we can do something about it later.” This idea also exists in the film and video world with a slight variation: “We’ll fix it in post.”
Well, now you’re in post, so let me throw out a sort of rhetorical question: Did either of these preceding ideas occur during the recording or filming process? I hope the answer is no. Because editing is much more than the process of snipping off the bad footage, you will have plenty to do without worrying how to stabilize a shaky shot or turn day into night. Okay, those are bad examples because they can be done in post. But you do want to have well lit scenes, well recorded audio, and a suitable variety of takes to do a good editing job. If you’ve watched and logged all of your video, you probably have a good idea already of the task ahead. Before you start cutting, try to identify any real problem areas that might exist and determine what you need to do to correct them. If something must be reshot, you can get those wheels in motion while you begin your editing process.
No matter what kind of video you are producing, there are some standard editing principles that are relevant. If you don’t know what they are, you can easily get up to speed by taking advantage of classes or books on the subject. If this is your first time doing any editing, you might want to practice on some footage other than your music video until you get your “editing chops” up.
Editing is really the process of assembling your shots in a cohesive order to make a rough cut. Then you fine-tune it and create a fine cut (and, eventually, a final cut).
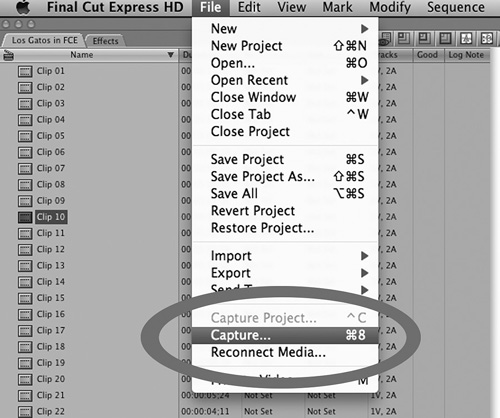
Assuming you already have your video-editing software (and if you don’t, see the section, “Editing Software,” later in this chapter), your first order of business is to import the video footage. Hook up your camera to your computer and follow the instructions for importing video. Luckily, most software editing programs are very straightforward and even capable of separating the scenes into individual clips. The importing process is also known as capturing in some programs (see Figure 9.6).
Most editing programs are based on a timeline. You use the timeline to drag and drop clips into the sequence you want. The timeline usually starts at 0 (zero) and, as you add each clip, the video lengthens by the amount of time it takes up. (I say usually starts at 0 because many filmmakers will start at 01:00:00:00, wherein the 01, instead of meaning one hour, means reel one.) There is a vertical line that moves from left to right that is similar to a playhead—wherever the playhead is located, that’s the exact frame of video you will see. In Figure 9.7, the semicircle surrounds the timeline.
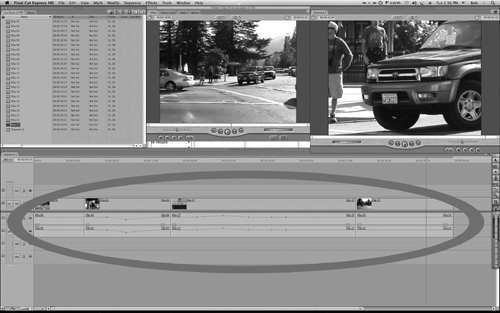
Figure 9.7. The timeline is the heart of the editing program, where you assemble clips, audio bits, titles, transitions, and effects to create a rough and/or final cut.
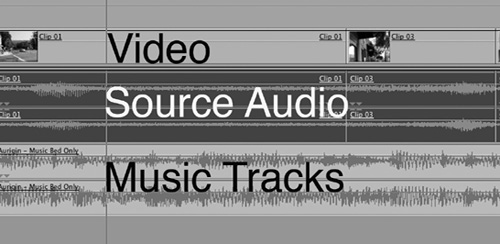
Because you are making a music video, the assembly mode of editing (adding clip by clip) is slightly different. Instead of adding clip by clip and thereby adding time, your time is predetermined by your music track. Again, the music drives the video. So, in addition to importing your video into your project, you need to import your song (your master recording) and place it on a stereo audio track—usually a second stereo audio track (see Figure 9.8). In reality, the source audio (which was recorded with the original video) is rarely used. An exception to this might be a segment at the beginning or end of the piece in which possibly some dialogue takes place. But most times, you will not be listening to your source audio. It’s the music that tells the story.
You are usually able to trim the clips on the timeline. Trimming can mean either making the clips shorter or making them longer. You will also be doing insert editing, in which a clip is added to the timeline. The clip may be inserted anywhere—before, after, or in between existing clips. One type of insert edit will force the existing clips (to the right of the insert) to move to the right by the same amount of time the new clips requires. This is called rippling—the net effect of the edit doesn’t change the content; it only changes the time at which subsequent clips occur.
There will be many occasions in which you will want to do an overwrite edit. An overwrite edit replaces the existing clip by the amount of time the new clip requires. It doesn’t push the remaining clips. The timing stays the same; it’s the content that changes. Overwriting is often used to cut away to completely different footage that illustrates a different scene, such as what an interviewee (just for example) might be talking about on camera.
Because you are creating a music video, the timing of events is determined by the music. One way to approach the editing process is to insert your clips into the timeline to get a rough cut—an approximation of what visuals you want and in what sequence they will occur. Then you might trim the clips to correspond to the timing of the music. Finally, you might get creative by doing some overwrite edits that replace some of the shots completely, but without changing everything else you’ve edited up to that point. Then you will likely do some fine-tuning to get the edits as precise as possible.
In addition to the basic cut from one scene to the next, a variety of transitions can be used instead. The most common one is the dissolve—one scene fading into another scene. In Figure 9.9, the image of the street is dissolving (sometimes called cross-dissolving) to an image of a sign that says “Los Gatos.” There are other types of fades—fades from black, fades to black, or fades from and to white. But that’s just the beginning. There are literally hundreds upon hundreds of transitions—wipes, splits, pushes, spirals—some of them must be seen to be understood.
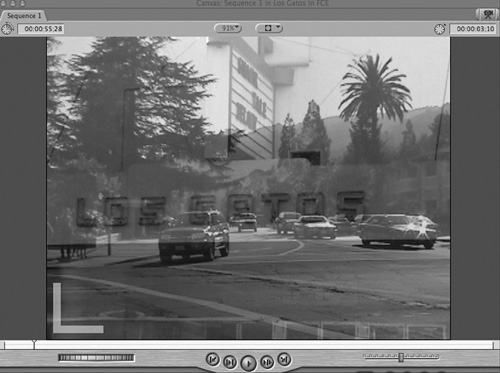
Figure 9.9. One of the most common transitions is the dissolve, whereby one image fades into the next.
Special effects also abound in plentiful numbers—compositing, lightning, distortion, lens flare, warps, particle generators, and a lot more. These effects were once achieved only by using the tools of expensive video systems. Digital, computer-based, desktop video has made transitions—and special effects—much more accessible to budding filmmakers.
One word of caution: Don’t overdo it. There is a tendency to overdo transitions and special effects because they’re so cool. But once the effects become the focus of attention, you begin to lose the effectiveness of your music video. In general, effects should not call attention to themselves—they should enhance the story and experience that you are conveying in your video.
There are numerous choices in the realm of software for film and video production. This was not the case several years ago when the editing process was grueling, requiring several professional video machines, synchronization machines, numerous monitors, switchers, effects boxes, and a whole lot more. It has almost become cliché to say, “You have more computing power on your desktop than they had on the space shuttle.” But you do. You have much, much more computing power than was imaginable when the space shuttle was launched.
Every industry has benefited from increased computing power, and audio, film, and video production is no exception. Even major motion pictures are often edited on computer-based machines, running software from companies such as Avid, Inc. and Apple.
I’ll start off by instigating a war: Mac or PC? PC or Mac? My computer is way better than your computer. Or is it?
The war of which computing platform is superior to any other is not the subject of this book. As a matter of fact, it’s not the subject of many books at all these days, as the topic has worn itself out for lack of any true substance or meaning. Either platform is a good choice and is supported by tons of software to make your production a reality. Your choice may be guided by personal preference, by what you already own, or by your budget.
However (you knew there would be a “however,” didn’t you?), for the sake of the discussion here, I will focus on the Mac platform and its software. It is known for its user-friendliness and is being adopted in large numbers by amateurs and professionals alike for making video productions. Still, the same principles apply to both platforms; therefore, no one loses out in this discussion.
Although it’s often referred to as editing software, the products that are available for production cover a lot more. Beyond the task of editing, there is color correction, transitions, titling, special effects, and more. These elements are fairly standard in most editing packages and are the ones you will find in Apple’s Final Cut software. Final Cut comes in two flavors: Final Cut Pro and Final Cut Express (Final Cut Express is shown in Figure 9.10).
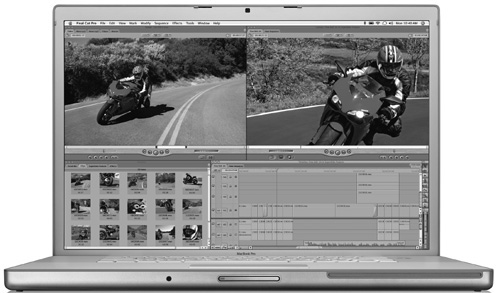
Figure 9.10. Apple’s Final Cut and Final Cut Express (shown here) are two popular programs used for post-production video editing. (Photo courtesy of Apple, Inc.)
Aside from a large difference in the price tag, the differences between the two programs are not numerous. Final Cut Pro can do more in terms of batch processing lots of clips and offers other advantages such as keyframing capabilities, compatibility with Adobe After Effects plug-ins, support of additional video formats, and so on. At the end of the day, these features need not prevent you from creating professional results on Final Cut Express.
There is even a less expensive option if you choose to use Apple’s iMovie to edit your project. The price tag on iMovie is hard to beat—it comes free and pre-installed with the purchase of any Mac. It is typically used by amateurs, hobbyists, or semi-professionals for basic editing projects. Now, someone, somewhere is likely to tell you something along the lines of, “You can never make a professional product using iMovie.” But you know better by now, especially because of the word “never.” Choose your weapons.
Although I won’t get into a full-blown lesson on using the Mac with either Final Cut or iMovie, a couple of general things are worth mentioning.
The first has to do with iMovie. Apple’s iMovie is offered as part of a package called iLife, with other products in this suite, including iPhoto, iWeb, and Garage Band. When it was first released, iMovie was the only product that offered a way to work and play in the digital lifestyle we take for granted today. There have been successive versions of iMovie (that is, iLife) since its first release, and as of today’s writing, the most current version is iLife 09.
I believe that most people will agree, and expect, that successive versions of software tend to improve in some way—ease of use, feature set, and so on. I am amazed to report to you that this did not happen with iMovie. Beginning with iMovie 08, Apple’s mission seemed to center on turning iMovie into such a simple product that even a baby could make a movie with it. Well, a baby cannot make a movie with it, and neither can most people who have had any experience with video production software. Apple tried to even the score with iMovie 09 (shown in Figure 9.11)—and indeed, a few of the requested older features came back. But I am sad to say that I would never recommend iMovie 09 for any serious work.
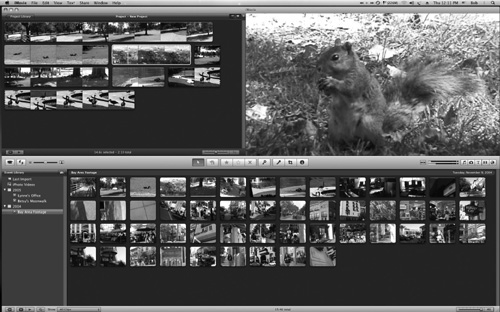
Figure 9.11. This screenshot of iMovie 09 shows several windows, but none of them contains an actual timeline.
All is not lost, however, because versions that precede iMovie 08 can be used effectively for editing without incurring a migraine headache. The headache is mostly caused by the lack of several standard features, the prime one being the timeline. There is no timeline in iMovie 09.
The timeline is the central area that is most often used for editing video. It is a visual layout of the sequence of your video clips. It also gives you a visual reference of your audio and indicates where transitions or other special effects occur. You create the timeline by making all of these choices, but you are also free to change things around, reorder them, add to them, and so on. A timeline usually allows for several video tracks, some of which may be title overlays or special effects; and several audio tracks, some of which may be narration, source audio, music, and so on. A playhead moves from left to right in the timeline, represented by a vertical line, which plays everything back and also indicates where you are, from a timing standpoint, in your production. A timeline is an essential part of editing software for video, film, and even for multimedia presentations. Figure 9.12 shows the timeline in iMovie HD. The timeline is the row at the bottom of the window—in case you had any doubts, I even included the word “timeline” in the timeline!
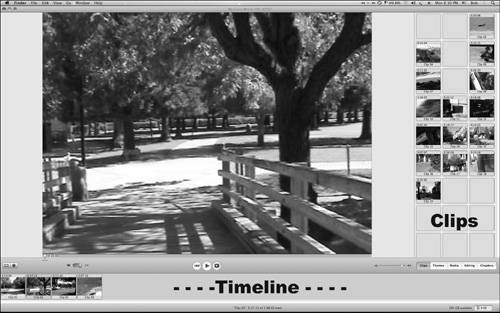
Figure 9.12. Earlier versions of iMovie (in this case, iMovie HD), may not have the feature set of Final Cut, but at least it has a timeline, a feature that is essential.
SMPTE is a standard in film and video editing. The use of a timeline in video editing is a standard way of assembling clips into a video, with SMPTE being the master of where you are in time—expressed in minutes, seconds, and frames. Whatever software package you decide to use, I encourage you to stick with one that has a timeline. As you graduate to more sophisticated editing packages, you’ll see that the timeline is always there as your main editing tool. Getting used to it now will help you in your current project as well as the ones you do down the road.
Video equipment can range in price from hundreds of dollars to hundreds of thousands of dollars. I mention this now because of the topic of synchronization. The ease with which you can keep everything in sync, even when you’re doing B-roll, cutaways, and many of the music video-editing techniques discussed previously, is somewhat determined by the sophistication of your gear. As an example, if you do a three-camera shoot, shoot lots of B-roll, and plan to use a lot of different takes within one scene, your need to have one timecode reference will be great—greater than a simple one-camera shoot with a few cutaways here or there. Sophisticated video gear or software helps simplify this process so that you can sync different shots with relative ease.
If you are on a lower budget, you know that at a minimum, your camcorder has timecode built in. If the other clips in your project don’t include a corresponding timecode, then locking up and keeping in sync are a bit more challenging—but certainly not impossible.
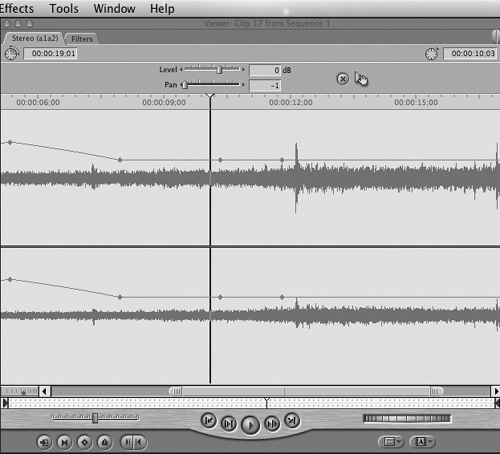
This is one reason that I recommend that you include a reference track in your timeline that consists of a rough cut of the song (refer to Chapter 8, “The Video Process: Pre-Production and the Shoot,” for more on a reference track). Beyond the master audio track, the reference track might provide clues as to who is singing what, where, and when. It might provide inspiration or ideas as you assemble your edits together, such as when you might cut away to a different shot or when you should stay put on the current shot. If you happen to have a reference track that has the exact timing of the master audio track, you are in better luck, because even without timecode on your B-roll footage, you can use the reference track to sync up visually—sort of an electronic lip-syncing as you cut to and from various shots. If the singer’s lips are not in sync at any particular point, you can slide and adjust your audio or video tracks (or both) to make the sync work. The better video-editing software packages allow you to zoom in close to your audio waveform for making precise edits, as in Figures 9.13 and 9.14.
The other joy made possible by video-editing software is the ability to go back and make further changes at a later point in time. When you launch your video project on your computer, everything is in the same state that you left it last time. This allows you to further fine-tune your project or to create different versions if you so desire. Whatever the case, make sure you back up your project onto other drives or media, such as a DVD. Computers provide you with an amazing method of creating your music video. But computers also have an “amazing” way of losing important data when you need it. Back up. Enough said.
Although your editing chores may be over, your work is not. There are still a few points to keep in mind before you get your video on the Internet.
If you think back to the final mix of your song, you likely took great care to ensure that everything in the mix was just right. You probably took many passes and tweaked a lot of things on your tracks before you even came close to what you considered a final mix.
The same care must be taken with the video portion of your music video. Color correction, a subject beyond the scope of this particular book, is an important process—almost the equivalent of equalizing your mix. If you don’t know enough about it or lack experience, you might consider hiring someone for that specific task. Though the ultimate differences may be subtle, a color-corrected video will have a much more professional look.
Most of your titles will be reserved for the end of your video. There is a fairly well-known practice of having a title section in the lower-left corner of a music video. These titles will include such information as the song title, performer, songwriter, record label (if there is one), and so on. Check out some music videos and look at how it’s done. There are even some editing software programs that include a music video template into which you can plug your own copy.
The end titles or end credits of major motion pictures usually include members of the cast and crew. You might not find the same with music videos, although there are exceptions. You should make a final determination as to what to have for end credits as well as keeping in mind that it’s not difficult to have a few versions—some with and some without end credits.
As with anything else, titles won’t make or break your music video, but they will add a professional look (and give credit where credit is due).
Don’t forget the legalese, especially when it comes to copyrights. If you are the copyright owner of the song, it should be stated at the end of your music video. If it is someone else’s, you must acknowledged this person. This is for your own protection as well as the protection of those on your crew.
Looking at it from another angle, if you used any clips that are copyrights of other people, you must have permission to use them. If you think it’s not that important because you’re a little fish in the big sea, think again. Remember, your ultimate goal is to post your video on the Internet. If you do so without copyright permission, you’re taking a big chance with your project and possibly with your career.
When you’re working on a project, do you hear a voice in your head? I’m not talking about multiple voices—if that’s the case, you may have a lot of problems that we can’t get into here. What I’m talking about is the voice that tells you “that doesn’t sound right” or “that doesn’t look right” and so on. It’s your intuition on the deepest level. This voice is not the same voice that you use to try to convince yourself of something. This is a voice of reason, of objectivity—a voice that is dialed into all of your senses.
The thing is, you have a choice as to whether or not to listen to this voice.
My advice to you is that you should listen very carefully. And watch very carefully, too. Because many times, the difference between goodness and greatness lies in following through on what “the voice” is asking you to do. The enemy of the voice is laziness: “I know I should fix those two frames, but who’s going to notice?” “Yeah, there’s some kind of glitch at 01:03:21:07, but I can live with it.” “I don’t have time to reshoot that scene, so I’m going with what I’ve got.”
It’s those compromises that can sometimes get you into trouble, or at least, get you into a final product that is sub-par. It is often painful to have to do what your inner voice says is important, but if you’re not stretching, if you’re not pushing your own limits, then you are likely settling for something less.
The other part of this process is objectivity. It’s very easy to get caught up in how good it sounds or how terrific it looks or how big of a yacht you’re going to buy once this rakes in the dough. Become the listener. Take off your producer/songwriter hat and listen as if it’s the first time you’ve ever heard or seen the music video. Maybe it really is great, but it will be up to others to pass final judgment on that—because if you’re going to post a music video on the World Wide Web—others will be passing judgment on it.
Give your project 110 percent—or more. And when the time comes to review all of it, listen to your inner voice and also become a member of the audience. When you feel comfortable with your final music video, you’re ready for the next step…posting it on the Internet, which I cover in Chapter 10, “Making Your Video Internet-Ready.”