
The HelloContacts application should be shaping up quite nicely by now. We've covered a lot of ground by creating a custom layout and a nice details page and the app is adaptive so it will work on any screen size that exists today. However, the best apps have one more aspect by which they set themselves apart from the competition: animation. We've implemented a little bit of animation, but so far we haven't explored the possibilities of animation in depth.
The UIKit framework offers very powerful animation APIs that you can utilize in your applications to make them stand out. Implementing animation with these APIs is relatively straightforward; you don't have to bend over backwards to create an engaging animation.
In this chapter, you'll learn how the UIView animation API that you used before works and what possibilities and options it offers. Next, we'll take a look at the new UIViewPropertyAnimator class that is added in iOS 10 and how it compares to the UIView animation API that is available on the previous iOS versions.
Animation isn't limited to elements that are on screen. When a user navigates from one view to another, the new view is animated onto the screen. You can implement your own animations for these transitions to make the user experience customized and engaging.
In this chapter, we will cover the following topics:
- The
UIViewanimation basics - Adding vibrancy to animations with springs
- Taking control of animations with
UIViewPropertyAnimator - Customizing view controller transitions
- The
UINavigationControllertransitions
You've already added animations to the HelloContacts application. However, you haven't really seen how they work yet. This section will cover the basics of the UIView animation and its options. First, we'll cover the different animation methods that are available. Then, we'll explore some of the available options for these animations.
The quickest way to add animation to your app is to use the UIView.animate method. This method was used in
Chapter 2,
A Better Layout with UICollectionView. The simplest variant of this method is animate(withDuration:animations:). This version of the animate method only takes a duration (in seconds) and the final values you want your animations to animate to. Whenever you call this method, the animation will start to move toward the new values right away.
Here's an example of how to use it:
UIView.animate(withDuration: 1.5, animations: {
    myView.backgroundColor = UIColor.red()
})
This animation animates the background of a view to a red color. The animation takes 1.5 seconds. Animations are configured using OptionSet. The OptionSet type is a special one. As you'll see shortly, an OptionSet looks a lot like an array of enum values. Internally, an OptionSet is actually a numeric value that represents the Boolean values of multiple options at once. If you call the animate method as you just saw, the animation will use curveEaseInOut and as its default animation timing option. Let's take a look at what this means.
The curveEaseInOut option tells the animation how it should progress over time. The default option is for the animation to start slow, speed up, and then slow down again as it nears the end. The best way to visualize how timing functions work is to show a couple of them in graph format. The following are some of the most commonly used timing functions:
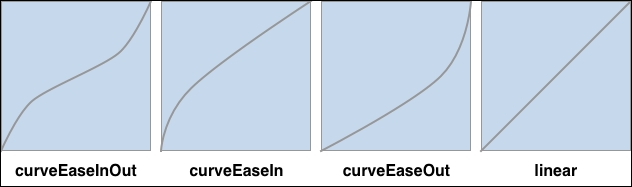
In these graphs, the horizontal axis represents the animation's progress. For each graph, the animation timeline is described from left to right on the X-axis. The animation's progress is visualized on the Y-axis from bottom to top. At the bottom left point, the animation hasn't started yet. At the right of the graph, the animation is completely done. The vertical axis represents time. So if we look at the curveEaseInOut graph, you'll see that the animation progresses slowly at first. Then, in a relatively small amount of time, the animation makes a lot of progress. Additionally, after that, it slows back down. We'll cover how you can pass some of the other timing functions to your animations soon. First, let's look at a slightly more expanded version of animate(withDuration:animations:) called animate(withDuration:animations:completion:).
This variant works identically to animate(withDuration:animations:), except you can now specify a closure that you want to be executed after the animation is complete. This is the version you used in
Chapter 2,
A Better Layout with UICollectionView to make the contact image bounce a little when you tapped on it. This is what this method looks like when in use:
UIView.animate(withDuration: 1.5, animations: {
    myView.backgroundColor = UIColor.red()
}, completion: { finished in
    myView.backgroundColor = UIColor.lightGray()
})
This snippet immediately changes the background color of myView to a light gray color right after the animation is finished. The completion closure receives a Bool value that indicates whether or not the animation actually finished.
The third and last version of the basic animate method you should know about is animate(withDuration:delay:options:animations:completion:). This is the version that you should use if you want to have a lot of control over the animation you're about to perform. This method allows you to delay an animation to a later time. You can also pass in your own custom options to change your animation's timing function and do more. Let's take a look at a basic example of using this method and then we'll explore the available animation options, as follows:
UIView.animate(withDuration: 1.5,
               delay: 1,
               options: [.curveEaseIn],
               animations: {
                myView.backgroundColor = UIColor.red() },
               completion: { finished in
                myView.backgroundColor = UIColor.lightGray() }
)
The preceding code performs the same animation as the previous snippet with two major differences:
- The animation is delayed by a second
- The timing function is
curveEaseIninstead of the defaultcurveEaseInOut
Each of the three animation methods we've covered has its own purpose. You should use the animation function that best fits your needs for the task you're trying to perform. If you don't need a delay or a different timing function, make use of the animate(withDuration:animations:completion:).
UIView's animate method can be configured with an array of the UIViewAnimationOptions properties. These options configure several aspects of the animations. You already saw the timing function option. UIViewAnimationOptions comes with three properties from which you can pick and also a default:
curveEaseIncurveEaseOutcurveLinearcurveEaseInOut(default)
To use the default configuration, you should use no timing function option; you can't select the default timing function yourself.
By default, user interactions are disabled on an animated view. You can use the userInteractionEnabled option to override this behavior.
Another interesting option is layoutSubviews. Normally, the subviews of an animated view are not animated alongside the animated view. This option will lay out subviews at the start of the animation, so the subviews animate along with the animated view.
If you want to animate a view back and forth multiple times, for example, if you're building a loader that moves from right to left and back and repeats until the loading action is done, the repeat and autoreverse options are what you're looking for. These properties take care of repeating and reversing the animation, respectively. If you're only using the autoreverse option without repeating the animation you need to make sure that you reset your view's properties in the completion closure; otherwise, your animation will animate from the start value to the end value, then back to the start value, and finally, it will jump to your initial end value again.
Passing options to an animation is done as an array. Consider the following example:
UIView.animate(withDuration: 1.5,
               delay: 1,
               options: [.curveEaseIn, .autoreverse, .repeat],
               animations: {
                myView.backgroundColor = UIColor.red() },
               completion: { finished in
                myView.backgroundColor = UIColor.lightGray() }
)
This is the snippet you saw before, except it uses more options. The updated options are highlighted. The animation eases in, reverses, and then repeats indefinitely.
If you want to see all of the options available to your animations, check out the documentation for UIViewAnimationOptions. There's quite an extensive list available. Now that we've covered the most basic UIView.animate versions, let's add some more life to them with some spring physics.