
When we built HelloContacts, we used classes and classical Object-Oriented Programming techniques. Now that you have seen how value types and protocols can improve your code, it's a good idea to revisit the HelloContacts application to see how we can improve it with this newfound knowledge. Even though our app is fairly small, there're a few places where we can improve the app and make it more flexible and future-proof.
This chapter will be all about making the HelloContacts application swifter than it is now. We'll do this by implementing elements of the app with protocols and value types. The structure for this chapter is as follows:
- Properly separating concerns
- Adding protocols for clarity
Let's get started right away.
Before we can improve our project structure with value types and protocols, it's a good idea to improve upon our general structure first. We haven't really thought about the reuse of certain aspects of the HelloContacts app that results in code that's harder to maintain in the long run. If you take a look at the source code for this project, the first thing that was done was to split all of the different files we had into groups that make sense. This will make it easier for you to navigate your projects, and it creates a natural place for certain files, as shown in the following screenshot:
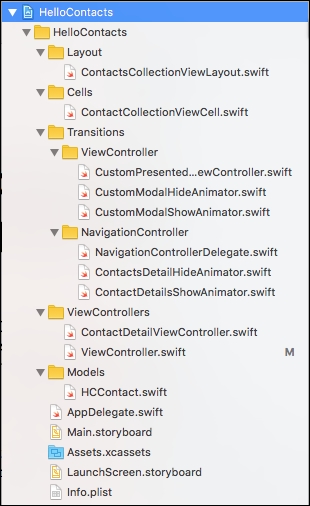
The structure applied in this project is merely a suggestion. If you feel that a different structure will suit you better, go ahead and make the change. The most important part is that you've thought about your project structure and set it up so it makes sense to you and helps you navigate your project.
With this improved folder structure, you may notice that there's some sort of a divide between certain files. There are files that help with transitions and a model file; and among other things, we also have view controllers that are grouped together. By doing this, you've given yourself an overview of the types of files in your project, and each file belongs to a certain group that describes its place in your app. Let's get started with refactoring some code.
The file we will refactor is ViewController.swift. This file contains the code for our contacts overview screen. Currently, this view controller fetches contacts, acts as a delegate and data source for the collection view, and takes care of the animations when a user taps on a cell.
You may consider this fine; but ideally, any given class shouldn't be responsible for that many things at once. What if we would like to create a second kind of overview page; how can we reuse the code that fetches contacts? What if we'd like to add the bouncing cell image animation to another image? These are two scenarios that are pretty likely to happen at some point in the future. Let's extract the contact fetching code and the animation code out to their own structs.
Start off by creating a new Swift file called ContactFetchHelper.swift. After creating the file, add it to a new folder called Helpers. First, we'll extract all the contact fetching code to our ContactFetchHelper struct. Then, we'll refactor ViewController.swift so it uses our new helper instead of implementing all the fetching code in the view controller. The following is the implementation for ContactFetchHelper:
import Contacts

struct ContactFetchHelper {
    typealias ContactFetchCallback = ([ContactDisplayable]) -> Void

    let store = CNContactStore()

    func fetch(withCallback callback: @escaping
      ContactFetchCallback) {
        if CNContactStore.authorizationStatus(for: .contacts)
          == .notDetermined {
            store.requestAccess(for: .contacts, completionHandler:
              {authorized, error in
                if authorized {
                    self.retrieve(withCallback: callback)
                }
            })
        } else if CNContactStore.authorizationStatus(for: .contacts)
           == .authorized {
            retrieve(withCallback: callback)
        }
    }

    private func retrieve(withCallback callback:
      ContactFetchCallback) {
        let keysToFetch =
            [CNContactGivenNameKey as CNKeyDescriptor,
             CNContactFamilyNameKey as CNKeyDescriptor,
             CNContactImageDataKey as CNKeyDescriptor,
             CNContactImageDataAvailableKey as CNKeyDescriptor,
             CNContactEmailAddressesKey as CNKeyDescriptor,
             CNContactPhoneNumbersKey as CNKeyDescriptor,
             CNContactPostalAddressesKey as CNKeyDescriptor]

        let containerId = store.defaultContainerIdentifier()
        let predicate = CNContact.predicateForContactsInContainer
          (withIdentifier: containerId)

        guard let retrievedContacts = try? store.unifiedContacts(matching:
          predicate, keysToFetch: keysToFetch) else {
            // call back with an empty array if we fail to retrieve contacts
            callback([])
            return
        }

        let contacts: [ContactDisplayable] = retrievedContacts.map {
          contact in
            return HCContact(contact: contact)
        }

        callback(contacts)
    }
}
This simple struct now contains all the required logic to fetch contacts. Let's go through some of the most interesting parts of code in this struct:
typealiasContactFetchCallback = ([HCContact]) -> Void
This line of code defines an alias, ContactFetchCallback, for a closure that receives an array of HCContact instances and returns nothing. This is the closure that is passed to the fetch method and it's called after the fetching is performed.
The fetch method is the method we'll call whenever we want to fetch contacts. The only argument it takes is a closure that needs to be called when the contacts are fetched. The fetch method performs the same authorization check we had in the view controller's viewDidLoad method.
Next, we have a private method, retrieve, that actually retrieves the contacts. The fetch method calls this method and passes on the callback it received. Once retrieve has retrieved the contacts, it calls the callback with the array of fetched contacts.
In ViewController.swift, all you will need to do is use the following code to retrieve contacts:
let contactFetcher = ContactFetchHelper()
contactFetcher.fetch { [weak self] contacts in
    self?.contacts = contacts
    self?.collectionView.reloadData()
}
You can delete the retrieveContacts method entirely and the preceding snippet replaces the code that checked for permissions in viewDidLoad. Also, because we're not directly using the Contacts framework anymore, you can also remove its import at the top of the file. You have now successfully extracted the contact's fetching code into a struct and you're using a typealias to make your code more readable. This is already a big win for maintainability and reusability. Now, let's extract our animation code as well.
The process of extracting our bounce animation is a little bit more complex than it was to extract the contact fetching. The purpose of extracting this bounce animation is to make it bounce, so we can make other objects in other sections of our app bounce just as the contact cell's image does.
To figure out what our bounce animation helper should do exactly and how it should work, it's a great idea to think about how you want to use this helper at the call site. The call site can be defined as the place where you use your helper. So, in this case, the call site is considered the ViewController. Let's write some down some pseudo code to try and determine what we will program later:
let onBounceComplete = { [weak self] finished in
    self?.performSegue(
withIdentifier: "contactDetailSegue",
        sender: self)
}

let bounce = BounceAnimationHelper(targetView: cell.contactImage,
onComplete: onBounceComplete)
This looks pretty good already and in reality, it's very close to the actual code we'll end up with later. All we really want to do is configure a bounce animation by passing it a view to perform the bounce on and to have some control over, should, happen after the animation is complete. We should consider the following two things before we can write the BounceAnimationHelper implementation:
- We can't set the bounce duration, is this desired?
- We have no control over the start time of the animation, so manually starting it would be nice
To address the first point, we could implement two initializers: one that uses a default duration and another where the users of the helper can specify their own duration. Doing this makes use of Swift's powerful method overloading, which enables us to write multiple initializers for the same object. This also enables programmers to write methods with the same name but a different signature due to different parameters.
The second point is valid, and we should write the helper in a way that requires manual starting of the animation. Theoretically speaking, we could add a Boolean value to the initializer that enables users of the helper to choose whether the animation should start automatically or not. We won't do this for now because manually starting the animation will make it feel more like the UIViewPropertyAnimator that's used under the hood. The calling code we'll end up with will look similar to the following code. You can go ahead and add it to the ViewController.swift file in place of the current bounce animation. We'll implement the helper shortly:
let onBounceComplete = { [weak self] finished in
    self?.performSegue(
withIdentifier: "contactDetailSegue", sender: self)

(without the newline after "contactDetailSegue",
}

let bounce = BounceAnimationHelper(targetView: cell.contactImage,
onComplete: onBounceComplete)

bounce.startAnimation()
Now that we have the call site figured out, let's take a look at the implementation of our BounceAnimationHelper. Create a new Swift file and add it to the Helpers folder. Start off by defining a struct named BounceAnimationHelper in the corresponding Swift file. Next, let's define a typealias for the completion handler and specify the properties we will need in our struct, as follows:
import UIKit

struct BounceAnimationHelper {
    typealias BounceAnimationComplete = (Bool) -> Void

    let animator: UIViewPropertyAnimator
}
The initial implementation for the struct is pretty bare boned. We define a typealias that passes a Boolean into a closure that has no return value. We'll also hold on to the UIViewPropertyAnimator so we can tell it to start whenever the helper's startAnimation method is called. Let's add the initializers we came up with earlier, in the following code:
init(targetView: UIView, onComplete: BounceAnimationComplete) {
    self.init(targetView: targetView, onComplete: onComplete, duration: 0.4)
}

init(targetView: UIView, onComplete: BounceAnimationComplete, duration: TimeInterval) {

}
These two initializers provide the APIs we're looking for. The first initializer calls out to the second with a default duration value of 0.4. Doing this allows us to write the actual animation in just a single place. There is just one initializer, the designated initializer, that's responsible for fully configuring our helper. The implementation for this initializer looks like this:
init(targetView: UIView, onComplete: BounceAnimationComplete, duration: TimeInterval) {
    let downAnimationTiming = UISpringTimingParameters(
dampingRatio: 0.9,
  initialVelocity: CGVector(dx: 20, dy: 0))

  self.animator = UIViewPropertyAnimator(
        duration: duration/2,
  timingParameters: downAnimationTiming)

  self.animator.addAnimations {
  targetView.transform =
CGAffineTransform(scaleX: 0.9, y: 0.9)
    }

  self.animator.addCompletion { position in
        let upAnimationTiming = UISpringTimingParameters(
dampingRatio: 0.3,
  initialVelocity:CGVector(dx: 20, dy: 0))

        let upAnimator = UIViewPropertyAnimator(
            duration: duration/2,
  timingParameters: upAnimationTiming)

  upAnimator.addAnimations {
  targetView.transform =
CGAffineTransform.identity

   }
upAnimator.addCompletion(onComplete)

    upAnimator.startAnimation()
    }
}
This snippet is very similar to the old animation; the main differences are highlighted. Instead of hard-coding a duration, we will use half of the total duration for the downward motion and half for the upward motion. Also, instead of using the cell's image directly, we will use the specified targetView. Finally, instead of passing our own callback to the upAnimator closure's completion, we will use the onComplete closure that was passed to the initializer. Note that the down animation hasn't started yet; we'll implement a separate method for that:
func startAnimation() {
    animator.startAnimation()
}
Add the preceding method to the BounceAnimationHelper and run your app. Your animation should bounce just as it did before, except the animation is reusable now and the code in ViewController.swift looks a lot cleaner.
With our cleaned up ViewController in place, let's see where we could benefit from protocols.