
The iPhone is a device that does a lot of things. So far, you've seen how the iPhone does networking and data management. You also know that the iPhone is really good at displaying content to your users. However, the iPhone can do much more. It's a device that people carry with them every day, and it contains all kinds of sensors that provide unique opportunities to build apps that help people manage their day to day lives.
People use their phones to navigate through the traffic or to figure out where they're heading through the compass app. The iPhone is also used to track workouts or even runs. Also, let's not forget that both the iPhone and iPad are used by people to take pictures and shoot videos. When we build apps, we need to be aware that we can use the iPhone's sensors to create a rich, fluid, and interactive experience.
In this chapter, we'll take a look at the following three sensors that are present in the iPhone and also at use cases for each of them and how you can use them in real applications:
- The camera
- The motion sensor
- GPS
In this chapter, you'll learn how to responsibly use each of these sensors. We'll take a look at what it takes to obtain access to these sensors and how they can be used to improve your apps. We'll try to avoid obvious use cases, such as taking a picture and saving it to the camera roll or taking a picture with the camera, attaching GPS data to it, and storing it in CoreData.
Instead, we will focus on building a nice login screen for a fictional app named ArtApp. This application is an Augmented Reality application that focusses on art. The login form fields will be positioned at the center of the screen. The camera will provide a background, and as the users move their phone, we'll make the login field move around a bit. This effect will look similar to the iOS wallpaper parallax effect you probably saw before. We'll use the location data to provide a fictional indication of how many pieces of Augmented Reality art are nearby their current location. Before we get started, we will create a new Single Page App named ArtApp; you don't have to include Core Data or Unit Tests for this application.
There are different ways to access the camera in iOS. Most applications won't directly access the camera and use the UIImagePickerController class. This class is the easiest way for developers to access the camera as all of the controls and interface elements are already implemented. The UIImagePickerController enables users to take a photo, switch to the front-facing camera, and more. In short, it provides access to all controls a user may expect from the default camera app.
If you simply want to enable your user to take a picture or shoot a video that is used in your app, UIImagePickerController is probably your best option. Let's take a quick look at how to use this class in your apps. Note that the following code does not work as you might want on the iOS simulator because it does not have access to the camera:
let imagePicker = UIImagePickerController()

if UIImagePickerController.isSourceTypeAvailable(.camera) {
    imagePicker.sourceType = .camera
    imagePicker.cameraCaptureMode = .photo
} else {
    imagePicker.sourceType = .photoLibrary
}

present(imagePicker, animated: true, completion: nil)
The preceding code will present the user with a camera interface, if possible. If the camera is not available, the users are presented with an image picker that shows their photo library.
This example isn't very useful because we don't gain access to the photo the users chose or took with their camera. To obtain access, we must set ourselves as a delegate for the image picker. The most important method for us to implement is imagePickerController(_:didFinishPickingMediaWithInfo:). This method is one of the three available delegate methods, and it's called whenever our users have finished taking a picture or have picked an image from their photo library.
The chosen image is available in the info dictionary that's passed to the delegate method. An implementation of this delegate method could be the following:
extension ViewController: UIImagePickerControllerDelegate {
    func imagePickerController(_ picker: UIImagePickerController,
      didFinishPickingMediaWithInfo info: [String : AnyObject]) {

        guard let image = info[UIImagePickerControllerOriginalImage]
            else { return }

        anImageView.image = image
    }
}
The preceding snippet extracts the original image from the info dictionary and sets it as the image for an image view. It's possible to allow the user to crop the image before picking it. To do this, you will need to set the image picker controller's allowsEditing property to true. If you did this, the cropped image is available through the UIImagePickerControllerCroppedImage key. For an exhaustive list of keys that are passed to the info dictionary, refer to UIKit's page on Editing Information Keys in the documentation.
Although the approach above is very convenient if all you need to do is to access an image from the users' library or if you want them to supply an image through the camera, it's not the way to go if you need to read input from the camera in real-time as our login screen needs to do.
Taking more control over the camera is possible through the AVFoundation framework. The AVFoundation framework is used to record, edit, and playback audio and video. If you look up the documentation for AVFoundation, you'll find that it's a huge framework that contains a whole range of audio- and video-related classes. Our app will focus on the classes that are related to reading the camera and displaying the camera feed on the screen.
The range of possibilities that AVFoundation offers is large enough to cover multiple chapters, so we will focus on a small section of capabilities of AVFoundation. However, this book wouldn't be complete if we didn't at least skim over some of its other classes and capabilities.
We'll take a look at two relatively simple use cases for AVFoundation before we move on to implementing the video feed. First, we will take a look at AVPlayer and how it can be used to play back a list of audio streams. Next, we'll take a look at video playback and how picture in picture works for the newer iPad models.
Playing audio with AVFoundation is fairly straightforward. All you need is an AVPlayer, or AVQueuePlayer if you have multiple items you want to play. Each resource that you play should be wrapped up in an AVPlayerItem instance. An AVPlayerItem provides an interface to the media it contains. For instance, it enables you to play or pause media and to change the playback rate.
As we'll see in a moment, AVPlayer itself can also be directly addressed to manipulate playback of the current item. Let's dive right into a basic example of audio playback with AVFoundation. For this and following snippets regarding AVFoundation, you can refer to the AVFoundationExploration project in the accompanying source code:
import UIKit
import AVFoundation

class AudioViewController: UIViewController {

    let streamUrls = [
        URL(string: "link/to/audio/resource"),
        URL(string: "link/to/audio/resource")]

    var audioPlayer: AVQueuePlayer!

    override func viewDidLoad() {
        super.viewDidLoad()

        var playerItems = [AVPlayerItem]()
        for url in streamUrls {
            playerItems.append(AVPlayerItem(url: url!))
        }

        audioPlayer = AVQueuePlayer(items: playerItems)
    }

    @IBAction func startStopTapped() {
        if audioPlayer.rate == 0.0 {
            audioPlayer.play()
        } else {
            audioPlayer.pause()
        }
    }
}
The preceding example plays audio files from a URL. This means that you could stream media from the network easily with the AVQueuePlayer. Go ahead and try it out. Spotify has a free-to-use API that you can use to play 30-second fragments from songs. Paste a couple of these URLs into the streamUrls array, and you're good to go.
This example is very basic, of course, and if you plan to build a full-blown audio player, you'll still have a lot of work to do in order to enable seeking, skipping songs, and more. All of these playback-related manipulations can be done through AVPlayer and AVPlayerItem.
One final remark on audio playback is that Apple recommends that you use AVAudioPlayer if you're going to play audio files that are locally available on the device. If your media is locally available, AVAudioPlayer will provide a couple of convenient properties that you can use, such as isPlaying, volume, and pan. These properties are not available on AVPlayer, and you'll need to resort to implementing them yourself if you find yourself needing these features. So, if possible, use AVAudioPlayer instead of AVPlayer to play back audio files.
Playing video with AVFoundation is pretty similar to playing audio. We can use an AVPlayer instance and pass it an instance of AVPlayerItem that points to a video on the web. This approach requires us to create an AVPlayerLayer that will use the AVPlayer as an input for its visual contents, as shown in the following code:
import UIKit
import AVFoundation

class VideoViewController: UIViewController {

    let url = URL(string: "path/to/video/file")
    var videoPlayer: AVPlayer!
    var playerLayer: AVPlayerLayer!

    override func viewDidLoad() {
        super.viewDidLoad()

        let videoItem = AVPlayerItem(url: url!)
        videoPlayer = AVPlayer(playerItem: videoItem)
        playerLayer = AVPlayerLayer(player: videoPlayer)

        playerLayer.backgroundColor = UIColor.black.cgColor
        playerLayer.videoGravity = AVLayerVideoGravityResizeAspectFill

        view.layer.addSublayer(playerLayer)

        videoPlayer.play()
    }

    override func viewDidLayoutSubviews() {
        let playerWidth = view.bounds.width - 20
        let playerHeight = playerWidth / (16/9)
        let yPos = (view.bounds.height - playerHeight) / 2

        playerLayer.frame = CGRect(x: 10,
                                   y: yPos,
                                   width: playerWidth,
                                   height: playerHeight)
    }
}
The preceding code speaks for itself. You'll notice the similarities with playing audio and how we manually set up a player layer that uses the player instance to drive its visual contents. If you test this example, you'll notice that there are no controls available for the video even though this is probably desirable for your app.
For this purpose, Apple has created the AVPlayerViewController. This view controller provides all the native interaction controls your users expect from iOS, and it's often a great idea to use this view controller instead of manually programming controls for your media playback. Let's take a look at a quick example:
playerController = AVPlayerViewController()
playerController.willMove(toParentViewController: self)
addChildViewController(playerController)
playerController.didMove(toParentViewController: self)

playerController.player = videoPlayer
view.addSubview(playerController.view)
playerController.view.translatesAutoresizingMaskIntoConstraints = false

NSLayoutConstraint.activate([
    playerController.view.widthAnchor.constraint(equalTo: view.widthAnchor,
      multiplier: 1, constant: -20),
    playerController.view.heightAnchor.constraint(equalTo:
      playerController.view.widthAnchor, multiplier: 9/16),
    playerController.view.centerXAnchor.constraint(equalTo: view.centerXAnchor),
    playerController.view.bottomAnchor.constraint(equalTo: bottomLayoutGuide.topAnchor, constant: -70)
])
You'll notice that there are a couple of lines at the beginning of the code that you haven't seen before and aren't even related to AVFoundation. What we essentially do whenever we use an AVPlayerViewController is add it as a child view controller. This means that we create an instance of another view controller and add its view to the container view controller's view. We will need to call willMove(toParentViewController:) and didMove(toParentViewController:) so the child view controller can take on some internal work. Once a view controller is another view controller's child, it will pass several life cycle methods to its child; some examples are trait collection changes and orientation changes. It's important that you properly take care of adding a child view controller, otherwise it will never receive lifecycle updates.
After we create the player view controller, we associate a player with it and we're good to go. All that's left to do is to add the player controller's view and set up some constraints for it so it has a good-looking layout. It's interesting to note that if you have multiple players that use the same player item, they will play the item back in sync. Go ahead and take a look at the sample code to see this in action.
With this video primer done, it's time to move on to using the camera. We didn't cover all of AVFoundation since there's simply too much to cover and most of it is very specialized and only useful if you're building a video or audio editing app.
Now that you've looked at AVFoundation and what it does, we can zoom in on the area we're most interested in: the camera. We'll first take a look at an overview of the AVFoundation classes that we will need to use to implement the video feed that will act as the background for our login screen. Once it's clear how a video feed is displayed to the user, we'll go in and take care of the implementation.
Whenever you capture a video feed with AVFoundation, there are several classes involved. This is in contrast with the extremely simple-to-use UIImagePickerController, which enables the user to take a picture, crop it, and pass it back to its delegate.
The foundation for our login screen is AVCaptureDevice. This class is responsible for providing access to the camera hardware. On an iPhone, this is either the front or back camera. AVCaptureDevice also provides access to camera hardware settings, such as flash or camera brightness.
The AVCaptureDevice works in concert with AVCaptureDeviceInput. AVCaptureDeviceInput is responsible for reading the data from the device and providing it to us. We don't get to read the data directly. The output data from a device input is made available through a subclass of AVCaptureOutput.
AVCaptureOutput is an abstract base class, this means that you never use this class directly but instead you make use of one of its subclasses. There are subclasses available for photos, such as AVCaptureStillImageOutput, which is used for capturing photos. There's also AVCaptureVideoOutput. This class provides access to raw video frames that can be used, for example, to create a live video preview. This is exactly what we will use later.
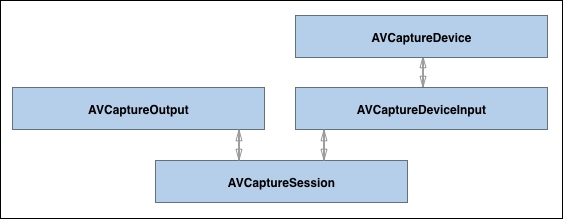
The input and output class instances are managed by AVCaptureSession. AVCaptureSession ties the input and output together and ensures that everything works. If either the input or the output generates an error, AVCaptureSession will raise the error.
To recap, these are the four classes that you will always use when you use AVFoundation to work with video:
- AVCaptureDevice
- AVCaptureDeviceInput
- AVCaptureOutput
- AVCaptureSession
The device works together with the device input. The output provides access to the output of the capture input and the session ties it all together. The following image illustrates these relationships:
Let's implement our live video preview.
If you have used an app that accesses the camera before, you should know that you must ask permission before you can access the user's camera. In iOS 10, asking permission became a bit stricter. If you want to access the camera, you will need to specify this in your app's Info.plist. Similar to how you obtained access to the user's contacts, this involves adding a key and a description to the Info.plist. Let's do this. First, add a key named NSCameraUsageDescription and add a short description; refer to the following screenshot to make sure that you added the key correctly:
After adding this key, we're ready to start implementing the camera feed. First, we'll prepare our storyboard so it can properly display our video feed in a way that allows us to add the login view later. In ViewController.swift, we will need an @IBOutlet for the video view:
@IBOutlet var videoView: UIView!
In Main.storyboard, drag out a UIView and use constraints to make it equal to the width and height of the view controller's view. Also, add constraints to center it inside of the view horizontally and vertically. This will properly position our view. Now, use the Outlet Inspector to connect the videoView with the view you just added. Lastly, go to the project settings and make sure that the only supported orientation is portrait since we will not make our camera view adaptive.
Add the following empty method to ViewController.swift; we'll use this method to implement the camera view soon:
func displayCamera() {

}
Next, add the following implementation for viewDidLoad:
override func viewDidLoad() {
    super.viewDidLoad()

    let authStatus = AVCaptureDevice.authorizationStatus(forMediaType:
      AVMediaTypeVideo)
    switch authStatus {
    case .notDetermined:
        AVCaptureDevice.requestAccess(forMediaType: AVMediaTypeVideo) {
          authorized in
            if authorized {
                self.displayCamera()
            } else {
                print("Did not authorize")
            }
        }
    case .authorized:
        displayCamera()
    case .denied, .restricted:
        print("No access granted")
    }
}
The code in this implementation should look somewhat familiar to when you asked permission to access the user's contacts. Depending on the current authorization status, we either ask the user for permission or call the displayCamera method. If the access is denied or the user doesn't accept the authorization request, you could implement a method that informs the user to open the settings app and allow access in order to display the live feed.
The next step in our app is to actually display the camera feed. Start off with adding the following instance variable to ViewController:
let captureSession = AVCaptureSession()
The capture session can be instantiated right away because it doesn't need any configuration. We'll set it up to suit our needs in the displayCamera method.
The simplest way to get the live camera feed to show is using the following displayCamera implementation:
func displayCamera() {
    guard let availableCameras = AVCaptureDevice.devices(withMediaType:
      AVMediaTypeVideo) as? [AVCaptureDevice]
        else { return }

    var backCamera: AVCaptureDevice?

    for camera in availableCameras  {
        if camera.position == .back {
            backCamera = camera
        }
    }

    guard let camera = backCamera,
        let input = try? AVCaptureDeviceInput(device: camera)
        else { return }

    if captureSession.canAddInput(input) {
        captureSession.addInput(input)
    }

    guard let preview = AVCaptureVideoPreviewLayer(session: captureSession)
        else { return }

    preview.frame = view.bounds
    view.layer.addSublayer(preview)

    captureSession.startRunning()
}
The preceding code first fetches all of the devices that are connected to the device and are able to provide the video. In our case, since we're working with iOS, this is usually a front-facing camera and a back-facing camera. The position property provides us with this information, and we're interested in the back-facing camera for our app. In order to retrieve the back-facing camera, we loop over the available devices and figure out which camera is the back camera.
If we find a camera, we attempt to create AVCaptureDeviceInput with this device. Then, we check whether our session is able to receive our input, if so, we add it. Finally, we use a class that wasn't discussed before. We use an AVCaptureVideoPreviewLayer instance to display the raw output from the camera. We don't have to manually parse the output if we use this class, as it's supposed to provide a convenient way to show the video preview. In order to start capturing the video output, we must manually call startRunning on the capture session.
If you build and run your app with this code in place, you'll see a live preview of whatever is visible on the camera at that time. The next step is to add the login fields and use the motion sensors to make it move as we move the device.