
When Apple announced its personal assistant Siri, developers immediately started speculating about a special Siri SDK. Year after year, hopes were high but the SDK never came. Until 2016's WWDC. As part of iOS 10, developers can finally integrate Siri into their apps using the Siri SDK.
This chapter will teach you all the ins and outs of SiriKit, the framework that's used to build extensions for Siri. Just like iMessage apps, widgets, and notifications, Siri makes use of extensions to integrate with other apps. This is convenient because a lot of knowledge we've already gained from studying extensions in iOS carries over to Siri extensions.
In addition to existing knowledge and terminology, SiriKit introduces many new concepts and terminologies. For example, Siri extensions use intents and a specialized vocabulary to integrate with your app. These concepts have been introduced especially for Siri extensions so you'll need to learn about them before you can implement a Siri extension.
In this chapter, we're going to cover the following topics:
- Understanding intents and vocabularies
- Handling intents in your extension
- Adding custom UI to Siri
The three topics above cover the entire flow that your extension goes through when a user uses Siri to make a request for your app. In this chapter, we won't be working on a specific app. Instead, we'll explore the different types of requests that Siri can handle through a series of very small apps that only receive requests from Siri, we won't implement a lot of code to handle these requests.
You'll see why this is an effective approach to learning about SiriKit soon. Let's start with diving into intents and vocabularies.
Siri is a powerful, smart, and learning personal assistant that aims to give natural responses to natural speech input. This means that there is often more than one way to say something to Siri. Some users like to be extremely polite to Siri, saying please and thank you whenever they ask for something. Other users like to be short and to the point, they simply tell Siri what they want and that's it.
This means that Siri has to be really smart about how it interprets language and how it converts the user's requests to actionable items. Not only does Siri take into account language, it's also aware of how the user is using Siri. If the user activated Siri by saying Hey Siri, Siri will be more vocal and verbose than when the user has activated Siri by pressing and holding the home button.
To convert the user's spoken request into actions, Siri uses intents. An intent is a way to describe an action. These intents are supported by app-specific vocabularies; this allows you to make sure that your users can use terms that are familiar to them because they are also used in your app.
Siri does not handle an unlimited amount of intents. All intents that Siri can handle belong to a predefined set of domains. If you plan to create a Siri extension for your own app, it must fit in one of the predefined domains that Siri understands. Currently, Siri can handle a handful of domains:
- Messaging
- Calling
- Payments
- Workouts
- Ride booking
- Photo search
If your app is not in one of these domains, Siri won't be able to integrate with your app and your app might even be rejected during review for the App Store. In order to integrate Siri with your app, your app must ask the user for permission for it to be used with Siri. It's recommended that you do this as soon as your user first opens your app because this ensures that your app is available to Siri as soon as possible. Make sure that you ask for permission appropriately though, you don't want to unpleasantly surprise your user with a permission request.
You also need to add the NSSiriUsageDescription key to your Info.plist file and you need to enable the Siri capability in your main app's capabilities tab. Note that the Siri capability is only available if you're on the paid Apple developer program.
Finally, if a user wants to use your app for a certain action, it's important that they mention your app's name to Siri. This is to make sure that apps don't hijack certain words or verbs which would result in a confusing experience. It doesn't matter exactly how or when the user does this. Siri is all about natural language and it will even understand if your app name is used as a verb. For example, MyBankApp some money to John Doe would be interpreted as a money transfer action from an app named MyBankApp to a person named John Doe.
However, Siri does not have all of the information needed to send money to John Doe yet. This is where intents have their moment of fame. Let's see how intents work and how our extension can work together with Siri to handle the sample request we just saw.
Whenever a user asks Siri to perform a task on their behalf, an intent is used to describe the task at hand. Every intent has a number of parameters or variables associated with them. Siri will always attempt to fill in these parameters to the best of its ability. Your intent extension is used by Siri to make sure that all the parts are present and valid.
You might expect intents to be a part of SiriKit. In reality, they're not. Intents have their own framework in iOS 10, enabling other applications like Maps to make use of intents as well. This means that any knowledge regarding intents that you've obtained in this chapter will translate over to other extensions as well.
To enable Siri to use your application for certain intents, you must specifically register for these intents in your extension's Info.plist file. In the book's repository, you'll find a project named SiriKitMessaging. We'll add extensions to this application in order to create a fake messaging app.
Before we explore the project, let's set it up so we can make use of Siri. First, make sure that the signing identity for the project is set to your own paid developer team. You can find and change your team on the General tab for your application target. Next, go to the Capabilities tab and enable Siri. Also, open the Info.plist file and add the NSSiriUsageDescription key to it. Provide a short description about what Siri is being used for in this app.
Finally, open ViewController.swift and add the following implementation for viewDidLoad:
override func viewDidLoad() {
    super.viewDidLoad()

    INPreferences.requestSiriAuthorization { status in
        print(status)
    }
}
This snippet will ask for permission to use Siri as soon as possible in this app, just like Apple recommends. If permission is already granted, the permissions dialog won't be displayed so we don't have to check for the current status prior to asking permission.
Now that you're all set up to integrate your app with Siri, let's go ahead and explore the example project.
In the project, you'll find two extensions; MessagingExtension and MessagingExtensionUI. Whenever you add a new Intents extension to your project, you're offered the option to add a UI extension as well. We'll look into these UI extensions later. Currently, we're only interested in registering our extension to be used for certain intents.
If you open the MessagingExtension folder, there are just two files in there. An IntentHandler.swift file and the extension's Info.plist. The IntentHandler class is responsible for communicating with Siri to resolve, confirm and handle the intents we're registered for. The Info.plist is used to determine which intents can be handled by our extensions so let's look at that right now.
Open the Info.plist file and drill into the NSExtension key. You'll notice that there are two intent-related keys in the file; IntentsRestrictedWhileLocked and IntentsSupported. The second key contains all of the intents our extension can handle. The IntentsRestrictedWhileLocked key specifies which of these supported keys can't be used without unlocking the device. SiriKit itself will lock certain intents by default. Money transfers, for example, can't be done without unlocking the device regardless of your extension settings:
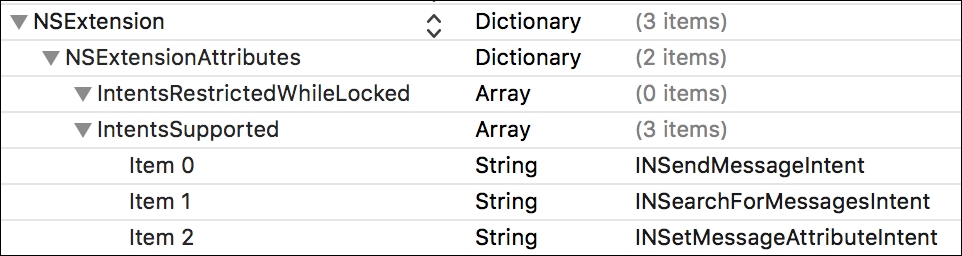
The list of intents in IntentsSupported is a list of intent class names that your extension can handle. Xcode has added a couple of example intents but this list is not even close to an exhaustive list of available intents. For a complete list of available intents, you should have a look at the documentation for the Intents framework.
The available intents range from starting a workout, to booking a restaurant reservation, or requesting another person transfer money into your account. Each of these intents have their own corresponding class that holds all of the properties that are used to describe the intent.
For our demonstration of integrating Siri into your app, only the INSendMessageIntent is required so you can remove the other two intents. If you want to experiment with multiple intents from the get go, go ahead and keep any intents you want to play around with. Or add more if you'd like.
Some apps have their own terminology for certain actions, this will make resolving certain intents a lot harder for Siri. Luckily, we can help Siri out by adding our own vocabulary to Siri. The next section focuses on doing this.
Siri will always make its best effort to understand what your users are trying to do with your app and Siri is usually quite good at this. However, sometimes it's really hard for Siri to figure out what's going on or what your user is trying to do. To help Siri figure out what your user might mean, you make use of vocabularies. A vocabulary is a set of strings that map to intents or parameters.
There are two ways for you to teach Siri the vocabulary for your app. One way is through a .plist file. This approach is mostly used for when your app has a global vocabulary that applies to all users. The second method is to write code inside of your app that teaches Siri new vocabularies on the fly. This is particularly useful if you want Siri to learn about certain contacts that your user has in your app.
We've already covered that Siri understands when a user wants to do something with your application, even if your user uses your app name as a verb. However, your app name might not be the only thing that's specific to your app. Let's look at an example for a workout app.
If the user asks Siri: Hey Siri, start an Ultimate Run using RunPotato, Siri would be able to figure out what RunPotato is; it's the app that will handle the intent. What it won't be able to understand instantly is what it means to start an Ultimate Run. This is where a custom vocabulary entry will make a lot of sense.
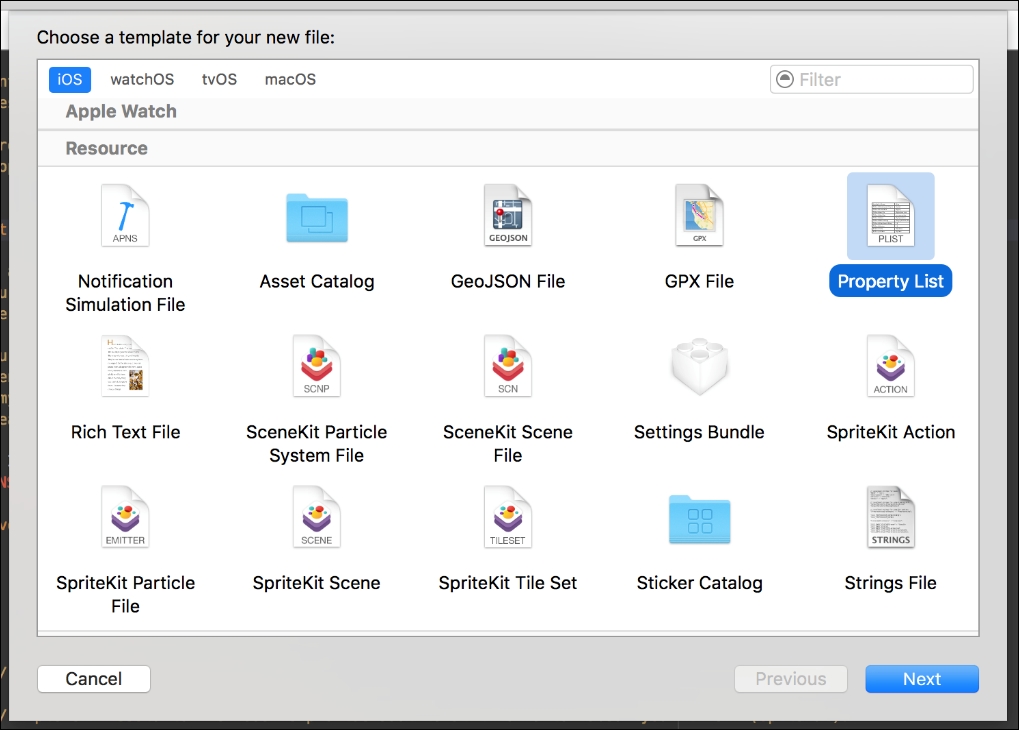
Custom vocabularies are always provided through the app itself, never through the extension. To add vocabulary in the form of app-specific words, like the workout name above, we need to add an extra .plist file to our app. To add a new .plist file, add a new file and select the Property List file type under the Resource header.
The file you create must be named AppIntentVocabulary. This file will contain all of the information about your custom vocabulary. Our example phrase, Hey Siri, start an Ultimate Run using RunPotato, contains a workout type that Siri won't understand straight away so we'll need to add this workout to our .plist somehow.
The vocabulary .plist is rather specific and verbose. This is important though because it's purpose is to provide a clear window into the vocabulary our app uses. When we created our AppIntentVocabulary.plist file, Xcode added a dictionary at the top level of our file. This file is a dictionary that will contain all of our custom vocabulary.
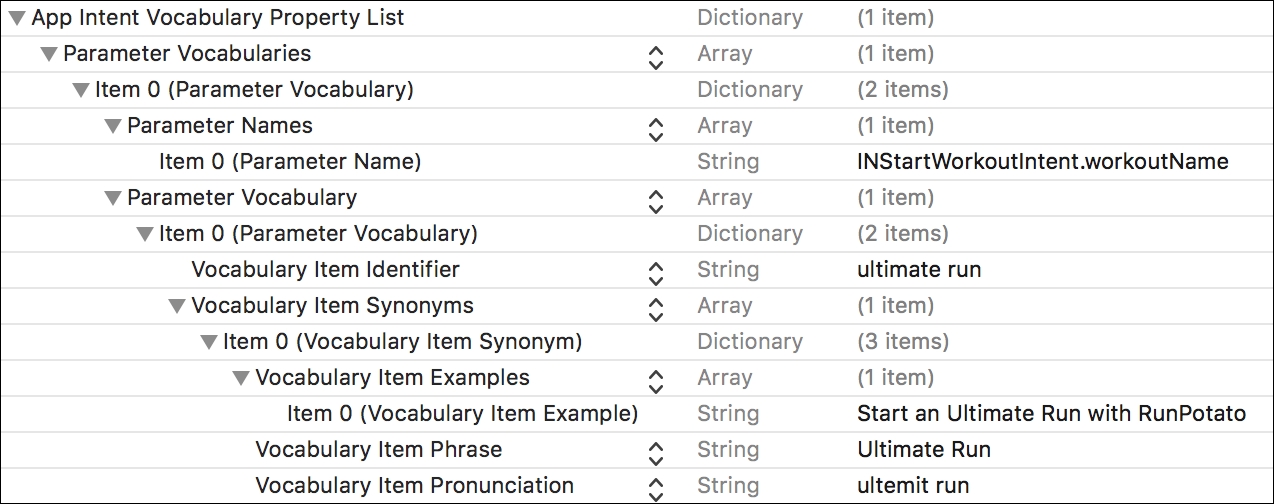
For our example phrase, we're going to need a Parameter Vocabularies array. This array will contain Parameter Vocabulary items that specify the vocabulary our app uses for workout names. The first item we should specify is a Parameter Names array. For our app, it contains a single entry; INStartWorkoutIntent.workoutName. We also must add a Parameter Vocabulary dictionary to our entry in the Parameter Vocabularies array.
The Parameter Vocabulary dictionary has keys for the item identifier, synonyms for this identifier, a pronunciation, and even an example phrase. This is all really verbose but it will provide Siri with all of the information it could ever need to resolve user input for your app. The image below shows an example of the entry we'd create for the ultimate run workout:
The second way you can teach Siri about specific content in your app is through the INVocabulary class. The INVocabulary class is used to teach Siri about information that is specific to the user or changes over time.
A great example of user-specific vocabulary is the workout programs that your user manually creates inside of your app. Or maybe the user's friends in a messaging app if these friends don't match the people your user has in their list of contacts on their device.
Updating the vocabularies for your app always occurs in batches. You don't add or remove individual words or phrases for a specific string type. For example, if your user adds a new workout type to a workout application, or if they add a new content in a messaging application, you must update the entire vocabulary for this type of string. Let's look at an example in the following code:
let workoutNames = Workout.orderedNames
INVocabulary.shared().setVocabularyStrings(workoutNames, of: .workoutActivityName)
This snippet uses a computed property on a Workout model to retrieve an ordered set of Workout names. These names are then added to the shared INVocabulary instance so Siri can learn all about them. The ordering of these names is important. You should always order the set you're adding by their likeliness of being used by your user. If your user adds or removes a workout, you must simply repeat the two lines above, and you must always overwrite your custom vocabulary for a specific string type if you change it.
If your user logs out or does something else that makes their custom vocabulary redundant or invalid, you need to make sure to delete the entire user specific vocabulary by calling removeAllVocabularyStrings() on the shared INVocabulary. This method of teaching vocabulary to Siri is not intended for vocabularies that are common to all users. This type of vocabulary should be added through the .plist file.
Now that you're completely up to speed regarding intents and vocabularies, let's see how we can start handling the intents Siri sends your way.