
In the previous chapter, you were introduced to AutoLISP, AutoCAD's macro and programming language. You learned that you can take advantage of this powerful tool without having to know anything about its internal workings. In this chapter, you'll see how you can take more control of AutoLISP and have it do the things you want to do for your own AutoCAD environment. You'll learn how to store information such as text and point coordinates, how to create smart macros, and how to optimize AutoLISP's operation on your computer system.
A word of advice as you begin this chapter: Be prepared to spend lots of time with your computer'not because programming in AutoLISP is all that difficult, but because it's so addicting! You've already seen how easy it is to use AutoLISP programs. I won't pretend that learning to program in AutoLISP is just as easy as using it, but it isn't as hard as you may think. Once you've created your first program, you'll be hooked.
In this chapter you'll learn to do the following:
You access AutoLISP through the AutoLISP interpreter, which is a little like a handheld calculator. When you enter information at the Command prompt, the interpreter evaluates it and then returns an answer. Evaluating means performing the instructions described by the information you provide. You could say that evaluation means 'find the value of.' The information you give the interpreter is like a formula—called an expression in AutoLISP.
Let's examine the interpreter's workings in more detail:
Start AutoCAD, and open a new file called
Temp25a. You'll use this file just to experiment with AutoLISP, so don't worry about saving it.At the Command prompt, enter (+ 2 2)

By entering information this way, you can perform calculations or even write short programs on the fly.
The plus sign you used in step 2 represents a function—an instruction telling the AutoLISP interpreter what to do. In many ways, it's like an AutoCAD command. A simple example of a function is the math function, Add, represented by the plus sign. AutoLISP has many built-in functions, and you can create many of your own.
Another calculator-like capability of the interpreter is its ability to remember values. You probably have a calculator that has some memory. This capability allows you to store the value of an equation for future use. In a similar way, the AutoLISP interpreter lets you store values using variables.
A variable is like a container that holds a value. That value can change many times in the course of a program's operation. You assign values to variables by using the Setq function. For example, let's assign the numeric value 1.618 to a variable named Golden. This value, often referred to as the golden section, is the ratio of a rectangular area's height to its width. Aside from having some interesting mathematical properties, the golden section is said to represent a ratio that occurs frequently in nature. Follow these steps:
At the Command prompt, enter (setq Golden 1.618)
Enter !Golden
The exclamation point (!) acts as a special character that extracts the value of an AutoLISP variable at the prompt. From now until you close the drawing, you can access the value of Golden at any time by preceding the variable name with an exclamation point.
In addition to using math formulas as responses to prompts, you can use values stored as variables. Let's see how you can use the variable Golden as the radius for a circle:
Click the Circle button on the Draw toolbar.
At the
Specify center point:prompt, pick a point in the center of your screen.At the
Specify radius of circle or [Diameter]:prompt, enter !Golden
Numbers aren't the only things that you can store using Setq. Let's look at the variety of other data types that variables can represent.

Understanding the various data types and how they differ is important because they can be a source of confusion if not carefully used. Remember that you can't mix data types in most operations, and quotes and parentheses must always be used in opening and closing pairs.
Variables are divided into several categories called data types. Categorizing data into types lets AutoLISP determine precisely how to evaluate the data and keep programs running quickly. Your computer has different ways of storing various types of data, so the use of data types helps AutoLISP communicate with the computer more efficiently. Also, data types aid your programming efforts by forcing you to think of data as having certain characteristics. The following list describes each of the available data types:
- Integers
Integers are whole numbers. When a mathematical expression contains only integers, only an integer is returned. For example, the expression
(/ 2 3)
means two divided by three. (The forward slash is the symbol for the division function.) This expression returns the value 0 because the answer is less than 1. Integers are best suited for counting and numbering. The numbers 1, −12, and 144 are all integers.
- Real numbers
Real numbers, often referred to as reals, are numbers that include decimals. When a mathematical expression contains a real number, a real number is returned. For example, the expression
(/ 2.0 3)
returns the value 0.66667. Real numbers are best suited in situations that require accuracy. Examples of real numbers are 0.1, 3.14159, and −2.2.
- Strings
Strings are text values. They're always enclosed in double quotes. Here are some examples of strings: "1", "George", and "Enter a value".
- Lists
Lists are groups of values enclosed in parentheses. Lists provide a convenient way to store whole sets of values in one variable. There are two classes of lists: those meant to be evaluated and those intended as repositories for data. In the strictest sense, AutoLISP programs are lists because they're enclosed in parentheses. Here are some examples of lists: (6.0 1.0 0.0), (A B C D), and (setq golden 1.618).
- Elements
There are two basic elements in AutoLISP: atoms and lists. I've already described lists. An atom is an element that can't be taken apart. Atoms are further grouped into two categories: numbers and symbols. A number can be a real number or an integer. A symbol, on the other hand, is often a name given to a variable, such as
point1ordx2.A number can be used as part of a symbol's name; however, its name must always start with a letter. Think of a symbol as a name given to a variable or function as a means of identifying it.
In the previous exercise, you used the Setq function to store variables. The way you used Setq is typical of all functions.
Functions act on arguments to accomplish a task. An argument can be a symbol, a number, or a list. A simple example of a function acting on numbers is the addition of 0.618 and 2. In AutoLISP, this function is entered as
(+ 0.618 2)
and returns the value 2.618.
This formula—the function followed by the arguments—is called an expression. It starts with the left (opening) parenthesis first, then the function, then the arguments, and finally the right (closing) parenthesis.
Arguments can also be expressions. An expression is a list that contains a function and arguments for that function. You can nest expressions. For example, here is how to assign the value returned by 0.618 + 2 to the variable Golden:
(setq Golden (+ 0.618 2))
This is called a nested expression. Whenever expressions are nested, the deepest nest is evaluated first, then the next deepest, and so on. In this example, the expression adding 0.618 to 2 is evaluated first. On the next level out, SETQ assigns the result of the expression (+ 0.168 2) to the variable Golden.
Arguments to functions can also be variables. For example, suppose you use Setq to assign the value 25.4 to a variable called Mill. You can then find the result of dividing Mill by Golden, as follows:
Enter (setq Mill 25.4)
Enter (/ Mill Golden)
Enter (setq B (/ Mill Golden))
The examples so far have shown only numbers being manipulated, but you can manipulate text in a similar way. Variables can be assigned text strings that can later be used to enter values in commands requiring text input. For text variables, you must enclose text in quotation marks, as in the following example:
(setq text1 "This is how text looks in AutoLISP")
This example shows a sentence being assigned to the variable text1.
Strings can also be concatenated, or joined together, to form new strings. Here is an example of how two pieces of text can be added together:
(setq text2 (strcat "This is the first part and " "this is the second part"))
Here, the AutoLISP function strcat is used to join the two strings. The result is as follows:
"This is the first part and this is the second part"
Strings and numeric values can't be evaluated together, however. This may seem like a simple rule, but if not carefully considered, it can lead to confusion. For example, it's possible to assign the number 1 to a variable as a text string, by entering this:
(setq foo "1")
Later, you may accidentally try to add this string variable to an integer or real number and AutoCAD will return an error message.
The Setq and the addition and division functions are but three of many functions available to you. AutoLISP offers all the usual math functions, plus many others used to test and manipulate variables. Table 27.l shows some commonly used math functions.
Table 27.1. Math Functions Available in AutoLISP
Operation | Example |
|---|---|
Add |
|
Subtract |
|
Multiply |
|
Divide |
|
Find largest number in list |
|
Find smallest number in list |
|
| |
Add 1 to |
|
Subtract 1 from |
|
Find the absolute value of |
|
Arc tangent of |
|
Cosine of |
|
e raised to the |
|
|
|
Greatest common denominator |
|
Natural log of |
|
Sine of |
|
Square root of |
|
Like numeric values, point coordinates can also be stored and retrieved. But because coordinates are sets of two or three numeric values, they have to be handled differently. AutoLISP provides the Getpoint function to handle the acquisition of points. Try the following to see how it works:
At the Command prompt, enter (getpoint)
Pick a point near the middle of the screen. In the prompt area, you see the coordinate of the point you picked.
Here, Getpoint pauses AutoCAD and waits for you to pick a point. Once you do, it returns the coordinate of the point you pick in the form of a list. The list shows the X, Y, and Z axes enclosed by parentheses.
You can store the coordinates obtained from Getpoint using the Setq function. Try the following:
Enter (setq point1 (getpoint))
Pick a point on the screen.
Enter !point1
Here you stored a coordinate list in a variable called point1. You then recalled the contents of point1 using the !. The value of the coordinate is in the form of a list with the X, Y, and Z values appearing as real numbers separated by spaces instead of the commas you've been used to.
So far, you've learned how to use AutoLISP to do simple math and to store values as variables. Certainly, AutoLISP has enormous value with these capabilities alone, but you can do a good deal more. In this section, you'll examine how to combine these three capabilities—math calculations, variables, and lists—to write a program for drawing a rectangle:
Press F2 to flip to a text display.
At the Command prompt, enter (defun c:rec ()
(_<
This is the AutoLISP prompt. It tells you, among other things, that you're in the AutoLISP interpreter. While you see this prompt, you can enter instructions to AutoLISP. You'll automatically exit the interpreter when you have finished entering the program. A program is considered complete when you've entered the last parenthesis, thereby balancing all the parentheses in your program.
Very carefully enter the following several lines. If you make a mistake while typing a line, use the arrow keys to navigate to the location of the error, and then highlight and correct the error. Each time you enter a line and press
(setq Pt1 (getpoint "Pick first corner point:" ))
(setq Pt3 (getpoint "Pick opposite corner:" ))(setq Pt2 (list (nth 0 Pt3) (nth 1 Pt1)))(setq Pt4 (list (nth 0 Pt1) (nth 1 Pt3)))(command "Pline" Pt1 Pt2 Pt3 Pt4 "C"))Once you enter the last parenthesis, you return to the standard AutoCAD Command prompt.
Check the lines you entered against the listing in step 3, and make sure you entered everything correctly. If you find a mistake, start over from the beginning and reenter the program.
When you're done, you get the message C:REC. This confirms that the rectangle-drawing program is stored in memory. Let's see it in action:
Enter Rec
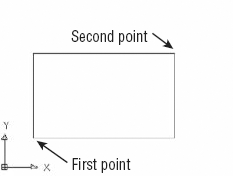
At the
Pick first corner point:prompt, pick a point at coordinate 1,1.At the
Pick opposite corner:prompt, pick a point at 6,4. A box appears between the two points you picked (see Figure 27.2).
The rectangle-drawing program incorporates all the things you've learned so far. Let's see how it works. First, it finds the two corner coordinates of a rectangle, which it gets from you as input; then, it extracts parts of those coordinates to derive the coordinates for the other two corners of the rectangle. Once it knows all four coordinates, the program can draw the lines connecting them. Figure 27.3 illustrates what the rec program does. Next, we'll look at the program in more detail.
In the previous exercise, you started with the following line:
(defun c:rec ()
You may recall from Chapter 26 that the defun function lets you create commands. The name that follows the defun function is the name of the command as you enter it through the keyboard. The c: tells AutoLISP to make this program act like a command. If the c: was omitted, you'd have to enter (rec) to view the program. The set of empty parentheses is for an argument list, which I'll discuss later.
In the next line, the variable Pt1 is assigned a value for a point you enter using your cursor. Getpoint is the AutoLISP function that pauses the AutoLISP program and allows you to pick a point using your cursor or to enter a coordinate. Once a point is entered, Getpoint returns the coordinate of that point as a list.
Immediately following Getpoint is a line that reads as follows:
"Pick first corner point:"
Getpoint allows you to add a prompt in the form of text. You may recall that when you first used Getpoint, it caused the prompt to go blank. Instead of a blank, you can use text as an argument to the Getpoint function to display a prompt describing what action to take.
The third line is similar to the second. It uses Getpoint to get the location of another point and then assigns that point to the variable Pt3:
(setq Pt3 (getpoint "Pick opposite corner:" ))
Once AutoLISP has the two corners, it has all the information it needs to find the other two corners of the rectangle.
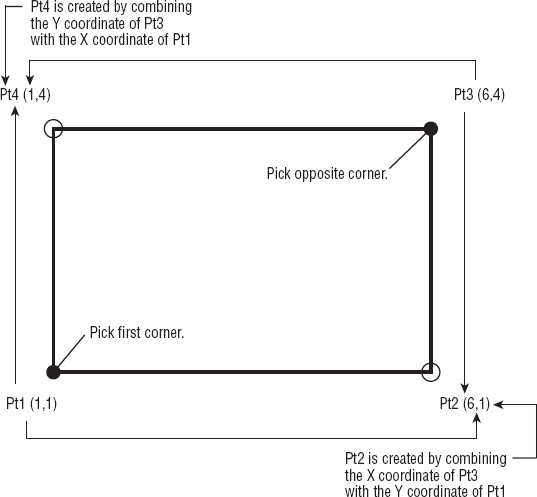
The next thing AutoLISP must do is take apart Pt1 and Pt3 to extract their X and Y coordinates and then reassemble those coordinates to get the other corner coordinates. AutoLISP must take the X coordinate from Pt3 and the Y coordinate from Pt1 to get the coordinate for the lower-right corner of the rectangle (see Figure 27.3). To do this, you use two new functions: Nth and List.
nth extracts a single element from a list. Because coordinates are lists, nth can be used to extract an X, Y, or Z component from a coordinate list. In the fourth line of the program, you see this:
(nth 0 Pt3)
Here the zero immediately following the Nth function tells Nth to take element number 0 from the coordinate stored as Pt3. Nth starts counting from 0 rather than 1, so the first element of Pt3 is considered item number 0. This is the X component of the coordinate stored as Pt3.
To see how Nth works, try the following:
Enter !point1
Enter (nth 0 point1)
Immediately following the first Nth expression is another Nth expression similar to the previous one:
(nth 1 Pt1)
Here, Nth extracts element number 1, the second element, from the coordinate stored as Pt1. This is the Y component of the coordinate stored as Pt1. If you like, try the previous exercise again, but this time, enter (nth 1 point1) and see what value you get.
AutoLISP has extracted the x component from Pt3 and the y component of Pt1. They must now be joined together into a new list. This is where the List function comes in. The List expression looks like this:
(list (nth 0 pt3) (nth 1 pt1))
You know that the first Nth expression extracts an X component and that the second extracts a Y component, so the expression can be simplified to look like this:
(list X Y)
Here X is the value derived from the first Nth expression, and Y is the value derived from the second Nth expression. The List function recombines its arguments into another list, in this case another coordinate list.
Finally, the outermost function of the expression uses Setq to create a new variable called Pt2, which is the new coordinate list derived from the List function. The following is a schematic version of the fourth line of the rec program, so you can see what is going on more clearly:
(setq pt2 (list X Y))
Pt2 is a coordinate list derived from combining the x component from Pt3 and the y component from Pt1.
Try the following exercise to see how List works:
Enter (list 5 6)
Enter (list (nth 0 point1) (nth 1 point1))
The fifth line is similar to the fourth. It creates a new coordinate list using the X value from Pt1 and the Y value from Pt2:
(setq Pt4 (list (nth 0 Pt1) (nth 1 Pt3)))
The last line tells AutoCAD to draw a polyline through the four points to create a box:
(command "Pline" Pt1 Pt2 Pt3 Pt4 "c")
The Command function issues the Pline command and then inputs the variables Pt1 through Pt4. Finally, it enters c to close the polyline. Note that in this expression, keystroke entries, such as "Pline" and "C", are enclosed in quotes.
In your rec program, you prompted the user to pick some points by using the Getpoint function. Several other functions allow you to pause for input and tell the user what to do. Nearly all these functions begin with the Get prefix.
Table 27.2 shows a list of these Get functions. They accept single values or, in the case of points, a list of two values.
In Getstring, string values are case sensitive. This means that if you enter a lowercase letter in response to Getstring, it's saved as a lowercase letter; uppercase letters are saved as uppercase letters. You can enter numbers in response to the Getstring function, but they're saved as strings and can't be used in mathematical operations. Also, AutoLISP automatically adds quotes to string values it returns, so you don't have to enter any.
Table 27.2. Functions That Pause to Allow Input
Function | Description |
|---|---|
| Allows entry of integer values. |
| Allows entry of real values. |
| Allows entry of string or text values. |
| Allows filtering of string entries through a list of keywords. |
| Allows keyboard or mouse entry of angles based on the standard AutoCAD compass points (returns values in radians). |
Allows keyboard or mouse entry of angles based on the | |
| Allows keyboard or mouse entry of distances (always returns values as real numbers, regardless of the unit format used). |
| Allows keyboard or mouse entry of point values (returns values as coordinate lists). |
| Allows selection of a point by using a window.* |
| Allows definition of a set of keywords for the |
* This function requires a base point value as a first argument. This base point defines the first corner of the window. A window appears, allowing you to select the opposite corner.
Just as with Getpoint, all these Get functions allow you to create a prompt by following the function with the prompt enclosed by quotation marks, as in the following expression:
(getpoint "Pick the next point:" )
This expression displays the prompt Pick the next point: while AutoCAD waits for your input.
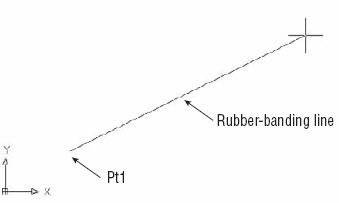
The functions Getangle, Getorient, Getdist, Getcorner, and Getpoint let you specify a point from which the angle, distance, or point is to be measured, as in the following expression:
(getangle Pt1 "Pick the next point:" )
Here, Pt1 is a previously defined point variable. A rubber-banding line appears from the coordinate defined by Pt1 (see Figure 27.4).
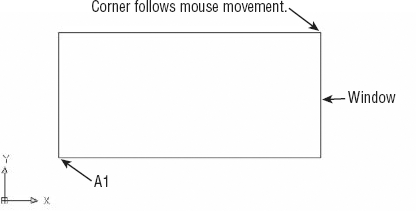
Once you pick a point, the angle defined by Pt1 and the point you pick are returned in radians. You can also enter a relative coordinate through the keyboard in the unit system currently being used in your drawing. Getangle and Getdist prompt you for two points if a point variable isn't provided. Getcorner always requires a point argument and generates a window rather than a rubber-banding line (see Figure 27.5).
You can easily create an AutoLISP expression that lets you select a single object and perform an operation on it. Here is an example of a macro that rotates an object 90°:
(defun c:r90 () (command "rotate" pause " " pause "90"))
In this example, the pause after "rotate" allows you to make a selection. The double quotes that follow act like a
If you load this macro into AutoCAD and run it, you're prompted to select an object. You're then immediately prompted to pick a point for the rotation center. You won't be allowed to continue to select other objects the way you can with most AutoCAD commands.
But what if you want that macro to let you make several selections instead of just one? At this point, you almost know enough to create a program to do that. The only part missing is Ssget.
So far, you know you can assign numbers, text, and coordinates to variables. Ssget is a function that assigns a set of objects to a variable, as demonstrated in the following exercise:
Draw a few random lines on the screen.
Enter (setq ss1 (ssget))
At the
Select objects:prompt, select the lines using any standard selection method. You can select objects just as you would at any object-selection prompt.When you're done selecting objects, press
Start the Move command, and at the object-selection prompt, enter !ss1
Press
In this exercise, you stored a selection set as the variable ss1. You can recall this selection set from the Command prompt using the !, just as you did with other variables.
You can also use the ss1 variable in an AutoLISP expression. For example, the r90 macro in the next exercise lets you select several objects to be rotated 90°:
Enter (defun c:r90 (/ ss1)
To complete the macro, enter
(setq ss1 (ssget))(command "rotate" ss1 "" pause "90"))
and press
Enter r90
At the
Select objects:prompt, select a few of the random lines you drew earlier.Press
The defun function tells AutoLISP this is to be a command called r90. A list follows the name of the macro—it's called an argument list. We'll look at argument lists a bit later in this chapter.
Following the argument list is the (setq ss1 (ssget)) expression you used in the previous exercise. This is where the new macro stops and asks you to select a set of objects to later be applied to the Rotate command.
The next expression uses the Command function. Command lets you include standard AutoCAD command-line input in an AutoLISP program. In this case, the input starts by issuing the Rotate command. It then applies the selection set stored by ss1 to the Rotate command's object-selection prompt. Next, the two "" marks indicate an
Command: RotateSelect objects:!ss1Select objects:Specify base point: (pause for input) Specify rotation angle or [Copy/Reference] <0>: 90
In this macro, the Ssget function adds flexibility by allowing the user to select as many objects as desired. (You could use the Pause function in place of the variable ss1, but with Pause, you can't anticipate whether the user will use a window, pick points, or select a previous selection set.)
Selection sets are memory hogs in AutoLISP. If you create too many of them, you'll end up draining AutoLISP's memory reserves. To limit the memory used by selection sets, you can turn them into local variables. Local variables are variables that exist only while the program is executing its instructions. Once the program is finished, local variables are discarded.
The vehicle for making variables local is the argument list. Let's look again at the set of empty parentheses that immediately follow the program name in the rec macro:
(defun c:rec () . . .)
If you include a list of variables between those parentheses, those variables become local. In the new r90 macro you just looked at, the ss1 selection-set variable is a local variable:
(defun c:r90 (/ ss1). . .)
The argument list starts with a forward slash and then a space followed by the list of variables. Once the r90 macro is done with its work, any memory assigned to ss1 can be recovered.
Sometimes, you'll want a variable to be accessible at all times by all AutoLISP programs. Such variables are known as global variables. You can use global variables to store information in the current editing session. You could even store a few selection sets as global variables. To control memory consumption, however, use global variables sparingly.
A typical task for a program is to execute one function or another depending on an existing condition. This type of operation is often called an if-then-else conditional statement: "If a condition is met, then perform computation A; else perform computation B." AutoLISP offers the If function to facilitate this type of operation.
The If function requires two arguments. The first argument must be a value that returns true or false—in the case of AutoLISP, T for true or nil for false. The second argument is the action to take if the value returned is true. It's like saying, "If true then do A," where "true" is the first argument and "A" is the second. Optionally, you can supply a third argument, which is the action to take if the value returned is nil. ("If true then do A; else do B.")
Here is an example of an If expression:
(if Exst (+ a b) (* a b))
Here the value of the Exst variable determines which of the two following expressions is evaluated. If Exst has a value, it returns T for true; that is, when AutoLISP evaluates Exst, the value returned is T. The expression then evaluates the second argument, (+ a b), which is itself an expression. If Exst doesn't have a value or is nil, the expression evaluates the third argument, (* a b).
Several special AutoLISP functions test variables for specific conditions. For example, you can test a number to see if it's equal to, less than, or greater than another number. In this expression, if A is equal to B, the second argument is evaluated:
(if (= A B) (+ A B) (* A B))
In this expression, if A is greater than B, the second argument is evaluated:
(if (> A B) (+ A B) (* A B))
The functions that test for T or nil are called predicates and logical operators. Table 27.3 shows a list of these functions.
Table 27.3. Predicates and Logical Operators
Function | Returns T (True) If |
|---|---|
| One numeric value is less than another. |
| One numeric value is greater than another. |
| One numeric value is less than or equal to another. |
| One numeric value is greater than or equal to another. |
| Two numeric or string values are equal. |
| Two numeric or string values aren't equal. |
| Two values are exactly the same. |
| Two values are the same (approximate). |
| A symbol represents an atom (as opposed to a list). |
| A symbol represents a list. |
| A numeric value is negative. |
| A symbol is a number, real or integer. |
| A symbol evaluates to zero. |
| All of several expressions or atoms return non-nil. |
| A symbol is nil. |
| A list is nil. |
| One of several expressions or atoms returns non-nil. |
Let's see how conditional statements, predicates, and logical operators work together. Suppose you want to write a program that either multiplies two numbers or adds the numbers together. You want the program to ask the user which action to take depending on which of the two values is greater. Follow these steps:
Enter the following program at the Command prompt, just as you did for the rec program:
(defun c:mul-add ()
(setq A (getreal "Enter first number:" ))(setq B (getreal "Enter second number:" ))(if (< A B) (+ a b) (* a b)))Run the program by entering Mul-add
At the
Enter first number:prompt, enter 3At the
Enter second number:prompt, enter 4Run the program again, but this time enter 4 at the first prompt and 3 at the second prompt. This time, you get the returned value 12.0.
In this program, the first two Setq expressions get two numbers from you. The conditional statement that follows, (< A B), tests to see if the first number you entered is less than the second. If this predicate function returns T for true, (+ a b) is evaluated. If it returns nil for false, (* a b) is evaluated.
You'll often find that you need to perform not just one but several steps, depending on some condition. Here is a more complex If expression that evaluates several expressions at once:
(if (= A B) (progn (* A B)(+ A B)(- A B) ))
In this example, the function Progn tells the If function that several expressions are to be evaluated if (= A B) returns true.
Sometimes, you'll want your program to evaluate a set of expressions repeatedly until a particular condition is met. If you're familiar with BASIC or Fortran, you know this function as a loop.
You can repeat steps in an AutoLISP program by using the While function in conjunction with predicates and logical operators. Like the If function, While's first argument must be one that returns a T or nil. You can have as many other arguments to the While function as you like as long as the first argument is a predicate function:
(while test (expression 1) (expression 2) (expression 3). . .)
The While function isn't the only one that will repeat a set of instructions. The Repeat function causes a set of instructions to be executed several times, but unlike While, Repeat requires an integer value for its first argument, as in the following:
(Repeat 14 (expression 1) (expression 2) (expression 3). . .)
In this example, Repeat will evaluate each expression 14 times.
A third function, Foreach, evaluates an expression for each element of a list. The arguments to Foreach are first a variable, then a list whose elements are to be evaluated, and then the expression used to evaluate each element of the list:
(foreachvar1(list1) (expression var1))
Foreach is a bit more difficult to understand at first because it involves a variable, a list, and an expression, all working together.
At this point, you've seen several useful programs created with just a handful of AutoLISP functions. Although I can't give a tutorial showing you how to use every available AutoLISP function, in these final sections I'll demonstrate a few more. This is far from a complete list, but it should be enough to get you well on your way to making AutoLISP work for you. Experiment with the functions at your leisure'but remember, using AutoLISP can be addicting!
These functions are useful for manipulating geometric data. (And don't forget the Get functions listed earlier, in Table 27.2.)
AngleFinds the angle between two points, and returns a value in radians. For example,
(angle '(6.0 4.0 0.0) '(6.0 5.0 0.0))
returns 1.57. This example uses two coordinate lists for arguments, but point variables can also be used.
DistanceFinds the distance between two points. The value returned is in base units. Just like
Angle,Distancerequires two coordinates as arguments. The expression(distance '(6.0 4.0 0.0) '(6.0 5.0 0.0))
returns 1.0.
PolarReturns a point in the form of a coordinate list based on the location of a point, an angle, and a distance. The expression
(polar '(1.0 1.0 0.0) 1.5708 1.0)
returns (0.999996 2.0 0.0). The first argument is a coordinate list, the second is an angle in radians, and the third is a distance in base units. The point must be a coordinate list.
IntersReturns the intersection point of two vectors, with each vector described by two points. The points must be in this order: the first two points define the first vector, and the second two points define the second vector. The expression
(inters
'(1.0 4.0 0.0)'(8.0 4.0 0.0)'(5.0 2.0 0.0)'(5.0 9.0 0.0)
)
returns (5.0 4.0 0.0). If the intersection point doesn't lie between either of the two vectors, you can still obtain a point, provided you include a non-nil fifth argument.
These functions allow you to manipulate strings. Although you can't supply strings for the text input of the text command, you can use the Command function with string variables to enter text, as in the following:
(Setq note "Hello World")
 (command "text" (getpoint) "2.0" "0" note)
In this example, note is first assigned a string value. Then, the Command function is used to issue the Text command and place the text in the drawing. Notice the (getpoint) function, which is included to obtain a point location.
Two other string functions, Substr and Strcat, let you manipulate text.
SubstrReturns a portion of a string, called a substring, beginning at a specified location. The expression
(substr "string" 3 4)
returns ring. The first argument is the string containing the substring to be extracted. The second argument, 3, tells
Substrwhere to begin the new string; this value must be an integer. The third argument, 4, is optional and tellsSubstrhow long the new string should be. The length must also be an integer.StrcatCombines several strings, and the result is a string. The expression
(strcat string1 string2 etc. )
returns string1 string2 etc. In this example, the
etc.
indicates that you can have as many string values as you want.
While using AutoLISP, you'll often have to convert values from one data type to another. For example, because most angles in AutoLISP must be represented in radians, you must convert them to degrees before you can use them in commands. You can do so using the Angtos function. Angtos converts a real number representing an angle in radians into a string in the degree format you desire. The following example converts an angle of 1.57 radians into surveyor's units with a precision of four decimal places:
(angtos 1.57 4 4)
This expression returns N 0d2′44″ E. The first argument is the angle in radians, the second argument is a code that tells AutoLISP which format to convert the angle to, and the third argument tells AutoLISP the degree of precision desired. (The third argument is optional.) The conversion codes for Angtos are as follows:
0 = Degrees
1 = Degrees/minutes/seconds
2 = Grads
3 = Radians
4 = Surveyor's units
Now that you've seen an example of what the Angtos data-type conversion can do, let's briefly look at similar functions:
AtofandAtoiAtof converts a string to a real number. The expression
(atof "33.334")
returns 33.334.
Atoiconverts a string to an integer. The expression(atoi "33.334")
returns 33.
ItoaandRtosItoa converts an integer to a string. The argument must be an integer. The expression
(itoa 24)
returns 24.
Rtosconverts a real number to a string. As with Angtos, a format code and precision value are specified. The expression(rtos 32.3 4 2)
returns ″2′-8¼″″.
The first argument is the value to be converted, the second argument is the conversion code, and the third argument is the precision value. The codes are as follows:
1 = Scientific
2 = Decimal
3 = Engineering
4 = Architectural
5 = Fractional
FixandFloatFix converts a real number into an integer. The expression
(fix 3.3334)
returns 3.
Floatconverts an integer into a real number. The expression(float 3)
returns 3.0.
When you exit AutoCAD, the rec program will vanish. But just as you were able to save keyboard shortcuts in Chapter 26, you can create a text file on a disk containing the rec program. That way, you'll have ready access to it at all times.
To save your programs, open a text editor and enter them through the keyboard just as you entered the rec program, including the first line that contains the defun function. Be sure you save the file with the .lsp filename extension. You can recall your program by choosing Tools
If you prefer, you can use the manual method for loading AutoLISP programs. This involves the Load AutoLISP function. Just as with all other functions, it's enclosed by parentheses. In Chapter 26, you loaded the GETAREA.LSP file using the Load/Unload Applications dialog box. To use the Load function instead to load GETAREA.LSP, enter the following:
(Load "getarea")
Load is one of the simpler AutoLISP functions because it requires only one argument: the name of the AutoLISP file you want to load. Notice that you don't have to include the .lsp filename extension.
If the AutoLISP file resides in a folder that isn't in the current path, you need to include the path in the filename, as in the following example:
(Load "C:/Mastering AutoCAD/Projects/Chapter 26/getarea")
Instead of the usual Windows , / is used to indicate folders. The forward slash is used because the backslash has special meaning to AutoLISP in a string value: It tells AutoLISP that a special character follows. If you attempted to use in the previous example, you'd get an error message.
As you may guess, the Load function can be a part of an AutoLISP program. It can also be included as part of a menu to load specific programs whenever you select a menu item. You'll learn more about customizing the menu in the next chapter.
Using Scripts
Before Autolisp, scripts were used to automate tasks in AutoCAD, and many users still use scripts for simple tasks. Scripts are simply a list of instructions to AutoCAD to perform a set of operations. You store scripts in text files using the Windows Notepad application.
To write a script, open a text file and type in your AutoCAD instructions as if you were entering them at the AutoCAD Command prompt. If a command requires point input or object selections, you can supply coordinate locations. You have to be very careful to make sure your text file contains the exact keystrokes that would be used if you were entering them in AutoCAD.
Once you have entered your script, make sure the very last line has a return at the end (press the enter key). Then you can save your script file with the SCR file name extension.
To run the script in AutoCAD, type Script
Scripts are very inflexible, and one missing keystroke or misplaced space can render your script useless. Today, you have Autolisp and the Action Recorder to handle most automation projects. But if you have a simple operation that is repetitive, it can be a useful tool.
I hope you'll be enticed into trying some programming on your own and learning more about AutoLISP. You can find a wealth of information in the AutoCAD Help window:

In the panel on the left, expand the AutoLISP reference listing. You see an alphabetic listing of the AutoLISP functions, some of which were discussed in this chapter.
As you work with AutoLISP material in the AutoCAD Help window, you'll also see references to Visual LISP. This is a self-contained programming environment for AutoLISP. Visual LISP is an excellent tool if you intend to make extensive use of AutoLISP in your work. Once you understand the basics of AutoLISP, you may want to explore Visual LISP through the tutorial in the AutoCAD Help system. You can find the Visual LISP tutorial by choosing Help
- Understand the interpreter
One of the simplest ways to start using AutoLISP is to enter an AutoLISP expression directly into the command line.
- Master It
Give an example of an AutoLISP formula that performs a simple math function.
- Use arguments and functions
AutoLISP needs two elements, an argument and an expression, to do any work.
- Master It
Which is the function in the following AutoLISP expression?
(+ 45 33)
- Create a simple program
You can input a simple program directly into AutoCAD by entering it through the command line.
- Master It
Name a function that pauses an AutoLISP program for user input.
- Select objects with AutoLISP
AutoLISP offers an expression that lets you select objects and then perform some operation on the set of objects.
- Master It
What function lets you select objects, and what AutoLISP feature do you use to store your selection?
- Control the flow of an AutoLISP program
You can set up an AutoLISP program to test for conditions and perform different operations depending on the result.
- Master It
Name some functions that test for a condition.
- Convert data types
The functions in AutoLISP are designed to work with their own types of data. For example, math functions work only with numbers, and string operations work only with text. If you need to use the result of a math function in text, you can convert the number into text.
- Master It
What is the name of the function that converts an angle in radians to text?
- Store your programs as files
You can save your AutoLISP program in a text editor like Windows Notepad and then later have AutoCAD retrieve your program for use any time.
- Master It
What is the filename extension for AutoLISP programs?