
As we saw in Chapter 1, Retrospective on software quality and Java testing, a unit test case is composed of four stages:
- Setup (optional): First, the test initializes the test fixture (before the picture of the SUT).
- Exercise: Second, the test interacts with the SUT, getting some outcome from it as a result.
- Verify: Third, the outcome from the system under test is compared to the expected value using one or several assertions (also known as predicates). As a result, a test verdict is created.
- Teardown (optional): Finally, the test releases the test fixture to put the SUT back into the initial state.
In JUnit 4, there were different annotations to control these test phases. JUnit 5 follows the same approach, that is, Java annotations are used to identify different methods within Java classes, implementing the test life cycle. In Jupiter, all these annotations are contained in the package org.junit.jupiter.api.
The most basic JUnit annotation is @Test, which identifies the methods that have to be executed as tests. Therefore, a Java method annotated with org.junit.jupiter.api.Test will be treated as a test. The difference of this annotation with respect to JUnit 4's @Test is two folded. On the one hand, the Jupiter @Test annotation does not declare any attributes. In JUnit 4, @Test can declare the test timeout (as long attribute with the timeout in milliseconds), on the other hand, in JUnit 5, neither test classes nor test methods need to be public (this was a requirement in JUnit 4).
Take a look at the following Java class. Possibly, it is the simplest test case we can create with Jupiter. It has simply a method with the @Test annotation. The test logic (that is the exercise and verify stages as described before) would be contained inside the method myTest.
package io.github.bonigarcia;

import org.junit.jupiter.api.Test;

class SimpleJUnit5Test {

    @Test
    void mySimpleTest() {
          // My test logic here
    }

}
The Jupiter annotations (also located in the package org.junit.jupiter.api) aimed to control the setup and tear down stages in JUnit 5 tests are described in the following table:
| JUnit 5 annotation | Description | JUnit 4's equivalence |
| @BeforeEach | Method executed before each @Test in the current class | @Before |
| @AfterEach | Method executed after each @Test in the current class | @After |
| @BeforeAll | Method executed before all @Test in the current class | @BeforeClass |
| @AfterAll | Method executed after all @Test in the current class | @AfterClass |
The following picture depicts the order of execution of these annotations in a Java class:

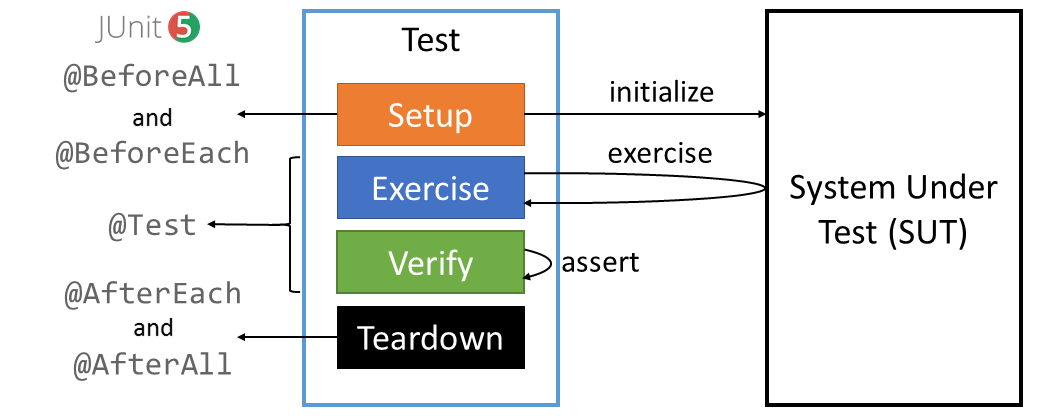
Let's go back to the generic structure for tests we saw at the beginning of this section. Now, we are able to map the Jupiter annotations to control the test lifecycle with the different parts of a test case. As illustrated in the following picture, we carry out the setup stage by annotating methods with @BeforeAll and @BeforeEach. Then, we carry out the exercise and verify stages in methods annotated with @Test. Finally, we carry out the tear down process in the methods with @AfterEach and @AfterAll.
Let's see a simple example, which uses all these annotations in a single Java class. This example defines two tests (that is, two methods annotated with @Test), and we define additional methods for the rest of the test life cycle with the annotations @BeforeAll, @BeforeEach, @AfterEach, and @AfterAll:
package io.github.bonigarcia;

import org.junit.jupiter.api.AfterAll;
import org.junit.jupiter.api.AfterEach;
import org.junit.jupiter.api.BeforeAll;
import org.junit.jupiter.api.BeforeEach;
import org.junit.jupiter.api.Test;

class LifecycleJUnit5Test {

      @BeforeAll
      static void setupAll() {
            System.out.println("Setup ALL TESTS in the class");
      }

      @BeforeEach
      void setup() {
            System.out.println("Setup EACH TEST in the class");
      }

      @Test
      void testOne() {
            System.out.println("TEST 1");
      }

      @Test
      void testTwo() {
            System.out.println("TEST 2");
      }

      @AfterEach
      void teardown() {
            System.out.println("Teardown EACH TEST in the class");
      }

      @AfterAll
      static void teardownAll() {
            System.out.println("Teardown ALL TESTS in the class");
      }

}
If we run this test class, first @BeforeAll will be executed. Then, the two test methods will be executed sequentially, that is, the first one and then the other. In each execution, the setup method annotated with @BeforeEach will be executed before the test, and then the @AfterEach method. The following screenshot shows an execution of the tests using Maven and the command line:
