
8. Implementing HomeKit
HomeKit, introduced with iOS 8, offers a consistent way for apps to integrate with home automation technology. Instead of needing a separate app to interact with each type of home automation hardware, HomeKit-certified devices (even from different manufacturers, using different communication standards) can all be managed from a HomeKit app. In addition, HomeKit information set up on an iOS device in one app can be used by any other HomeKit app on the same device. That way, the user has to set up information about the home and home automation devices only once, and the information is available in a consistent way.
HomeKit offers remote access so that the user can interact with home automation technology from any connected location, with secure communication between the app and the home automation devices.
HomeKit also offers advanced techniques for organizing and managing home automation devices. For example, rooms can be organized into zones (like Upstairs Rooms and Downstairs Rooms), and then operations can be performed on all the accessories in a zone (like, Turn On Lights in the Upstairs Rooms). In addition, HomeKit offers triggers. Triggers can fire a set of actions at a set time or on a repeatable schedule.
HomeKit interactions can take place only in the foreground, except for triggers that are managed by iOS. This way, the user experience is preserved by ensuring that home automation actions are not taking place by competing background apps with potentially unexpected results.
The Sample App
The sample app for this chapter is called HomeNav. It supports adding homes to HomeKit, adding rooms to homes, adding accessories to homes, and associating accessories to rooms. Accessories can be inspected to see what services they offer, what characteristics are available for each service, and the values for each characteristic. HomeNav can also update characteristics for power settings and lock status, to turn devices on or off and to lock or unlock a door.
Introduction to HomeKit
HomeKit offers a consistent API for apps to set up and communicate with home automation devices. It bears repeating that the data which HomeKit stores about a home and associated devices is independent of any individual app; rather, it is available to all apps that use HomeKit. HomeKit APIs can be accessed only while an app is in the foreground, which prevents potential errors that could come from multiple apps updating HomeKit simultaneously in the background.
HomeKit provides access to home information through the HMHomeManager class. Through this class, an app can get access to information about home data available (instances of HMHome), and can be notified when homes are added or removed via delegate methods.
Homes in HomeKit can contain rooms (instances of HMRoom), which can then be organized into zones (HMZone). Rooms can belong to more than one zone; for example, a bathroom could belong to the Upstairs Rooms zone and the Bathrooms zone.
Home automation devices are represented by accessories (instances of HMAccessory), which must be discovered through an HMAccessoryBrowser. The browser can search locally for Wi-Fi and Bluetooth-capable devices that HomeKit can interact with, and return a list of accessories for display and selection. After an accessory has been added to a house, an app can inspect and update it. Accessories provide services (HMService), which are made up of characteristics (HMCharacteristic). For example, a coffeemaker accessory might have a coffeemaking service, a light service, and a clock service. The coffeemaker service might have a read-only characteristic that includes whether it is currently brewing, not brewing with heater on, or not brewing with heater off. It might then have a readable and writable characteristic that includes the desired state of the coffeemaker that an app can write in order to change the state of the coffeemaker.
Changes to characteristics can be grouped into action sets (HMActionSet), which can be executed all at once, or can be scheduled on a timer (HMTimerTrigger). Scheduled updates are the one exception to the rule that all HomeKit APIs must be called by a foreground app; because the schedule is maintained and executed by iOS, the app does not need to be in the foreground for scheduled updates to happen.
When a HomeKit-enabled app accesses HomeKit for the first time (meaning there is no home information set up in HomeKit currently), the app should be able to walk a user through the home setup process. This means that the app should prompt the user to set up a home, add rooms, and add accessories to rooms. The sample app takes a minimal approach to this by just prompting the user to add a home or room when none exists; an app in the store should walk the user through the process and make it simple and clear.
Setting Up HomeKit Components
To set up an app to use HomeKit, first enable the HomeKit capability in the project. Enabling the HomeKit capability requires a valid, paid developer account so that the needed entitlement can be added to the app identifier.
Developer Account Setup
Xcode needs iOS developer account information in order to connect to the Member Center and perform all the setup necessary for HomeKit on the developer’s behalf. Select Xcode, Preferences from the Xcode menu, and then select the Accounts tab. To add a new account, click the plus sign in the lower left of the Accounts tab and select Apple ID. Enter the account credentials in the dialog shown in Figure 8.1 and click the Add button.

Xcode will validate the credentials and gather account information if valid. After a valid developer account is configured, Xcode will be able to perform the HomeKit capability setup steps.
Enabling HomeKit Capability
To set up the HomeKit capability, view the HomeNav Target in Xcode, click the Capabilities tab, and find the HomeKit section. Change the HomeKit switch to On, and Xcode will automatically create an entitlements file for the project and will configure the app identifier with the HomeKit entitlement, as shown in Figure 8.2. (Note that the app identifier will need to be changed from the sample app’s app identifier to something unique before this will work.)
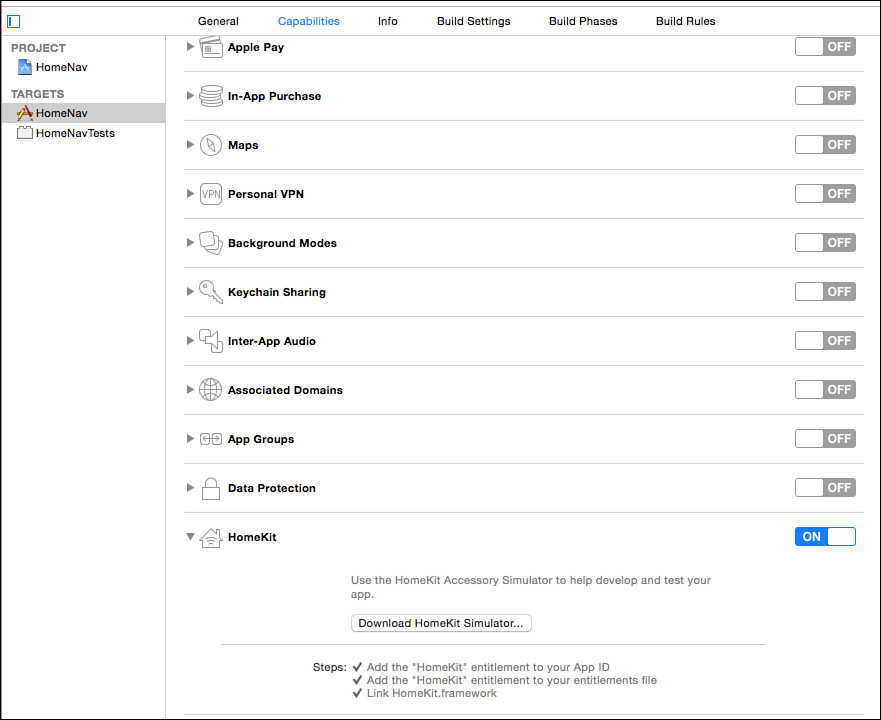
After the HomeKit capability is enabled, Xcode will present a link to download the HomeKit Simulator, and will note the steps that were completed to enable the HomeKit capability. The HomeKit Simulator will be explained in the section “Testing with HomeKit Accessory Simulator,” later in this chapter.
After the HomeKit capability is enabled, and there are checkmarks by all the listed steps, the app is ready to use HomeKit.
Home Manager
The Home Manager (instance of HMHomeManager) is the only way to get and update home information in HomeKit. An instance of HMHomeManager is needed to get the current homes that have been set up, to add a new home, or to remove an existing home. In addition, the HMHomeManagerDelegate protocol should be implemented when home information has been updated in HomeKit. In the sample app, this is done in ICFHomeTableViewController, in the viewDidLoad method.
self.homeManager = [[HMHomeManager alloc] init];
[self.homeManager setDelegate:self];
The home manager will update the list of available homes, and call the delegate method homeManagerDidUpdateHomes: when the list of homes is available. The sample app will reload the table view to display the most up-to-date home information. If no homes are set up, the sample app will prompt the user to create a new home.
- (void)homeManagerDidUpdateHomes:(HMHomeManager *)manager {
[self.tableView reloadData];
if ([manager.homes count] == 0)
{
[self addHomeButtonTapped:nil];
}
}
If the home manager has been called for the first time on the device, it will trigger a permission check, as shown in Figure 8.3.
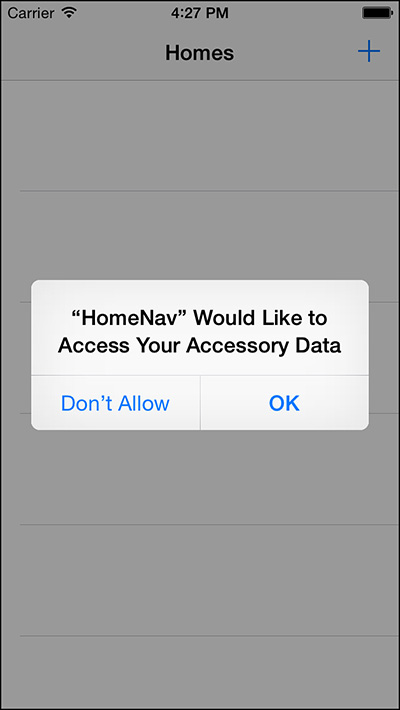
Specifying Don’t Allow will prevent HomeKit from providing any information to the app. This setting can be changed in Settings.app in the Privacy, HomeKit section.
If the user is signed into an iCloud account on the device but has not turned on iCloud Keychain, HomeKit will prompt the user to turn on iCloud Keychain to allow access to HomeKit from all the user’s iOS devices, as shown in Figure 8.4. If iCloud Keychain is not enabled, HomeKit will not function correctly and will receive an error for any HomeKit operations.

Tip
In case other errors are encountered with HomeKit, the HomeKit Constants Reference on Apple’s Developer Web site is available with a bit more detail about each error code.
Home
The sample app will prompt the user to add a home, as shown in Figure 8.5, if no homes have been set up in HomeKit. The user can also tap the Add (+) button at any time to add a new home.
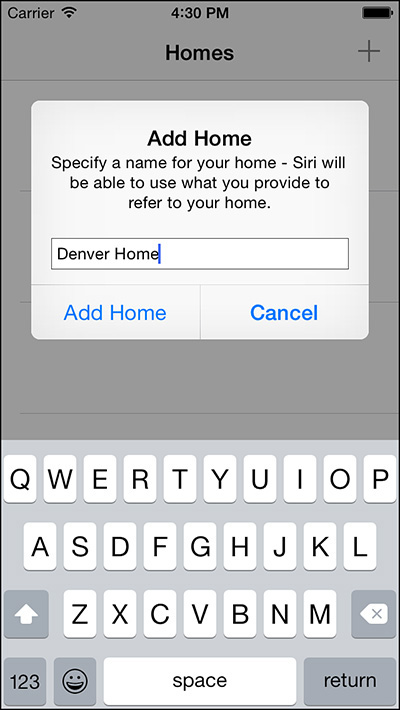
Tapping Add Home will grab the home name text from the text field, and request that the home manager add a new home with the name provided. The home name must be unique.
UITextField *homeNameTextField = addHomeAlertController.textFields.firstObject;
NSString *newHomeName = homeNameTextField.text;
__weak ICFHomeTableViewController *weakSelf = self;
[self.homeManager addHomeWithName:newHomeName
completionHandler:^(HMHome *home, NSError *error)
{
if (error)
{
NSLog(@"Error adding home: %@",error.localizedDescription);
} else
{
NSInteger rowForAddedHome = [weakSelf.homeManager.homes indexOfObject:home];
NSIndexPath *indexPathForAddedHome = [NSIndexPath indexPathForRow:rowForAddedHome inSection:0];
[weakSelf.tableView insertRowsAtIndexPaths:@[indexPathForAddedHome]
withRowAnimation:UITableViewRowAnimationAutomatic];
}
}];
The home manager will call the completion handler with either an error or a new instance of HMHome. The logic will determine an index path for the new home, and animate it into the table view. The home can now be used to set up rooms and accessories.
If the user has set up a home by mistake or does not want to maintain the home any longer, the user can delete the home from the table view. The table view is set up to allow editing mode. When a delete edit action is received in the tableView:commitEditingStyle:forRowAtIndexPath: method, the home corresponding to the row will be deleted using the removeHome:completionHandler: method on the homeManager.
HMHome *homeToRemove = [self.homeManager.homes objectAtIndex:indexPath.row];
__weak ICFHomeTableViewController *weakSelf = self;
[self.homeManager removeHome:homeToRemove completionHandler:^(NSError *error) {
[weakSelf.tableView deleteRowsAtIndexPaths:@[indexPath]
withRowAnimation:UITableViewRowAnimationAutomatic];
}];
After the home has been deleted, the completion handler block is used to delete the corresponding row from the table view. Note that deleting a home will delete all other related HomeKit objects, such as rooms and accessories tied to the home.
Rooms and Zones
Rooms in HomeKit (instances of HMRoom) represent a physical room in a home, such as kitchen, master bedroom, or living room. Rooms are also used to organize accessories; for example, the “front door lock” accessory might be in the foyer. To edit rooms for a home, the user can tap on the row for the home in the sample app. If the user is visiting the rooms view and no rooms have been set up for the home, the user will be prompted to add a room. The user will need to provide a room name that is unique within the home, and the method will add the room to the home using the addRoomWithName:completionHandler: method.
__weak ICFRoomTableViewController *weakSelf = self;
[self.home addRoomWithName:newRoomName completionHandler: ^(HMRoom *room, NSError *error)
{
if (error)
{
NSLog(@"Error adding home: %@",error.localizedDescription);
} else
{
NSInteger row = [weakSelf.home.rooms indexOfObject:room];
NSIndexPath *addedRoomIndexPath = [NSIndexPath indexPathForRow:(row + 1) inSection:0];
[weakSelf.tableView insertRowsAtIndexPaths:@[addedRoomIndexPath] withRowAnimation:UITableViewRowAnimationAutomatic];
}
}];
After the room has been added, the completion handler will insert a new row in the table to display it. The table view will use the rooms property on the self.home instance to determine how many rows are in the table (an extra row is added for the “Tap to add new room” row):
- (NSInteger)tableView:(UITableView *)tableView numberOfRowsInSection:(NSInteger)section {
return [self.home.rooms count] + 1;
}
The rooms property is an array of HMRoom instances. The table view will get the associated HMRoom instance for each row, and display the name property for it in the table cell.
- (UITableViewCell *)tableView:(UITableView *)tableView
cellForRowAtIndexPath:(NSIndexPath *)indexPath {
UITableViewCell *cell = [tableView dequeueReusableCellWithIdentifier:@"roomNameCell"
forIndexPath:indexPath];
if (indexPath.row == 0)
{
[cell.textLabel setText:@"Tap to add new room"];
} else
{
NSInteger row = indexPath.row - 1;
HMRoom *room = [self.home.rooms objectAtIndex:row];
[cell.textLabel setText:room.name];
}
return cell;
}
To remove a room, the user can tap the Edit button to change the table view to editing mode, and tap the delete control for any existing room. In the tableView:commitEditingStyle:forRowAtIndexPath: method the selected room will be removed from the home:
HMRoom *roomToDelete = [self.home.rooms objectAtIndex:(indexPath.row - 1)];
[self.home removeRoom:roomToDelete completionHandler:^(NSError *error) {
[tableView deleteRowsAtIndexPaths:@[indexPath]
withRowAnimation:UITableViewRowAnimationAutomatic];
}];
Zones (instances of HMZone) are logical groupings of rooms; no physical relationship is necessary between rooms in a zone. A zone can be used to organize rooms for convenient handling; for example, a zone might be “upstairs” or “downstairs,” or a zone might be “bedrooms” or “bathrooms.” The zone can be used to interact with all the rooms and accessories in the zone together, such as “turn off the lights downstairs.”
Zones are maintained on a home in much the same way that rooms are; they can be added to and removed from a home, and there is a zones property on an HMHome instance. An HMZone instance will have a rooms property that is an array of HMRooms; there are methods on HMZone to add and remove an HMRoom.
Accessories
An accessory is a physical device that provides services. Examples include lights, switch controls, coffeemakers, door locks, security system components such as motion sensors and door sensors, and more. Accessory providers must complete a certification process for their devices with Apple to work with HomeKit.
Note
In addition to individual devices, there is a special type of device in HomeKit called a bridge. A bridge is a HomeKit-compliant controller for other devices that are not HomeKit-compliant. HomeKit can communicate with the bridge to find out what devices are offered by the bridge, and then can use the bridge to communicate with those devices in a way that looks seamless to the user.
To add accessories to a home, an instance of HMAccessoryBrowser needs to be used to scan the local environment for HomeKit-compliant accessories that have not been added. In the sample app, the user can tap on a home, and then tap on accessories to see the list of accessories currently associated with the home. To search for new accessories, the user can tap Edit, then Search for New Accessories, which will present an instance of ICFAccessoryBrowserTableViewController. This view controller will create an empty array to be populated with accessories, and will instantiate an HMAccessoryBrowser.
self.accessoriesList = [[NSMutableArray alloc] init];
[self.tableView reloadData];
self.accessoryBrowser = [[HMAccessoryBrowser alloc] init];
[self.accessoryBrowser setDelegate:self];
[self.accessoryBrowser startSearchingForNewAccessories];
The accessoryBrowser’s delegate is set to handle when the accessory browser finds new accessories:
- (void)accessoryBrowser:(HMAccessoryBrowser *)browser
didFindNewAccessory:(HMAccessory *)accessory {
[self.accessoriesList addObject:accessory];
NSInteger rowAdded = [self.accessoriesList indexOfObject:accessory];
NSIndexPath *addedIndexPath = [NSIndexPath indexPathForRow:rowAdded inSection:0];
[self.tableView insertRowsAtIndexPaths:@[addedIndexPath] withRowAnimation:UITableViewRowAnimationAutomatic];
}
Each new accessory found by the browser is added to the accessoriesList array, and then inserted into the table view for display, as shown in Figure 8.6.
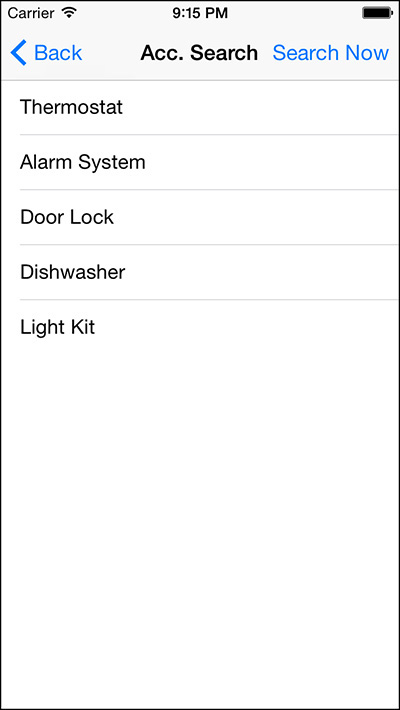
When the user taps on one of the accessories, an alert controller will be presented to request a name for the accessory that is meaningful to the user. For example, the user might want to add the Door Lock accessory, and give it a more specific name, such as Front Door Lock, as shown in Figure 8.7.
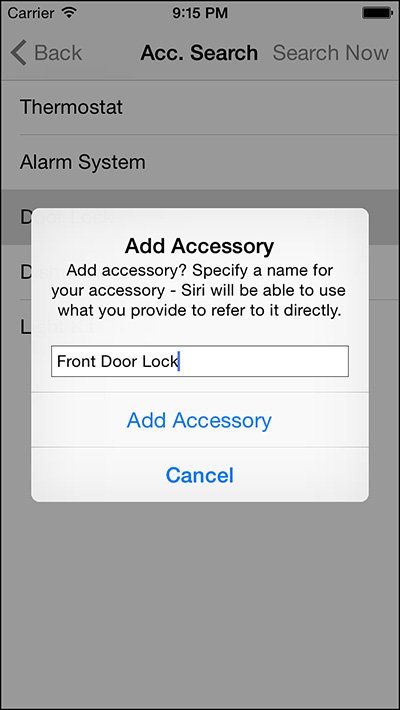
When the user has provided a name, the action block for the alert controller will attempt to add the accessory to the home.
UITextField *accNameTextField = addAccAlertController.textFields.firstObject;
NSString *newAccName = accNameTextField.text;
[self.home addAccessory:selectedAccessory completionHandler:^(NSError *error) {
...
}];
When the addAccessory: method is called on self.home, the pairing process will be initiated by HomeKit. HomeKit will present another alert controller to request the pairing code from the user, as shown in Figure 8.8.

If the pairing code provided by the user matches the pairing code for the device, the accessory will be added to the home (see the section “Testing with HomeKit Accessory Simulator,” later in the chapter, for more information on the pairing code). If not, or if the user cancels the pairing request, an instance of NSError will be returned in the completion handler for the addAccessory: method. If the accessory was successfully added to the home, it will be renamed using the name provided by the user for the accessory (from Figure 8.7) in the completion handler for adding the accessory.
if (!error) {
[selectedAccessory updateName:newAccName completionHandler:^(NSError *error) {
if (error) {
NSLog(@"Error updating name for selected accessory");
}
}];
} else {
NSLog(@"Error adding selected accessory");
}
After an accessory has been added to a home, it should also be added to a room in the home. By default, it is added to a room for the whole home; in the sample app, the user can tap the accessory that was just added in the accessory list to view the detail for it, as shown in Figure 8.9.
The user can then tap the room to select another room, as shown in Figure 8.10.
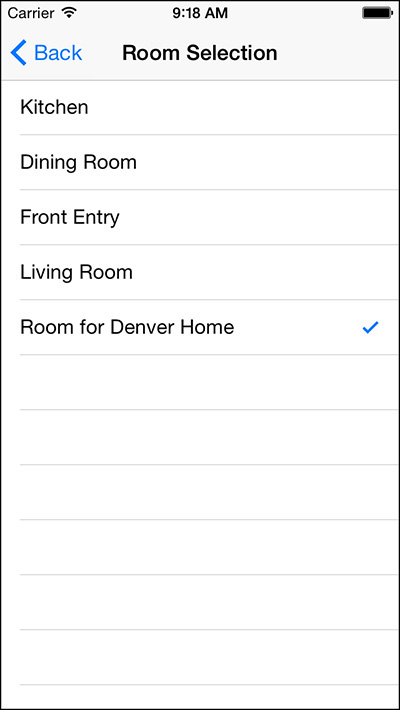
When the user selects a room from the choices, the tableView:didSelectRowAtIndexPath: method will assign the accessory to the selected room on self.home. The selected room can be either a room in the rooms property for self.home or the roomForEntireHome.
HMRoom *selectedRoom = nil;
if (indexPath.row < [self.home.rooms count])
{
selectedRoom = [self.home.rooms objectAtIndex:indexPath.row];
} else
{
selectedRoom = [self.home roomForEntireHome];
}
[self.home assignAccessory:self.accessory
toRoom:selectedRoom
completionHandler:^(NSError *error) {
if (error)
{
NSLog(@"Error assigning accessory to room: %@", error.localizedDescription);
}
}];
Services and Service Groups
Services are the functions that accessories perform. Services (instances of HMService) have a name, a service type, a reference to the containing accessory, and a list of characteristics that fulfill the service. Accessories typically have an information service that describes the accessory, and then at least one functional service that reports the status of the service and allows interaction with the service.
Characteristics are individual data points about a service. Characteristics (instances of HMCharacteristic) have a characteristic type, a reference to the containing service, an array of properties, and metadata.
The characteristicType, represented by a string constant, indicates the specific type of data for a characteristic and the meaning of that data. For example, a power state characteristic type (HMCharacteristicTypePowerState) means that the data for the characteristic is a BOOL value representing a power state of on or off. Alternatively, a characteristic type of HMCharacteristicTypeCurrentTemperature is a float value representing the current temperature reported by the accessory. There are characteristic types represented by several data types appropriate to the characteristic.
The properties array indicates whether the characteristic is readable, writable, or support event notification. A characteristic might support a combination of properties; for example, a brightness setting for a light bulb might be readable, be writable, and support event notification, whereas the model name of the light bulb might only be readable. A special case to be aware of is the Identify characteristic that is commonly available on accessories. Identify is typically a write-only characteristic; it can be used to instruct the accessory to identify itself using an appropriate method like flashing a light or making a noise. This is much better for users attempting to sort out similar accessories than having to read and compare serial numbers.
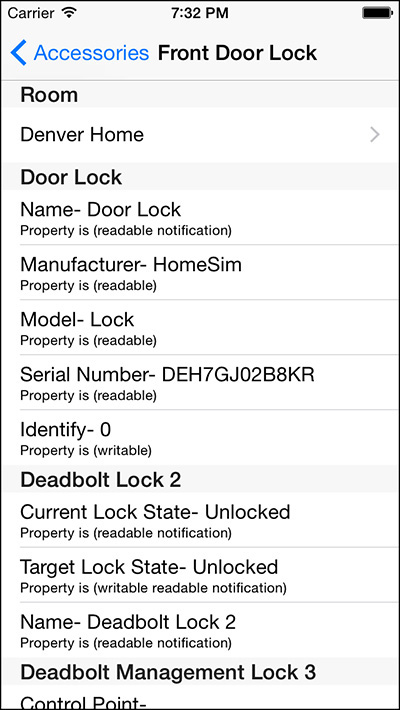
When the user selects an accessory that has already been added to a home in the sample app, the accessory detail view (ICFAccessoryDetailTableViewController) displays a section for the room that the accessory is assigned to, and then a section for each service that the accessory contains. The name of the service is displayed in the section header, and then information about the characteristics making up the service is displayed in the rows for the section, as shown in Figure 8.11.

To change the value of a characteristic, the user can tap on a supported table cell. As shown in Figure 8.12, the user has tapped on the Power State cell to turn off the light bulb.

To turn on the light bulb, the action block for the alert controller will use the writeValue:completionHandler: method on the characteristic:
[characteristic writeValue:[NSNumber numberWithBool:targetState]
completionHandler:^(NSError *error) {
if (error) {
NSLog(@"Error changing state: %@",error.localizedDescription);
} else {
[self.tableView reloadRowsAtIndexPaths:@[indexPath] withRowAnimation:UITableViewRowAnimationAutomatic];
}
}];
The writeValue:completionHandler: method can accept any id value, but will work only if the value passed is appropriate for the characteristic. The sample app approaches this simply by checking the characteristic type and using separate methods to handle different characteristic types; but any approach that ensures the correct value for a characteristic type will work.
A service group (instance of HMServiceGroup) provides a way to group services across accessories for easy management. A service group contains a name and an array of services (instances of HMService). Services can be added to or removed from a service group using the addService:completionHandler: and removeService:completionHandler: methods. Then a service group can be added to an HMHome instance and managed from there.
Actions and Action Sets
Actions and action sets currently provide a quick way to update characteristics on a group of accessories. This can be used to turn off all the light bulbs in the kitchen, or lock all the doors in the home.
HMAction is an abstract class with just one concrete implementation, HMCharacteristicWriteAction. Instances of HMCharacteristicWriteAction can be created using the initWithCharacteristic:targetValue: method, and then added to an instance of HMActionSet.
An instance of HMActionSet contains a name, an array of actions (instances of HMAction), and a property called executing. Actions can be added to or removed from an action set using the addAction:completionHandler and removeAction:completionHandler: methods. An action set is created by adding to an HMHome.
[self.home addActionSetWithName:@"Turn On Lights"
completionHandler:^(HMActionSet *actionSet, NSError *error) {
if (!error) {
HMCharacteristicWriteAction *writeAction = [[HMCharacteristicWriteAction alloc] initWithCharacteristic:characteristic targetValue:[NSNumber numberWithBool:YES]];
[actionSet addAction:writeAction completionHandler:^(NSError *error) {
if (error) {
NSLog(@"Error adding action to actionSet: %@", error.localizedDescription);
}
}];
}
}];
An action set can then be added to a trigger to be executed on a schedule, or executed immediately with the executeActionSet: method on HMHome.
Testing with the HomeKit Accessory Simulator
At the time of writing, no HomeKit-compliant devices had been announced or were available. So a valid question is, how can a developer build and test a HomeKit app without any devices? Fortunately, Apple anticipated this issue and offers a solution: the HomeKit Accessory Simulator. The HomeKit Accessory Simulator is a Mac OS X app that enables a developer to set up any kind of HomeKit accessory virtually, and then interact with that accessory as if it were the real thing. The simulator advertises accessories over the network just as if they were the real thing, and enables HomeKit apps to connect to and communicate with the accessories.
To get the HomeKit Accessory Simulator, visit the Capabilities tab for the target in Xcode (as shown in Figure 8.2 earlier in the chapter). If the HomeKit capability has been enabled, there will be a button titled Download HomeKit Simulator in the HomeKit capability information. Tapping that button will navigate to the “Downloads for Apple Developers” section in the Apple developer Web site (registration required). Find and download the “Hardware IO Tools for Xcode” item, which includes the HomeKit Accessory Simulator. After it has downloaded, extract the simulator and install in /Applications.
When the HomeKit Accessory Simulator is first launched, there will be no data in it. To use the simulator, a new accessory (or bridge) must be added. To add an accessory, tap the plus (+) button in the lower-left corner of the app and select New Accessory. HomeKit will present an action sheet with information needed for a new accessory, as shown in Figure 8.13.
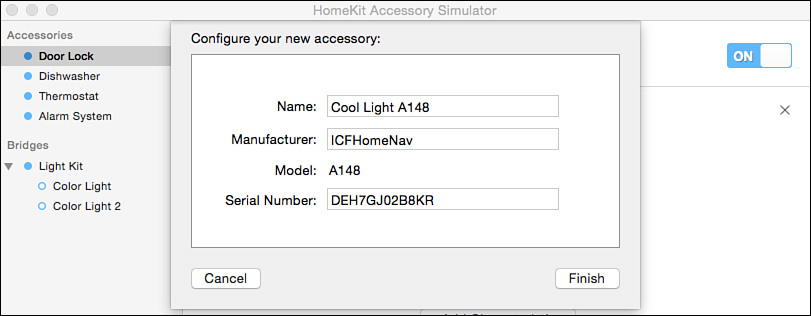
Provide an accessory name and a manufacturer name for the accessory, and click Finish (note that the simulator will provide a model and serial number). The simulator will add the accessory, which will then be visible in the list of accessories in the left section. Select the accessory and note the accessory information service visible with information about the accessory. Click Add Service to add a service to the accessory, and select a type of service to add when prompted. The simulator will add the service and standard characteristics to the accessory, as shown in Figure 8.14.
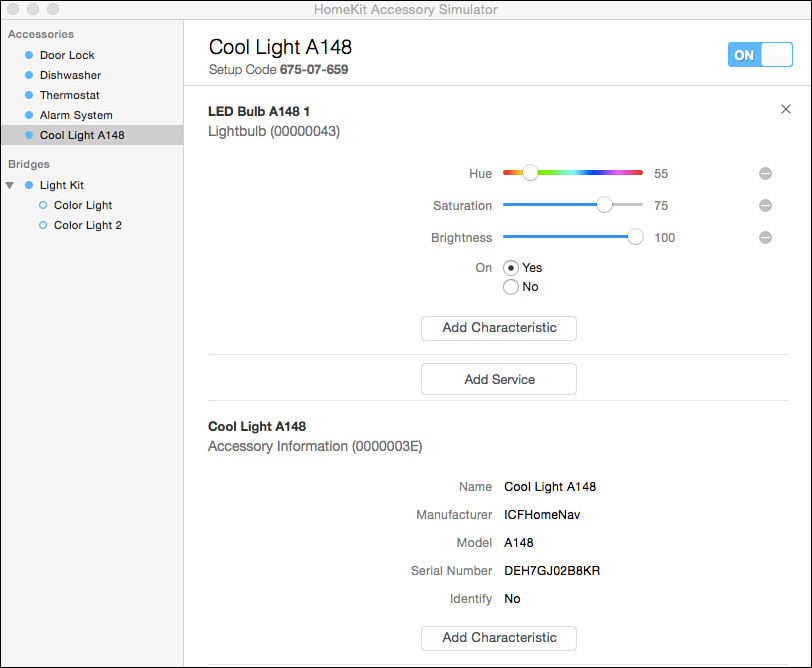
Characteristic information can be edited directly, and will be reflected in the HMCharacteristic information available to an app. The accessory can be turned on and off with the switch in the upper-right corner; when the accessory is on, it will be discoverable in the HMAccessoryBrowser. The Setup Code, shown just below the accessory name, is used to pair the accessory to the app when HomeKit requests a code for the accessory (refer to Figure 8.8).
When characteristic values are changed in an app that has paired with accessories from the HomeKit Accessory Simulator, those changes will be visible immediately in the simulator.
Scheduling Actions with Triggers
Triggers provide a way to kick off HomeKit-related actions when criteria are met. Currently, HomeKit supports a timer trigger (HMTimerTrigger), which can fire at a specified time and date, or with a recurrence interval from a time and date. This type of trigger is the only way to update HomeKit without an app being active in the foreground responding to user activity. HomeKit timer triggers are managed by iOS.
Triggers are based on action sets, as described previously in “Actions and Action Sets.” To implement a trigger, first create actions and action sets as desired that should be executed by the trigger. Then initialize a trigger using the initWithName:fireDate:timeZone:recurrence:recurrenceCalendar: method. Add action sets to the trigger using the addActionSet:completionHandler: method. When the trigger is ready, call the enable:completionHandler: method to enable the trigger. When the trigger is enabled, it will fire on the specified fire date (and at each recurrence interval) and execute the attached action sets.
Scheduled triggers can be a great way to perform actions on a schedule, like turning holiday lights on in the evening and off in the morning, ensuring that home and garage doors are closed and locked after leaving for work, or even running a sprinkler system or fish feeding system while on vacation.
Because the triggers are maintained by iOS, the app does not need to be running in order for the triggered actions to occur.
Summary
This chapter looked at using HomeKit in an app. It covered the basic concepts of HomeKit and how to set up a project to use HomeKit. This chapter described all the components of HomeKit, how to set each of them up in an app, and how to maintain them. It explained how to set up and use the HomeKit Accessory Simulator to test a HomeKit-enabled app, and how to use triggers to schedule actions that run independently of a HomeKit app.