
15. Getting Up and Running with Core Data
For many apps, being able to locally store and retrieve data that persists beyond a single session is a requirement. Since iOS 3.0, Core Data has been available to address this need. Core Data is a powerful object database; it provides robust data storage and management capabilities.
Core Data has its roots in NeXT’s Enterprise Object Framework (EOF), which was capable of mapping objects to relational databases. There are great advantages to writing business logic to objects, and to not having to build database or persistence-specific logic. Mainly, there is a lot less code to write, and that code tends to be focused on the needs of the app rather than the needs of the database. EOF could support several brands of relational databases. Since Core Data was built to support single-user applications in Mac OS X, Core Data supports storing data in an embedded relational database called SQLite, which provides the benefits of an SQL database without the hassle and overhead of maintaining a database server.
Some features of Core Data include the following:
![]() Modeling data objects with a visual model editor
Modeling data objects with a visual model editor
![]() Automatic and manual migration tools to handle when object schema changes
Automatic and manual migration tools to handle when object schema changes
![]() Establishing relationships between objects (one-to-one, one-to-many, many-to-many)
Establishing relationships between objects (one-to-one, one-to-many, many-to-many)
![]() Storing data in separate files and different file formats
Storing data in separate files and different file formats
![]() Validation of object attributes
Validation of object attributes
![]() Querying and sorting data
Querying and sorting data
![]() Lazy-loading data
Lazy-loading data
![]() Interacting closely with iOS table views and collection views
Interacting closely with iOS table views and collection views
![]() Managing related object changes with commit and undo capabilities
Managing related object changes with commit and undo capabilities
At first glance, Core Data can look difficult and overwhelming. Several books are devoted solely to Core Data, and the official Apple documentation is lengthy and challenging to get through since it covers the entire breadth and depth of the topic. However, most apps do not require all the features that Core Data has to offer. The goal of this chapter is to get you up and running with the most common Core Data features that apps need.
This chapter describes how to set up a project to use Core Data, and illustrates how to implement several common use cases with the sample app. It covers how to set up your data model, how to populate some starting data, and how to display data in a table using a fetched results controller. This chapter also demonstrates how to add, edit, and delete data, how to fetch data, and how to use predicates to fetch specific data. With this knowledge, you will have a good foundation for implementing Core Data quickly in your apps.
Deciding on Core Data
Before we dive into Core Data, it is generally worthwhile to take a look at the persistence requirements of an app and compare those to the available persistence options. If the app’s requirements can be met without implementing Core Data, that can save some development effort and reduce the overall complexity of the app, making it easier to maintain in the long run. A few options are available to iOS developers who want to use persistent data:
![]() NSUserDefaults: This method is typically used to save app preferences.
NSUserDefaults: This method is typically used to save app preferences. NSUserDefaults functions very much like an NSDictionary with key-value storage, and supports storing values that can be expressed as NSNumber, NSString, NSDate, NSData, NSDictionary, NSArray, or any object that conforms to the NSCoding protocol. If an app’s persistence needs can be satisfied using key-value pairs, dictionaries, and arrays, then NSUserDefaults is a viable option.
![]() iCloud Key-Value Storage: This method works just like
iCloud Key-Value Storage: This method works just like NSUserDefaults, except that it is supported by iCloud and can sync data across devices. There are fairly strict limits on how much data can be stored and synced. If an app’s persistence needs can be satisfied using key-value pairs, dictionaries, and arrays, and syncing between devices is desired, then iCloud key-value storage is a viable option.
![]() Property List (plist):
Property List (plist): NSDictionary and NSArray each support reading from and saving to a user-specified property list file, which is an XML file format supporting NSNumber, NSString, NSDate, NSData, NSDictionary, and NSArray. If an app’s persistence needs can be satisfied using a dictionary or an array, a property list file is a viable option.
![]() Coders and Keyed Archives:
Coders and Keyed Archives: NSCoder and NSKeyedArchiver support saving an arbitrary object graph into a binary file. These options require implementing NSCoder methods in each custom object to be saved, and require the developer to manage saving and loading. If an app’s persistence needs can be satisfied with a handful of custom objects, the coder/archiver approach is a viable option.
![]() Structured Text Files (JSON, CSV, etc.): Structured text files such as CSV or JSON can be used to store data. JSON in particular can take advantage of built-in serialization and deserialization support (see Chapter 9, “Working with and Parsing JSON,” for more details); but any structured text method will require building additional support for custom model objects and any searching and filtering requirements. If an app’s persistence needs can be satisfied with a handful of custom objects, or a dictionary or an array, then using structured text files can be a viable option.
Structured Text Files (JSON, CSV, etc.): Structured text files such as CSV or JSON can be used to store data. JSON in particular can take advantage of built-in serialization and deserialization support (see Chapter 9, “Working with and Parsing JSON,” for more details); but any structured text method will require building additional support for custom model objects and any searching and filtering requirements. If an app’s persistence needs can be satisfied with a handful of custom objects, or a dictionary or an array, then using structured text files can be a viable option.
![]() Direct SQLite: Using the C library
Direct SQLite: Using the C library libsqlite, apps can interact with SQLite databases directly. SQLite is an embedded relational database that does not need a server; it supports most of the standard SQL language as described by SQL92. Any data persistence logic that can be built using SQL can likely be built into an iOS app utilizing SQLite, including defining database tables and relationships, inserting data, querying data, and updating and deleting data. The drawback of this approach is that the app needs to map data between application objects and SQL files, requires writing SQL queries to retrieve and save data, and requires code to track which objects need to be saved.
![]() Core Data: This provides most of the flexibility of working with SQLite directly, while insulating the app from the mechanics of working with the database. If the app requires more than a handful of data, needs to maintain relationships between different objects, or needs to be able to access specific objects or groups of objects quickly and easily, Core Data might be a good candidate.
Core Data: This provides most of the flexibility of working with SQLite directly, while insulating the app from the mechanics of working with the database. If the app requires more than a handful of data, needs to maintain relationships between different objects, or needs to be able to access specific objects or groups of objects quickly and easily, Core Data might be a good candidate.
One feature that really makes Core Data stand out as an exceptional persistence approach is called the NSFetchedResultsController. With an NSFetchedResultsController, a table view or a collection view can be easily tied to data, and can be informed when the underlying data changes. Both table views and collection views have methods built in to allow for animation of cell insertions, deletions, and moves, which are provided when the NSFetchedResultsController detects changes to the relevant data. This feature can be used to great effect when an app needs to pull data from a server and store it locally, and then update a table or collection on the screen with the new data. This chapter explains how to implement an NSFetchedResultsController in an app.
Sample App
The sample app for this chapter is called MyMovies. It is a Core Data–based app that will keep track of all your physical media movies and, if you have loaned a movie to someone, who you loaned it to and when (as shown in Figure 15.1).
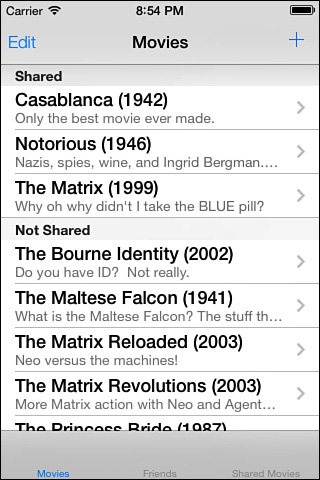
The sample app has three tabs: Movies, Friends, and Shared Movies. The Movies tab shows the whole list of movies that the user has added and tracked in a table view. There are two sections in the table view demonstrating how data can be segregated with a fetched results controller. Users can add new movies from this tab, and can edit existing movies. The Friends tab lists the friends set up to share movies with, shows which friends have borrowed movies, and enables the user to add and edit friends. The Shared Movies tab displays which movies have currently been shared with friends.
Starting a Core Data Project
To start a new Core Data project, open Xcode and select File from the menu, New, and then Project. Xcode will present some project template options to get you started (see Figure 15.2).

The quickest method to start a Core Data project is to select the Master-Detail template. Click Next to specify options for your new project, and then make sure that Use Core Data is selected (see Figure 15.3). This ensures that your project has the Core Data plumbing built in.

When Next is clicked, Xcode creates the project template. The project template includes a “master” view controller, which includes a table view populated by an NSFetchedResultsController, a specialized controller that makes pairing Core Data with a table view a snap. The project template includes a “detail” view to display a single data record. In the sample app, the master and detail views have been renamed to fit the project.
Note
To add Core Data to an existing project quickly, create an empty template project with Core Data support as described, and then copy the elements described in the following section, “Core Data Environment,” into the existing project. Add a new managed object model file to the project, and be sure to add the Core Data framework to the existing project as well.
Core Data Environment
The project template sets up the Core Data environment for the project in the class that implements the UIApplicationDelegate protocol; in the sample app this is ICFAppDelegate. The project template uses a lazy-loading pattern for each of the properties needed in the Core Data environment, so each is loaded when needed.
The process of loading the Core Data environment is kicked off the first time the managed object context is referenced in the app. The managed object context (NSManagedObjectContext) is a working area for managed objects. To create a new object, delete an object, or query existing objects, the app interacts with the managed object context. In addition, the managed object context can manage related changes. For example, the app could insert a few objects, update some objects, delete an object, and then save all those changes together or even roll them back if they are not needed.
More than one managed object context can be used at the same time to separate or confine work. Imagine that an app needs to display a set of data while it is importing some new data from a Web service. In that case, one managed object context would be used in the main thread to query and display existing data. Another managed object context could be created as a child of the main context, which would then be used in a background thread to import the data from the Web service. When the app is done importing data, it can quickly and automatically merge the two managed object contexts together and dispose of the background context. Core Data is powerful enough to handle cases in which the same object is updated in both contexts, and can merge the changes.
Note that one change to the template setup is needed as of this writing: Instead of a normal alloc / init for the managed object context, the initWithConcurrencyType: method should be used. As of iOS 8, the thread confinement approach for Core Data (in which the developer is responsible for managing which thread Core Data operations run on) has been deprecated. Instead, for basic apps with relatively small data requirements, use the main queue concurrency type, which requires performing Core Data operations in a block. This approach ensures that all the Core Data access takes place on the correct thread, and avoids potentially challenging threading and debugging issues. For more complex apps in which data updates need to take place on background threads, more advanced Core Data stacks can be established with parent/child relationships to handle background operations and efficient merging with the main queue managed object context.
The managed object context accessor method will check to see whether the managed object context instance variable has a reference. If not, it will get the persistent store coordinator and instantiate a new managed object context with it, assign the new instance to the instance variable, and return the instance variable.
- (NSManagedObjectContext *)managedObjectContext
{
if (__managedObjectContext != nil)
{
return __managedObjectContext;
}
NSPersistentStoreCoordinator *coordinator = [self persistentStoreCoordinator];
if (coordinator != nil)
{
__managedObjectContext = [[NSManagedObjectContext alloc] initWithConcurrencyType:NSMainQueueConcurrencyType];
[__managedObjectContext setPersistentStoreCoordinator:coordinator];
}
return __managedObjectContext;
}
The persistent store coordinator is the class that Core Data uses to manage the persistent stores (or files) where the data for the app is stored. To instantiate it, an instance of NSManagedObjectModel is needed so that the persistent store coordinator knows what object model the persistent stores are implementing. The persistent store coordinator also needs a URL for each persistent store to be added; if the file does not exist, Core Data will create it. If the persistent store doesn’t match the managed object model (Core Data uses a hash of the managed object model to uniquely identify it, which is kept for comparison in the persistent store), then the template logic will log an error and abort. In a shipping application, logic would be added to properly handle errors with a migration from the old data model to the new one; in development having the app abort can be a useful reminder when the model changes to retest with a clean installation of the app.
- (NSPersistentStoreCoordinator *)persistentStoreCoordinator
{
if (__persistentStoreCoordinator != nil)
{
return __persistentStoreCoordinator;
}
NSURL *storeURL = [[self applicationDocumentsDirectory] URLByAppendingPathComponent:@"MyMovies.sqlite"];
NSError *error = nil;
__persistentStoreCoordinator = [[NSPersistentStoreCoordinator alloc] initWithManagedObjectModel:[self managedObjectModel]];
if (![__persistentStoreCoordinator addPersistentStoreWithType:NSSQLiteStoreType configuration:nil URL:storeURL options:nil error:&error])
{
NSLog(@"Unresolved error %@, %@", error,
[error userInfo]);
abort();
}
return __persistentStoreCoordinator;
}
The managed object model is loaded from the app’s main bundle. Xcode will give the managed object model the same name as your project.
- (NSManagedObjectModel *)managedObjectModel
{
if (__managedObjectModel != nil)
{
return __managedObjectModel;
}
NSURL *modelURL = [[NSBundle mainBundle] URLForResource:@"MyMovies"
withExtension:@"momd"];
__managedObjectModel = [[NSManagedObjectModel alloc]
initWithContentsOfURL:modelURL];
return __managedObjectModel;
}
Building Your Managed Object Model
With the project template, Xcode will create a data model file with the same name as your project. In the sample project this file is called MyMovies.xdatamodeld. To edit your data model, click the data model file, and Xcode will present the data model editor (see Figure 15.4).
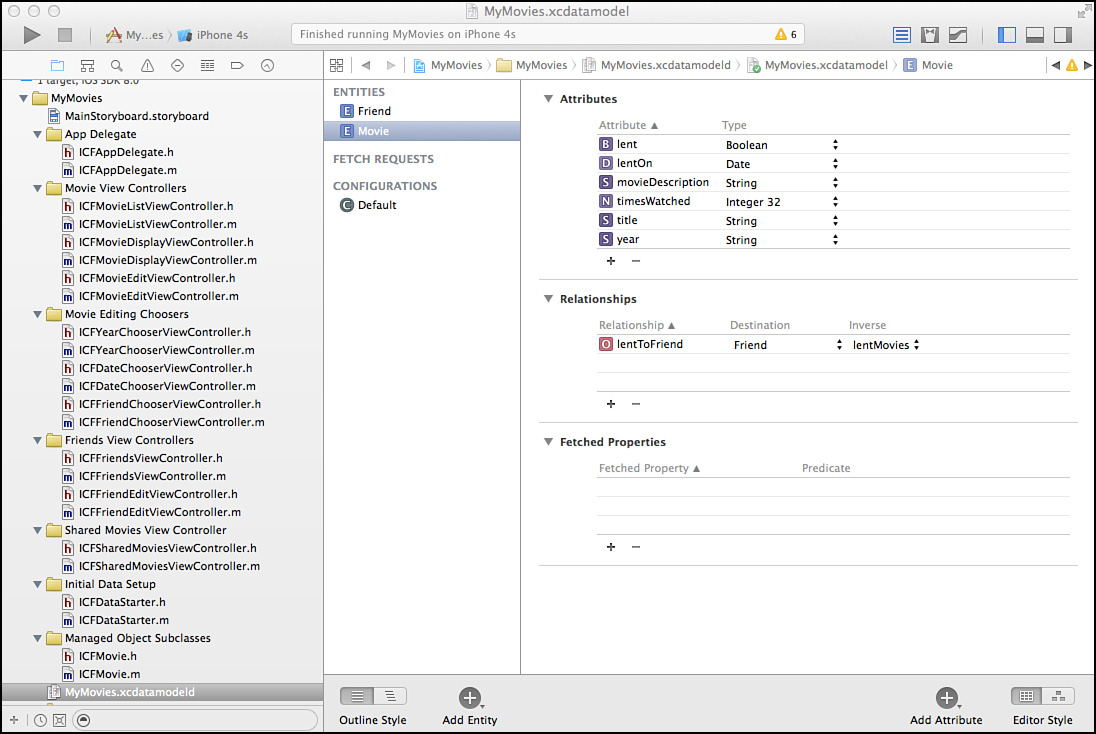
Xcode has two styles for the data model editor: Table and Graph. The Table style presents the entities in your data model in a list on the left. Selecting an entity will display and enable you to edit the attributes, relationships, and fetched properties for that entity.
To change to Graph style, click the Editor Style Graph button in the lower-right corner of the data model editor (see Figure 15.5). There will still be a list of entities on the left of the data model editor, but the main portion of the editor will present an entity relationship diagram of your data model. Each box presented in the diagram represents an entity, with the name of the entity at the top, the attributes listed in the middle, and any relationships listed in the bottom. The graph will have arrows connecting entities that have relationships established, with arrows indicating the cardinality of the relationship.

When you are working with your data model, it is often convenient to have more working space available and to have access to additional detail for selected items. Use Xcode’s View options in the upper-right corner of the window to hide the Navigator panel and display the Utilities panel (see Figure 15.5).
Creating an Entity
To create an entity, click the Add Entity button. A new entity will be added to the list of entities, and if the editor is in Graph style, a new entity box will be added to the view. Xcode will highlight the name of the entity and enable you to type in the desired name for the entity. The name of the entity can be changed at any time by just clicking twice on the entity name in the list of entities, or by selecting the desired entity and editing the entity name in the Utilities panel.
Core Data supports entity inheritance. For any entity, you can specify a parent entity from which your entity will inherit attributes, relationships, validations, and custom methods. To do that, ensure that the entity to be inherited from has been created, and then select the child entity and choose the desired parent entity in the Utilities panel.
Note
If you are using SQLite as your persistent store, Core Data implements entity inheritance by creating one table for the parent entity and all child entities, with a superset of all their attributes. This can obviously have unintended performance consequences if you have a lot of data in the entities, so use this feature wisely.
Adding Attributes
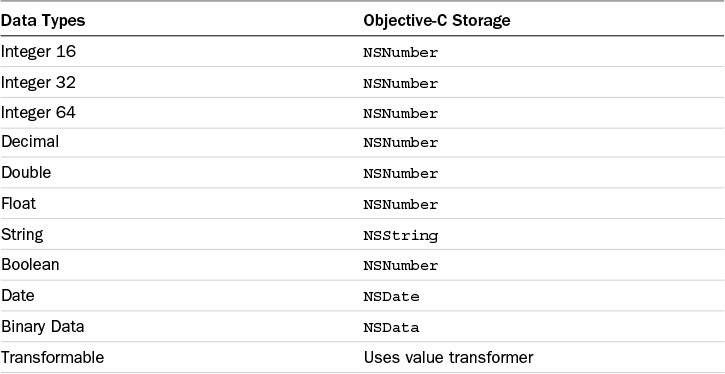
To add attributes to an entity, first select the entity in either the graph or the list of entities. Then click the Add Attribute button in the lower part of the editor, just to the left of the Editor Style buttons. Xcode will add an attribute called attribute to the entity. Select a Type for the attribute. (See Table 15.1 for supported data types.) Note that Core Data treats all attributes as Objective-C objects, so if Integer 32 is the selected data type, for example, Core Data will treat the attribute as an NSNumber.
One thing to note is that Core Data will automatically give each instance a unique object ID, called objectID, which it uses internally to manage storage and relationships. You can also add a unique ID or another candidate key to the entity and add an index to it for quick access, but note that Core Data will manage relationships with the generated object ID.
NSManagedObject instances also have a method called description; if you want to have a description attribute, modify the name slightly to avoid conflicts. In the sample app, for example, the Movie entity has a movieDescription attribute.
Establishing Relationships
Having relationships between objects can be a powerful technique to model the real world in an app. Core Data supports one-to-one and one-to-many relationships. In the sample app, a one-to-many relationship between friends and movies is established. Since a friend might borrow more than one movie at a time, that side of the relationship is “many,” but a movie can be lent to only one friend at a time, so that side of the relationship is “one.”
To add a relationship between entities, select one of the entities, and then Ctrl-click and drag to the destination entity. Alternatively, click and hold the Add Attribute button, and select Add Relationship from the menu that appears. Xcode will create a relationship to the destination entity and will call it “relationship.” In the Utilities panel, select the Data Model inspector, and change the name of the relationship. In the Data Model inspector, you can do the following:
![]() Indicate whether the relationship is transient.
Indicate whether the relationship is transient.
![]() Specify whether the relationship is optional or required with the Optional check box.
Specify whether the relationship is optional or required with the Optional check box.
![]() Specify whether the relationship is ordered.
Specify whether the relationship is ordered.
![]() Establish an inverse relationship. To do this, create and name the inverse relationship first, and then select it from the drop-down. The inverse relationship allows the “to” object to have a reference to the “from” object, in addition to the original relationship.
Establish an inverse relationship. To do this, create and name the inverse relationship first, and then select it from the drop-down. The inverse relationship allows the “to” object to have a reference to the “from” object, in addition to the original relationship.
![]() Specify the cardinality of the relationship by checking or unchecking the Plural check box. If checked, it indicates a to-many relationship.
Specify the cardinality of the relationship by checking or unchecking the Plural check box. If checked, it indicates a to-many relationship.
![]() Specify minimum and maximum counts for a relationship.
Specify minimum and maximum counts for a relationship.
![]() Set up the rule for Core Data to follow for the relationship when the object is deleted. Choices are No Action (no additional action taken on delete), Nullify (relationship set to
Set up the rule for Core Data to follow for the relationship when the object is deleted. Choices are No Action (no additional action taken on delete), Nullify (relationship set to nil), Cascade (objects on the other side of the relationship are deleted too), and Deny (error issued if relationships exist).
Custom Managed Object Subclasses
A custom NSManagedObject subclass can be useful if you have custom logic for your model object, or if you would like to be able to use dot syntax for your model object properties and have the compiler validate them.
Xcode has a menu option to automatically create a subclass for you. To use it, ensure that you have completed setup of your entity in the data model editor. Select your entity (or multiple entities) in the data model editor, select Editor from the Xcode menu, and then select Create NSManagedObject Subclass. Xcode will ask where you want to save the generated class files. Specify a location and click Create, and Xcode will generate the header and implementation files for each entity you specified. Xcode will name each class with the class prefix specified for your project concatenated with the name of the entity.
In the generated header file, Xcode will create a property for each attribute in the entity. Note that Xcode will also create a property for each relationship specified for the entity. If the relationship is to-one, Xcode will create an NSManagedObject property (or NSManagedObject subclass if the destination entity is a custom subclass). If the relationship is to-many, Xcode will create an NSSet property.
In the generated implementation file, Xcode will create @dynamic instructions for each entity, rather than @synthesize. This is because Core Data dynamically handles accessors for Core Data managed attributes, and does not need the compiler to build the accessor methods.
Note
A project called mogenerator will generate two classes per entity: one for the attribute accessors and one for custom logic. That way, you can regenerate classes easily when making model changes without overwriting your custom logic. Mogenerator is available at http://rentzsch.github.com/mogenerator/.
Setting Up Default Data
When a Core Data project is first set up, there is no data in it. Although this might work for some use cases, frequently it is a requirement to have some data prepopulated in the app for the first run. In the sample app there is a custom data setup class called ICFDataStarter, which illustrates one method to populate Core Data with some initial data. A #define variable is set up in MyMovies-Prefix.pch called FIRSTRUN, which can be uncommented to have the app run the logic in ICFDataStarter.
Inserting New Managed Objects
To create a new instance of a managed object for data that does not yet exist in your model, a reference to the managed object context is needed. The sample app passes the managed object context property from the ICFAppDelegate to the setupStarterDataWithMOC: method in ICFDataStarter:
[ICFDataStarter setupStarterDataWithMOC:[self managedObjectContext]];
To prevent threading errors, all activities against Core Data objects should take place in a block performed by the managed object context. There are two options: performBlock: and performBlockAndWait:. The first option will submit the block to the managed object context’s queue asynchronously, and then will continue executing code in the current scope. The second approach will submit the block to the managed object context’s queue asynchronously, and then wait until all the operations are completed before continuing to execute code in the current scope. When there are no dependencies in the current scope, use perform-Block: to avoid deadlocks and waiting; if there are dependencies, use performBlockAndWait:. In this case, because the managed object context is on the main queue and the code is executing on the main queue, using performBlockAndWait: ensures that everything executes in the sequence shown in the code and prevents any confusion from items potentially executing out of sequence.
[moc performBlockAndWait:^{
To insert data, Core Data needs to know what entity the new data is for. Core Data has a class called NSEntityDescription that provides information about entities. Create a new instance using NSEntityDescription’s class method:
NSManagedObject *newMovie1 = [NSEntityDescription insertNewObjectForEntityForName:@"Movie"
inManagedObjectContext:moc];
After an instance is available, populate the attributes with data:
[newMovie1 setValue:@"The Matrix" forKey:@"title"];
[newMovie1 setValue:@"1999" forKey:@"year"];
[newMovie1 setValue:@"Take the blue pill."
forKey:@"movieDescription"];
[newMovie1 setValue:@NO forKey:@"lent"];
[newMovie1 setValue:nil forKey:@"lentOn"];
[newMovie1 setValue:@20 forKey:@"timesWatched"];
Core Data uses key-value coding to handle setting attributes. If an attribute name is incorrect, it will fail at runtime. To get compile-time checking of attribute assignments, create a custom NSManagedObject subclass and use the property accessors for each attribute directly.
The managed object context acts as a working area for changes, so the sample app sets up more initial data:
NSManagedObject *newFriend1 = [NSEntityDescription insertNewObjectForEntityForName:@"Friend"
inManagedObjectContext:moc];
[newFriend1 setValue:@"Joe" forKey:@"friendName"];
[newFriend1 setValue:@"[email protected]" forKey:@"email"];
The last step after setting up all the initial data is to save the managed object context, and close the block.
NSError *mocSaveError = nil;
if ([moc save:&mocSaveError])
{
NSLog(@"Save completed successfully.");
} else
{
NSLog(@"Save did not complete successfully. Error: %@", [mocSaveError localizedDescription]);
}
}];
After the managed object context is saved, Core Data will persist the data in the data store. For this instance of the app, the data will continue to be available through shutdowns and restarts. If the app is removed from the simulator or device, the data will no longer be available. One technique to populate data for first run is to copy the data store from the app’s storage directory back into the app bundle. This will ensure that the default set of data is copied into the app’s directory on first launch and is available to the app.
Other Default Data Setup Techniques
Two other default data setup techniques are commonly used: data model version migrations and loading data from a Web service or an API.
Core Data managed object models are versioned. Core Data understands the relationship between the managed object model and the current data store. If the managed object model changes and is no longer compatible with the data store (for example, if an attribute is added to an entity), Core Data will not be able to initiate the persistent store object using the existing data store and new managed object model. In that case, a migration is required to update the existing data store to match the updated managed object model. In many cases Core Data can perform the migration automatically by passing a dictionary of options when instantiating the persistent store; in some cases, additional steps need to be taken to perform the migration. Migrations are beyond the scope of this chapter, but be aware that migrations can be used and are recommended by Apple to do data setup.
The other approach is to pull data from a Web service or an API. This approach is most applicable when an app needs to maintain a local copy of a subset of data on a Web server, and Web calls need to be written for the app to pull data from the API in the course of normal operation. To set up the app’s initial data, the Web calls can be run in a special state to pull all needed initial data and save it in Core Data.
Displaying Your Managed Objects
To display or use existing entity data in an app, managed objects need to be fetched from the managed object context. Fetching is analogous to running a query in a relational database, in that you can specify what entity you want to fetch, what criteria you want your results to match, and how you want your results sorted.
Creating Your Fetch Request
The object used to fetch managed objects in Core Data is called NSFetchRequest. Refer to ICFFriendChooserViewController in the sample app. This view controller displays the friends set up in Core Data and enables the user to select a friend to lend a movie to (see Figure 15.6).

To get the list of friends to display, the view controller performs a standard fetch request when the view controller has loaded. The first step is to create an instance of NSFetchRequest and associate the entity to be fetched with the fetch request:
NSManagedObjectContext *moc = kAppDelegate.managedObjectContext;
[moc performBlockAndWait:^{
NSFetchRequest *fetchReq = [[NSFetchRequest alloc] init];
NSEntityDescription *entity = [NSEntityDescription entityForName:@"Friend"
inManagedObjectContext:moc];
[fetchReq setEntity:entity];
The next step is to tell the fetch request how to sort the resulting managed objects. To do this, we associate a sort descriptor with the fetch request, specifying the attribute name to sort by:
NSSortDescriptor *sortDescriptor = [[NSSortDescriptor alloc] initWithKey:@"friendName"
ascending:YES];
NSArray *sortDescriptors = @[sortDescriptor];
[fetchReq setSortDescriptors:sortDescriptors];
Because the friend chooser should show all the available friends to choose from, it is not necessary to specify any matching criteria. All that remains is to execute the fetch:
NSError *error = nil;
self.friendList = [moc executeFetchRequest:fetchReq
error:&error];
if (error)
{
NSString *errorDesc = [error localizedDescription];
UIAlertController *alertController = [UIAlertController alertControllerWithTitle:@"Error fetching friends"
message:errorDesc
preferredStyle:UIAlertControllerStyleAlert];
[alertController addAction: [UIAlertAction actionWithTitle:@"OK"
style:UIAlertActionStyleCancel
handler:nil]];
[self presentViewController:alertController
animated:YES
completion:nil];
}
To execute a fetch, create an instance of NSError and set it to nil. Then have the managed object context execute the fetch request that has just been constructed. If an error is encountered, the managed object context will return the error to the instance you just created. The sample app will display the error in an instance of UIAlertController. If no error is encountered, the results will be returned as an NSArray of NSManagedObjects. The view controller will store those results in an instance variable to be displayed in a table view.
Fetching by Object ID
When only one specific managed object needs to be fetched, Core Data provides a way to quickly retrieve that managed object without constructing a fetch request. To use this method, you must have the NSManagedObjectID for the managed object.
To get the NSManagedObjectID for a managed object, you must already have fetched or created the managed object. Refer to ICFMovieListViewController in the sample app, in the prepareForSegue:sender: method. In this case, the user has selected a movie from the list, and the view controller is about to segue from the list to the detail view for the selected movie. To inform the detail view controller which movie to display, the objectID for the selected movie is set as a property on the ICFMovieDisplayViewController:
if ([[segue identifier] isEqualToString:@"showDetail"])
{
NSIndexPath *indexPath = [self.tableView indexPathForSelectedRow];
ICFMovie *movie = [[self fetchedResultsController] objectAtIndexPath:indexPath];
ICFMovieDisplayViewController *movieDispVC = (ICFMovieDisplayViewController *) [segue destinationViewController];
[movieDispVC setMovieDetailID:[movie objectID]];
}
When the ICFMovieDisplayViewController is loaded, it uses a method on the managed object context to load a managed object using the objectID:
[kAppDelegate.managedObjectContext performBlockAndWait:^{
ICFMovie *movie = (ICFMovie *)[kAppDelegate.managedObjectContext objectWithID:self.movieDetailID];
[self configureViewForMovie:movie];
}];
When this is loaded, the movie is available to the view controller to configure the view using the movie data (see Figure 15.7).

It is certainly possible to just pass the managed object from one view controller to the next with no problems, instead of passing the objectID and loading the managed object in the destination view controller. However, there are cases when using the objectID is highly preferable to using the managed object:
![]() If the managed object has been fetched or created on a different thread than the destination view controller will use to process and display the managed object—this approach must be used since managed objects are not thread safe!
If the managed object has been fetched or created on a different thread than the destination view controller will use to process and display the managed object—this approach must be used since managed objects are not thread safe!
![]() If a background thread might update the managed object in another managed object context between fetching and displaying—this will avoid possible issues with displaying the most up-to-date changes.
If a background thread might update the managed object in another managed object context between fetching and displaying—this will avoid possible issues with displaying the most up-to-date changes.
Displaying Your Object Data
After managed objects have been fetched, accessing and displaying data from them is straightforward. For any managed object, using the key-value approach will work to retrieve attribute values. As an example, refer to the configureCell:atIndexPath method in ICFFriendsViewController in the sample app. This code will populate the table cell’s text label and detail text label.
NSManagedObject *object = [self.fetchedResultsController objectAtIndexPath:indexPath];
cell.textLabel.text = [object valueForKey:@"friendName"];
NSInteger numShares = [[object valueForKey:@"lentMovies"] count];
NSString *subtitle = @"";
switch (numShares)
{
case 0:
subtitle = @"Not borrowing any movies.";
break;
case 1:
subtitle = @"Borrowing 1 movie.";
break;
default:
subtitle = [NSString stringWithFormat:@"Borrowing %d movies.", numShares];
break;
}
cell.detailTextLabel.text = subtitle;
To get the attribute values from the managed object, call valueForKey: and specify the attribute name. If the attribute name is specified incorrectly, the app will fail at runtime.
For managed object subclasses, the attribute values are also accessible by calling the property on the managed object subclass with the attribute name. Refer to the configureViewForMovie: method in ICFMovieDisplayViewController in the sample app.
- (void)configureViewForMovie:(ICFMovie *)movie
{
NSString *movieTitleYear = [movie yearAndTitle];
[self.movieTitleAndYearLabel setText:movieTitleYear];
[self.movieDescription setText:[movie movieDescription]];
BOOL movieLent = [[movie lent] boolValue];
NSString *movieShared = @"Not Shared";
if (movieLent)
{
NSManagedObject *friend = [movie valueForKey:@"lentToFriend"];
NSDateFormatter *dateFormatter = [[NSDateFormatter alloc] init];
[dateFormatter setDateStyle:NSDateFormatterMediumStyle];
NSString *sharedDateTxt = [dateFormatter stringFromDate:[movie lentOn]];
movieShared = [NSString stringWithFormat:@"Shared with %@ on %@", [friend valueForKey:@"friendName"],sharedDateTxt];
}
[self.movieSharedInfoLabel setText:movieShared];
}
If the property-based approach to get attribute values from managed object subclasses is used, errors will be caught at compile time.
Using Predicates
Predicates can be used to narrow down your fetch results to data that match your specific criteria. They are analogous to a where clause in an SQL statement, but they can be used to filter elements from a collection (like an NSArray) as well as a fetch request from Core Data. To see how a predicate is applied to a fetch request, refer to method fetchedResultsController in ICFSharedMoviesViewController. This method lazy-loads and sets up an NSFetchedResultsController, which helps a table view interact with the results of a fetch request (this is described in detail in the next section). Setting up a predicate is simple; for example:
NSPredicate *predicate = [NSPredicate predicateWithFormat:@"lent == %@",@YES];
In the format string, predicates can be constructed with attribute names, comparison operators, Boolean operators, aggregate operators, and substitution expressions. A comma-separated list of expressions will be substituted in the order of the substitution expressions in the format string. Dot notation can be used to specify relationships in the predicate format string. Predicates support a large variety of operators and arguments, as shown in Table 15.2.

Tell the fetch request to use the predicate:
[fetchRequest setPredicate:predicate];
Now the fetch request will narrow the returned result set of managed objects to match the criteria specified in the predicate (see Figure 15.8).

Introducing the Fetched Results Controller
A fetched results controller (NSFetchedResultsController) is a very effective liaison between Core Data and a UITableView or UICollectionView. The fetched results controller provides a way to set up a fetch request so that the results are returned in sections and rows, accessible by index paths. In addition, the fetched results controller can listen to changes in Core Data and update the table accordingly using delegate methods.
In the sample app, refer to ICFMovieListViewController for a detailed example of a fetched results controller in action (see Figure 15.9).

Preparing the Fetched Results Controller
When the “master” view controller is set up using Xcode’s Master Detail template, Xcode creates a property for the fetched results controller, and overrides the accessor method (fetchedResultsController) to lazy-load or initialize the fetched results controller the first time it is requested. First the method checks to see whether the fetched results controller has already been initialized:
if (__fetchedResultsController != nil)
{
return __fetchedResultsController;
}
If the fetched results controller is already set up, it is returned. Otherwise, a new fetched results controller is set up, starting with a fetch request:
NSFetchRequest *fetchRequest = [[NSFetchRequest alloc] init];
The fetch request needs to be associated with an entity from the managed object model, and a managed object context:
NSManagedObjectContext *moc = kAppDelegate.managedObjectContext;
NSEntityDescription *entity = [NSEntityDescription entityForName:@"Movie"
inManagedObjectContext:moc];
[fetchRequest setEntity:entity];
A batch size can be set up to prevent the fetch request from fetching too many records at once:
[fetchRequest setFetchBatchSize:20];
Next, the sort order is established for the fetch request using NSSortDescriptor instances. An important point to note is that the attribute used for sections needs to be the first in the sort order so that the records can be correctly divided into sections. The sort order is determined by the order of the sort descriptors in the array of sort descriptors attached to the fetch request.
NSSortDescriptor *sortDescriptor = [[NSSortDescriptor alloc] initWithKey:@"title" ascending:YES];
NSSortDescriptor *sharedSortDescriptor = [[NSSortDescriptor alloc] initWithKey:@"lent" ascending:NO];
NSArray *sortDescriptors = @[sharedSortDescriptor,sortDescriptor];
[fetchRequest setSortDescriptors:sortDescriptors];
After the fetch request is ready, the fetched results controller can be initialized. It requires a fetch request, a managed object context, a key path or an attribute name to be used for the table view sections, and a name for a cache (if nil is passed, no caching is done). The fetched results controller can specify a delegate that will respond to any Core Data changes. When this is complete, the fetched results controller is assigned to the view controller’s property:
NSFetchedResultsController *aFetchedResultsController = [[NSFetchedResultsController alloc] initWithFetchRequest:fetchRequest managedObjectContext:moc sectionNameKeyPath:@"lent" cacheName:nil];
aFetchedResultsController.delegate = self;
self.fetchedResultsController = aFetchedResultsController;
Now that the fetched results controller has been prepared, the fetch can be executed to obtain a result set the table view can display, and the fetched results controller can be returned to the caller:
NSError *error = nil;
if (![self.fetchedResultsController performFetch:&error])
{
NSLog(@"Unresolved error %@, %@", error, [error userInfo]);
abort();
}
return __fetchedResultsController;
Integrating Table View and Fetched Results Controller
Integrating the table view and fetched results controller is just a matter of updating the table view’s datasource and delegate methods to use information from the fetched results controller. In ICFMovieListViewController, the fetched results controller tells the table view how many sections it has:
- (NSInteger)numberOfSectionsInTableView:(UITableView *)tableView
{
return [[self.fetchedResultsController sections] count];
}
The fetched results controller tells the table view how many rows are in each section, using the NSFetchedResultsSectionInfo protocol:
- (NSInteger)tableView:(UITableView *)tableView numberOfRowsInSection:(NSInteger)section
{
id <NSFetchedResultsSectionInfo> sectionInfo = [[self.fetchedResultsController sections] objectAtIndex:section];
return [sectionInfo numberOfObjects];
}
The fetched results controller provides section titles, which are the values of the attribute specified as the section name. Since the sample app is using a Boolean attribute for the sections, the values that the fetched results controller returns for section titles are not user-friendly titles: 0 and 1. The sample app looks at the titles from the fetched results controller and returns more helpful titles: Shared instead of 1 and Not Shared instead of 0.
- (NSString *)tableView:(UITableView *)tableView titleForHeaderInSection:(NSInteger)section
{
id <NSFetchedResultsSectionInfo> sectionInfo = [[self.fetchedResultsController sections] objectAtIndex:section];
if ([[sectionInfo indexTitle] isEqualToString:@"1"])
{
return @"Shared";
}
else
{
return @"Not Shared";
}
}
To populate the table cells, the sample app dequeues a reusable cell, and then calls the configureView: method, passing the indexPath for the cell:
- (UITableViewCell *)tableView:(UITableView *)tableView cellForRowAtIndexPath:(NSIndexPath *)indexPath
{
UITableViewCell *cell = [tableView dequeueReusableCellWithIdentifier:@"Cell"];
[self configureCell:cell atIndexPath:indexPath];
return cell;
}
The fetched results controller knows which movie should be displayed at each index path, so the sample app can get the correct movie to display by calling the objectAtIndexPath: method on the fetched results controller. Then, it is simple to update the cell with data from the movie instance.
- (void)configureCell:(UITableViewCell *)cell atIndexPath:(NSIndexPath *)indexPath
{
ICFMovie *movie = [self.fetchedResultsController objectAtIndexPath:indexPath];
cell.textLabel.text = [movie cellTitle];
cell.detailTextLabel.text = [movie movieDescription];
}
The last table-view integration detail would typically be handling table cell selection in the tableView:didSelectRowAtIndexPath: method. In this case, no integration in that method is needed since selection is handled by storyboard segue. In the prepareForSegue:sender: method, selection of a table cell is handled with an identifier called showDetail:
if ([[segue identifier] isEqualToString:@"showDetail"])
{
NSIndexPath *indexPath = [self.tableView indexPathForSelectedRow];
ICFMovie *movie = [[self fetchedResultsController] objectAtIndexPath:indexPath];
ICFMovieDisplayViewController *movieDisplayVC = (ICFMovieDisplayViewController *) [segue destinationViewController];
[movieDisplayVC setMovieDetailID:[movie objectID]];
}
This method gets the index path of the selected row from the table view, and then gets the movie instance from the fetched results controller using the index path. The method then sets the movieDetailID of the ICFMovieDisplayViewController instance with the movie instance’s objectID.
Responding to Core Data Changes
For the fetched results controller to respond to Core Data changes and update the table view, methods from the NSFetchedResultsControllerDelegate protocol need to be implemented. First the view controller needs to declare that it will implement the delegate methods:
@interface ICFMovieListViewController : UITableViewController <NSFetchedResultsControllerDelegate>
The fetched results controller delegate will be notified when content will be changed, giving the delegate the opportunity to animate the changes in the table view. Calling the beginUpdates method on the table view tells it that all updates until endUpdates is called should be animated simultaneously.
- (void)controllerWillChangeContent: (NSFetchedResultsController *)controller
{
[self.tableView beginUpdates];
}
There are two delegate methods that might be called based on data changes. One method will tell the delegate that changes occurred that affect the table-view sections; the other will tell the delegate that the changes affect objects at specified index paths, so the table view will need to update the associated rows. Because the data changes are expressed by type, the delegate will be notified if the change is an insert, a delete, a move, or an update, so a typical pattern is to build a switch statement to perform the correct action by change type. For sections, the sample app will only make changes that can insert or delete a section (if a section name is changed, that might trigger a case in which a section might move and be updated as well).
- (void)controller:(NSFetchedResultsController *)controller didChangeSection:(id <NSFetchedResultsSectionInfo>)sectionInfo atIndex:(NSUInteger)sectionIndex forChangeType:(NSFetchedResultsChangeType)type
{
switch(type)
{
case NSFetchedResultsChangeInsert:
...
break;
case NSFetchedResultsChangeDelete:
...
break;
}
}
Table views have a convenient method to insert new sections, and the delegate method receives all the necessary information to insert new sections:
[self.tableView insertSections:[NSIndexSet indexSetWithIndex:sectionIndex] withRowAnimation:UITableViewRowAnimationFade];
Removing sections is just as convenient:
[self.tableView deleteSections:[NSIndexSet indexSetWithIndex:sectionIndex] withRowAnimation:UITableViewRowAnimationFade];
For object changes, the delegate will be informed of the change type, the object that changed, the current index path for the object, and a “new” index path if the object is being inserted or moved. Using switch logic to respond by change type works for this method as well.
- (void)controller:(NSFetchedResultsController *)controller didChangeObject:(id)anObject atIndexPath:(NSIndexPath *)indexPath forChangeType:(NSFetchedResultsChangeType)type newIndexPath:(NSIndexPath *)newIndexPath
{
UITableView *tableView = self.tableView;
switch(type)
{
case NSFetchedResultsChangeInsert:
...
break;
case NSFetchedResultsChangeDelete:
...
break;
case NSFetchedResultsChangeUpdate:
...
break;
case NSFetchedResultsChangeMove:
...
break;
}
}
Table views have convenience methods to insert rows by index path. Note that the newIndex-Path is the correct index path to use when inserting a row for an inserted object.
[tableView insertRowsAtIndexPaths:[NSArray arrayWithObject:newIndexPath] withRowAnimation:UITableViewRowAnimationFade];
To delete a row, use the indexPath passed to the delegate method.
[tableView deleteRowsAtIndexPaths:[NSArray arrayWithObject:indexPath] withRowAnimation:UITableViewRowAnimationFade];
To update a row, call the configureCell:atIndexPath: method for the current indexPath. This is the same configure method called from the table view delegate’s tableView:cellForRowAtIndexPath: method.
[self configureCell:[tableView cellForRowAtIndexPath:indexPath] atIndexPath:indexPath];
To move a row, delete the row for the current indexPath and insert a row for the newIndexPath.
[tableView deleteRowsAtIndexPaths:[NSArray arrayWithObject:indexPath] withRowAnimation:UITableViewRowAnimationFade];
[tableView insertRowsAtIndexPaths:[NSArray arrayWithObject:newIndexPath] withRowAnimation:UITableViewRowAnimationFade];
The fetched results controller delegate will be notified when the content changes are complete, so the delegate can tell the table view there will be no more animated changes by calling the endUpdates method. After that method is called, the table view will animate the accumulated changes in the user interface.
- (void)controllerDidChangeContent: (NSFetchedResultsController *)controller
{
[self.tableView endUpdates];
}
Adding, Editing, and Removing Managed Objects
Although it is useful to be able to fetch and display data, apps often need to add new data, edit existing data, and remove unneeded data at the user’s request.
Inserting a New Managed Object
In the sample app, view the Movies tab. To insert a new movie, the user can tap the Add button in the navigation bar. The Add button is wired to perform a segue to the ICFMovieEditViewController. In the segue logic, a new movie managed object is inserted into Core Data, and the new movie’s object ID is passed to the edit movie view controller. This approach is used in the sample app to prevent having logic in the edit view controller to handle both creating new managed objects and editing existing managed objects; however, it would be perfectly acceptable to create the new movie managed object in the edit view controller if that makes more sense in a different app.
To create a new instance of a movie managed object, a reference to the managed object context is needed.
NSManagedObjectContext *moc = [kAppDelegate managedObjectContext];
Set up a variable to capture the managed object ID of the new movie in block storage so that it can be used to pass along in the segue.
__block NSManagedObjectID *newMovieID = nil;
Again, use the performBlockAndWait: technique to isolate core data changes to the managed object context’s thread:
[moc performBlockAndWait:^{
To insert data, Core Data needs to know what entity the new data is for. Core Data has a class called NSEntityDescription that provides information about entities. Create a new instance using NSEntityDescription’s class method:
ICFMovie *newMovie = [NSEntityDescription insertNewObjectForEntityForName:@"Movie" inManagedObjectContext:moc];
Populate the new movie managed object’s attributes with data:
[newMovie setTitle:@"New Movie"];
[newMovie setYear:@"2014"];
[newMovie setMovieDescription:@"New movie description."];
[newMovie setLent:@NO];
[newMovie setLentOn:nil];
[newMovie setTimesWatched:@0];
Prepare an NSError variable to capture any potential errors, save the managed object context, and close the perform block.
NSError *mocSaveError = nil;
if (![moc save:&mocSaveError])
{
NSLog(@"Save did not complete successfully. Error: %@", [mocSaveError localizedDescription]);
}
After the managed object context has been successfully saved, the fetched results controller will be notified if the save affects the results of the controller’s fetch, and the delegate methods described earlier in this chapter will be called.
Removing a Managed Object
On the Movies tab in the sample app, the user can swipe on the right side of a table cell, or can tap the Edit button to reveal the delete controls for each table cell. When Delete is tapped on a cell, the table view delegate method tableView:commitEditingStyle:forRowAtIndexPath: is called. That method checks whether the editingStyle is equal to UITableViewCellEditingStyleDelete. If so, that indicates the user has tapped the Delete button for the table cell, so the method prepares to delete the corresponding movie by getting a reference to the managed object context from the fetched results controller. The fetched results controller keeps a reference to the managed object context it was initialized with, which is needed to delete the object.
NSManagedObjectContext *context = [self.fetchedResultsController managedObjectContext];
The method determines which managed object should be deleted, by asking the fetched results controller for the managed object at the specified index path.
[context performBlockAndWait:^{ NSManagedObject *objectToBeDeleted = [self.fetchedResultsController objectAtIndexPath:indexPath];
To delete the managed object, the method tells the managed object context to delete it.
[context deleteObject:objectToBeDeleted];
The deletion is not permanent until the managed object context is saved. After it is saved, the delegate methods described earlier in the chapter will be called and the table will be updated.
NSError *error = nil;
if (![context save:&error])
{
NSLog(@"Error deleting movie, %@", [error userInfo]);
}
Editing an Existing Managed Object
On the Movies tab in the sample app, the user can tap a movie to see more detail about it. To change any of the information about the movie, tap the Edit button in the navigation bar, which will present an instance of ICFMovieEditViewController. When the view is loaded, it will load an instance of ICFMovie using the objectID passed in from the display view or list view, will save that instance into the property editMovie, and will configure the view using information from the movie managed object.
If the user decides to edit the year of the movie, for example, another view controller will be presented with a UIPickerView for the user to select a new year. The ICFMovieEditViewController is set up as a delegate for the year chooser, so when the user has selected a new year and taps Save, the delegate method chooserSelectedYear: is called. In that method, the editMovie is updated with the new date and the display is updated.
- (void)chooserSelectedYear:(NSString *)year
{
[self.editMovie setYear:year];
[self.movieYearLabel setText:year];
}
Note that the managed object context was not saved after editMovie was updated. The managed object editMovie can keep updates temporarily until the user makes a decision about whether to make the changes permanent, indicated by tapping the Save or Cancel button.
Saving and Rolling Back Your Changes
If the user taps the Save button, he has indicated his intention to keep the changes made to the editMovie. In the saveButtonTouched: method, the fields not updated with delegate methods are saved to the editMovie property:
[kAppDelegate.managedObjectContext performBlockAndWait:^{
NSString *movieTitle = [self.movieTitle text];
[self.editMovie setTitle:movieTitle];
NSString *movieDesc = [self.movieDescription text];
[self.editMovie setMovieDescription:movieDesc];
BOOL sharedBool = [self.sharedSwitch isOn];
NSNumber *shared = [NSNumber numberWithBool:sharedBool];
[self.editMovie setLent:shared];
Then the managed object context is saved, making the changes permanent.
NSError *saveError = nil;
[kAppDelegate.managedObjectContext save:&saveError];
if (saveError)
{
UIAlertController *alertController = [UIAlertController alertControllerWithTitle:@"Error saving movie" message:[saveError localizedDescription] preferredStyle:UIAlertControllerStyleAlert];
[alertController addAction: [UIAlertAction actionWithTitle:@"OK"
style:UIAlertActionStyleCancel
handler:nil]];
[self presentViewController:alertController
animated:YES
completion:nil];
}
else
{
NSLog(@"Changes to movie saved.");
}
If the user decides that the changes should be thrown away and not be made permanent, the user will tap the Cancel button, which calls the cancelButtonTouched: method. That method will first check whether the managed object context has any unsaved changes. If so, the method will instruct the managed object context to roll back or throw away the unsaved changes. After that is completed, the managed object context will be back to the state it was in before any of the changes were made. Rather than the user interface being updated to reflect throwing away the changes, the view is dismissed.
if ([kAppDelegate.managedObjectContext hasChanges])
{
[kAppDelegate.managedObjectContext rollback];
NSLog(@"Rolled back changes.");
}
[self.navigationController.presentingViewController dismissModalViewControllerAnimated:YES];
The managed object context can be saved at any time while making updates; be advised that saving large numbers of changes with a main queue managed object context tied to the persistent store can result in a noticeable delay and potentially affect the user interface. It is generally advisable to keep saves relatively small and related; if saves must be large (for example, when pulling a lot of information from a Web API), then it is worth considering a more complex Core Data stack with multiple contexts in a parent/child relationship to prevent writing to the persistent store on the main queue.
Summary
This chapter described how to set up a new project to use Core Data and how to set up all the Core Data environment pieces. The chapter detailed how to create a managed object model, including how to add a new entity, add attributes to an entity, and set up relationships between entities. It also described why an NSManagedObject subclass is useful and how to create one.
This chapter explained how to set up some initial data for the project, and demonstrated how to insert new managed objects. Alternative techniques for initial data setup were discussed.
This chapter then detailed how to create a fetch request to get saved managed objects, and how to fetch individual managed objects using an objectID. It described how to display data from managed objects in the user interface of an app. It explained how to use predicates to fetch managed objects that match specific criteria.
This chapter introduced the fetched results controller, a powerful tool for integrating Core Data with the UITableView; described how to set up a UITableView with a fetched results controller; and explained how to set up a fetched results controller delegate to automatically update a table view from Core Data changes.
Finally, this chapter explained how to add, edit, and delete managed objects, and how to save changes or roll back unwanted changes.
With all these tools, you should now have a good foundation for using Core Data effectively in your apps.