
9. Working with and Parsing JSON
JSON is a great way to send data back and forth between servers, Web sites, and iOS apps. It is lighter and easier to handle than XML, and with iOS’s built-in support for JSON, it is easy to integrate into an iOS project. Many popular Web sites, including Flickr, Twitter, and Google, offer APIs that provide results in JSON format, and many languages offer JSON support. This chapter demonstrates how to parse and present JSON from a sample message-board server in an app, and encode a new message entry in JSON to send to the server.
JSON
JavaScript Object Notation (JSON) is a lightweight format for sharing data. It is technically a part of the language JavaScript and provides a way to serialize JavaScript objects; however, practically, it is supported in a wide variety of programming languages, making it a great candidate for sharing data between different platforms. JSON also has the benefit of being human-readable.
JSON has a simple and intuitive syntax. At its most basic level, a JSON document can contain objects, which are essentially key-value dictionaries like what Objective-C programmers are familiar with, or arrays. JSON can contain arrays of objects and arrays of values, and can nest arrays and objects. Values stored in JSON, either in arrays or associated with a key, can be other JSON objects, strings, numbers, or arrays, or true, false, or null.
Benefits of Using JSON
There are many reasons to use JSON in an iOS app:
![]() Server Support: Communicating information to and from a remote server is a common use case for iOS apps. Since so many server languages have built-in support for JSON, it is a natural choice as a data format.
Server Support: Communicating information to and from a remote server is a common use case for iOS apps. Since so many server languages have built-in support for JSON, it is a natural choice as a data format.
![]() Lightweight: JSON has little formatting overhead when compared to XML and can present a significant savings in the amount of bandwidth needed to transmit data between a server and a device.
Lightweight: JSON has little formatting overhead when compared to XML and can present a significant savings in the amount of bandwidth needed to transmit data between a server and a device.
![]() iOS Support: JSON is now fully supported as of iOS 5 with the addition of the
iOS Support: JSON is now fully supported as of iOS 5 with the addition of the NSJSONSerialization class. This class can conveniently provide an NSDictionary or NSArray (or even mutable varieties) from JSON data or can encode an NSDictionary or NSArray into JSON.
![]() Presentation and Native Handling: The simplest method to get data from a server to an iOS device is just to use a
Presentation and Native Handling: The simplest method to get data from a server to an iOS device is just to use a UIWebView and display a Web page; however, this approach has drawbacks in terms of performance and presentation. In many cases it is much better to just pull the data from the server, and present it on the device using native tools like UITableView. Performance can be much better, and presentation can be optimized to work on iOS screen sizes and take advantage of available retina displays.
JSON Resources
For more information on JSON, visit http://json.org. That site has a formal definition of JSON, with specific information on format and syntax.
The Sample App
The sample app for this chapter is Message Board, including a Ruby on Rails server and an iOS app.
The Ruby on Rails server consists of just one object: the message. It has been set up to support sending a list of messages in JSON, and to accept new messages in JSON format. The server also supports Web-based interactions.
The iOS app will pull messages from the server and display them in a standard table view and will be able to post new messages to the server in JSON format.
Accessing the Server
To view the Message Board Ruby on Rails server, visit http://freezing-cloud-6077.herokuapp.com/. The Messages home screen will be visible, as shown in Figure 9.1.

The messages server has been set up to handle creating and displaying messages on the Web and with JSON.
Getting JSON from the Server
To update the sample iOS app to handle JSON, the first thing to address is pulling the message list from the server and displaying it.
Building the Request
First, set up the URL so that the app can make calls to the right location:
NSString *const kMessageBoardURLString = @"http://freezing-cloud-6077.herokuapp.com/messages.json";
In the ICFViewController.m implementation, look at the viewWillAppear: method. This code will initiate the request to the server:
NSURL *msgURL = [NSURL URLWithString:kMessageBoardURLString];
NSURLSession *session = [NSURLSession sharedSession];
NSURLSessionTask *messageTask = [session dataTaskWithURL:msgURL completionHandler:^(NSData *data, NSURLResponse *response, NSError *error) {
...
}];
[messageTask resume];
This creates and initiates a network request to the messages.json resource at the server URL. The network request will run asynchronously, and when data comes back the completion handler block will be called. The important thing to note is that nothing special is required here for JSON; this is a standard network call. The only difference is that the .json extension used in the URL tells the server that the response should be in JSON format. Other servers might use a Content-Type and/or Accept HTTP header that specifies application/json as the mime-type to indicate that a JSON response is desired.
Note
Using the .json extension is not required for servers to return JSON format data; that is just how the sample server was set up. It is a common approach but is not required.
Inspecting the Response
When the network request has returned, the completion handler will be called. In the sample app, the data is converted into a UTF-8 string so that it can be logged to the console. This should not be done for every request in a production app; it is done here to demonstrate how to see the response for debugging when a problem parsing JSON is encountered.
NSString *retString = [NSString stringWithUTF8String:[data bytes]];
NSLog(@"json returned: %@", retString);
The log message will display on the console the data received:
json returned: [{"message":{"created_at":"2012-04-29T21:59:28Z",
"id":3, "message":"JSON is fun!", "message_date":"2012-04-29",
"name":"Joe","updated_at":"2012-04-29T21:59:28Z"}},
{"message":{"created_at":"2012-04-29T21:58:50Z","id":2,
"message":"Learning about JSON", "message_date":"2012-04-
29","name":"Joe", "updated_at":"2012-04-29T21:59:38Z"}},
{"message":{"created_at":"2012-04-29T22:00:00Z","id":4,
"message":"Wow, JSON is easy.", "message_date":"2012-04-
29","name":"Kyle", "updated_at":"2012-04-29T22:00:00Z"}},
{"message":{"created_at":"2012-04-29T22:46:18Z","id":5,
"message":"Trying a new message.", "message_date":"2012-04-
29","name":"Joe", "updated_at":"2012-04-29T22:46:18Z"}}]
Parsing JSON
Now that JSON has been received from the server, it is just a simple step to parse it. In the case of the sample app, an array of messages is expected, so parse the JSON into an NSArray:
NSError *parseError = nil;
NSArray *jsonArray = [NSJSONSerialization JSONObjectWithData:data
options:0
error:&parseError];
if (!parseError) {
[self setMessageArray:jsonArray];
NSLog(@"json array is %@", jsonArray);
} else {
NSString *err = [parseError localizedDescription];
NSLog(@"Encountered error parsing: %@", err);
}
NSJSONSerialization’s method JSONObjectWithData:options:error: expects as parameters the data to be serialized, any desired options (for example, returning a mutable array instead of a regular array), and a reference to an NSError in case there are any parsing errors.
In this example, a local instance variable has been updated to the just-parsed array, the table view has been told to reload data now that there is data to display, and the activity view has been hidden. Note that the completion handler will most likely be called on a background queue, so if the user interface will be updated, it will be necessary to switch to the main queue.
dispatch_async(dispatch_get_main_queue(), ^{
[self.messageTable reloadData];
[self.activityView setHidden:YES];
[self.activityIndicator stopAnimating];
});
Displaying the Data
Now that the JSON has been parsed into an NSArray, it can be displayed in a UITableView. The magic here is that there is no magic; the JSON received from the server is now just an array of NSDictionary instances. Each NSDictionary contains information for a message from the server, with attribute names and values. To display this in a table, just access the array and dictionaries as if they had been created locally.
- (UITableViewCell *)tableView:(UITableView *)tableView
cellForRowAtIndexPath:(NSIndexPath *)indexPath
{
UITableViewCell *cell = [tableView dequeueReusableCellWithIdentifier:@"MsgCell"];
if (cell == nil) {
cell = [[UITableViewCell alloc] initWithStyle:UITableViewCellStyleSubtitle reuseIdentifier:@"MsgCell"];
cell.selectionStyle = UITableViewCellSelectionStyleNone;
}
NSDictionary *message = (NSDictionary *)[[self.messageArray objectAtIndex:indexPath.row] objectForKey:@"message"];
NSString *byLabel = [NSString stringWithFormat:@"by %@ on %@", [message objectForKey:@"name"], [message objectForKey:@"message_date"]];
cell.textLabel.text = [message objectForKey:@"message"];
cell.detailTextLabel.text = byLabel;
return cell;
}
- (NSInteger)tableView:(UITableView *)tableView
numberOfRowsInSection:(NSInteger)section
{
return [[self messageArray] count];
}
The parsed JSON data will be visible in a standard table view, as shown in Figure 9.2.

When a null value is in the JSON source data, it will be parsed into an [NSNull null]. This can be a problem if nil is expected in a check or comparison, because [NSNull null] will return YES whereas nil will return NO. It is wise to specifically handle [NSNull null] when converting to a model object or presenting parsed JSON.
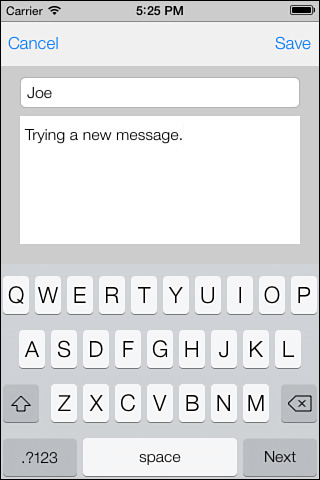
Posting a Message
The sample app includes ICFNewMessageViewController to post new messages to the server. There are two fields on that controller: one for a name and one for a message (see Figure 9.3). After the user enters that information and hits Save, it will be encoded in JSON and sent to the server.
Encoding JSON
An important detail for sending JSON to a Ruby on Rails server is to encode the data so that it mirrors what the Rails server provides. When a new message is sent to the server, it should have the same structure as an individual message received in the message list. To do this, a dictionary with the attribute names and values for the message is needed, and then a wrapper dictionary with the key “message” pointing to the attribute dictionary. This will exactly mirror what the server sends for a message. In the saveButtonTouched: method, set up this dictionary, like so:
NSMutableDictionary *messageDictionary = [NSMutableDictionary dictionaryWithCapacity:1];
[messageDictionary setObject:[nameTextField text]
forKey:@"name"];
[messageDictionary setObject:[messageTextView text]
forKey:@"message"];
NSDate *today = [NSDate date];
NSDateFormatter *dateFormatter = [[NSDateFormatter alloc] init];
NSString *dateFmt = @"yyyy'-'MM'-'dd'T'HH':'mm':'ss'Z'";
[dateFormatter setDateFormat:dateFmt];
[messageDictionary setObject:[dateFormatter stringFromDate:today]
forKey:@"message_date"];
NSDictionary *postDictionary = @{@"message" : messageDictionary};
Note that NSJSONSerialization accepts only instances of NSDictionary, NSArray, NSString, NSNumber, or NSNull. For dates or other data types not directly supported by NSJSONSerialization, they will need to be converted to a supported format. For example, in this example the date was converted to a string in a format expected by the server. Now that there is a dictionary, it is a simple step to encode it in JSON:
NSError *jsonSerializationError = nil;
NSData *jsonData = [NSJSONSerialization dataWithJSONObject:postDictionary options:NSJSONWritingPrettyPrinted error:&jsonSerializationError];
if (!jsonSerializationError)
{
NSString *serJSON =
[[NSString alloc] initWithData:jsonData
encoding:NSUTF8StringEncoding];
NSLog(@"serialized json: %@", serJSON);
...
} else
{
NSLog(@"JSON Encoding failed: %@", [jsonSerializationError localizedDescription]);
}
NSJSONSerialization expects three parameters:
1. An NSDictionary or NSArray with the data to be encoded.
2. Serialization options (in our case, we specified NSJSONWritingPrettyPrinted so that it’s easy to read; otherwise, the JSON is produced with no whitespace for compactness).
3. A reference to an NSError.
If there are no errors encoding the JSON, it will look like this:
serialized json: {
"message" : {
"message" : "Six Test Messages",
"name" : "Joe",
"message_date" : "2012-04-01T14:31:11Z"
}
}
Sending JSON to the Server
After the JSON is encoded, it is ready to be sent to the server. First, an instance of NSMutableURLRequest is needed. The request will be created with the URL for the server, and then will be customized with the HTTP method ("POST") and HTTP headers to indicate that the uploaded content data is in JSON format.
NSURL *messageBoardURL = [NSURL URLWithString:kMessageBoardURLString];
NSMutableURLRequest *request = [NSMutableURLRequest
requestWithURL:messageBoardURL
cachePolicy:NSURLRequestUseProtocolCachePolicy
timeoutInterval:30.0];
[request setHTTPMethod:@"POST"];
[request setValue:@"application/json"
forHTTPHeaderField:@"Accept"];
[request setValue:@"application/json"
forHTTPHeaderField:@"Content-Type"];
When the request is completed, an NSURLSessionUploadTask can be created. The task requires the request, the JSON data, and a completion handler. The completion handler will be called on a background thread, so any user interface updates must be dispatched to the main queue.
NSURLSession *session = [NSURLSession sharedSession];
NSURLSessionUploadTask *uploadTask =
[session uploadTaskWithRequest:uploadRequest fromData:jsonData completionHandler:^(NSData *data, NSURLResponse *response, NSError *error) {
NSHTTPURLResponse *httpResponse = (NSHTTPURLResponse *)response;
BOOL displayError = (error || httpResponse.statusCode != 200);
dispatch_async(dispatch_get_main_queue(), ^{
[self.activityView setHidden:YES];
[self.activityIndicator stopAnimating];
if (displayError) {
NSString *errorMessage = error.localizedDescription;
if (!errorMessage) {
errorMessage = [NSString stringWithFormat:@"Error uploading - http status: %i", httpResponse.statusCode];
}
UIAlertController *postErrorAlertController = [UIAlertController alertControllerWithTitle:@"Post Error"
message:errorMessage
preferredStyle:UIAlertControllerStyleAlert];
[postErrorAlertController addAction: [UIAlertAction actionWithTitle:@"Cancel"
style:UIAlertActionStyleCancel
handler:nil]];
[self presentViewController:postErrorAlertController
animated:YES
completion:nil];
} else {
[self.presentingViewController dismissViewControllerAnimated:YES
completion:nil];
}
});
}];
[uploadTask resume];
When resume is called on the uploadTask, the request will be made to the server, and the completion handler will be called when it is complete. Both the error returned in the completion handler and the response should be checked for errors; an error will be returned if there is a problem connecting (for example, the device is in airplane mode), or an HTTP status code might indicate a different problem if there is an issue on the server (for example, if the URL is not found, or if the server cannot process the data sent to it). If the request completes with no errors, the view controller will be dismissed and message board will be refreshed.