
10. Notifications
Notifications are Apple’s method of keeping the user informed of important iOS app-related events when the user is not actively using an app. Because only one iOS app can be active and in the foreground at a time, notifications provide a mechanism to have inactive apps receive important and time-sensitive information and notify the user. This chapter guides you through how to set up your app to receive local and remote push notifications, and how to customize what happens when the user receives a notification with an app badge, a sound, and a message.
Differences Between Local and Push Notifications
Two types of notifications are supported by iOS: local notifications and remote, or push, notifications. Local notifications do not use or require any external infrastructure; they happen entirely on the device. That means that the device does not require any connectivity—besides being “on”—to present a local notification. Push notifications, however, require connectivity and a server infrastructure of some kind to send the notification through the Apple Push Notification service (APNs) to the intended device. It is important to note that push notification delivery is not guaranteed, so it is not appropriate to assume that every notification gets to its intended target. Do not make your application depend on push notifications.
To understand why push notification delivery is not guaranteed, you need to understand how push notifications get to a device. The APNs first will try to use the cellular network to communicate with an iOS device if it is available, and then will attempt over Wi-Fi. Some devices need to be in an active state (on fourth-generation iPod touches, for example, the screen actually has to be visible) in order to receive Wi-Fi communication. Other devices, like iPads, can be asleep and maintain a connection to a Wi-Fi network.
The process that each type of notification goes through is also different. For local notifications, these are the steps:
1. Create a local notification object, and specify options such as schedule time and date, message, sound, and badge update.
2. Schedule the local notification.
3. iOS presents the notification, plays a sound, and updates the badge.
4. Receive the local notification in the application delegate.
For push notifications, this is the process:
1. Register the application for push notifications and receive a token.
2. Notify your server that the device (identified by a token) would like to receive push notifications.
3. Create a push notification on your server and communicate to APNs.
4. APNs delivers the notification to the device.
5. iOS presents the notification, plays a sound, and updates the badge.
6. Receive the notification in the application’s delegate.
With these differences, it is clear that there are different use cases in which local and push notifications make sense. If no information from outside the device is required, use a local notification. If information not available to the device is required, use a push notification.
The Sample App
The sample app for this chapter is called ShoutOut. It enables the user to prepare a test push message to the user’s device and to add reminders to Shout Out. The sample app will illustrate setting up reminders as local notifications, as well as covering all the steps necessary to set up an app to receive push notifications, what information should be communicated to a push server, and how to have the server send push notifications via the APNs.
App Setup
There are several steps to prepare the app for remote push notifications. To begin, set up an App ID in the iOS Provisioning Portal. Visit the iOS Dev Center (https://developer.apple.com/devcenter/ios/index.action), log in, and choose Certificates, Identifiers & Profiles in the menu titled iOS Developer Program on the right side of the screen (you must be logged in to see this menu). Choose Identifiers from the menu on the left side of the screen. Then, click the button with a plus sign in the upper-right corner to create a new App ID, as shown in Figure 10.1.
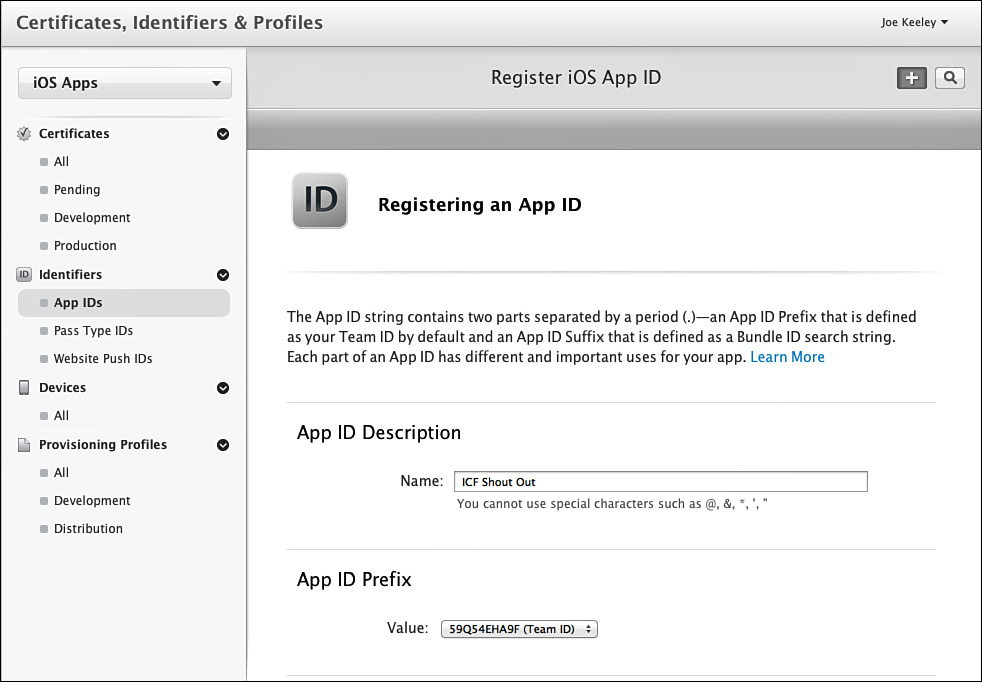
Specify an App ID Description. The Description will be used to display the app throughout the iOS Provisioning Portal. Select an App ID Prefix (previously called the Bundle Seed ID). Scroll down to specify the App ID Suffix, as shown in Figure 10.2.
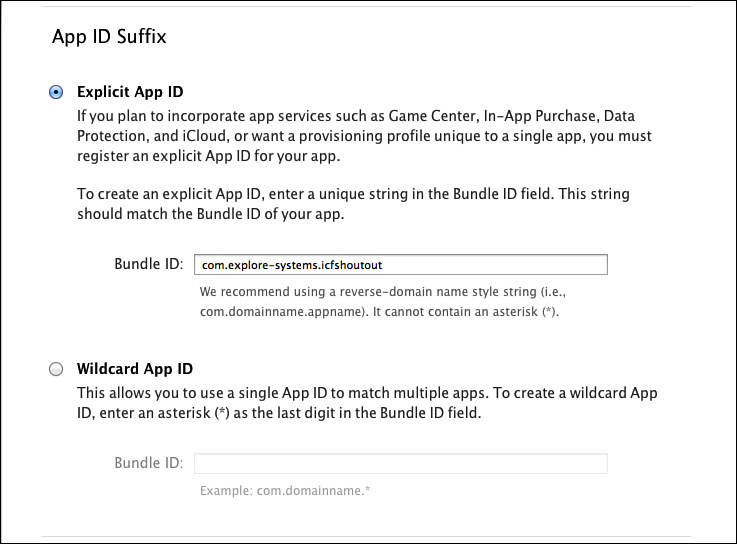
Push notifications require an explicit App ID, so select that option and specify the same string as the Bundle ID for your app. Scroll down to select App Services, as shown in Figure 10.3.
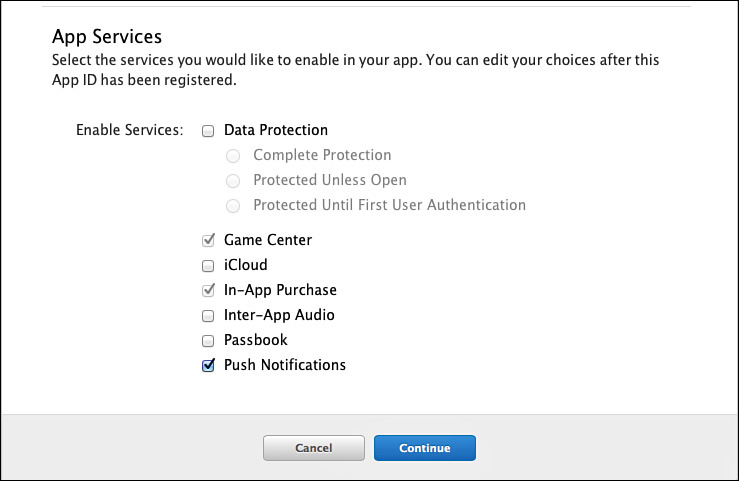
Select the check box for Push Notifications in the list of App Services to indicate that push notifications should be enabled for the App ID. Click Continue to save the new App ID, and it will be visible in the list of App IDs. Click on the App ID to expand it and view the status of services for the App ID, as shown in Figure 10.4.
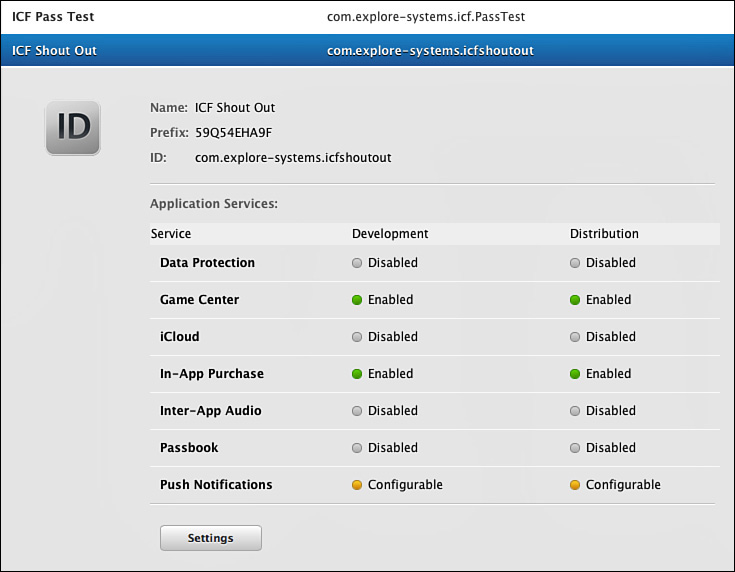
Now that the App ID is prepared, it needs to be configured for push notifications. Click Settings at the bottom of the App ID detail list, and scroll to the bottom to view the push notifications (see Figure 10.5).
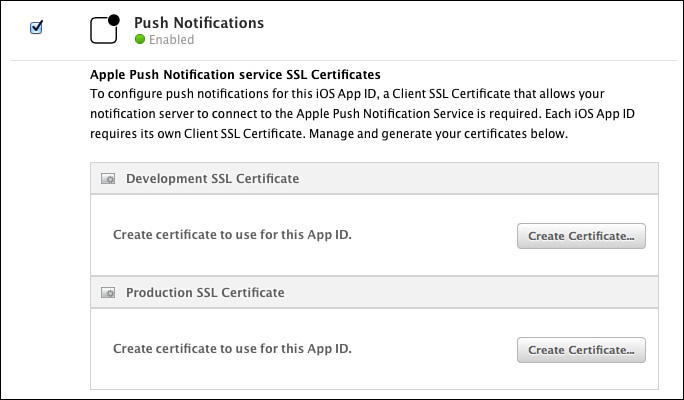
Make sure that Enabled for Apple Push Notification service is checked. If so, the App ID is ready and push certificates can be created.
Creating Development Push SSL Certificate
A Development Push SSL Certificate is what the push server uses to identify and authorize a specific account to APNs when connecting to APNs to send push notifications. To start the process of creating a certificate, click the Create Certificate button on the Development line (refer to Figure 10.5). Instructions are presented to help generate a certificate signing request, as shown in Figure 10.6.

Leave the Add iOS Certificate page open in the browser, and open Keychain Access (in Applications, Utilities). Select Keychain Access, Certificate Assistant, Request a Certificate from a Certificate Authority from the application menu. A certificate request form will be presented, as shown in Figure 10.7.
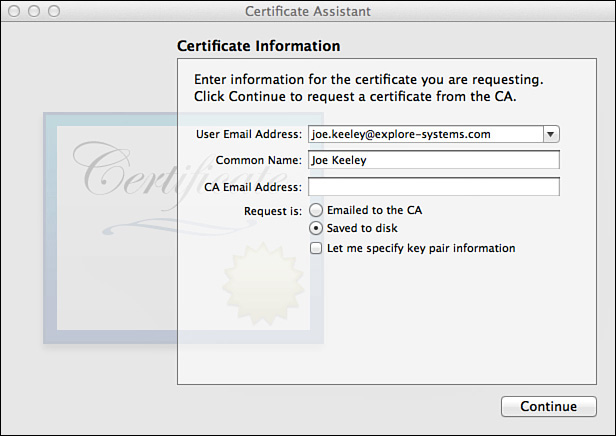
Enter an email address and a common name (typically a company name or an entity name—it is safe to use your Apple Developer account name), and then select Saved to Disk. Click Continue, and specify where to save the request. When that step is complete, return to the iOS Provisioning Portal and click Continue. Select the saved request, as shown in Figure 10.8.

After selecting it, click Generate. The development SSL Certificate will be generated, as shown in Figure 10.9.
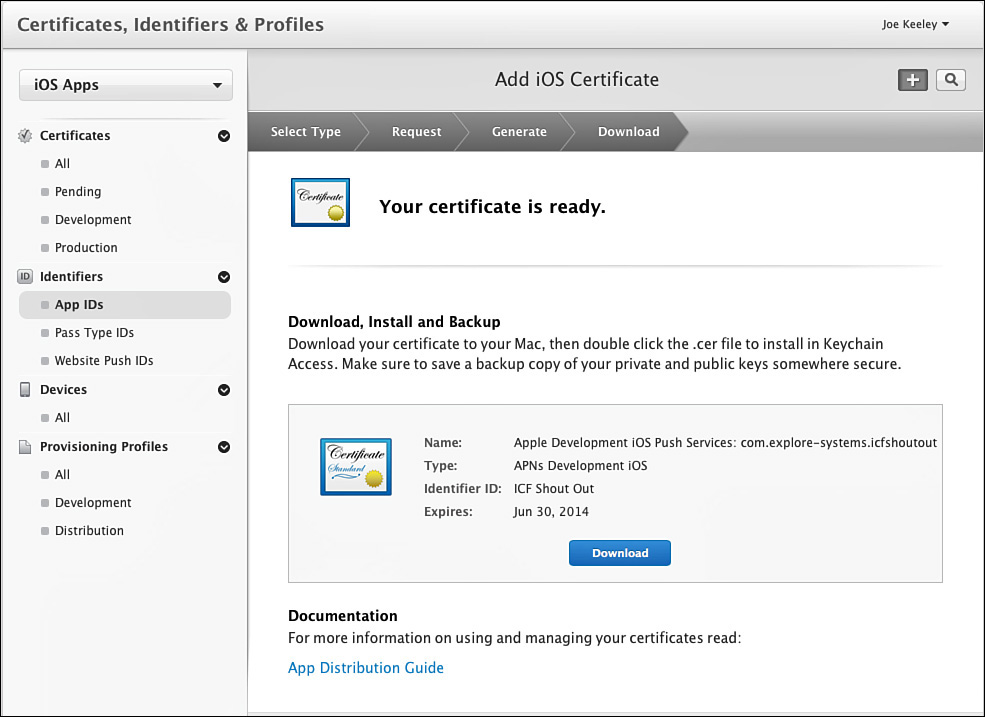
After the certificate has been created, click the Download button to download the certificate so that the certificate can be installed on the notification server.
Double-click the downloaded certificate file, and it will automatically be installed in Keychain Access. It should be visible in the list of certificates, as shown in Figure 10.10. Click the triangle to confirm that the private key was matched with the certificate.
Note that this procedure needs to be repeated to create Ad-Hoc and Production SSL Certificates when it is time to beta test and submit the application to the App Store.
The sample app includes a simple PHP file that can be executed from the command line to communicate with the APNs and send a test push notification. For that file to work, the certificate just generated needs to be converted into a format that can be included with an APNs request. This same conversion procedure will need to be performed for any server that communicates with APN. To convert the certificate, open Keychain Access and locate the certificate and key illustrated in Figure 10.10. Select them both, and choose File, Export Items. Save them as shoutout.p12 (any filename can be used with the p12 files). For communication with APNs, the certificate and key need to be in PEM format, so issue the following openssl command to convert them:
$ openssl pkcs12 -in shoutout.p12 –out shoutout.pem -nodes -clcerts
Copy the shoutout.pem file to the Xcode project Push Server group, and the sample app will be ready to send push notifications.
Development Provisioning Profile
For many apps, it is sufficient to use the team development provisioning profile automatically generated by Xcode to test on a device. To test push notifications, however, you need to create and use a development provisioning profile specific to the app to allow it to receive push notifications. To do this, click Provisioning Profiles in the left menu in the iOS Provisioning Portal.
Note
This presumes that a development certificate (under Certificates, Development) has already been created; if not, you should create one first. The procedure is well documented in the portal and similar to creating the SSL Certificate. This also presumes that you have set up at least one device for development in the portal; if not, you will need to do that as well (under Devices).
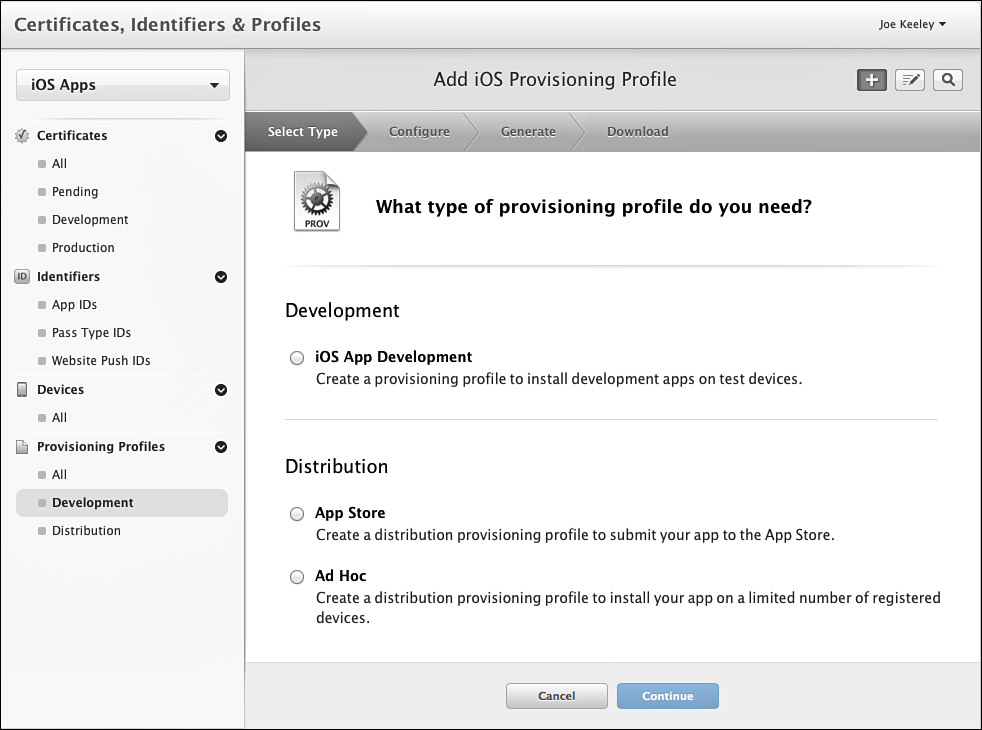
You are presented with a list of development provisioning profiles. To create a new one, click the button with the plus sign just above and to the right of the list. Select which type of provisioning profile to create (in this case, iOS App Development) and click Continue, as shown in Figure 10.11.
Select the App ID just created, as shown in Figure 10.12, and click Continue.

Next, select the Development Certificate(s) to be used when signing the app with this provisioning profile, as shown in Figure 10.13, and click Continue.

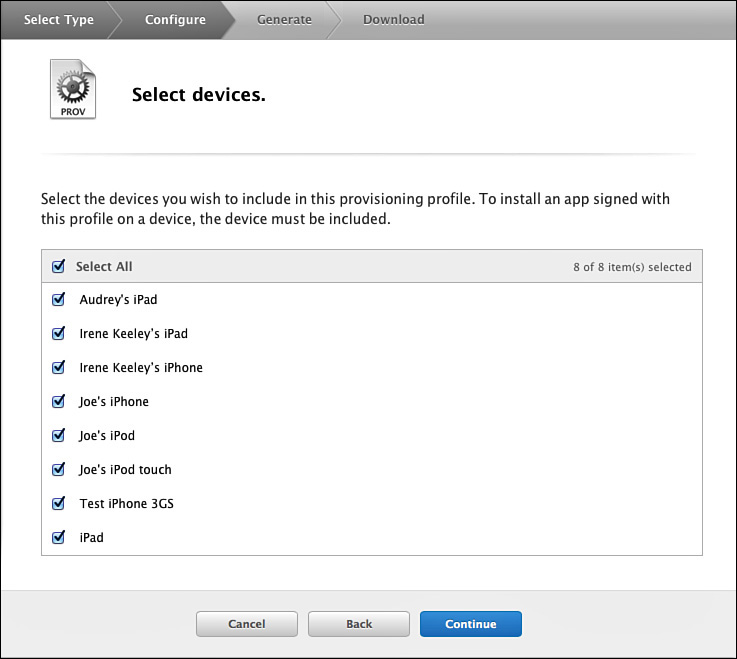
Select the devices that can be used to run the app using this provisioning profile, as shown in Figure 10.14. It is generally a good practice to select all available devices to prevent having to regenerate the provisioning profile when it is discovered that a team member was not added the first time around.
Finally, provide a name for the provisioning profile, and review the summary presented for the provisioning profile, as shown in Figure 10.15. If the profile looks correct, click Generate to create it.

Figure 10.15 iOS Provisioning Profile: Add iOS Provisioning Profile: Name This Profile and Generate.
Note
Be descriptive with your provisioning profile name; these names tend to get confusing in Xcode when you have a lot of them. One approach is to use the app name and environment in the name, such as “ICF Shout Out Development.”
When the provisioning profile has been created, a download page will be presented, as shown in Figure 10.16.

Click Download to get a copy of the provisioning profile. Double-click the profile after it is downloaded and it will be automatically installed and available in Xcode. One last step remains to make sure that the app is using the new provisioning profile. In Xcode, edit the Build Settings for your project (not the target). Find the section titled Code Signing, specifically Code Signing Identity. For Debug, choose iOS Developer under the Automatic section, as shown in Figure 10.17. To confirm that the provisioning profile is installed correctly on your system, check the Provisioning Profile section under the Code Signing Identity item and ensure that the provisioning profile is present in the list. Alternatively, select Preferences from the Xcode menu, and select Accounts. If your account information is not set up there, set it up. Select your account name and then View Details to see the provisioning profiles installed. Provisioning profiles can be refreshed directly from here rather than downloading directly from the portal; but provisioning profiles for individual apps must be created in the portal.

When that step is complete, you have completed all the configuration steps necessary on the app side to receive push notifications. Now you are ready to write some code.
Custom Sound Preparation
One detail that can really distinguish receipt of your push notification is a custom sound. iOS will play any specified sound less than 30 seconds in length if it is available in your app bundle. You can create a custom sound in GarageBand, for example (or any other audio app that can create sounds), and export the sound. It is worth exporting under each of the compression options to see what sounds good while meeting your size requirements (see Figure 10.18).

Now that you have a sound file, it will need to be converted to Core Audio format in order for your app to use it. Apple provides a command-line tool called afconvert that is up to the job. Open a Terminal session, navigate to the directory where the audio file is, and issue this command to convert your audio file to Core Audio format:
$ afconvert -f -caff -d ima4 shout_out.m4a shout_out.caf
This command will convert the shout_out.m4a file to ima4 format (which is a compressed format that works well on the device) and package it in a Core Audio–formatted sound file. When that process is complete, copy your new Core Audio format sound file into your Xcode project, and when it is specified in a notification, it will play.
Registering for Notifications
To enable the ShoutOut app to receive remote notifications, the app needs to register with the APNs to receive push notifications. In addition, the app needs to register settings for user notifications in order to update the badge, display a banner or an alert, or play a sound for both a local and remote notification. The app can be customized to register for push notifications at any point that makes sense, when the user has a good idea what value push notifications will provide from the app. For this example, however, the sample app will register with the APNs right away in the app delegate, in the application:didFinishLaunchingWithOptions: method:
- (BOOL)application:(UIApplication *)application
didFinishLaunchingWithOptions:(NSDictionary *)launchOptions
{
[[UIApplication sharedApplication] registerForRemoteNotifications];
UIUserNotificationSettings *notifSettings = [UIUserNotificationSettings settingsForTypes:UIUserNotificationTypeAlert | UIUserNotificationTypeBadge | UIUserNotificationTypeSound categories:nil];
[[UIApplication sharedApplication] registerUserNotificationSettings:notifSettings];
return YES;
}
UIUserNotificationSettings specify how the user can be alerted when a notification is received, including updating the application badge, presenting an alert, and playing a sound. The registerForRemoteNotifications: method will call the APNs and get a token to identify the device. Two delegate methods need to be implemented to handle receipt of that token, or an error in registering with APNs:
- (void)application:(UIApplication *)application
didRegisterForRemoteNotificationsWithDeviceToken:(NSData *)deviceToken {
NSString *formattedTokenString = [deviceToken description];
NSString *removedSpacesTokenString = [formattedTokenString stringByReplacingOccurrencesOfString:@" "
withString:@""];
NSString *trimmedTokenString = [removedSpacesTokenString stringByTrimmingCharactersInSet: [NSCharacterSet characterSetWithCharactersInString:@"<>"]];
[self setPushTokenString:trimmedTokenString];
}
- (void)application:(UIApplication *)application didFailToRegisterForRemoteNotificationsWithError:(NSError *)error {
NSLog(@"Error in push registration: %@", error.localizedDescription);
}
If the registration is successful, the token will be returned to the app in NSData format. For ShoutOut, the method will format a string by removing spaces and extra characters from the string representation provided by NSData, and store the string token so that it is available to create the command for sending test pushes. For typical apps, the device token might need to be sent to the push server for a user’s account to facilitate sending pushes. Apple recommends that you perform this registration every time the app is launched, since the user might have switched devices or upgraded her version of iOS, which will require a new token. If there are specific failure actions that need to take place, they can be specified in the didFailToRegiterForRemoteNotificationsWithError: method. For the purposes of the sample app, just log the failure.
At this point, ShoutOut is ready to receive remote push notifications and display local notifications.
Scheduling Local Notifications
For local notifications, no additional setup is required for the app. In ShoutOut, a local notification will be used to schedule a reminder. In ICFMainViewController, there is a method that gets called when the user hits the Set Reminder button:
- (IBAction)setReminder:(id)sender
{
NSDate *now = [NSDate date];
UILocalNotification *reminderNotification = [[UILocalNotification alloc] init];
[reminderNotification setFireDate:[now dateByAddingTimeInterval:15]];
[reminderNotification setTimeZone:[NSTimeZone defaultTimeZone]];
[reminderNotification setAlertBody:@"Don't forget to Shout Out!"];
[reminderNotification setAlertAction:@"Shout Now"];
[reminderNotification setSoundName:UILocalNotificationDefaultSoundName];
[reminderNotification setApplicationIconBadgeNumber:1];
[[UIApplication sharedApplication] scheduleLocalNotification:reminderNotification];
UIAlertController *alert = [UIAlertController alertControllerWithTitle:@"Reminder"
message:@"Your Reminder has been Scheduled"
preferredStyle:UIAlertControllerStyleAlert];
UIAlertAction *dismissAction = [UIAlertAction actionWithTitle:@"OK Thanks!"
style:UIAlertActionStyleCancel
handler:^(UIAlertAction *action){
[self dismissViewControllerAnimated:YES
completion:nil];
}];
[alert addAction:dismissAction];
[self presentViewController:alert animated:YES completion:nil];
}
To create a local notification, create an instance of UILocalNotification. Specify the fire date for the notification. It also is generally a good idea to specify a time zone so that if the user is traveling, he will receive the reminder at the correct time. To make it easy to see, just set the fire date to 15 seconds from now. Then set how the user will receive the notification, including specifying alert text, setting whether a sound (or a specific sound) should be played, and updating the application badge. Finally, schedule the local notification. To see it in action, run the app, hit Set Reminder, and then close the app. In 15 seconds, an alert will appear with the custom text, sound, and alert badge.
In addition to scheduling local notifications by date and time, local notifications can be scheduled for a region. When the device enters the region, the notification will fire. Refer to the “Geofencing” section in Chapter 2, “Core Location, MapKit, and Geofencing,” for more information on how to set up a CLRegion to assign to the region property on a local notification.
Note
Local notifications can be tested in the simulator, but remote push notifications cannot.
Receiving Notifications
When a device receives a notification, either local or remote, the device will check whether the app associated with the notification is currently active and in the foreground. If not, the parameters included guide the device to play a sound, display an alert, or update the badge on the app icon. If an alert is displayed, the user will have the opportunity to dismiss the alert or to follow the alert into the app.
If the user chooses to go into the app, then either the app delegate’s appDidFinishLaunchingWithOptions: method is called if the app is in a terminated state and is launching, or a delegate method will be called when the app is brought to the foreground. The same delegate method will be called if the app happens to be in the foreground when the notification is received.
If the app was launched as a result of tapping on a notification, the notification payload will be present in the launch options passed to the appDidFinishLaunchingWithOptions: method, and can be used to drive any desired custom functionality, like navigating to a view specific to the notification or displaying a message.
NSDictionary *notif = [launchOptions
objectForKey:UIApplicationLaunchOptionsRemoteNotificationKey];
if (notif) {
//custom logic here using notification info dictionary
}
If the notification is received while the app is active or in the background, there are two delegate methods for receiving notifications, one for local and one for remote:
- (void)application:(UIApplication *)application
didReceiveRemoteNotification:(NSDictionary *)userInfo {
NSString *message =
[[[userInfo objectForKey:@"aps"] objectForKey:@"alert"] objectForKey:@"body"];
NSString *appState = ([application applicationState] == UIApplicationStateActive) ? @"app Active" : @"app in Background";
[self presentAlertWithMessage:
[NSString stringWithFormat:@"Received remote push for app state %@: %@", appState, message]];
}
- (void)application:(UIApplication *)application didReceiveLocalNotification:(UILocalNotification *)notification {
NSString *message = [notification alertBody];
NSString *appState = ([application applicationState] == UIApplicationStateActive) ? @"app Active" : @"app in Background";
[self presentAlertWithMessage: [NSString stringWithFormat:@"Received local notification for app state %@: %@", appState, message]];
}
The local notification delegate method receives the local notification, and the remote notification delegate receives a dictionary with the notification information. That information can be inspected and acted upon. In this example an alert is displayed to the user, but other apps can use the information to navigate to a view in the app that is directly relevant to the notification. In both cases the application parameter can be inspected to determine the state of the app when the notification was received. Then the response to the notification can be customized depending on whether the app is currently active or whether the app was awakened from the background.
Push Notification Server
After the app is prepared to receive notifications, a server needs to be set up to send push notifications. Push notifications can be sent via the APNs from any type of server that can communicate over a secure TCP socket connection (an SSL stack is required). Apple requires that the server maintain a persistent connection while sending push notification requests to APNs to avoid the overhead of establishing connections. Many open source libraries support APNs for several different platforms, and third-party providers provide API access for push notifications. For the sample app, a simple PHP command-line utility is included to send test push messages through the sandbox APNs.
At a minimum, the server will need to know the device token in order to send a push to a device. For “data available” type notifications, this might be all that is required to inform the app to download new data. For other requirements, the server might need to specify a message, a sound to play, a number to set the badge on the app, or a custom hash of data to assist the app in navigating to relevant information.
The push server will create a message payload that contains the information to be sent to the device. This payload is in JSON format, and must contain a hash for the key aps:
{"aps":{"alert":"Hello Joe","sound":"shout_out.caf"}}
If the destination app has been localized, the server can include a hash for the alert item instead of just providing an alert string:
{"aps":{"alert": {"loc-key": "push-msg-key", "action-loc-key": "see-push-key"}, "sound":"shout_out.caf"}}
Alternatively, the device can pass up locale information to the server when registering the device token, and the server can localize the message before sending through APNs. The action-loc-key item can be specified to customize the title of the button presented with the notification.
Note
For more detail on communication with APNs, look at Apple’s documentation at https://developer.apple.com/library/ios/documentation/NetworkingInternet/Conceptual/RemoteNotificationsPG/Chapters/ApplePushService.html#//apple_ref/doc/uid/TP40008194-CH100-SW9.
Sending the Push Notifications
To send a test push using the sample app, run the app on a device. Enter some text in the text field presented, and tap the Shout button. The sample app will use that text to create a command that can be copied and then executed from a terminal session via the installed version of PHP. It requires a message parameter and device parameter to function correctly.
php shout.php "testing1..2..3" "f1313af4d5af93d53ba595fdd9a9dc8799bcf10c3e7b3e2cb53662816d5bcc89"
To execute the command, right-click on the shout.php file in the Push Server group in the sample app in Xcode, and select Show in Finder. Open a Terminal session, and navigate to the same directory where the shout.php file is. Ensure that the certificate has been created (as shown in Figure 10.10), has been exported to pem format, and is present in the same directory as shout.php. The code currently assumes that no passphrase was set for the certificate; however, if you set a passphrase you can uncomment the passphrase line in shout.php and add your passphrase there. Copy and paste the command from the Xcode console to the Terminal window and execute it. The script will create a push message in JSON using the provided message and device ID, and will send it to the APNs. Note that this version will send only one push per connection and is suitable only for very light testing in the sandbox; any volume testing should use a more robust version that will maintain a persistent connection with the APNs.
After the script has been executed, the notification will appear quickly on your device (see Figure 10.19). Visit Settings.app (under Notifications, ShoutOut) to change whether the notification is displayed alert style or banner style, and see how each looks on your device.

Handling APNs Feedback
APNs can provide feedback to each server that connects to it and sends notifications. If any of the device tokens specified in the messages have errors (for example, if the user has deleted the app from her device), the server should prevent sending future notifications to the disabled devices. Many APNs libraries have facilities built in to communicate with the feedback endpoint, which can be scheduled to run periodically. After the feedback has been obtained, stored device tokens on the server should be updated or removed to prevent sending additional notifications to them.
Summary
This chapter introduced you to Apple’s method of communicating with apps that are not active and in the foreground: notifications. It explained the differences between local and remote push notifications. It showed how to set up an app to receive remote push notifications, and how to schedule local notifications. This chapter guided you through how to use the utility push script to send test push notifications to your app via the Apple Push Notification service.