
11
Implementing the API and BFF Gateway Patterns
When building an application using the microservices architectural approach, we have come to realize that we will need to keep track of several API endpoints. We have effectively gone from one endpoint, which would have been made available through a monolith, to a series of endpoints. Some of these endpoints will be called by other APIs and some will integrate directly into the client applications that interact with the microservices.
This becomes a challenge because we end up conflating the client application with custom logic to cater to integrating with the various services and possibly orchestrating inter-service communications. We want to keep the client application code as simple and extensible as possible, but integrating with each service does not support that notion.
This is where we will consider implementing the API gateway pattern, which introduces a central point of contact between the client and the services. Our API gateway will keep a record of all the endpoints and expose a single API address where the endpoints will map to the various endpoints of the other microservices.
In this chapter, we will look at various scenarios that will make an API gateway a good selection for our application and methods of implementation.
After reading this chapter, we will be able to do the following:
- Understand API gateways and why they are important
- Implement an API gateway using industry-leading technology and methods
- Properly implement the backend for frontend (BFF) pattern
Technical requirements
The code references used in this chapter can be found in this project’s repository, which is hosted on GitHub at https://github.com/PacktPublishing/Microservices-Design-Patterns-in-.NET/tree/master/Ch11.
What is the API gateway pattern?
To understand the API gateway pattern and why we need it, we need to review the fundamentals of the service-oriented architecture and how we architect such solutions.
The service-oriented architecture includes three main layers to an application:
- Client: Also referred to as the fronted. This client app is what the user sees and is designed to consume its data from an API. Its functionality is generally limited to functions that the API makes available, and a frontend developer can leverage several techniques to expose functionality to the end user.
- Server: Also referred to as the backend. This section of the architecture houses the API and the business logic. The client app is only as intelligent as the backend. The backend can be made up of one or more services, as would be the case with microservices.
- Database: The database is the anchor of this entire application since it stores all the data being used by the API backend and is displayed on the frontend.
This application layout is popular in monolithic applications, where all the functionality that is needed on the frontend can be found in one API. This is an effective development method that has been at the helm of many successful and powerful applications. We have, however, explored the downsides to a monolithic approach, where the API might become bloated and difficult to maintain in the long run. The main advantage that we would seem to forsake in the pursuit of a microservices approach would be where we have a single point of entry for the client application, as opposed to several services each with requirements.
While the microservices architecture leads us down the path of having an application that is implemented with the service-oriented architecture, we will need to account for the fact that our client will need to keep track of several backends or APIs and be intelligent enough to orchestrate calls for each user request. This is a lot of responsibility for the portion of the application that should be the least intelligent, based on the description provided.
Figure 11.1 shows the client and microservices:

Figure 11.1 – The client app needs to be aware of all the endpoints of all the microservices and retain the knowledge of how each one works
This is where we introduce an API gateway. This gateway will sit between our services and the client app and simplify the communication between the two. For the client, it will expose a singular base URL, which the client will gladly interact with and see as one API service; to the microservices, it will act as a conduit, where it will forward requests coming in from the client to the appropriate microservice.
Let us review the advantages of introducing an API gateway.
Advantages of an API gateway
When a request comes in from a client, it is received by the gateway, which interprets the request, transforms the data if necessary, and then forwards it to the appropriate microservice. In fact, for situations where multiple microservices may need to be called, we can implement orchestration and result aggregation and return more accurate representations of the data to the client as needed.
Our API gateway also allows us to centralize the following tasks for our microservices:
- Centralized Logging: From the API gateway, we can centrally log all the traffic to our various endpoints and keep track of the success and error responses from the downstream services. This is advantageous because it spares us the need to implement logging in each service and potentially have a very chatty log. Using an API gateway allows us to centralize our implementation and prioritize what gets written to the log and can help us to better catalog the outcomes of synchronous operations. We can also use the gateway to track and log statistics and response times of calls to the downstream services.
- Caching: Caching acts as a temporary data store that comes in handy when the main data source might be offline or when we need to reduce the number of times the services are called. We can use a caching layer in the gateway to stabilize our application and potentially increase the application’s performance. With proper coordination and customization, we can use this caching for high-speed read operations on endpoints that have high volumes of traffic and even use it to handle partial failure, where we use the cached data for a response when a service is unavailable.
- Security: Securing microservices can be a tedious and technical task. Each service might have unique security requirements and may lead to development overhead when coordinating security measures and implementations. Using an API gateway, we can centralize security measures at the gateway level. This can remove the burden from the microservice to authenticate and authorize access to resources since the gateway will manage most of those requirements. We can also implement IP whitelisting at this level and limit access to an approved list of IP addresses.
- Service Monitoring: We can configure our API gateway to conduct health probes on the downstream services. As previously discussed, health checks or probes help us to ascertain the status of our services. Since the gateway will need to forward requests, it is important to be able to determine the health of a downstream service before attempting an operation. Since the gateway can determine the health of a service, it can be configured to gracefully handle failures and partial failures.
- Service Discovery: Our gateway needs to know the addresses of all services and how to transform and forward requests as needed. For this, the gateway needs a register of all the downstream services. The gateway will simply act as a wrapper around the services endpoints and expose a singular address to the client application.
- Rate Limiting: Sometimes, we want to limit the number of requests that can be sent in quick succession, from the same source, on the suspicion that such activity might be a distributed denial-of-service (DDoS) attack on a service endpoint. Using the API gateway, we can implement generic rules that govern how often endpoints can be accessed.
Once again, the most important aspect of the gateway’s implementation is that it takes much of the responsibility away from our client, making scaling and diversifying client code much easier.
Figure 11.2 shows the client, a gateway, and microservices:
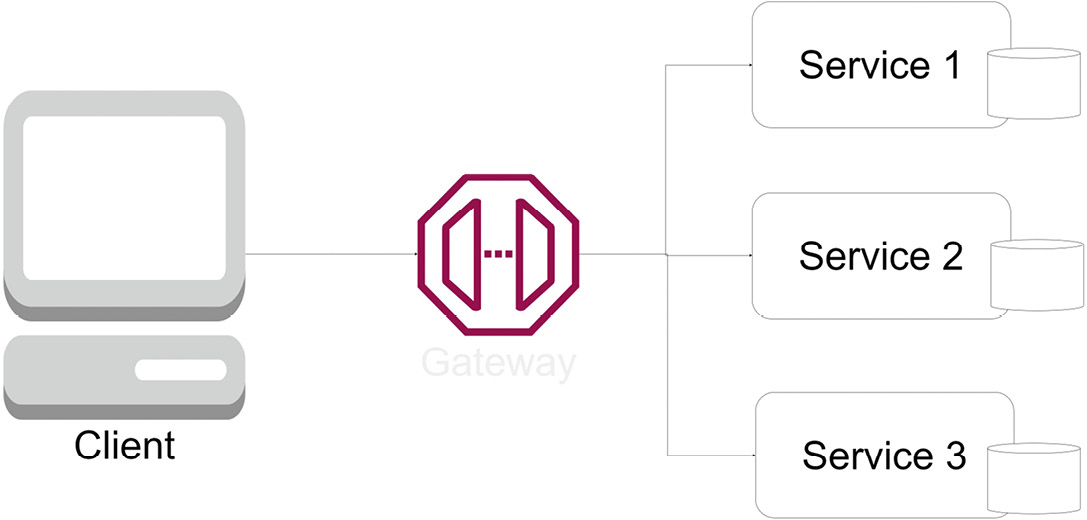
Figure 11.2 – With the gateway introduced, the client app now has one endpoint and doesn’t need to know about the underlying services
Now that we have seen where the API gateway helps us to centralize access to several API endpoints and make it easier for the client application to integrate API operations, let us review some of the disadvantages of using this pattern.
Disadvantages of an API gateway
While the advantages are clear and irrefutable, we must also be aware of the downsides of introducing an API gateway. An API gateway may come in the form of another microservice and ironically so. The remedy for dealing with too many services is to build one to rule them all. This then introduces a single point of failure since when this is offline, our client app will have no way to send requests to the various services. Now, additional maintenance is required as our gateway service needs to morph alongside each service it interacts with to ensure the requests and responses are accurately interpreted. We also run the risk of increasing the roundtrip time for requests, since this new layer will need to be performant enough to receive the original request, forward it, and then retrieve and forward the response from the microservice.
While we have obvious advantages that we can reference, we need to ensure that we know, accept, and mitigate the risks involved with implementing a gateway service for our microservices application.
As we have seen, there are several cross-cutting and generic concerns that all APIs share. Implementing these generic requirements in each service can lead to bloat and attempting to build a singular service to implement them can lead to a monolithic application being created. It is easier to use a third-party application that is fortified with the main features that we require of an API gateway.
Now, let us review the ways an API gateway could be implemented.
Implementing the API gateway pattern
Certain guidelines should be followed when implementing an API gateway. Given its description, we might be inclined to develop a new microservice, label it the gateway, and develop and maintain the API integrations ourselves.
Surely, this is a viable approach, and it does give you full control over the implementation, rules, and features that you deem necessary for your application and downstream services. We can also implement specific business logic to govern certain operations by orchestrating requests and responses to the downstream services and aggregating and transforming data accordingly. However, this can lead to having a thick API gateway. We will discuss this further in the next section.
Thick API gateways
The expression thick API gateway is coined when we realize we are placing too much business operation logic into our API gateway. Our gateway should act more as an abstraction layer between the client and the microservices, not the main hub for business logic. We should avoid placing business logic in the gateway, which will increase the complexity of the implementation and increase the maintenance effort required for the gateway.
We can also call this an overambitious gateway and generally should try to avoid making the API gateway a central point for how our application behaves. We also risk implementing a monolith and ending up at square one with our microservices application. At the same time, we should not avoid such a gateway implementation entirely, since there are additional patterns that can be leveraged by having a gateway with some business logic.
Earlier in this book, we reviewed the Saga pattern and, more specifically, the orchestration pattern. Recall that the orchestration pattern hinges on the presence of a central service that has oversight of the downstream services, monitors the service responses, and decides to continue or terminate the saga accordingly. In this situation, a thick API gateway would be an asset in implementing this kind of behavior.
Ultimately, we all have different needs in our applications, and these are, once again, guidelines that we should abide by in doing our implementations. We should always make the best decision for our application based on our needs.
In a situation where all these factors might not be applicable and we need to minimize the amount of business logic that the gateway implements, we may look to existing tools and services that can help us to accomplish these with much less maintenance and development effort. At this point, we can begin thinking about Amazon API Gateway, Microsoft Azure API Management, and open source solutions such as Ocelot.
In the next section, we will review implementing API gateway functionality using Microsoft Azure API Management.
Implementing an API gateway using Azure API Management
Microsoft Azure API Management is a cloud-based solution that can be found in the Microsoft Azure suite of development tools. It is designed to abstract, protect, accelerate, and observe backend APIs. While doing this, it securely exposes APIs through service discovery, to internal and external clients, inside and outside of the Azure ecosystem.
It serves several purposes, including the following:
- API Gateway: Allows controlled access to backend services and allows us to enforce throttling and access control policies. The gateway acts as a façade to the backend services, allowing API providers to reduce the attrition involved in making changes to the ever-evolving suite of services in the backend. The gateway provides consistent and powerful configuration options for security, throttling, monitoring, and even caching.
- While this is a cloud-based service, the API gateway can also be deployed in a local environment for customers who wish to self-host their APIs for performance and compliance reasons. This self-hosted gateway is packaged as a Docker container and is commonly deployed to Kubernetes.
- Developer Portal: An automatically generated and fully customizable website. Third-party developers can use the developer portal to review API documentation and learn how to integrate it into their applications.
- Management Plane: This section of Azure API Management allows us to provision and configure the service’s settings. We can define API schemas from several sources and configure support for different protocols and standards such as OpenAPI specifications, WebSockets, or GraphQL.
Now, let us explore some of the steps required to set up our first Azure API Management service. For these exercises, you will need an Azure subscription and if you don’t already have one, you may create a free Microsoft Azure account before you begin.
Our first action is to sign in to the Azure portal. You can then use the search feature and type in API Management services and select the matching option in the search results. The resulting page will list all the instances of the API Management services that you currently have. For this exercise, you may proceed by clicking Create.
Figure 11.3 shows the Azure API Management services search results:

Figure 11.3 – Proceed to create a new API Management service for this exercise
On the next screen, we can proceed to fill in the details of our service and select the following options:
- Subscription: The subscription this new service will be provisioned under.
- Resource group: The logical group of resources associated with the service being provisioned. A new one can be created for this exercise.
- Region: The best geographical representation of where the bulk of the users of the services will be located.
- Resource name: A unique name for the instance that you will be provisioning. You will need to modify the name displayed in Figure 11.4 to proceed.
- Organization name: The name of your organization. This will be the name associated with ownership of the API service.
- Administrator email address: The email address to be used for all communication and notifications from API Management.
- Pricing tier: This determines the level of service uptime that we prefer. For this instance, we will use the Developer tier, which isn’t for production use.
Figure 11.4 shows the various Azure API Management options:
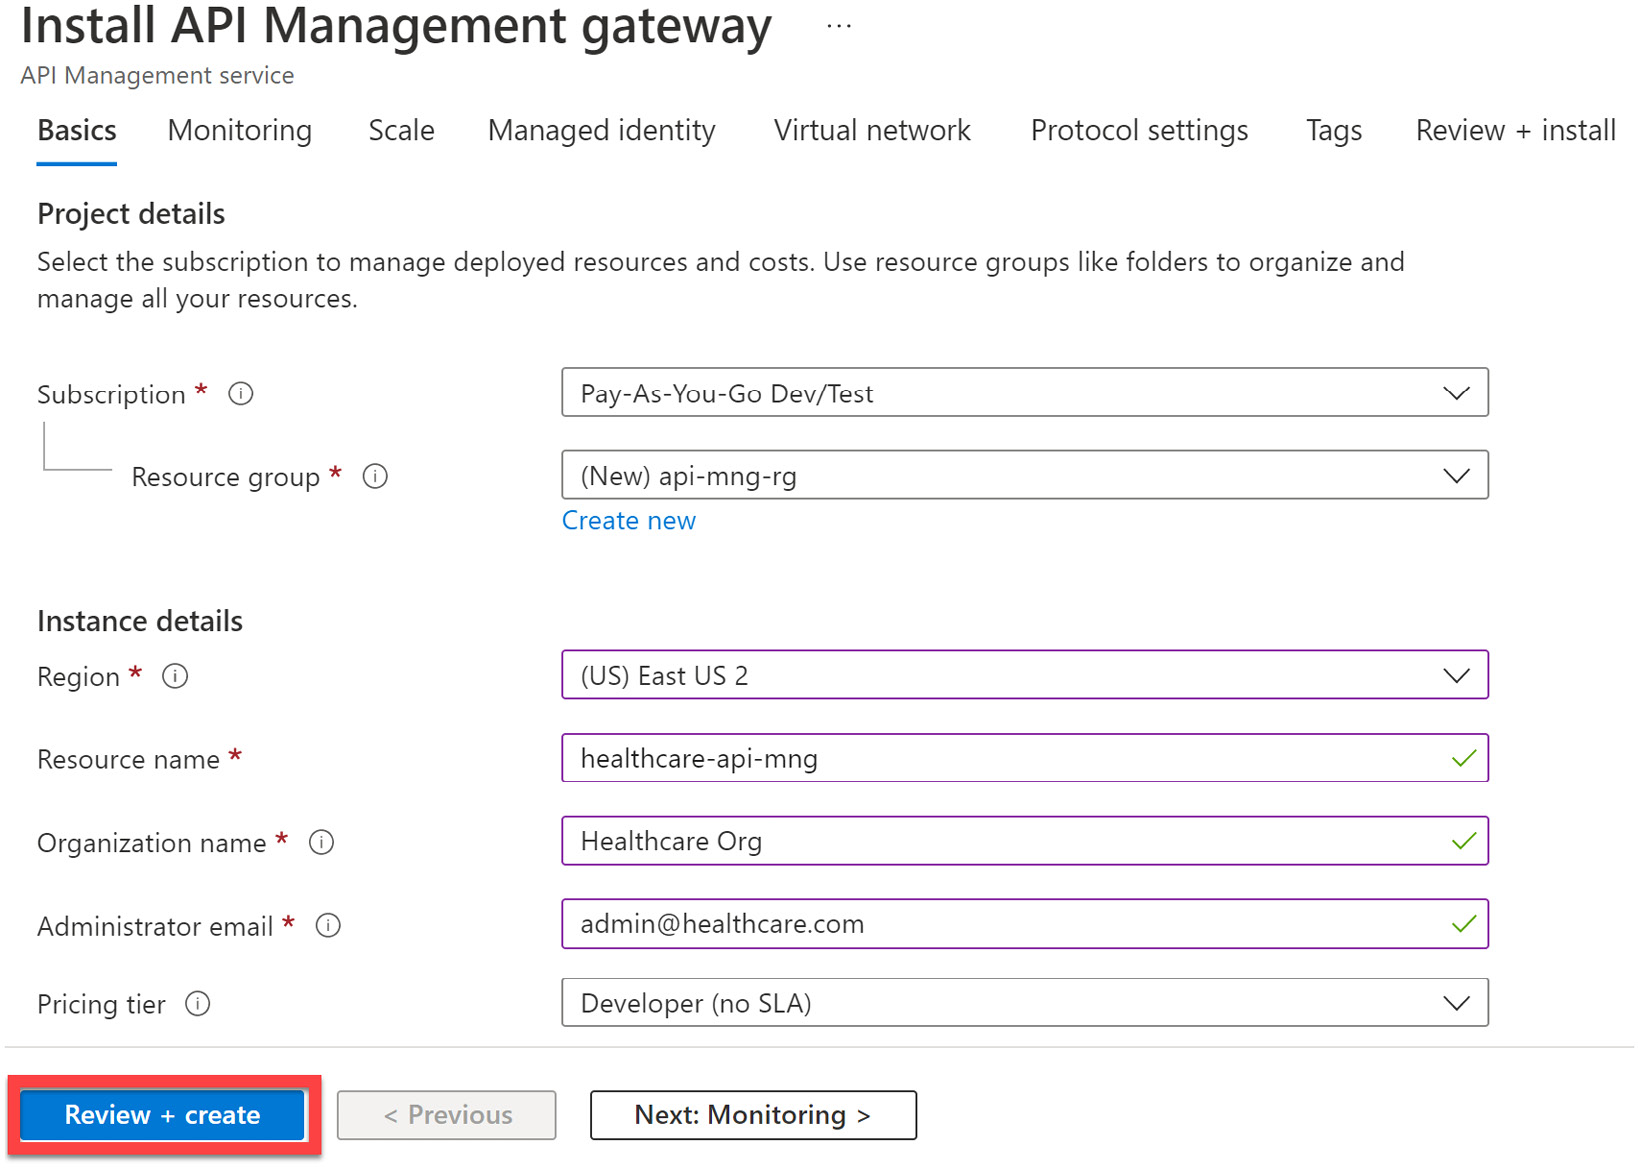
Figure 11.4 – Minimum values needed to create the API Management service
After creating the API Management service, we can begin importing our microservices into the management portal. Now, our API Management service will act as a façade in front of our services, allowing us to control access and transform data as needed. We can import APIs from any source if their API is discoverable across the internet or network.
The API Management service will handle all communications between a client and the target service that maps to the requested endpoint, regardless of the technology used to implement the API.
Figure 11.5 shows the APIs added to the Azure API Management service:
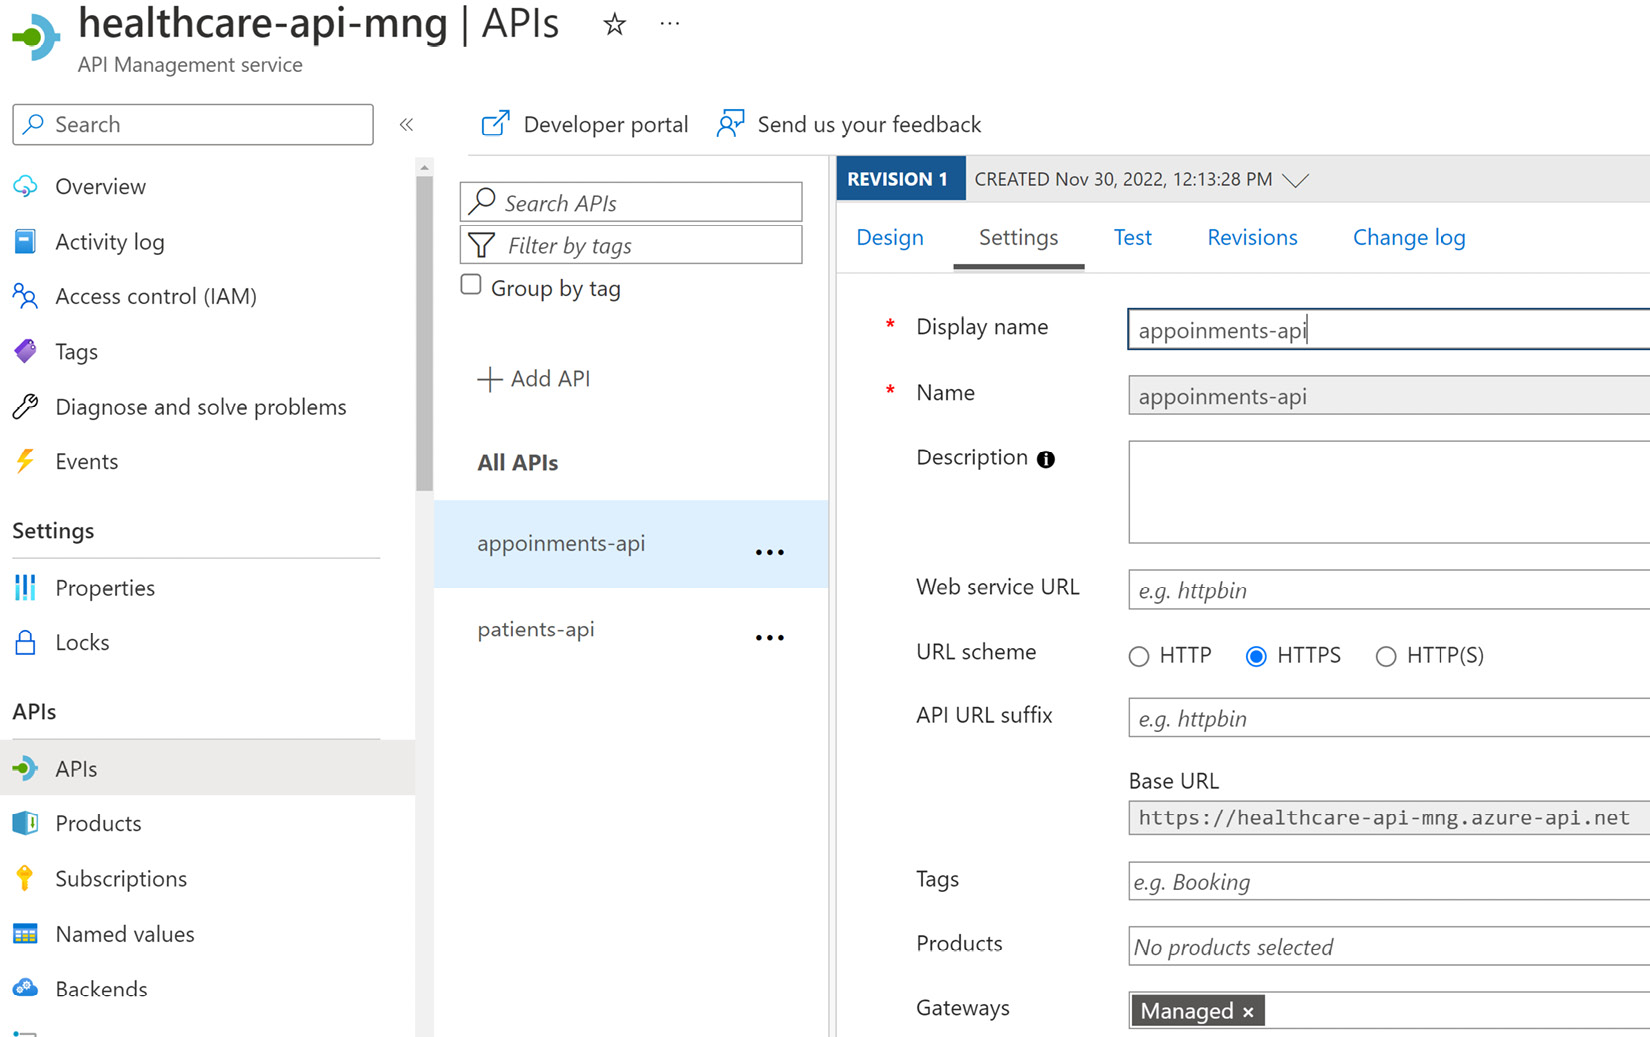
Figure 11.5 – The API Management service allows you to add APIs and map custom routes, that when called, will reroute the request to the mapped resource
In Figure 11.5, we can see where we have mapped our appointments and customer APIs to the API Management service and have defined a base URL based on the primary endpoint now available through the service.
In Figure 11.6, we can see where we can manage the request types that are allowed, as well as define our policies and transformations for each request type.
Figure 11.6 also shows the various request processing options in the Azure API Management service:
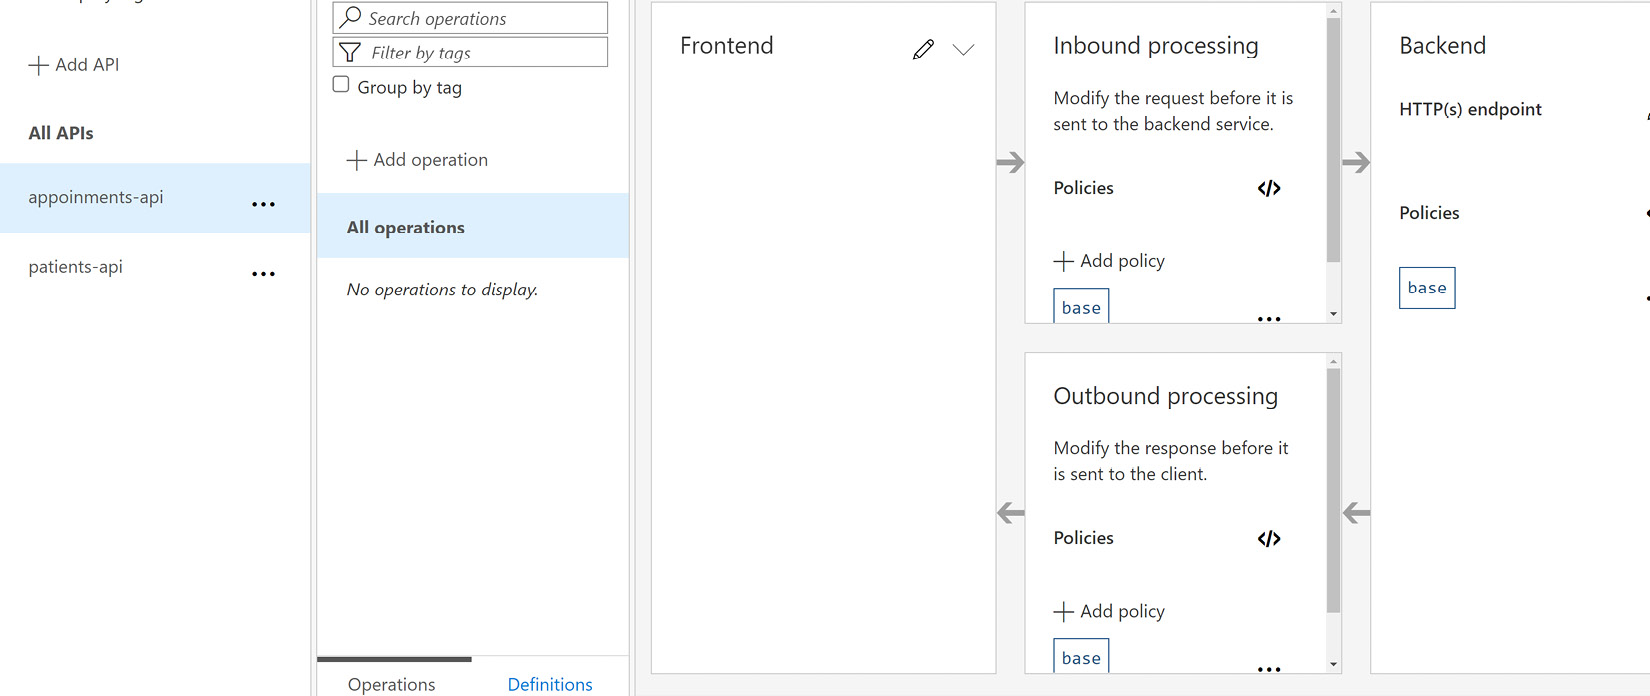
Figure 11.6 – The API Management service allows you to easily manage the request types that are allowed for each API and define transformation policies for requests and responses
Using Azure API Management, we gain many standard API gateway features out of the box and the further benefit of availability and service uptime guarantees when we have production-grade pricing tiers. If we choose not to self-host this application, we can take advantage of its Software-as-a-Service (SaaS) model, where we have a greatly reduced responsibility to do any infrastructure work related to getting it up and running.
We may end up in a situation where we need to self-host our gateway and API Management is not an option. In this situation, we can look to provide our own API gateway application. A great candidate for this implementation is Ocelot, which is a lightweight API gateway package that can be installed directly into a standard ASP.NET Core project. We will discuss this further in the next section.
Implementing an API gateway using Ocelot
Ocelot is an open source API gateway developed on the .NET Core platform. It is a simple implementation of a gateway that unifies the communication to microservices through abstraction, as we have come to expect from a gateway. The Ocelot API gateway transforms incoming HTTP requests and forwards them to the appropriate microservice address based on preset configurations.
It is a popular and widely used API gateway technology and can easily be installed into a .NET Core application using the NuGet package manager. Its configurations can be outlined in JSON format; here, we define upstream and downstream routes. Upstream routes refer to the service address that is exposed to the client, while downstream routes are the real addresses of the mapped microservices. We can also define the allowed protocols for each upstream service route, allowing robust control over the kind of traffic that we are willing to accept on a route.
Let us set up an Ocelot API gateway application together. We will use a simple ASP.NET Web API project template and start by adding the Ocelot package via the NuGet package manager:
Install-Package Ocelot
Now that we have our package installed, we need to begin outlining our routing configurations. We can create a new configuration file and call it ocelot.json. In this JSON file, we will outline all upstream and downstream routes. This configuration will look something like this:
{
     "Routes": [
    {
      "DownstreamPathTemplate": "/api/Patients",
      "DownstreamScheme": "http",
      "DownstreamHostAndPorts": [
        {
          "Host": "localhost",
          "Port": 5232
        }
      ],
      "UpstreamPathTemplate": "/Patients",
      "UpstreamHttpMethod": [
        "GET",
        "POST"
      ]
    },
    {
      "DownstreamPathTemplate": "/api/Patients/{id}",
      "DownstreamScheme": "http",
      "DownstreamHostAndPorts": [
        {
          "Host": "localhost",
          "Port": 5232
        }
      ],
      "UpstreamPathTemplate": "/Patients/{id}",
      "UpstreamHttpMethod": [
        "GET",
        "PUT"
      ]
    },
    {
      "DownstreamPathTemplate": "/api/Appointments",
      "DownstreamScheme": "http",
      "DownstreamHostAndPorts": [
        {
          "Host": "localhost",
          "Port": 5274
        }
      ],
      "UpstreamPathTemplate": "/Appointments",
      "UpstreamHttpMethod": [
        "POST",
        "PUT",
        "GET"
      ]
    }
  ],
  "GlobalConfiguration": {
    "BaseUrl": http://localhost:5245""
  }
}
This configuration file is straightforward and once we pick up on the pattern, we can extend it as needed for the rest of our services. The sections are explained here:
- Routes: This is the parent section of our JSON configuration, where we begin to define the upstream and downstream configurations.
- DownstreamPathTemplate: This section outlines the address at which the microservice can be found.
- DownstreamScheme: This outlines the protocols that we will use to communicate to the microservice being defined.
- DownstreamHostAndPorts: The host address and port are defined in this section.
- UpstreamPathTemplate: We outline the path that we expose to the client apps. By calling this defined route, Ocelot will automatically reroute the request to the service defined in the DownstreamPathTemplate. Notice that in the preceding example, we can rename the route if we need to. The Customers API endpoint originally found in the downstream API can only be reached via a Patients endpoint address.
- UpstreamHttpMethod: Here, we define the methods that we will accept as legitimate requests from a client.
- GlobalConfiguration: We outline the BaseUrl in the configuration, where all request traffic should be sent through.
Now, let us configure our application to use these configurations and use the Ocelot package. We will start by adding the following lines to the Program.cs file:
builder.Configuration.AddJsonFile("ocelot.json", optional:
  false, reloadOnChange: true);
builder.Services.AddOcelot(builder.Configuration);
These lines add the ocelot.json file to our global configuration at application startup and then register Ocelot as a service. Then, we need to add the Ocelot middleware, like this:
await app.UseOcelot();
With these few configurations, we can now use the gateway URL as the API URL in our client apps.
Ocelot is well-documented and extendable. It supports other features, such as the following:
- Built-in cache management
- A rate limiter
- Support for native .NET Core logging integrations
- Support for JSON Web Token (JWT) authentication
- Retry and circuit breaker policies (using Polly)
- Aggregating
- Pre- and post-downstream request transformations
Now that we have learned how to set up a simple gateway with Ocelot, let us look into extending this functionality. We will begin by adding cache management.
Adding cache management
Caches act as temporary data stores in between requests to a more reliable data store. This means that a cache will temporarily store data based on the last set of data it was given. Good cache management would suggest that we flush our cache based on an interval and refresh it with a newer version of the data.
Caching comes in handy when we need to reduce the number of trips that are made to the main database, reducing latency and read/write costs that come with database calls. Ocelot has some support for caching, which is good for solving small caching concerns natively in the gateway application.
This can be added with a fair amount of ease. We will begin by using NuGet Package Manager to execute the following command:
Install-Package Ocelot.Cache.CacheManager
This package gives us the caching extensions that we need to then introduce an extension method in the Program.cs file. This extension method looks like this:
builder.Services.AddOcelot()
    .AddCacheManager(x =>
    {
        x.WithDictionaryHandle();
    });
Finally, we add the following line to our ocelot.json configuration file:
"FileCacheOptions": {
    "TtlSeconds": 20,
    "Region": "SomeRegionName"
  }
Now that we have introduced a configuration to govern how caching should occur in our gateway, we must outline that values should be cached for a maximum of 20 seconds. This will add native caching support for the downstream services that have been defined. Once that cache period has expired, requests will be forwarded as expected and then the new response values will be cached once again, for the defined period.
Caching helps to reduce the amount of pressure that we place on a service, but it reasonably only imposes that limit for a short period. If we extend that period, then we run the risk of returning stale data for too long. Another layer of protection that we will want to implement is rate limiting. Let us explore this next.
Adding rate limiting
Rate limiting helps us to defend our application from the effects of DDoS attacks. Essentially, we impose rules on how frequently our service endpoints can be accessed by the same resource. When the request frequency violates our rules, we reject other incoming requests. This helps to prevent probable service performance degradation. Our service will not be attempting to fulfill all requests, especially those that may look like attacks.
Rate limiting works by recording the IP address of the originating request. For all other requests from the same IP address, we evaluate if it is legal and within the set constraints that govern how often a request should come from the same sender. When a rule violation is detected, we send a failure response and do not forward the request in the service.
Ocelot allows us to configure rate limiting for the configured downstream services. This is good because it allows us to globally manage these rules and we do not need to implement these rules in each service.
First, let us modify our code to implement rate limiting for a particular downstream service. We can add the following code to the service’s configuration file:
{
      "DownstreamPathTemplate": "/api/Patients",
      "DownstreamScheme": "http",
      "DownstreamHostAndPorts": [
        {
          "Host": "localhost",
          "Port": 5232
        }
      ],
      "UpstreamPathTemplate": "/Patients",
      "UpstreamHttpMethod": [
        "GET",
        "POST"
      ],
      "RateLimitOptions": {
        "ClientWhitelist": [],
        "EnableRateLimiting": true,
        "Period": "5s",
        "PeriodTimespan": 1,
        "Limit": 1
      }
    },
We have introduced a new section called RateLimitingOptions to the ocelot.json file. More specifically, we have added this new configuration to our patient’s downstream service configuration. This will now impose the following restrictions on how this downstream service can be accessed:
- ClientWhiteList: List of allowed clients that are not subjected to the rate limiting restrictions.
- EnableRateLimiting: A flag that indicates whether the rate-limiting restrictions should be enforced or not.
- Period: This value specifies the amount of time that we use to determine if a client is making a request that violates the limiting options. We can use the following:
- s for seconds
- m for minutes
- h for hours
- d for days
The pattern is fairly easy to follow. In our example, we have a 5-second limit on requests.
- PeriodTimeSpan: This is like a cooldown period. For this period, subsequent requests from the client that violated the limiting restrictions will be rejected and the clock will restart. Once this period has elapsed, the client can continue making requests.
- Limit: The number of requests that a client is allowed to make during the period. Here, we are defining that only one request should come in from the client every 5 seconds.
Then, we can define global values that govern how the gateway will handle rate limiting. We can add a similar RateLimitingOptions section to our GlobalConfiguration section:
"GlobalConfiguration": {
    "BaseUrl": http://localhost:5245"",
    "RateLimitOptions": {
      "DisableRateLimitHeaders": false,
      "QuotaExceededMessage": "Too many requests!!!",
      "HttpStatusCode": 429,
      "ClientIdHeader": "ClientId"
    }
  }
Now, we have some new options, which are as follows:
- DisableRateLimitHeaders: A flag that determines whether we disable or enable rate-limiting headers. These header values are generally as follows:
- X-Rate-Limit: Maximum number of requests available within the timespan
- Retry-After: Indicates how long the client should wait before making a follow-up request
- QuotaExceededMessage: Allows us to define a custom message to send to the client that has violated the limiting rules.
- HttpStatusCode: This outlines the response code to be sent when the rules are violated. 429TooManyRequests is the standard response for this situation.
- ClientIdHeader: Specifies the header that should be used to identify the client making the request.
With these minor changes, we have enforced rate limiting on all requests coming into the /patients endpoint. We will respond with a 429TooManyRequests HTTP response if two or more requests come in within 5 seconds, from the same client address.
Another consideration we might have when using Ocelot is to aggregate our responses. This allows us to string multiple calls along and reduce the client’s need to orchestrate these calls. We’ll learn how to add this next.
Adding response aggregation
Response aggregation is a method used for merging responses from multiple downstream services and sending one response accordingly. Essentially, an API gateway can achieve this by accepting a single request from a client and then making distributed parallel requests to several downstream services. Once all the responses are in from the downstream services, it will merge the data into a single object and return it to the client.
Several benefits come with this approach. The most prevalent one is that we can reduce the number of requests that the client needs to make to get data from several services. The API gateway will handle that orchestration automatically. The client also only needs to know one schema. So, several potentially complex requests can be merged into a single request body, which will reduce the number of schemas that the client needs to track. This approach will also speed up the response times involved with calling several services. Since the calls will be made in parallel, we do not have to wait the entire period that would be required when making service calls one after the other.
Ocelot allows us to configure aggregate calls with a fair amount of ease. We will decorate our downstream service configurations with keys that act as a point of reference for our aggregate configuration. If we want to aggregate a call that should return a patient and all the appointments that they have made, we would need to make the following modifications:
    {
      "DownstreamPathTemplate": "/api/Patients/{id}",
      "DownstreamScheme": "http",
      "DownstreamHostAndPorts": [
        {
          "Host": "localhost",
          "Port": 5232
        }
      ],
      "UpstreamPathTemplate": "/Patients/{id}",
      "UpstreamHttpMethod": [
        "GET",
        "PUT"
      ],
      "Key": "get-patient"
    }
We start by adding a new key to the api/patients/{id} downstream service configuration. This key acts as an alias, which we will use later. We will also add a new downstream service configuration for appointments and a new endpoint. The configuration looks like this:
    {
      "DownstreamPathTemplate":
          "/api/user/Appointments/{id}",
      "DownstreamScheme": "http",
      "DownstreamHostAndPorts": [
        {
          "Host": "localhost",
          "Port": 5274
        }
      ],
      "UpstreamPathTemplate": "/Appointments/user/{id}",
      "UpstreamHttpMethod": [
        "GET"
      ],
      "Key": "get-patient-appointments"
    }
The matching endpoint that will be implemented in the appointments services looks like this:
// GET: api/Appointments/user/{id}
        [HttpGet("user/{id}")]
        public async Task<ActionResult<List<Appointment>>>
            GetAppointmentsByUser(Guid id)
        {
            var appointments = await _context.Appointments
                .Where(q => q.PatientId == id)
                .ToListAsync();
            return appointments;
        }
Now that we have configured the new endpoints and modified the downstream service configurations, we need to add a new configuration for our aggregate orchestration:
"Aggregates": [
    {
      "RouteKeys": [
        "get-patient",
        "get-patient-appointments"
      ],
      "UpstreamPathTemplate": "/get-patient-details/{id}"
    }
  ],
Now, we can use the endpoint as defined by the aggregate configuration and execute a single call that will return a patient’s record alongside all the appointments that they have made. This information comes from multiple services almost simultaneously. Our client no longer needs to make multiple calls to get this information.
This simple and powerful technique helps us to better orchestrate API calls and present exactly the information that a client app needs. It promotes a more behavior-driven workflow when retrieving data and reduces the development overhead that each client application will need.
Now that we have seen how we can implement API gateways using either our API project or Azure API Management, we have overcome a major hurdle in our microservices application. We no longer need to build client apps that need to keep track of all the addresses of our microservices.
This now raises another cause for concern. Unfortunately, different devices might have different requirements for how they interact with our services. Mobile clients might need special security and caching considerations that web applications do not. This adds more complication to how we keep track of configurations in the central gateway, relative to the devices hosting the client apps.
These considerations lead us down the path of implementing a gateway per type of service client. This method of implementation is called the Backend for Frontend pattern, which we will discuss next.
Backend for Frontend pattern
While API gateways solve several problems, it is not a one size fits all solution. We still end up contending with the possibility of catering to multiple device types and, by extension, client applications. For example, we may need to use additional compression and caching rules with data being consumed by a mobile client, whereas a website might not need many special considerations. The more devices become capable of interacting with APIs, the more we need to ensure that we can support integrations.
Figure 11.7 shows multiple clients with one gateway:

Figure 11.7 – All client devices access the same gateway, leading to inefficient behavior for some devices
All these considerations make a good case for the Backend for Frontend (BFF) pattern. This pattern allows us to supply a service-per-device API approach. The BFF pattern allows us to acutely define our API functionality based on the experience that we hope for a user to have on a particular user interface. This makes it easier for us to develop and maintain and adjust our API based on the client’s requirements and simplifies the process of delivering functionality across multiple clients.
Figure 11.8 shows a BFF setup:

Figure 11.8 – Each client app has an endpoint to a gateway that is specially configured to optimize API traffic for the target device type
Now, we can optimize each gateway instance to handle traffic for specific devices in the most efficient way possible. For instance, our mobile applications might require additional caching or compression settings and we may need to rewrite request headers. We might even define additional header information to be provided from our mobile devices as we may need to track the device type and location. In a nutshell, we need to ensure that we are catering to each possible device as much as possible.
Azure API Management has features that allow us to interrogate the incoming request and redirect or modify the request before forwarding it or modifying the response before it is sent to the requesting client. By defining these policies, we can implement a BFF-like mechanism where policies are defined to look for the type of device or, generally, the source of the request and modify it as optimally as possible for forwarding or returning.
Ocelot might require a bit more potentially confusing logic to support policies of this nature. The more recommended way to implement this pattern using Ocelot is to use multiple implementations of Ocelot. In this implementation style, we would create multiple Ocelot projects, each with its specific purpose, such as mobile, web, and public gateways, and add each configuration for the allowed up and downstream services. We would also be able to specify the rate-limiting and caching options per implementation.
Let us review how this pattern can be implemented using Ocelot.
BFF pattern using Ocelot
We have already seen that we can configure Ocelot to be our API gateway. A simple enough extension to what we have done is to create additional projects and configure them similarly. We can retain the gateway that we have already and use it exclusively for third-party application access. With the up and downstream services we have defined, we can restrict third parties to only be able to access those endpoints.
We can then create a new Ocelot project and use it specifically for our web client. Let us say that we do not want rate limiting on the web client and can decrease the cache time to 10 seconds instead of 20. Given that this is our web application, we can lift most of these restrictions and allow for less strict interactions.
This configuration file will simply look like this:
{
  "Routes": [
    {
      "DownstreamPathTemplate": "/api/Patients",
      "DownstreamScheme": "http",
      "DownstreamHostAndPorts": [
        {
          "Host": "localhost",
          "Port": 5232
        }
      ],
      "UpstreamPathTemplate": "/web/Patients",
      "UpstreamHttpMethod": [
        "GET",
        "POST"
      ]
    },
   // omitted for brevity   ],
  "FileCacheOptions": {
    "TtlSeconds": 10,
    "Region": "SomeRegionName"
  },
  "GlobalConfiguration": {
    "BaseUrl": http://localhost:5245""
  }
}
This looks similar to what we have already done with the previous gateway, but note that now, we have the unique opportunity to define custom paths that match with the web entry point that we are implementing while adding/removing configurations as we deem necessary for the web client. Also, notice that it will broadcast from a separate address, which will prevent any reference overlaps between the clients.
We may also want to implement a mobile client that has fewer restrictions similar to what we have outlined in the web gateway, but we may also want to customize the aggregation operation. So, for our mobile client gateway, we can add the following aggregator definition to the Ocelot configuration:
  "Aggregates": [
    {
      "RouteKeys": [
        "get-patient",
        "get-patient-appointments"
      ],
      "UpstreamPathTemplate": "/get-patient-details/{id}",
      "Aggregator": "PatientAppointmentAggregator"
    }
  ],
In the Program.cs file, we add the following line to register the aggregator:
builder.Services.AddOcelot().AddSingletonDefinedAggregator<
  PatientAppointmentAggregator>()
Now, we need to define a class called PatientAppointmentAggregator, which will implement our custom aggregation logic. This custom aggregator will intercept the responses from the downstream server and allow us to interrogate and modify what is returned:
public class PatientAppointmentAggregator :
  IDefinedAggregator
{
    public async Task<DownstreamResponse>
        Aggregate(List<HttpContext> responses)
    {
        var patient = await responses[0].Items.Downstream
          Response().Content.ReadAsStringAsync();
        var appointments = await responses[1]
          .Items.DownstreamResponse()
            .Content.ReadAsStringAsync();
        var contentBuilder = new StringBuilder();
        contentBuilder.Append(patient);
        contentBuilder.Append(appointments);
        var response = new StringContent
          (contentBuilder.ToString())
        {
            Headers = { ContentType = new
              MediaTypeHeaderValue("application/json") }
        };
        return new DownstreamResponse(response,
          HttpStatusCode.OK, new List<KeyValuePair<string,
            IEnumerable<string>>>(), "OK");
    }
}
This aggregator code receives a list of responses, where each entry represents the response from the downstream services in the order they were defined in the configuration. We then extract the response as a string and append it in one string value. We also add a ContentType header to the ultimate response, which is sent with a 200OK HTTP response. This is a simple example, but it shows how easy it is for us to customize the default aggregation behavior and, by extension, for a specific BFF gateway.
The BFF pattern allows us to further diversify our development teams and their efforts in maintaining the various microservices. Teams can now manage their gateways and implement gateway methods and features that are unique to the devices they are catering to.
Now that we understand API gateways, the BFF pattern, and how we can implement either one of these using industry-standard software, let us review what we have learned in this chapter.
Summary
This chapter has reviewed the need for an API gateway. When building a monolith, we have a single point of entry to our application’s supporting API and this single point of entry can be used for any type of client.
The downside to this is that we might end up with an API that becomes increasingly difficult to improve on and scale as the demands change. We also need to consider the fact that different devices have different needs from the API in terms of caching, compression, and authentication to name a few.
We then attempt to diversify our application’s capabilities into multiple services or microservices and then implement only what is needed per service. This approach simplifies each service’s code base while complicating the code base of the client applications. Where there was one service endpoint, we now have several to keep track of.
API gateways will sit on top of all the microservices and expose a single point of entry and allow us to implement several instances, which can cater to the direct needs of the client applications that will use them. This adjustment is called BFF, and it allows us to curate backend services specifically for the client applications that need them.
The major downside here is that we have reintroduced a single point of failure by providing the gateway layer, which can introduce potential performance issues. The goal, however, is to reduce the need for our client apps to have intimate knowledge of the complex web of services that they need to interact with, and this layer of abstraction also helps us to maintain our services with less effect on the client applications.
We also learned that when attempting to add the BFF pattern, we introduce the need for more services and more code to maintain. Ideally, we would like to have a single implementation that can be provisioned multiple times, all with their specific configurations. This is where technology such as Docker will help, but we will review that later in this book.
Now that we have seen the pros and cons of the API gateway pattern, we need to explore security for our APIs. In the next chapter, we will explore API security using bearer tokens.